User Guide
Page 14
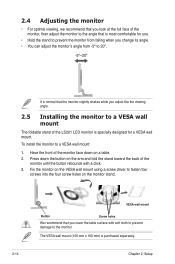
... face down the button on the arm and fold the stand toward the back of the LS201 LCD monitor is purchased separately. 2-14 Chapter 2: Setup Fix the monitor on the VESA wall mount using a screw driver to fasten four screws into the four screw holes on a table. 2. The VESA wall mount (100...
... face down the button on the arm and fold the stand toward the back of the LS201 LCD monitor is purchased separately. 2-14 Chapter 2: Setup Fix the monitor on the VESA wall mount using a screw driver to fasten four screws into the four screw holes on a table. 2. The VESA wall mount (100...
User Guide
Page 19
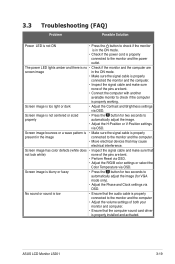
... the signal cable and make sure that may cause electrical interference. No sound or sound is low • Ensure that the computer sound card driver is properly working. Screen image has color defects (white does • Inspect the signal cable and make sure none of both your monitor and... settings of the pins are bent. • Perform Reset via OSD. • Adjust the R/G/B color settings or select the Color Temperature via OSD. ASUS LCD Monitor LS201 3-19 Screen image is too light or dark • Adjust the Contrast and Brightness settings via OSD.
... the signal cable and make sure that may cause electrical interference. No sound or sound is low • Ensure that the computer sound card driver is properly working. Screen image has color defects (white does • Inspect the signal cable and make sure none of both your monitor and... settings of the pins are bent. • Perform Reset via OSD. • Adjust the R/G/B color settings or select the Color Temperature via OSD. ASUS LCD Monitor LS201 3-19 Screen image is too light or dark • Adjust the Contrast and Brightness settings via OSD.


