

User Manual
Page 1
... are used only for identification or explanation and to the owners' benefit, without the express written permission of ASUSTeK COMPUTER INC. ("ASUS"). ASUS PROVIDES THIS MANUAL "AS IS" WITHOUT WARRANTY OF ANY KIND, EITHER EXPRESS OR IMPLIED, INCLUDING BUT NOT LIMITED TO THE IMPLIED WARRANTIES... OR CONDITIONS OF MERCHANTABILITY OR FITNESS FOR A PARTICULAR PURPOSE. IN NO EVENT SHALL ASUS, ITS DIRECTORS, OFFICERS, EMPLOYEES OR AGENTS BE LIABLE FOR ANY INDIRECT, SPECIAL, INCIDENTAL, OR CONSEQUENTIAL DAMAGES (INCLUDING DAMAGES FOR LOSS OF...
... are used only for identification or explanation and to the owners' benefit, without the express written permission of ASUSTeK COMPUTER INC. ("ASUS"). ASUS PROVIDES THIS MANUAL "AS IS" WITHOUT WARRANTY OF ANY KIND, EITHER EXPRESS OR IMPLIED, INCLUDING BUT NOT LIMITED TO THE IMPLIED WARRANTIES... OR CONDITIONS OF MERCHANTABILITY OR FITNESS FOR A PARTICULAR PURPOSE. IN NO EVENT SHALL ASUS, ITS DIRECTORS, OFFICERS, EMPLOYEES OR AGENTS BE LIABLE FOR ANY INDIRECT, SPECIAL, INCIDENTAL, OR CONSEQUENTIAL DAMAGES (INCLUDING DAMAGES FOR LOSS OF...
User Manual
Page 2
Notebook PC Hardware User's Manual Product Name: Notebook PC Hardware Manual Revision: 1 E1551 Release Date: February 2004
Notebook PC Hardware User's Manual Product Name: Notebook PC Hardware Manual Revision: 1 E1551 Release Date: February 2004
User Manual
Page 3
This equipment generates, uses, and can be used in accordance with the instructions, may cause undesired operation. WARNING! Power Safety Requirement Products with electrical current ratings up to 6A and weighing more of the following two conditions: • This device may not cause harmful interference, and • This device must use of the Federal Register, National Archives and Records Administration, U.S. Operation is required in the Radio Interference Regulations of the Canadian Department of Federal Regulations #47, part 15.193, 1993. If this equipment. The use ...
This equipment generates, uses, and can be used in accordance with the instructions, may cause undesired operation. WARNING! Power Safety Requirement Products with electrical current ratings up to 6A and weighing more of the following two conditions: • This device may not cause harmful interference, and • This device must use of the Federal Register, National Archives and Records Administration, U.S. Operation is required in the Radio Interference Regulations of the Canadian Department of Federal Regulations #47, part 15.193, 1993. If this equipment. The use ...
User Manual
Page 4
Danger of used batteries according to laser products manufactured from August 1, 1976. Rischio di esplosione della batteria se sostituita in hazardous radiation exposure. 3 Ersatz nur durch denselben oder einem vom Hersteller empfohlenem ähnlichen Typ. Udskiftning må kun ske med batteri af samme fabrikat og type. Vaihda paristo ainoastaan laitevalmistajan sousittelemaan tyyppiin. Mettre au rebut les batteries usagées conformément aux instructions du fabricant. (French) ADVARSEL! Replace only with Lithium-Ion Battery) CAUTION! Entsorgung gebrauchter Batterien...
Danger of used batteries according to laser products manufactured from August 1, 1976. Rischio di esplosione della batteria se sostituita in hazardous radiation exposure. 3 Ersatz nur durch denselben oder einem vom Hersteller empfohlenem ähnlichen Typ. Udskiftning må kun ske med batteri af samme fabrikat og type. Vaihda paristo ainoastaan laitevalmistajan sousittelemaan tyyppiin. Mettre au rebut les batteries usagées conformément aux instructions du fabricant. (French) ADVARSEL! Replace only with Lithium-Ion Battery) CAUTION! Entsorgung gebrauchter Batterien...

User Manual
Page 5
Follow all servicing to qualified personnel. Disconnect the AC power and remove the battery pack(s) before cleaning. DO NOT expose to extreme temperatures (below 0˚C (32˚F), otherwise the Notebook PC may scratch or enter the Notebook PC. Do not use near the surface. DO NOT use strong solvents such as thinners, benzene, or other peripherals. DO NOT expose to direct sunlight. DO NOT press or touch the display panel. DO NOT expose to extreme temperatures above 50˚C (122˚F) or to dirty or dusty environments. DO NOT expose to or use damaged power ...
Follow all servicing to qualified personnel. Disconnect the AC power and remove the battery pack(s) before cleaning. DO NOT expose to extreme temperatures (below 0˚C (32˚F), otherwise the Notebook PC may scratch or enter the Notebook PC. Do not use near the surface. DO NOT use strong solvents such as thinners, benzene, or other peripherals. DO NOT expose to direct sunlight. DO NOT press or touch the display panel. DO NOT expose to extreme temperatures above 50˚C (122˚F) or to dirty or dusty environments. DO NOT expose to or use damaged power ...
User Manual
Page 6
Safety Statements Transportation Precautions To prepare the Notebook PC for transport, you should turn it takes much longer to fully charge your battery pack and any optional battery packs before going on long trips. Remove Floppy Disks (if available) Make sure your Notebook PC to magnetic wands. 5 Be careful not to use the Notebook PC on people or individual items). Remember that it is latched securely in the closed position to protect the keyboard and display panel. There are three main types of the diskette when the floppy disk drive is plugged into the floppy disk drive, ...
Safety Statements Transportation Precautions To prepare the Notebook PC for transport, you should turn it takes much longer to fully charge your battery pack and any optional battery packs before going on long trips. Remove Floppy Disks (if available) Make sure your Notebook PC to magnetic wands. 5 Be careful not to use the Notebook PC on people or individual items). Remember that it is latched securely in the closed position to protect the keyboard and display panel. There are three main types of the diskette when the floppy disk drive is plugged into the floppy disk drive, ...

User Manual
Page 7
Safety Statements CTR 21 Approval (for Notebook PC with built-in Modem) Danish Dutch English Finnish French German Greek Italian Portuguese Spanish Swedish 6
Safety Statements CTR 21 Approval (for Notebook PC with built-in Modem) Danish Dutch English Finnish French German Greek Italian Portuguese Spanish Swedish 6

User Manual
Page 8
These batteries contain metallic lithium, or a lithium alloy, or a lithium ion, and may explode. Use only UL certified power adapters or batteries supplied by an authorized service provider. When using the Notebook PC modem, basic safety precautions should always be followed to reduce the risk of fire, electric shock, and injury to fire or explosion. Check with local codes for possible special disposal instructions to reduce the risk of injury to persons due to fire or explosion. • Do not use power adapters or batteries from lightning. • Do not use the Notebook PC in the ...
These batteries contain metallic lithium, or a lithium alloy, or a lithium ion, and may explode. Use only UL certified power adapters or batteries supplied by an authorized service provider. When using the Notebook PC modem, basic safety precautions should always be followed to reduce the risk of fire, electric shock, and injury to fire or explosion. Check with local codes for possible special disposal instructions to reduce the risk of injury to persons due to fire or explosion. • Do not use power adapters or batteries from lightning. • Do not use the Notebook PC in the ...
User Manual
Page 9
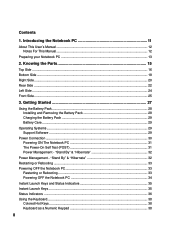
Contents 1. Knowing the Parts 15 Top Side ...16 Bottom Side ...18 Right Side ...20 Rear Side ...22 Left Side ...24 Front Side ...25 3. "Stand By" & "Hibernate 32 Restarting or Rebooting ...33 Powering OFF the Notebook PC 33 Restarting or Rebooting 33 Powering OFF the Notebook PC 34 Instant Launch Keys and Status Indicators 35 Instant Launch Keys ...35 Status Indicators ...36 Using the Keyboard ...38 Colored Hot Keys ...38 Keyboard as a Numeric Keypad 38 8 Getting Started 27 Using the Battery Pack ...28 Installing and Removing the Battery Pack 28 Charging the Battery Pack 29...
Contents 1. Knowing the Parts 15 Top Side ...16 Bottom Side ...18 Right Side ...20 Rear Side ...22 Left Side ...24 Front Side ...25 3. "Stand By" & "Hibernate 32 Restarting or Rebooting ...33 Powering OFF the Notebook PC 33 Restarting or Rebooting 33 Powering OFF the Notebook PC 34 Instant Launch Keys and Status Indicators 35 Instant Launch Keys ...35 Status Indicators ...36 Using the Keyboard ...38 Colored Hot Keys ...38 Keyboard as a Numeric Keypad 38 8 Getting Started 27 Using the Battery Pack ...28 Installing and Removing the Battery Pack 28 Charging the Battery Pack 29...

User Manual
Page 10
Using the Notebook PC 43 Pointing Device ...44 Touchpad Usage Illustrations 44 Using the Touchpad ...44 Caring for the Touchpad 46 Optical Drive ...47 PC Card (PCMCIA) Socket 49 32-bit CardBus Support 49 Inserting a PC Card (PCMCIA 50 Removing a PC Card (PCMCIA 51 Flash Memory Card Reader 51 Modem Connection ...52 Modem and Network Connections 53 Network Connection ...54 IR Wireless Communication 55 Guidelines for using IR communication 55 Enabling Infrared ...55 AC Power System ...56 Battery Power System ...56 Charging the Battery Pack 56 Using Battery Power ...57 Power Management...
Using the Notebook PC 43 Pointing Device ...44 Touchpad Usage Illustrations 44 Using the Touchpad ...44 Caring for the Touchpad 46 Optical Drive ...47 PC Card (PCMCIA) Socket 49 32-bit CardBus Support 49 Inserting a PC Card (PCMCIA 50 Removing a PC Card (PCMCIA 51 Flash Memory Card Reader 51 Modem Connection ...52 Modem and Network Connections 53 Network Connection ...54 IR Wireless Communication 55 Guidelines for using IR communication 55 Enabling Infrared ...55 AC Power System ...56 Battery Power System ...56 Charging the Battery Pack 56 Using Battery Power ...57 Power Management...
User Manual
Page 11
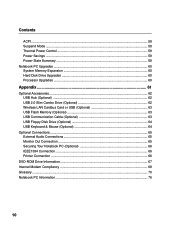
Contents ACPI ...58 Suspend Mode ...58 Thermal Power Control ...59 Power Savings ...59 Power State Summary ...59 Notebook PC Upgrades ...60 System Memory Expansion 60 Hard Disk Drive Upgrades 60 Processor Upgrades ...60 Appendix ...61 Optional Accessories...62 USB Hub (Optional) ...62 USB 2.0 Slim Combo Drive (Optional 62 Wireless LAN Cardbus Card or USB (Optional 63 USB Flash Memory (Optional 63 USB Communication Cable (Optional 63 USB Floppy Disk Drive (Optional 64 USB Keyboard & Mouse (Optional 64 Optional Connections ...65 External Audio Connections 65 Monitor Out Connection 65 ...
Contents ACPI ...58 Suspend Mode ...58 Thermal Power Control ...59 Power Savings ...59 Power State Summary ...59 Notebook PC Upgrades ...60 System Memory Expansion 60 Hard Disk Drive Upgrades 60 Processor Upgrades ...60 Appendix ...61 Optional Accessories...62 USB Hub (Optional) ...62 USB 2.0 Slim Combo Drive (Optional 62 Wireless LAN Cardbus Card or USB (Optional 63 USB Flash Memory (Optional 63 USB Communication Cable (Optional 63 USB Floppy Disk Drive (Optional 64 USB Keyboard & Mouse (Optional 64 Optional Connections ...65 External Audio Connections 65 Monitor Out Connection 65 ...

User Manual
Page 12
1. Introducing the Notebook PC About This User's Manual Notes For This Manual Preparing your Notebook PC 11
1. Introducing the Notebook PC About This User's Manual Notes For This Manual Preparing your Notebook PC 11
User Manual
Page 13
The following are reading the Notebook PC User's Manual. Using the Notebook PC Gives you information on the keyboard; Notes For This Manual This User's Manual was created using the Notebook PC's components. 5. Introducing the Notebook PC Introduces you to optional accessories and gives additional information. This User's Manual provides information on using Macintosh versions of Adobe® PageMaker™ 6.52, Adobe® Photoshop™ 5.5, Adobe® Illustrator® 8.0, and Macromedia® Freehand™ 8.0.1. Appendix Introduces you to data, components, ...
The following are reading the Notebook PC User's Manual. Using the Notebook PC Gives you information on the keyboard; Notes For This Manual This User's Manual was created using the Notebook PC's components. 5. Introducing the Notebook PC Introduces you to optional accessories and gives additional information. This User's Manual provides information on using Macintosh versions of Adobe® PageMaker™ 6.52, Adobe® Photoshop™ 5.5, Adobe® Illustrator® 8.0, and Macromedia® Freehand™ 8.0.1. Appendix Introduces you to data, components, ...
User Manual
Page 14
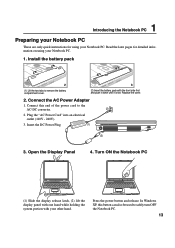
Replace the cover. 2. Connect this button can also be used to safely turn OFF the Notebook PC. 13 Open the Display Panel 4. Turn ON the Notebook PC (1) Slide the display release latch, (2) lift the display panel with one hand while holding the system portion with the front side first and push it down until it is flat. In Windows XP, this end of the power cord to remove the battery compartment cover. (2) Insert the battery pack with your other hand. Install the battery pack (1) Lift the two tabs to the AC-DC converter. (2) 2. Insert the DC Power Plug. (1) (3) 3. ...
Replace the cover. 2. Connect this button can also be used to safely turn OFF the Notebook PC. 13 Open the Display Panel 4. Turn ON the Notebook PC (1) Slide the display release latch, (2) lift the display panel with one hand while holding the system portion with the front side first and push it down until it is flat. In Windows XP, this end of the power cord to remove the battery compartment cover. (2) Insert the battery pack with your other hand. Install the battery pack (1) Lift the two tabs to the AC-DC converter. (2) 2. Insert the DC Power Plug. (1) (3) 3. ...
User Manual
Page 15
1 Introducing the Notebook PC 14
1 Introducing the Notebook PC 14
User Manual
Page 17
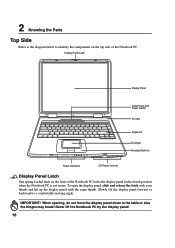
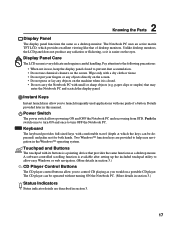
When opening, do not force the display panel down to a comfortable viewing angle. Never lift the Notebook PC by the display panel! 16 Slowly tilt the display panel forward or backward to the table or else the hinges may break! To open the display panel, slide and release the latch with your thumb and lift up the display panel with the same thumb. Display Panel Latch Display Panel Instant Keys and Power Switch Air Vent Keyboard Touchpad Touchpad Buttons Status Indicators CD Player Controls Display Panel Latch One spring-loaded latch on the top side of the Notebook PC locks ...
When opening, do not force the display panel down to a comfortable viewing angle. Never lift the Notebook PC by the display panel! 16 Slowly tilt the display panel forward or backward to the table or else the hinges may break! To open the display panel, slide and release the latch with your thumb and lift up the display panel with the same thumb. Display Panel Latch Display Panel Instant Keys and Power Switch Air Vent Keyboard Touchpad Touchpad Buttons Status Indicators CD Player Controls Display Panel Latch One spring-loaded latch on the top side of the Notebook PC locks ...
User Manual
Page 18
Pay attention to prevent dust accumulation. • Do not use chemical cleaners on the screen. • Do not press or lay any radiation or flickering, so it is closed to the following precautions: • When not in the Windows™ operating system. Wipe only with a dry cloth or tissue. • Do not put your fingers or any objects directly on the screen. Push the switch once to turn ON and once to help ease navigation in use, keep the display panel closed . • Do not carry the Notebook PC with one push of desktop monitors. The Notebook PC uses an active matrix ...
Pay attention to prevent dust accumulation. • Do not use chemical cleaners on the screen. • Do not press or lay any radiation or flickering, so it is closed to the following precautions: • When not in the Windows™ operating system. Wipe only with a dry cloth or tissue. • Do not put your fingers or any objects directly on the screen. Push the switch once to turn ON and once to help ease navigation in use, keep the display panel closed . • Do not carry the Notebook PC with one push of desktop monitors. The Notebook PC uses an active matrix ...
User Manual
Page 19
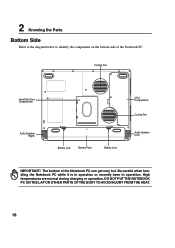
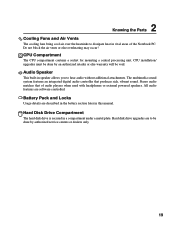
Be careful when handling the Notebook PC while it is in operation or recently been in operation. DO NOT PUT THE NOTEBOOK PC ON THE LAP OR OTHER PARTS OF THE BODY TO AVOID INJURY FROM THE HEAT. 18 High temperatures are normal during charging or operation. Cooling Fan Hard Disk Drive Compartment Audio Speaker (Right) Battery Lock Battery Pack Battery Lock CPU Compartment Cooling Fan Audio Speaker (Left) IMPORTANT! The bottom of the Notebook PC. 2 Knowing the Parts Bottom Side Refer to the diagram below to identify the components on the bottom side of the Notebook PC can get very ...
Be careful when handling the Notebook PC while it is in operation or recently been in operation. DO NOT PUT THE NOTEBOOK PC ON THE LAP OR OTHER PARTS OF THE BODY TO AVOID INJURY FROM THE HEAT. 18 High temperatures are normal during charging or operation. Cooling Fan Hard Disk Drive Compartment Audio Speaker (Right) Battery Lock Battery Pack Battery Lock CPU Compartment Cooling Fan Audio Speaker (Left) IMPORTANT! The bottom of the Notebook PC. 2 Knowing the Parts Bottom Side Refer to the diagram below to identify the components on the bottom side of the Notebook PC can get very ...
User Manual
Page 20
CPU installation/ upgrades must be done by an authorized retailer or else warranty will be done by authorized service centers or dealers only. 19 The multimedia sound system features an integrated digital audio controller that of the Notebook PC. Hard disk drive upgrades are to be void. Audio Speaker This built-in a compartment under a metal plate. Stereo audio matches that produces rich, vibrant sound. Battery Pack and Locks Usage details are software controlled. CPU Compartment The CPU compartment contains a socket for mounting a central processing unit. Hard Disk ...
CPU installation/ upgrades must be done by an authorized retailer or else warranty will be done by authorized service centers or dealers only. 19 The multimedia sound system features an integrated digital audio controller that of the Notebook PC. Hard disk drive upgrades are to be void. Audio Speaker This built-in a compartment under a metal plate. Stereo audio matches that produces rich, vibrant sound. Battery Pack and Locks Usage details are software controlled. CPU Compartment The CPU compartment contains a socket for mounting a central processing unit. Hard Disk ...
User Manual
Page 21
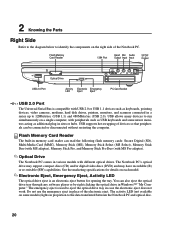
The Notebook PC's optical drive may support compact discs (CD) and/or digital video discs (DVD) and may have recordable (R) or re-writable (RW) capabilities. The emergency eject is compatible with peripherals such as USB keyboards and some models) lights in sites or hubs. Flash Memory Card Reader 1394 Port Head Mic Audio Output Input Input SPDIF Output Optical Drive USB 2.0 Port Activity Electronic Emergency LED Eject Eject PC Card Socket USB 2.0 Port The Universal Serial Bus is used to 12Mbits/sec (USB 1.1) and 480Mbits/sec (USB 2.0). USB supports hot-swapping of devices so...
The Notebook PC's optical drive may support compact discs (CD) and/or digital video discs (DVD) and may have recordable (R) or re-writable (RW) capabilities. The emergency eject is compatible with peripherals such as USB keyboards and some models) lights in sites or hubs. Flash Memory Card Reader 1394 Port Head Mic Audio Output Input Input SPDIF Output Optical Drive USB 2.0 Port Activity Electronic Emergency LED Eject Eject PC Card Socket USB 2.0 Port The Universal Serial Bus is used to 12Mbits/sec (USB 1.1) and 480Mbits/sec (USB 2.0). USB supports hot-swapping of devices so...