
Motherboard DIY Troubleshooting Guide
Page 18
... USBPW1 Top:Line In Center:Line Out Below:Mic In SPDIF_O VIA K8T890 EATXPWR JMicron JMB363 SATA_RAID1 PCIEX16 K8V -XE PCI1 R RTL8201CL CD ALC660 AAFP GAME PCI2 VIA VT8251 PCI3 PCIEX1_1 PCIEX1_2 FLOPPY Super I/O 4M BIOS CR2032 3V Lithium Cell CMOS Power SATA4 SATA2 SATA3 SATA1 SPDIF_OUT USBPW2 SB_PWR USB56 USB78 CLRTC CHA_FAN...
... USBPW1 Top:Line In Center:Line Out Below:Mic In SPDIF_O VIA K8T890 EATXPWR JMicron JMB363 SATA_RAID1 PCIEX16 K8V -XE PCI1 R RTL8201CL CD ALC660 AAFP GAME PCI2 VIA VT8251 PCI3 PCIEX1_1 PCIEX1_2 FLOPPY Super I/O 4M BIOS CR2032 3V Lithium Cell CMOS Power SATA4 SATA2 SATA3 SATA1 SPDIF_OUT USBPW2 SB_PWR USB56 USB78 CLRTC CHA_FAN...
Motherboard DIY Troubleshooting Guide
Page 59
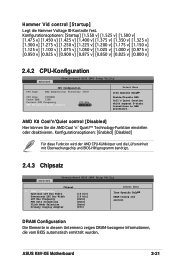
.... AMD K8 CoolʼnʼQuiet control [Disabled] Hier können Sie die AMD Cool ʻnʼ Quiet!TM Technology-Funktion einstellen oder deaktivieren. ASUS K8V-XE Motherboard 2-21 Konfigurationsoptionen: [Startup] [1.550 v] [1.525 v] [1.500 v] [1.475 v] [1.450 v] [1.425 v] [1.400 v] [1.375 v]...v] [0.950 v] [0.925 v] [0.900 v] [0.875 v] [0.850 v] [0.825 v] [0.800 v] 2.4.2 CPU-Konfiguration Advanced Phoenix-Award BIOS CMOS Setup Utility CPU Type CPU Configuration AMD Sempron(tm) Processor 3000+ CPU Spee 1800MHz Cache RAM 128K Current FSB Frequency AMD K8...
.... AMD K8 CoolʼnʼQuiet control [Disabled] Hier können Sie die AMD Cool ʻnʼ Quiet!TM Technology-Funktion einstellen oder deaktivieren. ASUS K8V-XE Motherboard 2-21 Konfigurationsoptionen: [Startup] [1.550 v] [1.525 v] [1.500 v] [1.475 v] [1.450 v] [1.425 v] [1.400 v] [1.375 v]...v] [0.950 v] [0.925 v] [0.900 v] [0.875 v] [0.850 v] [0.825 v] [0.800 v] 2.4.2 CPU-Konfiguration Advanced Phoenix-Award BIOS CMOS Setup Utility CPU Type CPU Configuration AMD Sempron(tm) Processor 3000+ CPU Spee 1800MHz Cache RAM 128K Current FSB Frequency AMD K8...
Motherboard DIY Troubleshooting Guide
Page 61
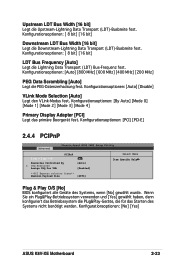
... die für das Starten des Systems nicht benötigt werden. Konfigurationsoptionen: [PCI] [PCI-E] 2.4.4 PCIPnP Advanced Phoenix-Award BIOS CMOS Setup Utility Plug & Play O/S PCIPnP [No] Resources Controlled By x IRQ Resources Assign IRQ For VGA [Auto] [Enabled] Select Menu...] [16 bit] LDT Bus Frequency [Auto] Legt die Lightning Data Transport (LDT) Bus-Frequenz fest. Konfigurationsoptionen: [No] [Yes] ASUS K8V-XE Motherboard 2-23 Konfigurationsoptionen: [Auto] [Disable] VLink Mode Selection [Auto] Legt den VLink-Modus fest. Upstream LDT Bus Width [16 bit...
... die für das Starten des Systems nicht benötigt werden. Konfigurationsoptionen: [PCI] [PCI-E] 2.4.4 PCIPnP Advanced Phoenix-Award BIOS CMOS Setup Utility Plug & Play O/S PCIPnP [No] Resources Controlled By x IRQ Resources Assign IRQ For VGA [Auto] [Enabled] Select Menu...] [16 bit] LDT Bus Frequency [Auto] Legt die Lightning Data Transport (LDT) Bus-Frequenz fest. Konfigurationsoptionen: [No] [Yes] ASUS K8V-XE Motherboard 2-23 Konfigurationsoptionen: [Auto] [Disable] VLink Mode Selection [Auto] Legt den VLink-Modus fest. Upstream LDT Bus Width [16 bit...

K8V-XE User's Manual for English Edition
Page 4
... 2.1 2.1.1 2.1.2 2.1.3 2.1.4 2.1.5 2.2 2.1.6 2.2.1 2.2.2 2.2.3 2.2.4 2.2.5 2.2.6 2.2.7 2.3 2.2.8 2.3.1 2.3.2 2.3.3 2.3.4 2.4 2.3.5 2.4.1 2.4.2 2.4.3 2.4.4 2.4.5 2.5 2.4.6 2.5.1 2.5.2 Managing and updating your BIOS ...2-2 Creating a bootable floppy disk...2-2 Updating the BIOS ...2-3 Saving the current BIOS file...2-5 ASUS CrashFree BIOS 2 utility ...2-6 ASUS EZ Flash utility...2-8 ASUS Update utility ...2-9 BIOS menu screen...2-13 Menu bar ...2-13 Legend bar ...2-14 Menu items ...2-14 Sub-menu items ...2-14 Configuration fields ...2-14 Pop-up window ...2-...
... 2.1 2.1.1 2.1.2 2.1.3 2.1.4 2.1.5 2.2 2.1.6 2.2.1 2.2.2 2.2.3 2.2.4 2.2.5 2.2.6 2.2.7 2.3 2.2.8 2.3.1 2.3.2 2.3.3 2.3.4 2.4 2.3.5 2.4.1 2.4.2 2.4.3 2.4.4 2.4.5 2.5 2.4.6 2.5.1 2.5.2 Managing and updating your BIOS ...2-2 Creating a bootable floppy disk...2-2 Updating the BIOS ...2-3 Saving the current BIOS file...2-5 ASUS CrashFree BIOS 2 utility ...2-6 ASUS EZ Flash utility...2-8 ASUS Update utility ...2-9 BIOS menu screen...2-13 Menu bar ...2-13 Legend bar ...2-14 Menu items ...2-14 Sub-menu items ...2-14 Configuration fields ...2-14 Pop-up window ...2-...

K8V-XE User's Manual for English Edition
Page 8
...such as warranty flyers, that comes with the motherboard package. • Chapter 2: BIOS setup • Chapter 3: Software support Where to find more information Refer to the ASUS contact information. Detailed descriptions of the standard package. About this guide is organized This manual... following sources for additional information and for product and software updates. 1. The ASUS website provides updated information on the motherboard. These documents are not part of the BIOS parameters are also provided. How this guide This user guide contains the information ...
...such as warranty flyers, that comes with the motherboard package. • Chapter 2: BIOS setup • Chapter 3: Software support Where to find more information Refer to the ASUS contact information. Detailed descriptions of the standard package. About this guide is organized This manual... following sources for additional information and for product and software updates. 1. The ASUS website provides updated information on the motherboard. These documents are not part of the BIOS parameters are also provided. How this guide This user guide contains the information ...
K8V-XE User's Manual for English Edition
Page 10
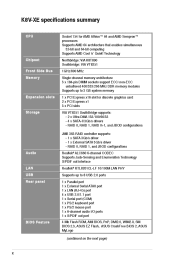
.../2 mouse port 1 x 6-channel audio I/O ports 1 x S/PDIF out port 4 Mb Flash ROM, AMI BIOS, PnP, DMI2.0, WfM2.0, SM BIOS 2.3, ASUS EZ Flash, ASUS CrashFree BIOS 2, ASUS MyLogo Chipset Front Side Bus Memory Expansion slots Storage LAN USB Rear panel BIOS Feature (continued on the next page) x K8V-XE specifications summary CPU Socket 754 for discrete graphics card 2 x PCI...
.../2 mouse port 1 x 6-channel audio I/O ports 1 x S/PDIF out port 4 Mb Flash ROM, AMI BIOS, PnP, DMI2.0, WfM2.0, SM BIOS 2.3, ASUS EZ Flash, ASUS CrashFree BIOS 2, ASUS MyLogo Chipset Front Side Bus Memory Expansion slots Storage LAN USB Rear panel BIOS Feature (continued on the next page) x K8V-XE specifications summary CPU Socket 754 for discrete graphics card 2 x PCI...

K8V-XE User's Manual for English Edition
Page 11
xi K8V-XE specifications summary Overclocking features CPU Multiplier SFS (Stepless Frequency Selection), from 200 MHz up to 300 MHz at 1MHz increment C.P.R.(CPU Parameter Recall) EZ Flash ASUS CrashFree BIOS 2 ASUS MyLogo™ ASUS EZ Flash WOL by PME, WOR by PME, WOR by Ring 2 x USB 2.0 connectors ...connector 1 x Front panel audio connector 1 x System panel connector ATX form factor: 12 in x 7.6 in (30.5 cm x 19 cm) Device drivers ASUS PC Probe II ASUS Live Update utility Anti-virus software User's Manual 1 x UltraDMA 133/100/66 cable 1 x FDD cable 1 x I/O shield 1 x SATA Cable Kit (...
xi K8V-XE specifications summary Overclocking features CPU Multiplier SFS (Stepless Frequency Selection), from 200 MHz up to 300 MHz at 1MHz increment C.P.R.(CPU Parameter Recall) EZ Flash ASUS CrashFree BIOS 2 ASUS MyLogo™ ASUS EZ Flash WOL by PME, WOR by PME, WOR by Ring 2 x USB 2.0 connectors ...connector 1 x Front panel audio connector 1 x System panel connector ATX form factor: 12 in x 7.6 in (30.5 cm x 19 cm) Device drivers ASUS PC Probe II ASUS Live Update utility Anti-virus software User's Manual 1 x UltraDMA 133/100/66 cable 1 x FDD cable 1 x I/O shield 1 x SATA Cable Kit (...

K8V-XE User's Manual for English Edition
Page 16
... need to overclocking, C.P.R. feature of the motherboard BIOS allows automatic re-setting to the BIOS default settings in case when the BIOS codes and data are corrupted. See pages 2-33. 1.3.2 Innovative ASUS features CrashFree BIOS 2 This feature allows you to restore the original BIOS data from a floppy disk. ASUS MyLogo™ This feature allows you can...
... need to overclocking, C.P.R. feature of the motherboard BIOS allows automatic re-setting to the BIOS default settings in case when the BIOS codes and data are corrupted. See pages 2-33. 1.3.2 Innovative ASUS features CrashFree BIOS 2 This feature allows you to restore the original BIOS data from a floppy disk. ASUS MyLogo™ This feature allows you can...

K8V-XE User's Manual for English Edition
Page 18
... B: Keyboard KBPWR ATX12V CPU_FAN COM1 F_USB12 Bottom: USB3 RJ-45 USB4 Top: USBPW1 SPDIF_O VIA K8T890 JMicron JMB363 K8V -XE R PCIEX16 SATA_RAID1 PCI2 RTL8201CL VIA VT8251 CD ALC660 PCI3 Super I/O SEC_IDE PCIEX1_1 AAFP 4M BIOS CR2032 3V Lithium Cell CMOS Power SATA4 SATA2 SATA3 SATA1 PCIEX1_2 FLOPPY GAME SPDIF_OUT USBPW2 SB_PWR CHA_FAN CLRTC...
... B: Keyboard KBPWR ATX12V CPU_FAN COM1 F_USB12 Bottom: USB3 RJ-45 USB4 Top: USBPW1 SPDIF_O VIA K8T890 JMicron JMB363 K8V -XE R PCIEX16 SATA_RAID1 PCI2 RTL8201CL VIA VT8251 CD ALC660 PCI3 Super I/O SEC_IDE PCIEX1_1 AAFP 4M BIOS CR2032 3V Lithium Cell CMOS Power SATA4 SATA2 SATA3 SATA1 PCIEX1_2 FLOPPY GAME SPDIF_OUT USBPW2 SB_PWR CHA_FAN CLRTC...

K8V-XE User's Manual for English Edition
Page 26
... holder for PCI steering PS/2 Compatible Mouse Port Numeric Data Processor Primary IDE Channel Secondary IDE Channel Standard Function * These IRQs are usually available for BIOS information. 3. 1.7.3 Installing a DIMM Follow these steps to the card. Assign an IRQ to install a DIMM. 1. DO NOT force a DIMM ... following the instructions that came with a notch so that the notch on the DIMM matches the break on the system and change the necessary BIOS settings, if any. See Chapter 2 for ISA or PCI devices. 1-14 Chapter 1: Product introduction Align a DIMM on the socket such that...
... holder for PCI steering PS/2 Compatible Mouse Port Numeric Data Processor Primary IDE Channel Secondary IDE Channel Standard Function * These IRQs are usually available for BIOS information. 3. 1.7.3 Installing a DIMM Follow these steps to the card. Assign an IRQ to install a DIMM. 1. DO NOT force a DIMM ... following the instructions that came with a notch so that the notch on the DIMM matches the break on the system and change the necessary BIOS settings, if any. See Chapter 2 for ISA or PCI devices. 1-14 Chapter 1: Product introduction Align a DIMM on the socket such that...
K8V-XE User's Manual for English Edition
Page 29
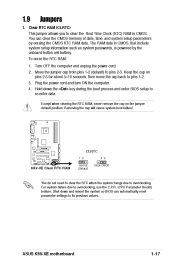
... on pins 2-3 for about 5~10 seconds, then move the cap back to re-enter data. Shut down the key during the boot process and enter BIOS setup to pins 1-2. 3. ASUS K8V-XE motherboard 1-17 Plug the power cord and turn ON the computer. 4. Hold down and reboot the system so... BIOS can clear the CMOS memory of date, time, and system setup parameters by the onboard button cell battery. To erase the RTC RAM: 1. Keep the ...
... on pins 2-3 for about 5~10 seconds, then move the cap back to re-enter data. Shut down the key during the boot process and enter BIOS setup to pins 1-2. 3. ASUS K8V-XE motherboard 1-17 Plug the power cord and turn ON the computer. 4. Hold down and reboot the system so... BIOS can clear the CMOS memory of date, time, and system setup parameters by the onboard button cell battery. To erase the RTC RAM: 1. Keep the ...

K8V-XE User's Manual for English Edition
Page 30
...devices. This feature requires an ATX power supply that can supply at least 1A on the keyboard. KBPWR 2 1 3 2 +5VSB K8V -XE R +5V (Default) K8V-XE Keyboard Power Setting 3. Otherwise, the system would not power up from S1 sleep mode (CPU stopped, DRAM refreshed, system running in ...mode). The total current consumed must NOT exceed the power supply capability (+5VSB) whether under normal condition or in the BIOS. USBPW1 2 1 3 2 +5VSB +5V (Default) K8V -XE R 1 2 USBPW2 2 3 K8V-XE USB Device Wake Up • • +5V (Default) +5VSB The USB device wake-up the computer when...
...devices. This feature requires an ATX power supply that can supply at least 1A on the keyboard. KBPWR 2 1 3 2 +5VSB K8V -XE R +5V (Default) K8V-XE Keyboard Power Setting 3. Otherwise, the system would not power up from S1 sleep mode (CPU stopped, DRAM refreshed, system running in ...mode). The total current consumed must NOT exceed the power supply capability (+5VSB) whether under normal condition or in the BIOS. USBPW1 2 1 3 2 +5VSB +5V (Default) K8V -XE R 1 2 USBPW2 2 3 K8V-XE USB Device Wake Up • • +5V (Default) +5VSB The USB device wake-up the computer when...

K8V-XE User's Manual for English Edition
Page 38
The LED lights up . This 4-pin connector connects to the case-mounted speaker and allows you turn on the BIOS or OS settings. This 2-pin connector connects to hear system beeps and warnings. This connector supplies power to the system power LED....case-mounted reset switch for easy and foolproof connection. Any read or write activity of the specific connector colors as described. PLED PLED+ PLED- K8V-XE System Panel Connector • • This 3-pin connector connects to the hard disk activity LED. 8. This connector connects a switch that controls the system...
The LED lights up . This 4-pin connector connects to the case-mounted speaker and allows you turn on the BIOS or OS settings. This 2-pin connector connects to hear system beeps and warnings. This connector supplies power to the system power LED....case-mounted reset switch for easy and foolproof connection. Any read or write activity of the specific connector colors as described. PLED PLED+ PLED- K8V-XE System Panel Connector • • This 3-pin connector connects to the hard disk activity LED. 8. This connector connects a switch that controls the system...

K8V-XE User's Manual for English Edition
Page 39
BIOS information Detailed descriptions of the BIOS parameters are also provided. Chapter 2 This chapter tells how to change system settings through the BIOS Setup menus.
BIOS information Detailed descriptions of the BIOS parameters are also provided. Chapter 2 This chapter tells how to change system settings through the BIOS Setup menus.

K8V-XE User's Manual for English Edition
Page 40
...Click File from the Windows® 2000 CD: a. b. ASUS CrashFree BIOS 2 (Updates the BIOS using a bootable floppy disk or the motherboard support CD when the BIOS file fails or gets corrupted.) ASUS EZ Flash (Updates the BIOS in the future. DOS environment Insert a 1.44 MB &#... the floppy disk drive. Copy the original motherboard BIOS using a floppy disk or the motherboard support CD.) ASUS Update (Updates the BIOS in Windows® environment.) Refer to restore the BIOS in DOS using the ASUS Update or AwardBIOS Flash utilities. 2.1.1 Creating a bootable fl...
...Click File from the Windows® 2000 CD: a. b. ASUS CrashFree BIOS 2 (Updates the BIOS using a bootable floppy disk or the motherboard support CD when the BIOS file fails or gets corrupted.) ASUS EZ Flash (Updates the BIOS in the future. DOS environment Insert a 1.44 MB &#... the floppy disk drive. Copy the original motherboard BIOS using a floppy disk or the motherboard support CD.) ASUS Update (Updates the BIOS in Windows® environment.) Refer to restore the BIOS in DOS using the ASUS Update or AwardBIOS Flash utilities. 2.1.1 Creating a bootable fl...

K8V-XE User's Manual for English Edition
Page 41
... press . Boot the system in the floppy disk to the floppy disk with the floppy disk containing the new BIOS file and the Award BIOS Flash Utility. d. e. ASUS K8V-XE motherboard 2-3 Copy the original (or the latest) motherboard BIOS to Program: Message: Please input File Name! c. Follow succeeding screen instructions. 2.1.2 Updating the...
... press . Boot the system in the floppy disk to the floppy disk with the floppy disk containing the new BIOS file and the Award BIOS Flash Utility. d. e. ASUS K8V-XE motherboard 2-3 Copy the original (or the latest) motherboard BIOS to Program: Message: Please input File Name! c. Follow succeeding screen instructions. 2.1.2 Updating the...
K8V-XE User's Manual for English Edition
Page 42
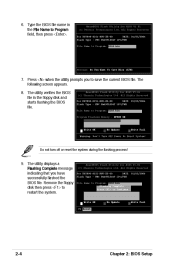
... system during the flashing process! 9. The utility verifies the BIOS file in the File Name to save the current BIOS file. AwardBIOS Flash Utility for ASUS V1.01 (C) Phoenix Technologies Ltd. All Rights Reserved For K8T890-8251-K8V-XE-00 DATE: 01/05/2006 Flash Type - AwardBIOS Flash Utility for...
... system during the flashing process! 9. The utility verifies the BIOS file in the File Name to save the current BIOS file. AwardBIOS Flash Utility for ASUS V1.01 (C) Phoenix Technologies Ltd. All Rights Reserved For K8T890-8251-K8V-XE-00 DATE: 01/05/2006 Flash Type - AwardBIOS Flash Utility for...

K8V-XE User's Manual for English Edition
Page 43
... file. Press when the utility prompts you to save the current BIOS file. AwardBIOS Flash Utility for ASUS V1.01 (C) Phoenix Technologies Ltd. Type a filename for ASUS V1.01 (C) Phoenix Technologies Ltd. ASUS K8V-XE motherboard 2-5 All Rights Reserved For K8T890-8251-K8V-XE-00 DATE: 01/05/2006 Flash Type - Message: Please Wait! To...
... file. Press when the utility prompts you to save the current BIOS file. AwardBIOS Flash Utility for ASUS V1.01 (C) Phoenix Technologies Ltd. Type a filename for ASUS V1.01 (C) Phoenix Technologies Ltd. ASUS K8V-XE motherboard 2-5 All Rights Reserved For K8T890-8251-K8V-XE-00 DATE: 01/05/2006 Flash Type - Message: Please Wait! To...

K8V-XE User's Manual for English Edition
Page 44
...to Boot from the support CD: 1. Recovering the BIOS from the support CD To recover the BIOS from it fails or gets corrupted during the updating process. Award BootBlock BIOS v1.0 Copyright (c) 2000, Award Software, Inc. Award BootBlock BIOS v1.0 Copyright (c) 2000, Award Software, Inc. ...while updating the BIOS! Prepare the motherboard support CD or the floppy disk containing the updated motherboard BIOS before using the motherboard support CD or the floppy disk that allows you to the optical drive. 3. 2.1.4 ASUS CrashFree BIOS 2 utility The ASUS CrashFree BIOS 2 is ...
...to Boot from the support CD: 1. Recovering the BIOS from the support CD To recover the BIOS from it fails or gets corrupted during the updating process. Award BootBlock BIOS v1.0 Copyright (c) 2000, Award Software, Inc. Award BootBlock BIOS v1.0 Copyright (c) 2000, Award Software, Inc. ...while updating the BIOS! Prepare the motherboard support CD or the floppy disk containing the updated motherboard BIOS before using the motherboard support CD or the floppy disk that allows you to the optical drive. 3. 2.1.4 ASUS CrashFree BIOS 2 utility The ASUS CrashFree BIOS 2 is ...

K8V-XE User's Manual for English Edition
Page 45
... the optical drive for this motherboard. Restart the system after the utility completes the updating process. Award BootBlock BIOS v1.0 Copyright (c) 2000, Award Software, Inc. ASUS K8V-XE motherboard 2-7 Recovering the BIOS from a floppy disk To recover the BIOS from the optical drive, then turn on the system. 2. Insert the floppy disk with the original...
... the optical drive for this motherboard. Restart the system after the utility completes the updating process. Award BootBlock BIOS v1.0 Copyright (c) 2000, Award Software, Inc. ASUS K8V-XE motherboard 2-7 Recovering the BIOS from a floppy disk To recover the BIOS from the optical drive, then turn on the system. 2. Insert the floppy disk with the original...


