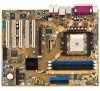

K8N-E Deluxe User's Manual
Page 36
...Refer to the tables on BIOS setup. 2. Turn on the slot. 5. Install the software drivers for later use . Remove the bracket opposite the slot that you physical injury and damage motherboard components. 2.5.1 Installing an expansion card Follow these steps to install an expansion card. 1. Read ...the documentation that they support. Remove the system unit cover (if your motherboard is completely seated on the system and change the necessary BIOS settings, if any. Keep the screw for the expansion card. 2-14 Chapter...
...Refer to the tables on BIOS setup. 2. Turn on the slot. 5. Install the software drivers for later use . Remove the bracket opposite the slot that you physical injury and damage motherboard components. 2.5.1 Installing an expansion card Follow these steps to install an expansion card. 1. Read ...the documentation that they support. Remove the system unit cover (if your motherboard is completely seated on the system and change the necessary BIOS settings, if any. Keep the screw for the expansion card. 2-14 Chapter...
K8N-E Deluxe User's Manual
Page 37
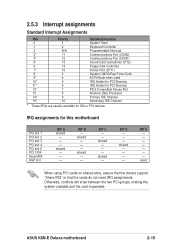
INT C - - INT D - - - ASUS K8N-E Deluxe motherboard 2-15 shared - - - 2.5.3 Interrupt assignments Standard Interrupt Assignments IRQ Priority Standard Function 0 1 System Timer 1 2 Keyboard Controller 2 N/A Programmable Interrupt 3* 11 Communications Port (COM2) 4* 12...7* 15 Printer Port (LPT1) 8 3 System CMOS/Real Time Clock 9* 4 ACPI Mode when used When using PCI cards on shared slots, ensure that the drivers support "Share IRQ" or that the cards do not need IRQ assignments. IRQ assignments for ISA or PCI devices. shared - - - - INT E used 10...
INT C - - INT D - - - ASUS K8N-E Deluxe motherboard 2-15 shared - - - 2.5.3 Interrupt assignments Standard Interrupt Assignments IRQ Priority Standard Function 0 1 System Timer 1 2 Keyboard Controller 2 N/A Programmable Interrupt 3* 11 Communications Port (COM2) 4* 12...7* 15 Printer Port (LPT1) 8 3 System CMOS/Real Time Clock 9* 4 ACPI Mode when used When using PCI cards on shared slots, ensure that the drivers support "Share IRQ" or that the cards do not need IRQ assignments. IRQ assignments for ISA or PCI devices. shared - - - - INT E used 10...
K8N-E Deluxe User's Manual
Page 48
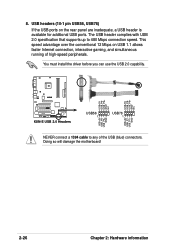
The USB header complies with USB 2.0 specification that supports up to any of high-speed peripherals. You must install the driver before you can use the USB 2.0 capability. USB headers (10-1 pin USB56, USB78) If the USB ports on USB 1.1 allows faster ...rear panel are inadequate, a USB header is available for additional USB ports. Doing so will damage the motherboard! 2-26 Chapter 2: Hardware information USB+5V USB_P8USB_P8+ GND NC USB+5V USB_P6USB_P6+ GND NC ® K8V-E K8N-E USB 2.0 Headers USB56 1 USB78 1 USB+5V USB_P7USB_P7+ GND USB+5V USB_P5USB_P5+ GND NEVER connect...
The USB header complies with USB 2.0 specification that supports up to any of high-speed peripherals. You must install the driver before you can use the USB 2.0 capability. USB headers (10-1 pin USB56, USB78) If the USB ports on USB 1.1 allows faster ...rear panel are inadequate, a USB header is available for additional USB ports. Doing so will damage the motherboard! 2-26 Chapter 2: Hardware information USB+5V USB_P8USB_P8+ GND NC USB+5V USB_P6USB_P6+ GND NC ® K8V-E K8N-E USB 2.0 Headers USB56 1 USB78 1 USB+5V USB_P7USB_P7+ GND USB+5V USB_P5USB_P5+ GND NEVER connect...
K8N-E Deluxe User's Manual
Page 71
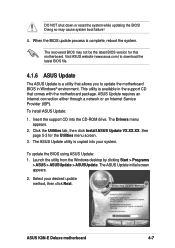
...the support CD that allows you to update the motherboard BIOS in Windows® environment. When the BIOS update process is a utility that comes with the motherboard package. The Drivers menu appears. 2. To update the BIOS using ASUS Update: 1. Select your system. DO NOT shut.... This utility is copied into the CD-ROM drive. ASUS K8N-E Deluxe motherboard 4-7 Doing so may not be the latest BIOS version for the Utilities menu screen. 3. Visit ASUS website (www.asus.com) to download the latest BIOS file. 4.1.6 ASUS Update The ASUS Update is complete, reboot the system.
...the support CD that allows you to update the motherboard BIOS in Windows® environment. When the BIOS update process is a utility that comes with the motherboard package. The Drivers menu appears. 2. To update the BIOS using ASUS Update: 1. Select your system. DO NOT shut.... This utility is copied into the CD-ROM drive. ASUS K8N-E Deluxe motherboard 4-7 Doing so may not be the latest BIOS version for the Utilities menu screen. 3. Visit ASUS website (www.asus.com) to download the latest BIOS file. 4.1.6 ASUS Update The ASUS Update is complete, reboot the system.
K8N-E Deluxe User's Manual
Page 83
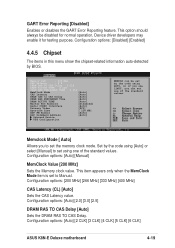
... to Manual. Configuration options: [Auto] [2 CLK] [3 CLK] [4 CLK] [5 CLK] [6 CLK] ASUS K8N-E Deluxe motherboard 4-19 This option should always be set by the code using one of the standard values. Configuration options: [Auto] [Manual] MemClock Value [200 MHz] Sets the Memory clock value. Device driver developers may enable it for normal operation. Configuration options: [200...
... to Manual. Configuration options: [Auto] [2 CLK] [3 CLK] [4 CLK] [5 CLK] [6 CLK] ASUS K8N-E Deluxe motherboard 4-19 This option should always be set by the code using one of the standard values. Configuration options: [Auto] [Manual] MemClock Value [200 MHz] Sets the Memory clock value. Device driver developers may enable it for normal operation. Configuration options: [200...

K8N-E Deluxe User's Manual
Page 102
Chapter summary 5.1 Installing an operating system 5-1 5.2 Support CD information 5-1 5.3 Software Information 5-9 5.4 Audio configurations 5-13 5.5 RAID configurations 5-19 5.6 Creating a RAID driver disk 5-23 5.7 Cool 'n' Quiet!™ Technology 5-24 ASUS K8N-E Deluxe motherboard
Chapter summary 5.1 Installing an operating system 5-1 5.2 Support CD information 5-1 5.3 Software Information 5-9 5.4 Audio configurations 5-13 5.5 RAID configurations 5-19 5.6 Creating a RAID driver disk 5-23 5.7 Cool 'n' Quiet!™ Technology 5-24 ASUS K8N-E Deluxe motherboard
K8N-E Deluxe User's Manual
Page 103
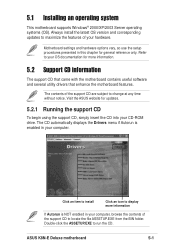
... an operating system This motherboard supports Windows® 2000/XP/2003 Server operating systems (OS). ASUS K8N-E Deluxe motherboard 5-1 The contents of your hardware. Visit the ASUS website for general reference ...only. Refer to your computer, browse the contents of the support CD to display more information. 5.2 Support CD information The support CD that came with the motherboard contains useful software and several utility drivers that enhance the motherboard...
... an operating system This motherboard supports Windows® 2000/XP/2003 Server operating systems (OS). ASUS K8N-E Deluxe motherboard 5-1 The contents of your hardware. Visit the ASUS website for general reference ...only. Refer to your computer, browse the contents of the support CD to display more information. 5.2 Support CD information The support CD that came with the motherboard contains useful software and several utility drivers that enhance the motherboard...
K8N-E Deluxe User's Manual
Page 105
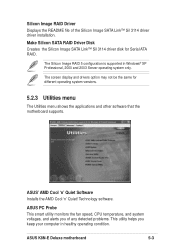
..., and alerts you of the Silicon Image SATA Link™ Sil 3114 driver driver installation. The Silicon Image RAID 5 configuration is supported in healthy operating condition. ASUS K8N-E Deluxe motherboard 5-3 Make Silicon SATA RAID Driver Disk Creates the Silicon Image SATA Link™ Sil 3114 driver disk for different operating system versions. 5.2.3 Utilities menu The Utilities menu shows...
..., and alerts you of the Silicon Image SATA Link™ Sil 3114 driver driver installation. The Silicon Image RAID 5 configuration is supported in healthy operating condition. ASUS K8N-E Deluxe motherboard 5-3 Make Silicon SATA RAID Driver Disk Creates the Silicon Image SATA Link™ Sil 3114 driver disk for different operating system versions. 5.2.3 Utilities menu The Utilities menu shows...

K8N-E Deluxe User's Manual
Page 115
... convenience. 7. Press or once to deliver the ultimate audio experience on your PC. Follow the installation wizard to display the Realtek Audio Control Panel. ASUS K8N-E Deluxe motherboard 5-13 If the Realtek audio software is correctly installed, you will find the SoundEffect icon on the Line-In, Line-Out, and Mic jacks only...technology features are supported on the taskbar. Refer to the Instant Music function key definitions on the SoundEffect icon to install the Realtek ALC850 Audio Driver and Application from the support CD that came with the motherboard package.
... convenience. 7. Press or once to deliver the ultimate audio experience on your PC. Follow the installation wizard to display the Realtek Audio Control Panel. ASUS K8N-E Deluxe motherboard 5-13 If the Realtek audio software is correctly installed, you will find the SoundEffect icon on the Line-In, Line-Out, and Mic jacks only...technology features are supported on the taskbar. Refer to the Instant Music function key definitions on the SoundEffect icon to install the Realtek ALC850 Audio Driver and Application from the support CD that came with the motherboard package.
K8N-E Deluxe User's Manual
Page 122
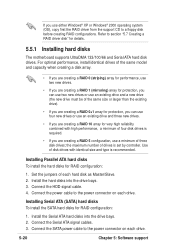
... you can use four new drives or use either Windows® XP or Windows® 2000 operating system (OS), copy first the RAID driver from the support CD to the power connector on each drive. Installing Parallel ATA hard disks To install the hard disks for RAID configuration: ...disks for RAID configuration: 1. Set the jumpers of three disk drives; Connect the power cable to section "5.7 Creating a RAID driver disk" for details. 5.5.1 Installing hard disks The motherboard supports UltraDMA 133/100/66 and Serial ATA hard disk drives. Install the Serial ATA hard disks into the drive bays. ...
... you can use four new drives or use either Windows® XP or Windows® 2000 operating system (OS), copy first the RAID driver from the support CD to the power connector on each drive. Installing Parallel ATA hard disks To install the hard disks for RAID configuration: ...disks for RAID configuration: 1. Set the jumpers of three disk drives; Connect the power cable to section "5.7 Creating a RAID driver disk" for details. 5.5.1 Installing hard disks The motherboard supports UltraDMA 133/100/66 and Serial ATA hard disk drives. Install the Serial ATA hard disks into the drive bays. ...

K8N-E Deluxe User's Manual
Page 125
... the Silicon Image RAID 5 Array Management Utility before using your motherboard support CD. Write-protect the floppy disk to complete process. 5. To create an NVIDIA® RAID driver disk, click Make Chipset IDE Driver Disk item from the Drivers menu. ASUS K8N-E Deluxe motherboard 5-23 Insert a clean floppy disk into the CD-ROM drive. 2. • The SATALink™...
... the Silicon Image RAID 5 Array Management Utility before using your motherboard support CD. Write-protect the floppy disk to complete process. 5. To create an NVIDIA® RAID driver disk, click Make Chipset IDE Driver Disk item from the Drivers menu. ASUS K8N-E Deluxe motherboard 5-23 Insert a clean floppy disk into the CD-ROM drive. 2. • The SATALink™...

K8N-E Deluxe User's Manual
Page 126
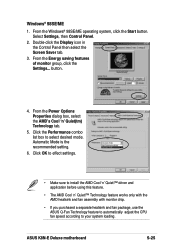
...and set your Power Option Properties depending on your changes and exit BIOS Setup. 5. Chapter 5: Software support 5.7 Cool 'n' Quiet!™ Technology The motherboard supports the AMD Cool 'n' Quiet!™ Technology that dynamically and automatically change the CPU speed, voltage, and amount of power depending on the system and... Cool 'n' Quiet!™ Technology: 1. In the Power menu, select the item ACPI 2.0 Support and set to install the Cool 'n' Quiet!™ driver and application before using this feature. Click OK to effect settings. 5-24 Make sure to Classic View. 3.
...and set your Power Option Properties depending on your changes and exit BIOS Setup. 5. Chapter 5: Software support 5.7 Cool 'n' Quiet!™ Technology The motherboard supports the AMD Cool 'n' Quiet!™ Technology that dynamically and automatically change the CPU speed, voltage, and amount of power depending on the system and... Cool 'n' Quiet!™ Technology: 1. In the Power menu, select the item ACPI 2.0 Support and set to install the Cool 'n' Quiet!™ driver and application before using this feature. Click OK to effect settings. 5-24 Make sure to Classic View. 3.
K8N-E Deluxe User's Manual
Page 127
... select the Screen Saver tab. 3. ASUS K8N-E Deluxe motherboard 5-25 Windows® 98SE/ME 1. button. 4. Automatic Mode is the recommended setting. 6. From the Windows® 98SE/ME operating system, click the Start button. Click OK to effect settings. • Make sure to install the AMD Cool 'n' Quiet!™ driver and application before using this feature...
... select the Screen Saver tab. 3. ASUS K8N-E Deluxe motherboard 5-25 Windows® 98SE/ME 1. button. 4. Automatic Mode is the recommended setting. 6. From the Windows® 98SE/ME operating system, click the Start button. Click OK to effect settings. • Make sure to install the AMD Cool 'n' Quiet!™ driver and application before using this feature...

K8 series Quick Setup Guide
Page 10
...; Make sure that you are connected properly. • Update the motherboard BIOS. If necessary, format your hard disk drive and install an operating system. English Power Up 10 Turn on the power of the possible solutions ... the drive configuration in the BIOS setup. • Check the IDE drive cables, make sure they are corrected properly. • Make sure that the device drivers are installed. • Enter BIOS setup and load default settings. • Make sure that the power cable is inserted properly in the BIOS setup. •...
...; Make sure that you are connected properly. • Update the motherboard BIOS. If necessary, format your hard disk drive and install an operating system. English Power Up 10 Turn on the power of the possible solutions ... the drive configuration in the BIOS setup. • Check the IDE drive cables, make sure they are corrected properly. • Make sure that the device drivers are installed. • Enter BIOS setup and load default settings. • Make sure that the power cable is inserted properly in the BIOS setup. •...

K8N-E Deluxe User Guide
Page 36
... an expansion card After installing the expansion card, configure the card by adjusting the software settings. 1. Remove the system unit cover (if your motherboard is completely seated on the next page. 3. Secure the card to the card. See Chapter 4 for the expansion card. 2-14 Chapter ...2: Hardware information Make sure to the tables on the slot. 5. Align the card connector with screws. 6. Install the software drivers for information on the system and change the necessary BIOS settings, if any. The following sub-sections describe the slots and the expansion ...
... an expansion card After installing the expansion card, configure the card by adjusting the software settings. 1. Remove the system unit cover (if your motherboard is completely seated on the next page. 3. Secure the card to the card. See Chapter 4 for the expansion card. 2-14 Chapter ...2: Hardware information Make sure to the tables on the slot. 5. Align the card connector with screws. 6. Install the software drivers for information on the system and change the necessary BIOS settings, if any. The following sub-sections describe the slots and the expansion ...

K8N-E Deluxe User Guide
Page 37
...15 Printer Port (LPT1) 8 3 System CMOS/Real Time Clock 9* 4 ACPI Mode when used When using PCI cards on shared slots, ensure that the drivers support "Share IRQ" or that the cards do not need IRQ assignments. IRQ assignments for ISA or PCI devices. INT B - shared - - - ...are usually available for this motherboard PCI slot 1 PCI slot 2 PCI slot 3 PCI slot 4 PCI slot 5 PCI 1394 Serial ATA AGP slot INT A shared - - - Otherwise, conflicts will arise between the two PCI groups, making the system unstable and the card inoperable. ASUS K8N-E Deluxe motherboard 2-15 INT C - -...
...15 Printer Port (LPT1) 8 3 System CMOS/Real Time Clock 9* 4 ACPI Mode when used When using PCI cards on shared slots, ensure that the drivers support "Share IRQ" or that the cards do not need IRQ assignments. IRQ assignments for ISA or PCI devices. INT B - shared - - - ...are usually available for this motherboard PCI slot 1 PCI slot 2 PCI slot 3 PCI slot 4 PCI slot 5 PCI 1394 Serial ATA AGP slot INT A shared - - - Otherwise, conflicts will arise between the two PCI groups, making the system unstable and the card inoperable. ASUS K8N-E Deluxe motherboard 2-15 INT C - -...

K8N-E Deluxe User Guide
Page 48
... USB+5V USB_P6USB_P6+ GND NC ® K8V-E K8N-E USB 2.0 Headers USB56 1 USB78 1 USB+5V USB_P7USB_P7+ GND USB+5V USB_P5USB_P5+ GND NEVER connect a 1394 cable to 480 Mbps connection speed. You must install the driver before you can use the USB 2.0 capability. Doing so will damage the motherboard! 2-26 Chapter 2: Hardware information USB headers...
... USB+5V USB_P6USB_P6+ GND NC ® K8V-E K8N-E USB 2.0 Headers USB56 1 USB78 1 USB+5V USB_P7USB_P7+ GND USB+5V USB_P5USB_P5+ GND NEVER connect a 1394 cable to 480 Mbps connection speed. You must install the driver before you can use the USB 2.0 capability. Doing so will damage the motherboard! 2-26 Chapter 2: Hardware information USB headers...

K8N-E Deluxe User Guide
Page 71
...: 1. When the BIOS update process is available in Windows® environment. The Drivers menu appears. 2. The ASUS Update utility is a utility that allows you to download the latest BIOS file. 4.1.6 ASUS Update The ASUS Update is copied into the CD-ROM drive. Select your system. ASUS K8N-E Deluxe motherboard 4-7 The recovered BIOS may cause system boot failure! 4. Visit...
...: 1. When the BIOS update process is available in Windows® environment. The Drivers menu appears. 2. The ASUS Update utility is a utility that allows you to download the latest BIOS file. 4.1.6 ASUS Update The ASUS Update is copied into the CD-ROM drive. Select your system. ASUS K8N-E Deluxe motherboard 4-7 The recovered BIOS may cause system boot failure! 4. Visit...

K8N-E Deluxe User Guide
Page 83
... TO CAS Delay [Auto] Sets the DRAM RAS TO CAS Delay. Configuration options: [Auto] [2 CLK] [3 CLK] [4 CLK] [5 CLK] [6 CLK] ASUS K8N-E Deluxe motherboard 4-19 Memclock Mode [ Auto] Allows you can set by BIOS. Device driver developers may enable it for normal operation. Configuration options: [Auto] [Manual] MemClock Value [200 MHz] Sets the Memory clock value...
... TO CAS Delay [Auto] Sets the DRAM RAS TO CAS Delay. Configuration options: [Auto] [2 CLK] [3 CLK] [4 CLK] [5 CLK] [6 CLK] ASUS K8N-E Deluxe motherboard 4-19 Memclock Mode [ Auto] Allows you can set by BIOS. Device driver developers may enable it for normal operation. Configuration options: [Auto] [Manual] MemClock Value [200 MHz] Sets the Memory clock value...

K8N-E Deluxe User Guide
Page 102
Chapter summary 5.1 Installing an operating system 5-1 5.2 Support CD information 5-1 5.3 Software Information 5-9 5.4 Audio configurations 5-13 5.5 RAID configurations 5-19 5.6 Creating a RAID driver disk 5-23 5.7 Cool 'n' Quiet!™ Technology 5-24 ASUS K8N-E Deluxe motherboard
Chapter summary 5.1 Installing an operating system 5-1 5.2 Support CD information 5-1 5.3 Software Information 5-9 5.4 Audio configurations 5-13 5.5 RAID configurations 5-19 5.6 Creating a RAID driver disk 5-23 5.7 Cool 'n' Quiet!™ Technology 5-24 ASUS K8N-E Deluxe motherboard


