K8N-E Deluxe User's Manual
Page 5
... Drives 4-32 4.6.3 Boot Settings Configuration 4-32 4.6.4 Security 4-33 4.7 Exit menu 4-36 Chapter 5: Software support 5.1 Installing an operating system 5-1 5.2 Support CD information 5-1 5.2.1 Running the support CD 5-1 5.2.2 Drivers menu 5-2 5.2.3 Utilities menu 5-3 5.2.4 Manuals menu 5-5 5.2.5 ASUS Contact information 5-6 5.2.6 Other information 5-6 5.3 Software Information 5-9 5.3.1 ASUS MyLogo2 5-9 5.3.2 ASUS Instant Music 5-11 v
... Drives 4-32 4.6.3 Boot Settings Configuration 4-32 4.6.4 Security 4-33 4.7 Exit menu 4-36 Chapter 5: Software support 5.1 Installing an operating system 5-1 5.2 Support CD information 5-1 5.2.1 Running the support CD 5-1 5.2.2 Drivers menu 5-2 5.2.3 Utilities menu 5-3 5.2.4 Manuals menu 5-5 5.2.5 ASUS Contact information 5-6 5.2.6 Other information 5-6 5.3 Software Information 5-9 5.3.1 ASUS MyLogo2 5-9 5.3.2 ASUS Instant Music 5-11 v
K8N-E Deluxe User's Manual
Page 12
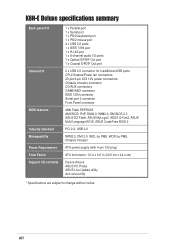
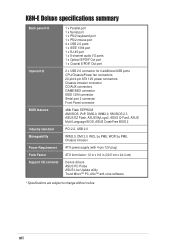
xii K8N-E Deluxe specifications summary Back panel I/O Internal I/O BIOS features Industry standard Manageability Power Requirement Form Factor Support CD contents 1 x Parallel port 1 x Serial port 1 x PS/2 keyboard port 1 x PS/2 ..., DMI2.0, WfM2.0, SM BIOS 2.3 ASUS EZ Flash, ASUS MyLogo2, ASUS Q-Fan2, ASUS Multi-Language BIOS, ASUS CrashFree BIOS 2 PCI 2.2, USB 2.0 WfM2.0, DMI 2.0, WOL by PME, WOR by PME, Chassis intrusion ATX power supply (with 4-pin 12V plug) ATX form factor: 12 in x 9.6 in (30.5 cm x 24.4 cm) Device drivers ASUS PC Probe ASUS Live Update utility Anti-virus...
xii K8N-E Deluxe specifications summary Back panel I/O Internal I/O BIOS features Industry standard Manageability Power Requirement Form Factor Support CD contents 1 x Parallel port 1 x Serial port 1 x PS/2 keyboard port 1 x PS/2 ..., DMI2.0, WfM2.0, SM BIOS 2.3 ASUS EZ Flash, ASUS MyLogo2, ASUS Q-Fan2, ASUS Multi-Language BIOS, ASUS CrashFree BIOS 2 PCI 2.2, USB 2.0 WfM2.0, DMI 2.0, WOL by PME, WOR by PME, Chassis intrusion ATX power supply (with 4-pin 12V plug) ATX form factor: 12 in x 9.6 in (30.5 cm x 24.4 cm) Device drivers ASUS PC Probe ASUS Live Update utility Anti-virus...

K8N-E Deluxe User's Manual
Page 36
... cards that you intend to install expansion cards. Remove the system unit cover (if your motherboard is completely seated on BIOS setup. 2. Install the software drivers for later use . Assign an IRQ to unplug the power cord before adding or removing expansion cards. Turn on the next page. 3. Refer to the...
... cards that you intend to install expansion cards. Remove the system unit cover (if your motherboard is completely seated on BIOS setup. 2. Install the software drivers for later use . Assign an IRQ to unplug the power cord before adding or removing expansion cards. Turn on the next page. 3. Refer to the...
K8N-E Deluxe User's Manual
Page 37
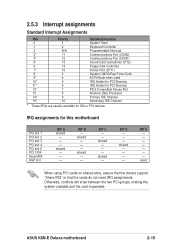
shared - INT D - - - Otherwise, conflicts will arise between the two PCI groups, making the system unstable and the card inoperable. shared - - - INT B - ASUS K8N-E Deluxe motherboard 2-15 shared - - - shared - - - shared - - - - INT C - - shared - - INT E used 10* 5 IRQ Holder for PCI Steering 11* 6 IRQ Holder for PCI ...) 8 3 System CMOS/Real Time Clock 9* 4 ACPI Mode when used When using PCI cards on shared slots, ensure that the drivers support "Share IRQ" or that the cards do not need IRQ assignments. IRQ assignments for ISA or PCI devices.
shared - INT D - - - Otherwise, conflicts will arise between the two PCI groups, making the system unstable and the card inoperable. shared - - - INT B - ASUS K8N-E Deluxe motherboard 2-15 shared - - - shared - - - shared - - - - INT C - - shared - - INT E used 10* 5 IRQ Holder for PCI Steering 11* 6 IRQ Holder for PCI ...) 8 3 System CMOS/Real Time Clock 9* 4 ACPI Mode when used When using PCI cards on shared slots, ensure that the drivers support "Share IRQ" or that the cards do not need IRQ assignments. IRQ assignments for ISA or PCI devices.
K8N-E Deluxe User's Manual
Page 48
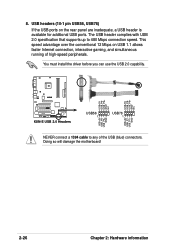
You must install the driver before you can use the USB 2.0 capability. This speed advantage over the conventional 12 Mbps on the rear panel are inadequate, a USB header is available ... faster Internet connection, interactive gaming, and simultaneous running of the USB (blue) connectors. USB+5V USB_P8USB_P8+ GND NC USB+5V USB_P6USB_P6+ GND NC ® K8V-E K8N-E USB 2.0 Headers USB56 1 USB78 1 USB+5V USB_P7USB_P7+ GND USB+5V USB_P5USB_P5+ GND NEVER connect a 1394 cable to 480 Mbps connection speed. The USB header complies...
You must install the driver before you can use the USB 2.0 capability. This speed advantage over the conventional 12 Mbps on the rear panel are inadequate, a USB header is available ... faster Internet connection, interactive gaming, and simultaneous running of the USB (blue) connectors. USB+5V USB_P8USB_P8+ GND NC USB+5V USB_P6USB_P6+ GND NC ® K8V-E K8N-E USB 2.0 Headers USB56 1 USB78 1 USB+5V USB_P7USB_P7+ GND USB+5V USB_P5USB_P5+ GND NEVER connect a 1394 cable to 480 Mbps connection speed. The USB header complies...
K8N-E Deluxe User's Manual
Page 71
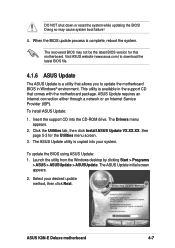
...utility is copied into the CD-ROM drive. To install ASUS Update: 1. Select your system. The ASUS Update utility is available in Windows® environment. ASUS K8N-E Deluxe motherboard 4-7 See page 5-3 for this motherboard. The ASUS Update initial screen appears. 2. DO NOT shut down or ...the Windows desktop by clicking Start > Programs > ASUS > ASUSUpdate > ASUSUpdate. Insert the support CD into your desired update method, then click Next. The Drivers menu appears. 2. Click the Utilities tab, then click Install ASUS Update VX.XX.XX. The recovered BIOS may cause...
...utility is copied into the CD-ROM drive. To install ASUS Update: 1. Select your system. The ASUS Update utility is available in Windows® environment. ASUS K8N-E Deluxe motherboard 4-7 See page 5-3 for this motherboard. The ASUS Update initial screen appears. 2. DO NOT shut down or ...the Windows desktop by clicking Start > Programs > ASUS > ASUSUpdate > ASUSUpdate. Insert the support CD into your desired update method, then click Next. The Drivers menu appears. 2. Click the Utilities tab, then click Install ASUS Update VX.XX.XX. The recovered BIOS may cause...
K8N-E Deluxe User's Manual
Page 83
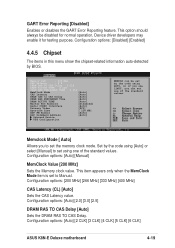
Device driver developers may enable it for normal operation. Memory CLK : 200 MHz CAS Latency : 2.5 DRAM RAS TO CAS Delay : 3 CLK DRAM ACTIVE TIME : 8 CLK DRAM RAS ... of the standard values. Configuration options: [Auto] [Manual] MemClock Value [200 MHz] Sets the Memory clock value. Configuration options: [Auto] [2 CLK] [3 CLK] [4 CLK] [5 CLK] [6 CLK] ASUS K8N-E Deluxe motherboard 4-19 Configuration options: [Disabled] [Enabled] 4.4.5 Chipset The items in this menu show the chipset-related information auto-detected by the code using [Auto] or...
Device driver developers may enable it for normal operation. Memory CLK : 200 MHz CAS Latency : 2.5 DRAM RAS TO CAS Delay : 3 CLK DRAM ACTIVE TIME : 8 CLK DRAM RAS ... of the standard values. Configuration options: [Auto] [Manual] MemClock Value [200 MHz] Sets the Memory clock value. Configuration options: [Auto] [2 CLK] [3 CLK] [4 CLK] [5 CLK] [6 CLK] ASUS K8N-E Deluxe motherboard 4-19 Configuration options: [Disabled] [Enabled] 4.4.5 Chipset The items in this menu show the chipset-related information auto-detected by the code using [Auto] or...

K8N-E Deluxe User's Manual
Page 102
Chapter summary 5.1 Installing an operating system 5-1 5.2 Support CD information 5-1 5.3 Software Information 5-9 5.4 Audio configurations 5-13 5.5 RAID configurations 5-19 5.6 Creating a RAID driver disk 5-23 5.7 Cool 'n' Quiet!™ Technology 5-24 ASUS K8N-E Deluxe motherboard
Chapter summary 5.1 Installing an operating system 5-1 5.2 Support CD information 5-1 5.3 Software Information 5-9 5.4 Audio configurations 5-13 5.5 RAID configurations 5-19 5.6 Creating a RAID driver disk 5-23 5.7 Cool 'n' Quiet!™ Technology 5-24 ASUS K8N-E Deluxe motherboard
K8N-E Deluxe User's Manual
Page 103
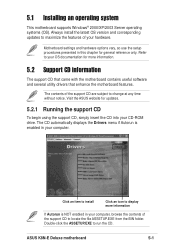
...to display more information. 5.2 Support CD information The support CD that came with the motherboard contains useful software and several utility drivers that enhance the motherboard features. Always install the latest OS version and corresponding updates to maximize the features of your computer....XP/2003 Server operating systems (OS). Motherboard settings and hardware options vary, so use the setup procedures presented in your hardware. ASUS K8N-E Deluxe motherboard 5-1 The contents of the support CD to change at any time without notice. Click an item to install Click an icon...
...to display more information. 5.2 Support CD information The support CD that came with the motherboard contains useful software and several utility drivers that enhance the motherboard features. Always install the latest OS version and corresponding updates to maximize the features of your computer....XP/2003 Server operating systems (OS). Motherboard settings and hardware options vary, so use the setup procedures presented in your hardware. ASUS K8N-E Deluxe motherboard 5-1 The contents of the support CD to change at any time without notice. Click an item to install Click an icon...

K8N-E Deluxe User's Manual
Page 104
... AMD Cool 'n' Quiet!™ Technology driver. 5-2 Chapter 5: Software support Install the necessary drivers to install the Microsoft® DirectX™ 9.0 driver before installing the NVIDIA® Chipset drivers. Nvidia Chipset Driver Program Installs the NVIDIA® Chipset drivers for Serial ATA and RAID features. 5.2.2 Drivers menu The drivers menu shows the available device drivers if the system detects installed...
... AMD Cool 'n' Quiet!™ Technology driver. 5-2 Chapter 5: Software support Install the necessary drivers to install the Microsoft® DirectX™ 9.0 driver before installing the NVIDIA® Chipset drivers. Nvidia Chipset Driver Program Installs the NVIDIA® Chipset drivers for Serial ATA and RAID features. 5.2.2 Drivers menu The drivers menu shows the available device drivers if the system detects installed...
K8N-E Deluxe User's Manual
Page 105
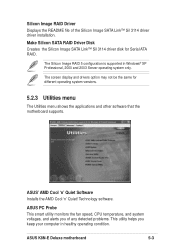
... and other software that the motherboard supports. The Silicon Image RAID 5 configuration is supported in healthy operating condition. ASUS' AMD Cool 'n' Quiet Software Installs the AMD Cool 'n' Quiet! ASUS K8N-E Deluxe motherboard 5-3 Silicon Image RAID Driver Displays the README file of any detected problems. This utility helps you of the Silicon Image SATA Link™...
... and other software that the motherboard supports. The Silicon Image RAID 5 configuration is supported in healthy operating condition. ASUS' AMD Cool 'n' Quiet Software Installs the AMD Cool 'n' Quiet! ASUS K8N-E Deluxe motherboard 5-3 Silicon Image RAID Driver Displays the README file of any detected problems. This utility helps you of the Silicon Image SATA Link™...

K8N-E Deluxe User's Manual
Page 115
The software provides Jack-Sensing function (Line-In, Line-Out, Mic-In), S/PDIF out support and interrupt capability. ASUS K8N-E Deluxe motherboard 5-13 Realtek SoundEffect icon From the taskbar, double-click on the SoundEffect icon to select other tracks or control the volume.... the CD. 5.4 Audio configurations The Realtek® ALC850 AC '97 audio CODEC provides 8-channel audio capability to install the Realtek ALC850 Audio Driver and Application from the support CD that came with the motherboard package. The ALC850 also includes the Realtek® proprietary UAJ® (Universal...
The software provides Jack-Sensing function (Line-In, Line-Out, Mic-In), S/PDIF out support and interrupt capability. ASUS K8N-E Deluxe motherboard 5-13 Realtek SoundEffect icon From the taskbar, double-click on the SoundEffect icon to select other tracks or control the volume.... the CD. 5.4 Audio configurations The Realtek® ALC850 AC '97 audio CODEC provides 8-channel audio capability to install the Realtek ALC850 Audio Driver and Application from the support CD that came with the motherboard package. The ALC850 also includes the Realtek® proprietary UAJ® (Universal...
K8N-E Deluxe User's Manual
Page 122
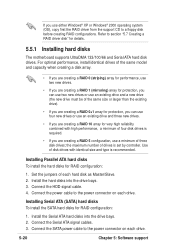
... three disk drives; Install the Serial ATA hard disks into the drive bays. 3. Connect the SATA power cable to section "5.7 Creating a RAID driver disk" for RAID configuration: 1. Install the hard disks into the drive bays. 2. Connect the Serial ATA signal cables. 3. Use of disk drives ...array for RAID configuration: 1. If you use either Windows® XP or Windows® 2000 operating system (OS), copy first the RAID driver from the support CD to the power connector on each hard disk as Master/Slave. 2. For optimal performance, install identical drives of the same...
... three disk drives; Install the Serial ATA hard disks into the drive bays. 3. Connect the SATA power cable to section "5.7 Creating a RAID driver disk" for RAID configuration: 1. Install the hard disks into the drive bays. 2. Connect the Serial ATA signal cables. 3. Use of disk drives ...array for RAID configuration: 1. If you use either Windows® XP or Windows® 2000 operating system (OS), copy first the RAID driver from the support CD to the power connector on each hard disk as Master/Slave. 2. For optimal performance, install identical drives of the same...

K8N-E Deluxe User's Manual
Page 125
... disk drive. 3. To create an NVIDIA® RAID driver disk, click Make Chipset IDE Driver Disk item from the Drivers menu. To create a RAID driver disk: 1. Follow succeeding screen information to section "5.2.2 Drivers menu" for details. 4. ASUS K8N-E Deluxe motherboard 5-23 Refer to complete process. 5. To install the RAID driver: 1. You can be set using the SATALink™ SATA...
... disk drive. 3. To create an NVIDIA® RAID driver disk, click Make Chipset IDE Driver Disk item from the Drivers menu. To create a RAID driver disk: 1. Follow succeeding screen information to section "5.2.2 Drivers menu" for details. 4. ASUS K8N-E Deluxe motherboard 5-23 Refer to complete process. 5. To install the RAID driver: 1. You can be set using the SATALink™ SATA...

K8N-E Deluxe User's Manual
Page 126
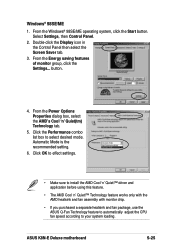
... effect settings. 5-24 Make sure to Classic View. 3. In the Power menu, select the item ACPI 2.0 Support and set to install the Cool 'n' Quiet!™ driver and application before using this feature. button. From the Power schemes combo list box, select Minimal Power Management. 6. Chapter 5: Software support 5.7 Cool 'n' Quiet!™ Technology...
... effect settings. 5-24 Make sure to Classic View. 3. In the Power menu, select the item ACPI 2.0 Support and set to install the Cool 'n' Quiet!™ driver and application before using this feature. button. From the Power schemes combo list box, select Minimal Power Management. 6. Chapter 5: Software support 5.7 Cool 'n' Quiet!™ Technology...
K8N-E Deluxe User's Manual
Page 127
... Panel then select the Screen Saver tab. 3. Click the Performance combo list box to your system loading. ASUS K8N-E Deluxe motherboard 5-25 Click OK to effect settings. • Make sure to install the AMD Cool 'n' Quiet!™ driver and application before using this feature. • The AMD Cool 'n' Quiet!™ Technology feature works only...
... Panel then select the Screen Saver tab. 3. Click the Performance combo list box to your system loading. ASUS K8N-E Deluxe motherboard 5-25 Click OK to effect settings. • Make sure to install the AMD Cool 'n' Quiet!™ driver and application before using this feature. • The AMD Cool 'n' Quiet!™ Technology feature works only...

K8 series Quick Setup Guide
Page 10
... the drive configuration in its expansion slot. • Check the memory modules and make sure they are corrected properly. • Make sure that the device drivers are installed. • Enter BIOS setup and load default settings. • Make sure that the power cable is inserted properly in the BIOS setup. •...
... the drive configuration in its expansion slot. • Check the memory modules and make sure they are corrected properly. • Make sure that the device drivers are installed. • Enter BIOS setup and load default settings. • Make sure that the power cable is inserted properly in the BIOS setup. •...

K8N-E Deluxe User Guide
Page 5
... Drives 4-32 4.6.3 Boot Settings Configuration 4-32 4.6.4 Security 4-33 4.7 Exit menu 4-36 Chapter 5: Software support 5.1 Installing an operating system 5-1 5.2 Support CD information 5-1 5.2.1 Running the support CD 5-1 5.2.2 Drivers menu 5-2 5.2.3 Utilities menu 5-3 5.2.4 Manuals menu 5-5 5.2.5 ASUS Contact information 5-6 5.2.6 Other information 5-6 5.3 Software Information 5-9 5.3.1 ASUS MyLogo2 5-9 5.3.2 ASUS Instant Music 5-11 v
... Drives 4-32 4.6.3 Boot Settings Configuration 4-32 4.6.4 Security 4-33 4.7 Exit menu 4-36 Chapter 5: Software support 5.1 Installing an operating system 5-1 5.2 Support CD information 5-1 5.2.1 Running the support CD 5-1 5.2.2 Drivers menu 5-2 5.2.3 Utilities menu 5-3 5.2.4 Manuals menu 5-5 5.2.5 ASUS Contact information 5-6 5.2.6 Other information 5-6 5.3 Software Information 5-9 5.3.1 ASUS MyLogo2 5-9 5.3.2 ASUS Instant Music 5-11 v
K8N-E Deluxe User Guide
Page 12
xii K8N-E Deluxe specifications summary Back panel I/O Internal I/O BIOS features Industry standard Manageability Power Requirement Form Factor Support CD contents 1 x Parallel port 1 x Serial port 1 x PS/2 keyboard port 1 x PS/2 ... by PME, WOR by PME, Chassis intrusion ATX power supply (with 4-pin 12V plug) ATX form factor: 12 in x 9.6 in (30.5 cm x 24.4 cm) Device drivers ASUS PC Probe ASUS Live Update utility Trend Micro™ PC-cillin™ anti-virus software * Specifications are subject to change without notice.
xii K8N-E Deluxe specifications summary Back panel I/O Internal I/O BIOS features Industry standard Manageability Power Requirement Form Factor Support CD contents 1 x Parallel port 1 x Serial port 1 x PS/2 keyboard port 1 x PS/2 ... by PME, WOR by PME, Chassis intrusion ATX power supply (with 4-pin 12V plug) ATX form factor: 12 in x 9.6 in (30.5 cm x 24.4 cm) Device drivers ASUS PC Probe ASUS Live Update utility Trend Micro™ PC-cillin™ anti-virus software * Specifications are subject to change without notice.

K8N-E Deluxe User Guide
Page 36
... and make the necessary hardware settings for information on the slot. 5. Keep the screw for the expansion card. 2-14 Chapter 2: Hardware information Install the software drivers for later use . Remove the system unit cover (if your motherboard is completely seated on BIOS setup. 2. Turn on the next page. 3. 2.5 Expansion slots In...
... and make the necessary hardware settings for information on the slot. 5. Keep the screw for the expansion card. 2-14 Chapter 2: Hardware information Install the software drivers for later use . Remove the system unit cover (if your motherboard is completely seated on BIOS setup. 2. Turn on the next page. 3. 2.5 Expansion slots In...


