
User's Manual for English Edition
Page 33
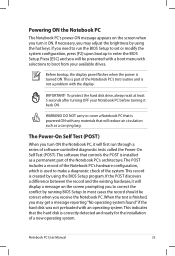
Powering ON the Notebook PC The Notebook PC's power-ON message appears on the screen prompting you to make a diagnostic check of a new operating system. If you need to run through a series of software-controlled diagnostic tests called the Power-... 33 If necessary, you receive the Notebook PC. Press [ESC] and you turn it back ON. WARNING! This indicates that will display a message on the screen when you may adjust the brightness by using the BIOS Setup program. To protect the hard disk drive, always wait at least 5 seconds after turning...
Powering ON the Notebook PC The Notebook PC's power-ON message appears on the screen prompting you to make a diagnostic check of a new operating system. If you need to run through a series of software-controlled diagnostic tests called the Power-... 33 If necessary, you receive the Notebook PC. Press [ESC] and you turn it back ON. WARNING! This indicates that will display a message on the screen when you may adjust the brightness by using the BIOS Setup program. To protect the hard disk drive, always wait at least 5 seconds after turning...
User's Manual for English Edition
Page 35
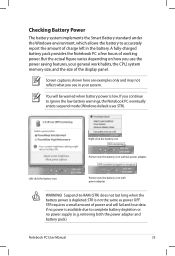
... be warned when battery power is low. Notebook PC User Manual 35 A fully-charged battery pack provides the Notebook PC a few hours of working power. Screen captures shown here are examples only and may not reflect what you see in the battery. removing both the power adapter and battery pack). If...
... be warned when battery power is low. Notebook PC User Manual 35 A fully-charged battery pack provides the Notebook PC a few hours of working power. Screen captures shown here are examples only and may not reflect what you see in the battery. removing both the power adapter and battery pack). If...
User's Manual for English Edition
Page 42
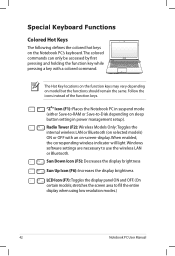
Follow the icons instead of the function keys. stretches the screen area to use the wireless LAN or Bluetooth. The Hot Key locations on the function keys may vary depending on sleep button setting in suspend ... key while pressing a key with an on the Notebook PC's keyboard. Special Keyboard Functions Colored Hot Keys The following defines the colored hot keys on -screen-display.
Follow the icons instead of the function keys. stretches the screen area to use the wireless LAN or Bluetooth. The Hot Key locations on the function keys may vary depending on sleep button setting in suspend ... key while pressing a key with an on the Notebook PC's keyboard. Special Keyboard Functions Colored Hot Keys The following defines the colored hot keys on -screen-display.
User's Manual for English Edition
Page 44
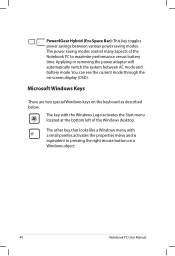
Microsoft Windows Keys There are two special Windows keys on -screen display (OSD). The key with a small pointer, activates the properties menu and is equivalent to maximize performance versus battery time. The other key, that looks ...
Microsoft Windows Keys There are two special Windows keys on -screen display (OSD). The key with a small pointer, activates the properties menu and is equivalent to maximize performance versus battery time. The other key, that looks ...
User's Manual for English Edition
Page 80
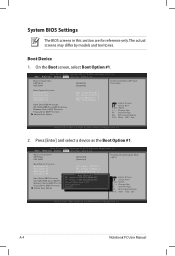
...01.1208. F1: General Help F9: Optimized Defaults F10: Save ESC: Exit Version 2.01.1208. System BIOS Settings The BIOS screens in this section are for reference only. Copyright (C) 2010 American Megatrends, Inc. Copyright (C) 2010 American Megatrends, Inc. �...Priorities Floppy Drive BBS Priorities Delete Boot Option [P0: Hitachi HTS545...] [P1: Hitachi HTS545...] [Generic-Multi-Card......] [P0: SlimTypeDVD A....] : Select Screen : Select Item Enter: Select +/-: Change Opt. Boot Option Priorities Boot Option #1 [P0: Hitachi HTS545...] Boot Option #2 [P1: Hitachi HTS545...
...01.1208. F1: General Help F9: Optimized Defaults F10: Save ESC: Exit Version 2.01.1208. System BIOS Settings The BIOS screens in this section are for reference only. Copyright (C) 2010 American Megatrends, Inc. Copyright (C) 2010 American Megatrends, Inc. �...Priorities Floppy Drive BBS Priorities Delete Boot Option [P0: Hitachi HTS545...] [P1: Hitachi HTS545...] [Generic-Multi-Card......] [P0: SlimTypeDVD A....] : Select Screen : Select Item Enter: Select +/-: Change Opt. Boot Option Priorities Boot Option #1 [P0: Hitachi HTS545...] Boot Option #2 [P1: Hitachi HTS545...
User's Manual for English Edition
Page 81
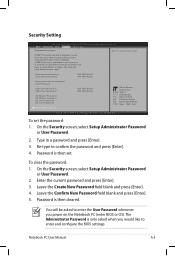
...65533;��B�o��o�t Security Save & Exit Password Description Set the system boot order. On the Security screen, select Setup Administrator Password or User Password. 2. Leave the Confirm New Password field blank and press [Enter]. 5. Password... set the password: 1. Leave the Create New Password field blank and press [Enter]. 4. Notebook PC User Manual A-5 On the Security screen, select Setup Administrator Password or User Password. 2. Copyright (C) 2010 American Megatrends, Inc. �M�a��in a password and press...
...65533;��B�o��o�t Security Save & Exit Password Description Set the system boot order. On the Security screen, select Setup Administrator Password or User Password. 2. Leave the Confirm New Password field blank and press [Enter]. 5. Password... set the password: 1. Leave the Create New Password field blank and press [Enter]. 4. Notebook PC User Manual A-5 On the Security screen, select Setup Administrator Password or User Password. 2. Copyright (C) 2010 American Megatrends, Inc. �M�a��in a password and press...
User's Manual for English Edition
Page 82
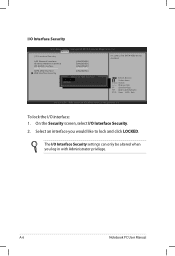
...like to lock and click LOCKED. Copyright (C) 2010 American Megatrends, Inc. � � � Security I /O Interface Security settings can only be disabled. : Select Screen : Select Item Enter: Select +/-: Change Opt. F1: General Help F9: Optimized Defaults F10: Save ESC: Exit Version 2.01.1208. To lock the I /O Interface Security... 2. A-6 Notebook PC User Manual Copyright (C) 2010 American Megatrends, Inc. Select an interface you log in with Administrator privilege. On the Security screen, select I /O interface: 1. I/O Interface Security Aptio Setup Utility -
...like to lock and click LOCKED. Copyright (C) 2010 American Megatrends, Inc. � � � Security I /O Interface Security settings can only be disabled. : Select Screen : Select Item Enter: Select +/-: Change Opt. F1: General Help F9: Optimized Defaults F10: Save ESC: Exit Version 2.01.1208. To lock the I /O Interface Security... 2. A-6 Notebook PC User Manual Copyright (C) 2010 American Megatrends, Inc. Select an interface you log in with Administrator privilege. On the Security screen, select I /O interface: 1. I/O Interface Security Aptio Setup Utility -
User's Manual for English Edition
Page 83
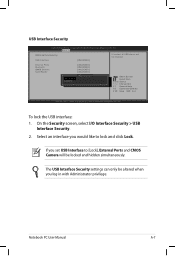
...when you would like to [Lock], External Ports and CMOS Camera will be locked and hidden simultaneously. On the Security screen, select I/O Interface Security > USB Interface Security. 2. External Ports Bluetooth CMOS Camera Card Reader UNLOCKED LOCKED [UNLOCKED] [UNLOCKED] [UNLOCKED]... [UNLOCKED] USB Interface : Select Screen : Select Item Enter: Select +/-: Change Opt. Notebook PC User Manual A-7 F1: General Help F9: Optimized Defaults F10: Save ESC:...
...when you would like to [Lock], External Ports and CMOS Camera will be locked and hidden simultaneously. On the Security screen, select I/O Interface Security > USB Interface Security. 2. External Ports Bluetooth CMOS Camera Card Reader UNLOCKED LOCKED [UNLOCKED] [UNLOCKED] [UNLOCKED]... [UNLOCKED] USB Interface : Select Screen : Select Item Enter: Select +/-: Change Opt. Notebook PC User Manual A-7 F1: General Help F9: Optimized Defaults F10: Save ESC:...
User's Manual for English Edition
Page 84
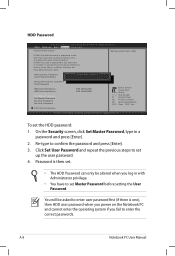
...is then set up the user password. 4. Copyright (C) 2010 American Megatrends, Inc. A-8 Notebook PC User Manual On the Security screen, click Set Master Password, type in ����A�d��v�a�n�c�e�d���&#...Set Master Password Set Master Password Set User Password Set User Password I/O Interface Security NOT INSTALLED NOT INSTALLED : Select Screen : Select Item Enter: Select +/-: Change Opt. Copyright (C) 2010 American Megatrends, Inc. �M�a��in a password and press [...
...is then set up the user password. 4. Copyright (C) 2010 American Megatrends, Inc. A-8 Notebook PC User Manual On the Security screen, click Set Master Password, type in ����A�d��v�a�n�c�e�d���&#...Set Master Password Set Master Password Set User Password Set User Password I/O Interface Security NOT INSTALLED NOT INSTALLED : Select Screen : Select Item Enter: Select +/-: Change Opt. Copyright (C) 2010 American Megatrends, Inc. �M�a��in a password and press [...
User's Manual for English Edition
Page 85
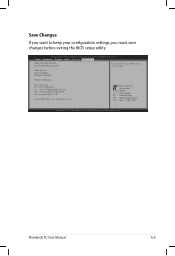
... Restore Defaults Boot Override P0: ST9500420AS P1: HL-DT-STBDDVDRW CA21N P2: SlimTypeDVD A DS8A5SH Generic-Multi-Card 1.00 Launch EFI Shell from filesystem device : Select Screen : Select Item Enter: Select +/-: Change Opt. Save Changes If you want to keep your configuration settings, you must save changes before exiting the BIOS setup...
... Restore Defaults Boot Override P0: ST9500420AS P1: HL-DT-STBDDVDRW CA21N P2: SlimTypeDVD A DS8A5SH Generic-Multi-Card 1.00 Launch EFI Shell from filesystem device : Select Screen : Select Item Enter: Select +/-: Change Opt. Save Changes If you want to keep your configuration settings, you must save changes before exiting the BIOS setup...
User's Manual for English Edition
Page 89
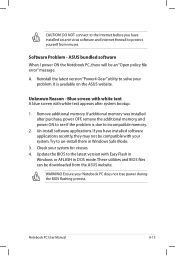
... anti-virus software and Internet firewall to un-install them in DOS mode. ASUS bundled software When I power ON the Notebook PC, there will be compatible with your problem. A. Blue screen with white text A blue screen with Easy Flash in Windows or AFLASH in Windows Safe Mode. 3. Remove ...with white text appears after purchase, power OFF, remove the additional memory, and power ON to see if the problem is available on the ASUS website. Unknown Reason - Check your Notebook PC does not lose power during the BIOS flashing process. Ensure your system for viruses. 4. ...
... anti-virus software and Internet firewall to un-install them in DOS mode. ASUS bundled software When I power ON the Notebook PC, there will be compatible with your problem. A. Blue screen with white text A blue screen with Easy Flash in Windows or AFLASH in Windows Safe Mode. 3. Remove ...with white text appears after purchase, power OFF, remove the additional memory, and power ON to see if the problem is available on the ASUS website. Unknown Reason - Check your Notebook PC does not lose power during the BIOS flashing process. Ensure your system for viruses. 4. ...
User's Manual for English Edition
Page 91
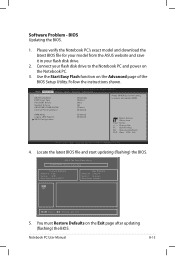
SVM Mode Legacy USB Support SATA Configuration [Enabled] [Enabled] : Select Screen : Select Item Enter: Select +/-: Change Opt. ASUS Tek. Use the Start Easy Flash function on the Exit page after updating (flashing) the BIOS. Notebook PC User Manual A-15 Please verify the ...Notebook PC's exact model and download the latest BIOS file for your model from the ASUS website and save it in your flash disk drive to select and update BIOS. Aptio Setup Utility - Easy Flash Utility FLASH TYPE: Generic Flash Type...
SVM Mode Legacy USB Support SATA Configuration [Enabled] [Enabled] : Select Screen : Select Item Enter: Select +/-: Change Opt. ASUS Tek. Use the Start Easy Flash function on the Exit page after updating (flashing) the BIOS. Notebook PC User Manual A-15 Please verify the ...Notebook PC's exact model and download the latest BIOS file for your model from the ASUS website and save it in your flash disk drive to select and update BIOS. Aptio Setup Utility - Easy Flash Utility FLASH TYPE: Generic Flash Type...
User's Manual for English Edition
Page 108
... current ratings up to 6A and weighing more than 3Kg must use approved power cords greater than or equal to the earth at http://csr.asus.com/english/REACH.htm. REACH Complying with ANSI/NFPA 70, the National Electrical Code (NEC), in our products at...
... current ratings up to 6A and weighing more than 3Kg must use approved power cords greater than or equal to the earth at http://csr.asus.com/english/REACH.htm. REACH Complying with ANSI/NFPA 70, the National Electrical Code (NEC), in our products at...


