User Manual
Page 32
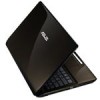
If you press [Tab] during the splash screen, standard boot information such as a permanent part of the Notebook PC's architecture.The POST includes a record of the Notebook ...will reduce air circulation such as a carrying bag. Powering ON the Notebook PC The Notebook PC's power-ON message appears on the screen prompting you turn it will first run the BIOS Setup to set or modify the system configuration, press [F2] upon bootup to .... This record is finished, you receive the Notebook PC. Press [ESC] and you will display a message on the screen when you turn ON the Notebook PC, it ON.
If you press [Tab] during the splash screen, standard boot information such as a permanent part of the Notebook PC's architecture.The POST includes a record of the Notebook ...will reduce air circulation such as a carrying bag. Powering ON the Notebook PC The Notebook PC's power-ON message appears on the screen prompting you turn it will first run the BIOS Setup to set or modify the system configuration, press [F2] upon bootup to .... This record is finished, you receive the Notebook PC. Press [ESC] and you will display a message on the screen when you turn ON the Notebook PC, it ON.
User Manual
Page 34
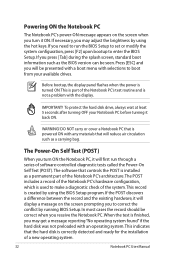
... habits, the CPU, system memory size, and the size of working power. removing both the power adapter and battery pack). 34 Notebook PC User Manual Screen captures shown here are examples only and may not reflect what you see in the battery. Left-click the battery icon Pointer over the battery...
... habits, the CPU, system memory size, and the size of working power. removing both the power adapter and battery pack). 34 Notebook PC User Manual Screen captures shown here are examples only and may not reflect what you see in the battery. Left-click the battery icon Pointer over the battery...
User Manual
Page 40
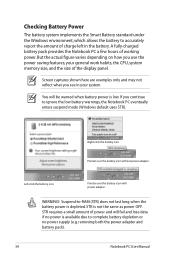
... Sun Up Icon (F6): Increases the display brightness LCD Icon (F7): Toggles the display panel ON and OFF. (On certain models; stretches the screen area to use the wireless LAN or Bluetooth. Windows software settings are necessary to fill the entire display when using low resolution modes.) 40 Notebook... or Bluetooth (on selected models) ON or OFF with a colored command. The Hot Key locations on the function keys may vary depending on -screen-display. The colored commands can only be accessed by first pressing and holding the function key while pressing a key with an on model but the...
... Sun Up Icon (F6): Increases the display brightness LCD Icon (F7): Toggles the display panel ON and OFF. (On certain models; stretches the screen area to use the wireless LAN or Bluetooth. Windows software settings are necessary to fill the entire display when using low resolution modes.) 40 Notebook... or Bluetooth (on selected models) ON or OFF with a colored command. The Hot Key locations on the function keys may vary depending on -screen-display. The colored commands can only be accessed by first pressing and holding the function key while pressing a key with an on model but the...
User Manual
Page 42
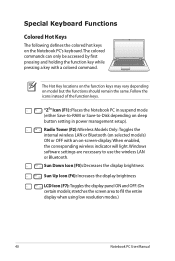
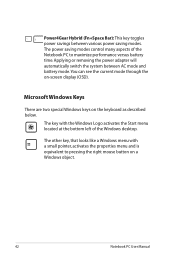
Microsoft Windows Keys There are two special Windows keys on -screen display (OSD). The other key, that looks like a Windows menu with the Windows Logo activates the Start menu located at the bottom left of the ...
Microsoft Windows Keys There are two special Windows keys on -screen display (OSD). The other key, that looks like a Windows menu with the Windows Logo activates the Start menu located at the bottom left of the ...
User Manual
Page 74
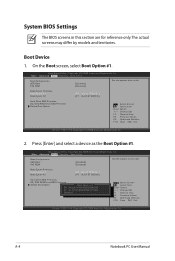
...Setup Utility - F1: General Help F2: Previous Values F9: Optimized Defaults F10: Save ESC: Exit Version 1.28.1119. System BIOS Settings The BIOS screens in this section are for reference only. Boot Device 1. Press [Enter] and select a device as the Boot Option #1. A-4 Notebook PC User ... #2 [P0: Hitachi HTS545...] [P1: HL-DT-ST BDDVD.] Hard Drive BBS Priorities CD/DVD ROM Drive BBS Priorities Delete Boot Option : Select Screen : Select Item Enter: Select +/-: Change Opt. F1: General Help F2: Previous Values F9: Optimized Defaults F10: Save ESC: Exit Version 1.28.1119...
...Setup Utility - F1: General Help F2: Previous Values F9: Optimized Defaults F10: Save ESC: Exit Version 1.28.1119. System BIOS Settings The BIOS screens in this section are for reference only. Boot Device 1. Press [Enter] and select a device as the Boot Option #1. A-4 Notebook PC User ... #2 [P0: Hitachi HTS545...] [P1: HL-DT-ST BDDVD.] Hard Drive BBS Priorities CD/DVD ROM Drive BBS Priorities Delete Boot Option : Select Screen : Select Item Enter: Select +/-: Change Opt. F1: General Help F2: Previous Values F9: Optimized Defaults F10: Save ESC: Exit Version 1.28.1119...
User Manual
Page 75
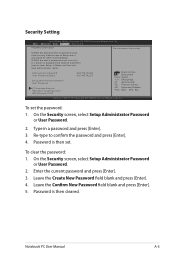
... User Password Status NOT INSTALLED NOT INSTALLED Setup administrator password User Password I/O Interface Security HDD Security Configuration: HDD 0:Hitachi HTS5 : Select Screen : Select Item Enter: Select +/-: Change Opt. Password is only asked for when entering Setup. Enter the current password and press [... Defaults F10: Save ESC: Exit Version 1.28.1119. Re-type to Setup and is then set the password: 1. On the Security screen, select Setup Administrator Password or User Password. 2. Password is a power on password and must be entered to boot or enter Setup. ...
... User Password Status NOT INSTALLED NOT INSTALLED Setup administrator password User Password I/O Interface Security HDD Security Configuration: HDD 0:Hitachi HTS5 : Select Screen : Select Item Enter: Select +/-: Change Opt. Password is only asked for when entering Setup. Enter the current password and press [... Defaults F10: Save ESC: Exit Version 1.28.1119. Re-type to Setup and is then set the password: 1. On the Security screen, select Setup Administrator Password or User Password. 2. Password is a power on password and must be entered to boot or enter Setup. ...
User Manual
Page 76
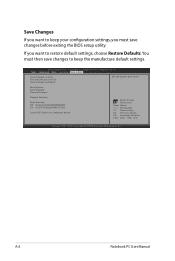
... Options Save Changes Discard Changes Restore Defaults Boot Override P0: Hitachi HTS545050B9A300 P1: HL-DT-ST BDDVDRW CT10N Launch EFI Shell from filesystem device : Select Screen : Select Item Enter: Select +/-: Change Opt. Copyright (C) 2008 American Megatrends, Inc. �M�a��in����A�d��v�a�...
... Options Save Changes Discard Changes Restore Defaults Boot Override P0: Hitachi HTS545050B9A300 P1: HL-DT-ST BDDVDRW CT10N Launch EFI Shell from filesystem device : Select Screen : Select Item Enter: Select +/-: Change Opt. Copyright (C) 2008 American Megatrends, Inc. �M�a��in����A�d��v�a�...
User Manual
Page 80
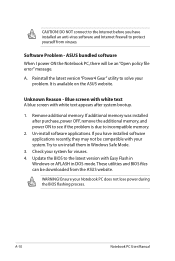
...software applications. Update the BIOS to un-install them in DOS mode. ASUS bundled software When I power ON the Notebook PC, there will be compatible with your system for viruses. 4. A. Blue screen with white text A blue screen with Easy Flash in Windows or AFLASH in Windows Safe Mode. 3.... installed an anti-virus software and Internet firewall to incompatible memory. 2. Software Problem - It is due to protect yourself from the ASUS website. Ensure your problem. These utilities and BIOS files can be downloaded from viruses. Check your system.Try to the latest version ...
...software applications. Update the BIOS to un-install them in DOS mode. ASUS bundled software When I power ON the Notebook PC, there will be compatible with your system for viruses. 4. A. Blue screen with white text A blue screen with Easy Flash in Windows or AFLASH in Windows Safe Mode. 3.... installed an anti-virus software and Internet firewall to incompatible memory. 2. Software Problem - It is due to protect yourself from the ASUS website. Ensure your problem. These utilities and BIOS files can be downloaded from viruses. Check your system.Try to the latest version ...
User Manual
Page 82
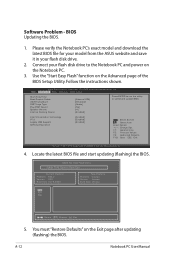
... model and download the latest BIOS file for your model from the ASUS website and save it in your flash disk drive to select and ...;M���a��i�n� Advanced Boot Security Save & Exit Start Easy Flash Boot Graphic Select ASUS FancyStart POST Logo Type Play POST Sound Speaker Volume Internal Pointing Device [External VGA] [Disabled] [Static] [No...: General Help F2: Previous Values F9: Optimized Defaults F10: Save ESC: Exit Version 1.28.1119. ASUS Tek. Use the "Start Easy Flash" function on the Advanced page of the BIOS Setup Utility. Intel...
... model and download the latest BIOS file for your model from the ASUS website and save it in your flash disk drive to select and ...;M���a��i�n� Advanced Boot Security Save & Exit Start Easy Flash Boot Graphic Select ASUS FancyStart POST Logo Type Play POST Sound Speaker Volume Internal Pointing Device [External VGA] [Disabled] [Static] [No...: General Help F2: Previous Values F9: Optimized Defaults F10: Save ESC: Exit Version 1.28.1119. ASUS Tek. Use the "Start Easy Flash" function on the Advanced page of the BIOS Setup Utility. Intel...

User Manual
Page 98
REACH Complying with ANSI/NFPA 70, the National Electrical Code (NEC), in our products at ASUS REACH website at the building entrance. A-28 Notebook PC User Manual TV Tuner Notices Note to : H05VV-F, 3G, 0.75mm2 or H05VV-F, 2G, 0.75mm2. installation should ..., we publish the chemical substances in particular Section 820.93, Grounding of Outer Conductive Shield of the coaxial cable to the earth at http://crs.asus.com/english/REACH.htm. Power Safety Requirement Products with electrical current ratings up to 6A and weighing more than 3Kg must use approved power cords...
REACH Complying with ANSI/NFPA 70, the National Electrical Code (NEC), in our products at ASUS REACH website at the building entrance. A-28 Notebook PC User Manual TV Tuner Notices Note to : H05VV-F, 3G, 0.75mm2 or H05VV-F, 2G, 0.75mm2. installation should ..., we publish the chemical substances in particular Section 820.93, Grounding of Outer Conductive Shield of the coaxial cable to the earth at http://crs.asus.com/english/REACH.htm. Power Safety Requirement Products with electrical current ratings up to 6A and weighing more than 3Kg must use approved power cords...


