
User Guide
Page 2
...Edition January 2015 Copyright © 2015 ASUSTeK Computer Inc. ASUS ASSUMES NO RESPONSIBILITY OR LIABILITY FOR ANY ERRORS OR INACCURACIES THAT MAY APPEAR IN THIS MANUAL, INCLUDING THE PRODUCTS AND SOFTWARE DESCRIBED IN IT. ASUS PROVIDES THIS MANUAL "AS IS"WITHOUT WARRANTY OF ANY KIND, EITHER EXPRESS ... SHOULD NOT BE CONSTRUED AS A COMMITMENT BY ASUS. Products and corporate names appearing in this manual, including the products and software described in any form or by any means, except documentation kept by ASUS; IN NO EVENT SHALL ASUS, ITS DIRECTORS, OFFICERS, EMPLOYEES OR AGENTS BE...
...Edition January 2015 Copyright © 2015 ASUSTeK Computer Inc. ASUS ASSUMES NO RESPONSIBILITY OR LIABILITY FOR ANY ERRORS OR INACCURACIES THAT MAY APPEAR IN THIS MANUAL, INCLUDING THE PRODUCTS AND SOFTWARE DESCRIBED IN IT. ASUS PROVIDES THIS MANUAL "AS IS"WITHOUT WARRANTY OF ANY KIND, EITHER EXPRESS ... SHOULD NOT BE CONSTRUED AS A COMMITMENT BY ASUS. Products and corporate names appearing in this manual, including the products and software described in any form or by any means, except documentation kept by ASUS; IN NO EVENT SHALL ASUS, ITS DIRECTORS, OFFICERS, EMPLOYEES OR AGENTS BE...

User Guide
Page 3
... memory card reader 28 Using the optical drive...29 Chapter 4 Connecting to the Internet Wired connection...31 Chapter 5 Troubleshooting Troubleshooting...37 Appendix Windows® 8.1 User Manual Starting for the first time...47 Windows® 8.1 lock screen...47 Using the Windows® UI...48 Working with Windows® apps...51 Other keyboard...
... memory card reader 28 Using the optical drive...29 Chapter 4 Connecting to the Internet Wired connection...31 Chapter 5 Troubleshooting Troubleshooting...37 Appendix Windows® 8.1 User Manual Starting for the first time...47 Windows® 8.1 lock screen...47 Using the Windows® UI...48 Working with Windows® apps...51 Other keyboard...

User Guide
Page 7
... exigences du Règlement sur le matériel brouilleur du Canada. 7 Equipment registered based on the standard of the general public to the instruction manual. This is a product for Interference by Information Technology Equipment (VCCI). Bluetooth Industry Canada Statement This Class B device meets all requirements of the Wi-Fi technology...
... exigences du Règlement sur le matériel brouilleur du Canada. 7 Equipment registered based on the standard of the general public to the instruction manual. This is a product for Interference by Information Technology Equipment (VCCI). Bluetooth Industry Canada Statement This Class B device meets all requirements of the Wi-Fi technology...

User Guide
Page 10
...ensure that you MUST follow to help you complete a task. CAUTION: Information to prevent damage to the components when trying to the ASUS website www.asus.com. Where to find more information Refer to complete a task. The User Guide is located in the following symbols used in ...yourself when trying to the following sources for additional information and for the contact information of the following folder in this manual. NOTE: Tips and additional information to complete a task. ASUS websites The ASUS website provides updated information on ASUS hardware and software products.
...ensure that you MUST follow to help you complete a task. CAUTION: Information to prevent damage to the components when trying to the ASUS website www.asus.com. Where to find more information Refer to complete a task. The User Guide is located in the following symbols used in ...yourself when trying to the following sources for additional information and for the contact information of the following folder in this manual. NOTE: Tips and additional information to complete a task. ASUS websites The ASUS website provides updated information on ASUS hardware and software products.
User Guide
Page 18
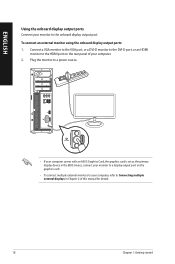
... to a display output port on the rear panel of this manual for details. 18 Chapter 1: Getting started ENGLISH Using the onboard display output ports Connect your computer, refer to Connecting multiple external displays in Chapter 2 of your computer comes with an ASUS Graphics Card, the graphics card is set as the primary...
... to a display output port on the rear panel of this manual for details. 18 Chapter 1: Getting started ENGLISH Using the onboard display output ports Connect your computer, refer to Connecting multiple external displays in Chapter 2 of your computer comes with an ASUS Graphics Card, the graphics card is set as the primary...

User Guide
Page 20
Turn your computer. Turn on your computer. Power button 3. Wait until the operating system loads automatically. For details on shutting down your Desktop PC, refer to turn your computer ON: 1. Press the power button on the power switch. 2. ENGLISH Turning your computer ON/OFF This section describes how to the Windows® 8.1 User Manual, which can be found in this manual. 20 Chapter 1: Getting started Turning your computer ON To turn on/off your computer after setting up your monitor ON. 3.
Turn your computer. Turn on your computer. Power button 3. Wait until the operating system loads automatically. For details on shutting down your Desktop PC, refer to turn your computer ON: 1. Press the power button on the power switch. 2. ENGLISH Turning your computer ON/OFF This section describes how to the Windows® 8.1 User Manual, which can be found in this manual. 20 Chapter 1: Getting started Turning your computer ON To turn on/off your computer after setting up your monitor ON. 3.
User Guide
Page 45
ASUS Desktop PC Windows® 8.1 User Manual Appendix Windows® 8.1 User Manual E8607 First Edition August 2013 Copyright © ASUSTeK Computer Inc. All Rights Reserved
ASUS Desktop PC Windows® 8.1 User Manual Appendix Windows® 8.1 User Manual E8607 First Edition August 2013 Copyright © ASUSTeK Computer Inc. All Rights Reserved
User Guide
Page 48
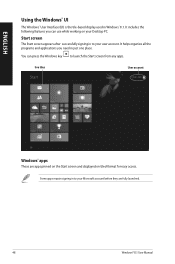
... can use while working on tiled-format for easy access. live tiles User account Windows® apps These are fully launched. 48 Windows® 8.1 User Manual It includes the following features you need in Windows® 8.1. It helps organize all the programs and applications you can press the Windows key to...
... can use while working on tiled-format for easy access. live tiles User account Windows® apps These are fully launched. 48 Windows® 8.1 User Manual It includes the following features you need in Windows® 8.1. It helps organize all the programs and applications you can press the Windows key to...
User Guide
Page 50
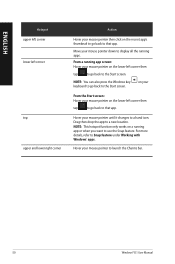
... the Snap feature. Move your mouse pointer on a running app screen: Hover your mouse pointer down to launch the Charms bar. 50 Windows® 8.1 User Manual
... the Snap feature. Move your mouse pointer on a running app screen: Hover your mouse pointer down to launch the Charms bar. 50 Windows® 8.1 User Manual
User Guide
Page 52
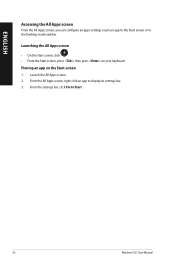
Launch the All Apps screen. 2. From the All Apps screen, right-click an app to Start. 52 Windows® 8.1 User Manual Launching the All Apps screen • On the Start screen, click . • From the Start screen, press , then press on the Start screen 1. Pinning an app on your keyboard. From the settings bar, click Pin to display its settings bar. 3. ENGLISH Accessing the All Apps screen From the All Apps screen, you can configure an apps settings or pin an app to the Start screen or to the Desktop mode taskbar.
Launch the All Apps screen. 2. From the All Apps screen, right-click an app to Start. 52 Windows® 8.1 User Manual Launching the All Apps screen • On the Start screen, click . • From the Start screen, press , then press on the Start screen 1. Pinning an app on your keyboard. From the settings bar, click Pin to display its settings bar. 3. ENGLISH Accessing the All Apps screen From the All Apps screen, you can configure an apps settings or pin an app to the Start screen or to the Desktop mode taskbar.
User Guide
Page 54
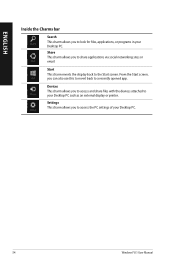
Share This charm allows you to access the PC settings of your Desktop PC. 54 Windows® 8.1 User Manual Devices This charm allows you to access and share files with the devices attached to your Desktop PC. ENGLISH Inside the Charms bar Search This ...
Share This charm allows you to access the PC settings of your Desktop PC. 54 Windows® 8.1 User Manual Devices This charm allows you to access and share files with the devices attached to your Desktop PC. ENGLISH Inside the Charms bar Search This ...
User Guide
Page 56
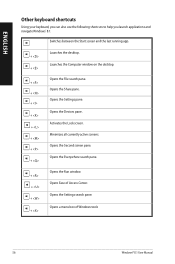
... currently active screens. Opens the Settings pane. Opens the Everywhere search pane. + + + + Opens the Run window. Opens Ease of Windows tools 56 Windows® 8.1 User Manual ENGLISH Other keyboard shortcuts Using your keyboard, you can also use the following shortcuts to help you launch applications and navigate Windows® 8.1. Opens the...
... currently active screens. Opens the Settings pane. Opens the Everywhere search pane. + + + + Opens the Run window. Opens Ease of Windows tools 56 Windows® 8.1 User Manual ENGLISH Other keyboard shortcuts Using your keyboard, you can also use the following shortcuts to help you launch applications and navigate Windows® 8.1. Opens the...

User Guide
Page 58
... least four seconds to shut down your Desktop PC, then press the power button again to turn on your Desktop PC. 58 Windows® 8.1 User Manual Reconnect the power cord and press the power button to turn your Desktop PC back on, and press during POST. • When your Desktop PC...
... least four seconds to shut down your Desktop PC, then press the power button again to turn on your Desktop PC. 58 Windows® 8.1 User Manual Reconnect the power cord and press the power button to turn your Desktop PC back on, and press during POST. • When your Desktop PC...
User Guide
Page 60
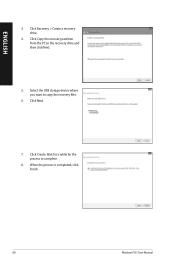
Select the USB storage device where you want to the recovery drive and then click Next. 5. When the process is completed, click Finish. 60 Windows® 8.1 User Manual Click Recovery > Create a recovery drive. 4. Click Copy the recovery partition from the PC to copy the recovery files. 6. ENGLISH 3. Click Create. Click Next. 7. Wait for a while for the process to complete. 8.
Select the USB storage device where you want to the recovery drive and then click Next. 5. When the process is completed, click Finish. 60 Windows® 8.1 User Manual Click Recovery > Create a recovery drive. 4. Click Copy the recovery partition from the PC to copy the recovery files. 6. ENGLISH 3. Click Create. Click Next. 7. Wait for a while for the process to complete. 8.
User Guide
Page 62
...886-2-2894-3447 +886-2-2890-7798 info@asus.com.tw www.asus.com.tw Technical Support Telephone Online support +86-21-38429911 support.asus.com ASUS COMPUTER INTERNATIONAL (America) Address 800 Corporate...+1-510-608-4555 Web site usa.asus.com Technical Support Telephone Support fax Online support +1-812-282-2787 +1-812-284-0883 support.asus.com ASUS COMPUTER GmbH (Germany and Austria) ...23, D-40880 Ratingen, Germany Fax +49-2102-959931 Web site asus.com/de Online contact eu-rma.asus.com/sales Technical Support Telephone (Component) +49-2102-5789555 Telephone ...
...886-2-2894-3447 +886-2-2890-7798 info@asus.com.tw www.asus.com.tw Technical Support Telephone Online support +86-21-38429911 support.asus.com ASUS COMPUTER INTERNATIONAL (America) Address 800 Corporate...+1-510-608-4555 Web site usa.asus.com Technical Support Telephone Support fax Online support +1-812-282-2787 +1-812-284-0883 support.asus.com ASUS COMPUTER GmbH (Germany and Austria) ...23, D-40880 Ratingen, Germany Fax +49-2102-959931 Web site asus.com/de Online contact eu-rma.asus.com/sales Technical Support Telephone (Component) +49-2102-5789555 Telephone ...


