Asus HHHadas Support and Manuals
Get Help and Manuals for this Asus item

View All Support Options Below
Free Asus HHHadas manuals!
Problems with Asus HHHadas?
Ask a Question
Free Asus HHHadas manuals!
Problems with Asus HHHadas?
Ask a Question
Popular Asus HHHadas Manual Pages
Install Manual - Page 2
... or service will not be extended if: (1) the product is repaired, modified or altered, unless such repair, modification...ERROR IN THIS MANUAL OR PRODUCT. ASUS ASSUMES NO RESPONSIBILITY OR LIABILITY FOR ANY ERRORS OR INACCURACIES THAT MAY APPEAR IN THIS MANUAL, INCLUDING THE PRODUCTS AND SOFTWARE DESCRIBED IN IT. Copyrights/Disclaimer
Copyright © 2003 ASUSTeK COMPUTER INC.
Manual updates...
Install Manual - Page 3

... 6 Installation Notices 6 Using the Device 7 Conventions used in this guide 7
Package Contents 8
Welcome 9
Product Introduction 9 Specifications 9 Front Panel 10 Rear Panel 11 Setting the Jumper Terminals 12
Installing the... 20 Environmental Specifications 20 Electrical and Audio Specifications 20
DVD Region Codes 21
Quick Installation Guide 23
ASUS DVD-E616P1 User Manual
3
Install Manual - Page 4

...installed and used in a particular installation. Notices
Federal Communications Commission Statement
This device complies with Canadian ICES-003.
4
ASUS DVD-E616P1 User Manual...set out in a residential installation. Canadian Department of Communications. This class B digital apparatus complies with FCC Rules Part...assure compliance with manufacturer's instructions, may cause undesired ...
Install Manual - Page 7

...: Information to prevent damage to the components when trying to interrupt the supply of the following symbols used in this manual.
You may break while in completing a task. Conventions used throughout this guide
To make sure that you accidentally sprayed any solvent on the device, use and damage the device.
• Do...
Install Manual - Page 10

...power of the tray to load the tray back in place.
4. Press the Eject Button or push the front part of the drive is turned off and wait more than one minute till the disc rotation is lit on all ... when you cannot eject a disc from the drive using the eject button due to power failure or software problems, insert a pin or a paper clip into this button to manually eject the tray and the disc.
Install Manual - Page 11

... (Refer to the IDE interface on the motherboard.
10. Host IDE Interface
This connector is for jumber settings.)
Pin
Name
Switch Status
Description
1
MA
ON
Master mode
2
SL
ON
Slave mode
3
CS
ON
Cable...3
G
Ground
4
R
Right channel audio output
8. ASUS DVD-E616P1 User Manual
11
Rear Panel
7
8
9
10
7. DC Input
This DC connector is
compatible with "Molex 70553".
Install Manual - Page 12
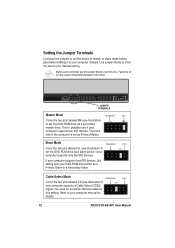
... IDE devices. Failure to do so may cause irreparable damage to your computer manual for
this setting sets your DVD-ROM drive either as a slave device if your computer supports four IDE devices, this setting.
RESERVED
If your computer supports only two IDE devices. Refer to the drive! Slave Mode
Cover the two pins labeled SL...
Install Manual - Page 15

...apply too much force when fitting the cable plugs. Power Cable
4-pin Audio Cable
IDE Cable
Replace the computer cover according to your computer has a sound card or an onboard audio feature,...on the motherboard. ASUS DVD-E616P1 User Manual
15
If a plug does not fit in only one orientation.
Connecting the Drive Cables
1. If your computer manual. Connect the power cable plug to the...
Install Manual - Page 16

When the drive tray ejects out of the drive, place the disc on the front of the drive to eject the tray.
2. Press the eject button on the tray with the label (printed) side up.
16
ASUS DVD-E616P1 User Manual DVD-ROM Drive Basics
Placing a Disc into the Drive
1.
Install Manual - Page 17

Carefully remove the disc from the Drive
1. ASUS DVD-E616P1 User Manual
17 Press the drive eject button or lightly push the center of the drive tray ...using a 12-cm disc, place it fits the outer circular border. Press the eject button on the front of the drive to replace the tray inside the drive. This border helps hold the disc in place. Ejecting a Disc from the tray. 3. If you ...
Install Manual - Page 18

...drive tray using the emergency pinhole. 1. Use the manual method only as a last resort when the eject button does not work. Make sure that you to manually eject the drive tray and remove a disc from... to the computer is cut due to avoid breaking the tray panel.
18
ASUS DVD-E616P1 User Manual Do not force the tray open;
Carefully pull the tray out and remove the disc. Follow these...
Install Manual - Page 19

Handling a Disc
Hold a disc by the edges. Using Compact Discs
Take note of the dust on a disc.
Do not touch the disc surface. ASUS DVD-E616P1 User Manual
19 These instructions will help you avoid damaging the discs and your DVD-ROM drive. Cleaning a Disc
Spray the disc with compressed air for about five seconds to get rid of the instructions in this section when using compact discs.
Install Manual - Page 20

... ratio
70 dB
Output: Line Out 0.7 V rms (typical)
20
ASUS DVD-E616P1 User Manual no damage Less than 49dB (Without loading operation, on 1m hemisphere, with 0.25 imbalance disc... (at 8,600 rpm.)
Reliability
MTBF:
100,000 power on hours
Mean Time To Repair (MTTR)
30 minutes
Electrical and Audio Specifications
Power Source I/O Terminal
Audio
Voltage Tolerance
+5V DC +/- 5%
+12V DC +/-...
Install Manual - Page 21

... only or you may risk setting the drive permanently for use in any region in your part of the DVD standard. There are part of the world. Please set up into regions according to another...Eastern Europe, India, Africa, North Korea
6 China
ASUS DVD-E616P1 User Manual
21
DVD Region Codes
Region codes are six regions around the world as illustrated by the map below. However, Region...
Install Manual - Page 24

...setting. (See page 13 for your computer and any peripheral devices connected to the DC input connector of the 4-pin audio cable to your computer. Connect one end of the DVD-ROM drive. 7. English
Quick Installation Guide
Hardware Installation
1. Turn off your drive and installs the appropriate driver... cable with four screws. 10. Replace the computer cover. 11. Turn on the IDE connector.
Asus HHHadas Reviews
We have not received any reviews for Asus yet.