

User Guide
Page 3
Contents Safety information...iv About this guide...iv Package contents...vi H81M-D R2.0 specifications summary vi Product introduction 1.1 Before you proceed 1-1 1.2 Motherboard overview 1-1 1.3 Central Processing Unit (CPU 1-4 1.4 System memory 1-7 1.5 Expansion slots 1-9 1.6 Headers...1-11 1.7 Connectors 1-12 1.8 Software support 1-19 ... setup program 2-6 2.3 Main menu...2-9 2.4 Ai Tweaker menu 2-10 2.5 Advanced menu 2-11 2.6 Monitor menu 2-12 2.7 Boot menu...2-13 2.8 Tools menu 2-14 2.9 Exit menu...2-14 Appendices Notices...A-1 ASUS contact information A-3 iii
Contents Safety information...iv About this guide...iv Package contents...vi H81M-D R2.0 specifications summary vi Product introduction 1.1 Before you proceed 1-1 1.2 Motherboard overview 1-1 1.3 Central Processing Unit (CPU 1-4 1.4 System memory 1-7 1.5 Expansion slots 1-9 1.6 Headers...1-11 1.7 Connectors 1-12 1.8 Software support 1-19 ... setup program 2-6 2.3 Main menu...2-9 2.4 Ai Tweaker menu 2-10 2.5 Advanced menu 2-11 2.6 Monitor menu 2-12 2.7 Boot menu...2-13 2.8 Tools menu 2-14 2.9 Exit menu...2-14 Appendices Notices...A-1 ASUS contact information A-3 iii

User Guide
Page 6
H81M-D R2.0 specifications summary CPU Chipset Memory Graphics Expansion slots Storage LAN LGA1150 socket for the latest Memory QVL (Qualified Vendors List). *** Due to Intel® chipset ... Intel® Turbo Boost Technology 2.0* * Intel® Turbo Boost Technology 2.0 support depends on the next page) vi res olution up to www.asus.com for the following items. Motherboard ASUS H81M-D R2.0 motherboard Cables 2 x Serial ATA 6.0 Gb/s cables Accessories 1 x I/O Shield Application DVD Support DVD Documentation User Guide If any of the above items is...
H81M-D R2.0 specifications summary CPU Chipset Memory Graphics Expansion slots Storage LAN LGA1150 socket for the latest Memory QVL (Qualified Vendors List). *** Due to Intel® chipset ... Intel® Turbo Boost Technology 2.0* * Intel® Turbo Boost Technology 2.0 support depends on the next page) vi res olution up to www.asus.com for the following items. Motherboard ASUS H81M-D R2.0 motherboard Cables 2 x Serial ATA 6.0 Gb/s cables Accessories 1 x I/O Shield Application DVD Support DVD Documentation User Guide If any of the above items is...

User Guide
Page 7
... the next page) vii ASUS AI Suite 3 - ASUS USB 3.0 Boost - Supports Jack-Detection and Front Panel Jack-Retasking * Use a chassis with excellent durability ASUS Stainless Steel Back I /O to support an 8-channel audio output Intel® H81 Express Chipset - ASUS GPU Boost - Separate layers for the CPU - H81M-D R2.0 specifications summary Audio USB ASUS unique features Realtek®...
... the next page) vii ASUS AI Suite 3 - ASUS USB 3.0 Boost - Supports Jack-Detection and Front Panel Jack-Retasking * Use a chassis with excellent durability ASUS Stainless Steel Back I /O to support an 8-channel audio output Intel® H81 Express Chipset - ASUS GPU Boost - Separate layers for the CPU - H81M-D R2.0 specifications summary Audio USB ASUS unique features Realtek®...

User Guide
Page 9
... bag that the ATX power supply is switched off or the power cord is detached from the wall socket before installing or removing the motherboard. ASUS H81M-D R2.0 1-1 Failure to avoid touching the ICs on a grounded antistatic pad or in the image below. Product introduction 1 1.1 Before you proceed Take note of the following...
... bag that the ATX power supply is switched off or the power cord is detached from the wall socket before installing or removing the motherboard. ASUS H81M-D R2.0 1-1 Failure to avoid touching the ICs on a grounded antistatic pad or in the image below. Product introduction 1 1.1 Before you proceed Take note of the following...

User Guide
Page 11
VD2 PCIEX1_2 SPDIF_OUT Intel® H81 64Mb BIOS SPEAKER 5 6 F_PANEL AAFP USB910 USB1112 CLRTC SATA6G_1 SATA6G_2 SATA3G_1 SATA3G_2 12 11 10 9 8 7 ASUS H81M-D R2.0 1-3 1.2.3 Motherboard layout KBMS 1 2 3 18.3cm(7.2in) 24 ATX12V DIGI +VRM CPU_FAN COM DDR3 DIMM_A1 (64bit, 240-pin module) DDR3 DIMM_B1 (64bit, 240-pin module) EATXPWR 22.6cm(8.9in) LPT VGA LGA1150 2 USB3_12 LAN_USB34 AUDIO RTL 8111GR CHA_FAN BATTERY H81M-D R2.0 PCIEX16 Super I/O PCIEX1_1 ALC 887-
VD2 PCIEX1_2 SPDIF_OUT Intel® H81 64Mb BIOS SPEAKER 5 6 F_PANEL AAFP USB910 USB1112 CLRTC SATA6G_1 SATA6G_2 SATA3G_1 SATA3G_2 12 11 10 9 8 7 ASUS H81M-D R2.0 1-3 1.2.3 Motherboard layout KBMS 1 2 3 18.3cm(7.2in) 24 ATX12V DIGI +VRM CPU_FAN COM DDR3 DIMM_A1 (64bit, 240-pin module) DDR3 DIMM_B1 (64bit, 240-pin module) EATXPWR 22.6cm(8.9in) LPT VGA LGA1150 2 USB3_12 LAN_USB34 AUDIO RTL 8111GR CHA_FAN BATTERY H81M-D R2.0 PCIEX16 Super I/O PCIEX1_1 ALC 887-
User Guide
Page 13
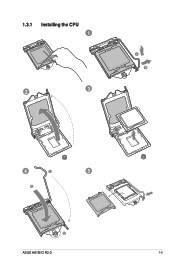
1.3.1 Installing the CPU 1 2 3 A B 4 C 5 A B ASUS H81M-D R2.0 1-5
1.3.1 Installing the CPU 1 2 3 A B 4 C 5 A B ASUS H81M-D R2.0 1-5
User Guide
Page 15
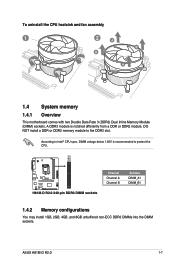
...;ECC DDR3 DIMMs into the DIMM sockets. According to Intel® CPU spec, DIMM voltage below 1.65V is notched differently from a DDR or DDR2 module. ASUS H81M-D R2.0 1-7 To uninstall the CPU heatsink and fan assembly 1 2 A B B A 1.4 System memory 1.4.1 Overview This motherboard comes with two Double Data Rate 3 (DDR3) Dual Inline Memory Module (DIMM...
...;ECC DDR3 DIMMs into the DIMM sockets. According to Intel® CPU spec, DIMM voltage below 1.65V is notched differently from a DDR or DDR2 module. ASUS H81M-D R2.0 1-7 To uninstall the CPU heatsink and fan assembly 1 2 A B B A 1.4 System memory 1.4.1 Overview This motherboard comes with two Double Data Rate 3 (DDR3) Dual Inline Memory Module (DIMM...

User Guide
Page 17
Unplug the power cord before adding or removing expansion cards. Failure to do so may cause you may need to install expansion cards. The following sub‑sections describe the slots and the expansion cards that they support. 2 3 To remove a DIMM B A A 1.5 Expansion slots In the future, you physical injury and damage motherboard components. ASUS H81M-D R2.0 1-9
Unplug the power cord before adding or removing expansion cards. Failure to do so may cause you may need to install expansion cards. The following sub‑sections describe the slots and the expansion cards that they support. 2 3 To remove a DIMM B A A 1.5 Expansion slots In the future, you physical injury and damage motherboard components. ASUS H81M-D R2.0 1-9

User Guide
Page 19
... re- enter data. • If the steps above do not need to clear the RTC when the system hangs due to overclocking. ASUS H81M-D R2.0 1-11 1.6 Headers 1. H81M-D R2.0 CLRTC +3V_BAT GND PIN 1 H81M-D R2.0 Clear RTC RAM To erase the RTC RAM: 1. Shut down the key during the boot process and enter BIOS setup to overclocking...
... re- enter data. • If the steps above do not need to clear the RTC when the system hangs due to overclocking. ASUS H81M-D R2.0 1-11 1.6 Headers 1. H81M-D R2.0 CLRTC +3V_BAT GND PIN 1 H81M-D R2.0 Clear RTC RAM To erase the RTC RAM: 1. Shut down the key during the boot process and enter BIOS setup to overclocking...
User Guide
Page 21
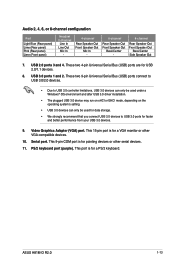
... used for data storage. • We strongly recommend that you connect USB 3.0 devices to USB 3.0 ports for USB 2.0/1.1 devices. 8. USB 2.0 ports 3 and 4. USB 3.0 ports 1 and 2. ASUS H81M-D R2.0 1-13 Audio 2, 4, 6, or 8-channel configuration Port Light Blue (Rear panel) Lime (Rear panel) Pink (Rear panel) Lime (Front panel) Headset 2-channel Line In Line Out...
... used for data storage. • We strongly recommend that you connect USB 3.0 devices to USB 3.0 ports for USB 2.0/1.1 devices. 8. USB 2.0 ports 3 and 4. USB 3.0 ports 1 and 2. ASUS H81M-D R2.0 1-13 Audio 2, 4, 6, or 8-channel configuration Port Light Blue (Rear panel) Lime (Rear panel) Pink (Rear panel) Lime (Front panel) Headset 2-channel Line In Line Out...

User Guide
Page 23
...ASUS Fan Xpert feature. 4. Connect the USB module cable to any of these connectors, then install the module to a slot opening at the back of the connector. CPU_FAN CPU FAN PWM CPU FAN IN CPU FAN PWR GND H81M-D R2...+5V USB_P9USB_P9+ GND NC USB+5V USB_P11USB_P11+ GND NC USB+5V USB_P10USB_P10+ GND USB+5V USB_P12USB_P12+ GND H81M-D R2.0 PIN 1 PIN 1 H81M-D R2.0 USB2.0 connectors Never connect a 1394 cable to the fan connectors. These USB connectors comply with USB 2.0...Insufficient air flow inside the system may damage the motherboard components. 3. ASUS H81M-D R2.0 1-15
...ASUS Fan Xpert feature. 4. Connect the USB module cable to any of these connectors, then install the module to a slot opening at the back of the connector. CPU_FAN CPU FAN PWM CPU FAN IN CPU FAN PWR GND H81M-D R2...+5V USB_P9USB_P9+ GND NC USB+5V USB_P11USB_P11+ GND NC USB+5V USB_P10USB_P10+ GND USB+5V USB_P12USB_P12+ GND H81M-D R2.0 PIN 1 PIN 1 H81M-D R2.0 USB2.0 connectors Never connect a 1394 cable to the fan connectors. These USB connectors comply with USB 2.0...Insufficient air flow inside the system may damage the motherboard components. 3. ASUS H81M-D R2.0 1-15

User Guide
Page 25
7. ASUS H81M-D R2.0 1-17 Intel® H81 Serial ATA 6.0Gb/s connectors (7-pin SATA6G_1~2 [gray]) These connectors connect to Serial ATA 3.0 Gb/s hard disk drives via Serial ATA 6.0 Gb/s ... 1~2 [black]) These connectors connect to Serial ATA 6.0 Gb/s hard disk drives via Serial ATA 3.0 Gb/s signal cables. H81M-D R2.0 SATA3G_1 SATA3G_2 GND RSATA_RXP1 RSATA_RXN1 GND RSATA_TXN1 RSATA_TXP1 GND GND RSATA_RXP2 RSATA_RXN2 GND RSATA_TXN2 RSATA_TXP2 GND H81M-D R2.0 SATA 3.0Gb/s connectors When using hot-plug and NCQ, set the SATA Mode Selection item in the...
7. ASUS H81M-D R2.0 1-17 Intel® H81 Serial ATA 6.0Gb/s connectors (7-pin SATA6G_1~2 [gray]) These connectors connect to Serial ATA 3.0 Gb/s hard disk drives via Serial ATA 6.0 Gb/s ... 1~2 [black]) These connectors connect to Serial ATA 6.0 Gb/s hard disk drives via Serial ATA 3.0 Gb/s signal cables. H81M-D R2.0 SATA3G_1 SATA3G_2 GND RSATA_RXP1 RSATA_RXN1 GND RSATA_TXN1 RSATA_TXP1 GND GND RSATA_RXP2 RSATA_RXN2 GND RSATA_TXN2 RSATA_TXP2 GND H81M-D R2.0 SATA 3.0Gb/s connectors When using hot-plug and NCQ, set the SATA Mode Selection item in the...

User Guide
Page 27
... the Support DVD into the optical drive. The contents of your OS documentation for updates. Double-click the ASSETUP.EXE to your hardware. ASUS H81M-D R2.0 1-19 Motherboard settings and hardware options vary. If Autorun is enabled in your computer, browse the contents of your computer, the DVD... the Specials screen which lists the unique features of the Support DVD to install If Autorun is for reference only. Visit the ASUS website at any time without notice. Click an icon to display Support DVD/motherboard information Click to display more items Click an ...
... the Support DVD into the optical drive. The contents of your OS documentation for updates. Double-click the ASSETUP.EXE to your hardware. ASUS H81M-D R2.0 1-19 Motherboard settings and hardware options vary. If Autorun is enabled in your computer, browse the contents of your computer, the DVD... the Specials screen which lists the unique features of the Support DVD to install If Autorun is for reference only. Visit the ASUS website at any time without notice. Click an icon to display Support DVD/motherboard information Click to display more items Click an ...

User Guide
Page 29
ASUS H81M-D R2.0 2-1 With this utlity, you to automatically update your motherboard's softwares, drivers and the BIOS ...EZ Update, click EZ Update on the AI Suite 3 main menu bar. Copy the original motherboard BIOS using the ASUS Update utility. 2.1.1 EZ Update EZ Update is a utility that allows you can also manually update the saved BIOS and... the system goes into POST. BIOS information 2.1 Managing and updating your motherboard's driver, software and firmware Model Name: H81M-D R2.0 Version: 0306 Release Date: 08/08/2014 Click to find and select the BIOS from file Click to select a...
ASUS H81M-D R2.0 2-1 With this utlity, you to automatically update your motherboard's softwares, drivers and the BIOS ...EZ Update, click EZ Update on the AI Suite 3 main menu bar. Copy the original motherboard BIOS using the ASUS Update utility. 2.1.1 EZ Update EZ Update is a utility that allows you can also manually update the saved BIOS and... the system goes into POST. BIOS information 2.1 Managing and updating your motherboard's driver, software and firmware Model Name: H81M-D R2.0 Version: 0306 Release Date: 08/08/2014 Click to find and select the BIOS from file Click to select a...

User Guide
Page 31
...NTFS is in single partition and in the support DVD may not be the latest version. You can cause system boot failure! 2.1.4 ASUS BIOS Updater ASUS BIOS Updater allows you to restore the BIOS file when it fails or gets corrupted during the updating process. Insert the support DVD...file. • Before using the motherboard support DVD or a USB flash drive that contains the BIOS file to H81MDR2. Ensure that your computer screen. ASUS H81M-D R2.0 2-3 DO NOT shut down or reset the system while updating the BIOS! CAP. • The BIOS file in FAT32/16 format. • ...
...NTFS is in single partition and in the support DVD may not be the latest version. You can cause system boot failure! 2.1.4 ASUS BIOS Updater ASUS BIOS Updater allows you to restore the BIOS file when it fails or gets corrupted during the updating process. Insert the support DVD...file. • Before using the motherboard support DVD or a USB flash drive that contains the BIOS file to H81MDR2. Ensure that your computer screen. ASUS H81M-D R2.0 2-3 DO NOT shut down or reset the system while updating the BIOS! CAP. • The BIOS file in FAT32/16 format. • ...

User Guide
Page 33
... BIOS Backup feature is done, press to exit BIOS Updater. 6. Restart your motherboard user guide for DOS V1.30 [2014/01/01] Current ROM BOARD: H81M-D R2.0 VER: 0306 (H :00 B :00) DATE: 08/08/2014 PATH: C:\ Update ROM BOARD: Unknown VER: Unknown DATE: Unknown C: FORMAN~1 D: ... BIOS update. Ensure to load the BIOS default settings to select the BIOS file and press . 4. See Chapter 2 of your computer. ASUS H81M-D R2.0 2-5 Press to switch from Drives panel to Files panel then press keys to ensure system compatibility and stability. After the BIOS Updater checks...
... BIOS Backup feature is done, press to exit BIOS Updater. 6. Restart your motherboard user guide for DOS V1.30 [2014/01/01] Current ROM BOARD: H81M-D R2.0 VER: 0306 (H :00 B :00) DATE: 08/08/2014 PATH: C:\ Update ROM BOARD: Unknown VER: Unknown DATE: Unknown C: FORMAN~1 D: ... BIOS update. Ensure to load the BIOS default settings to select the BIOS file and press . 4. See Chapter 2 of your computer. ASUS H81M-D R2.0 2-5 Press to switch from Drives panel to Files panel then press keys to ensure system compatibility and stability. After the BIOS Updater checks...
User Guide
Page 35
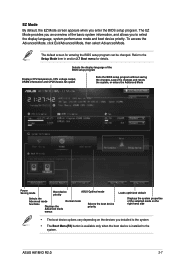
... Loads optimized default Displays the system properties of the basic system information, and allows you enter the BIOS setup program. The default screen for details. ASUS H81M-D R2.0 2-7 EZ Mode By default, the EZ Mode screen appears when you to select the display language, system performance mode and boot device priority. Refer to...
... Loads optimized default Displays the system properties of the basic system information, and allows you enter the BIOS setup program. The default screen for details. ASUS H81M-D R2.0 2-7 EZ Mode By default, the EZ Mode screen appears when you to select the display language, system performance mode and boot device priority. Refer to...
User Guide
Page 37
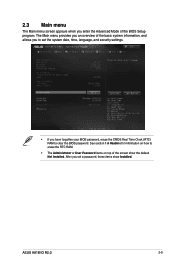
... appears when you enter the Advanced Mode of the basic system information, and allows you to set a password, these items show the default Not Installed. ASUS H81M-D R2.0 2-9 After you set the system date, time, language, and security settings. • If you have forgotten your BIOS password, erase the CMOS Real Time Clock...
... appears when you enter the Advanced Mode of the basic system information, and allows you to set a password, these items show the default Not Installed. ASUS H81M-D R2.0 2-9 After you set the system date, time, language, and security settings. • If you have forgotten your BIOS password, erase the CMOS Real Time Clock...

User Guide
Page 39
ASUS H81M-D R2.0 2-11 Be cautious when changing the settings of the Advanced menu items. Incorrect field values can cause the system to change the settings for the CPU and other system devices. Scroll down to display the following items: 2.5 Advanced menu The Advanced menu items allow you to malfunction.
ASUS H81M-D R2.0 2-11 Be cautious when changing the settings of the Advanced menu items. Incorrect field values can cause the system to change the settings for the CPU and other system devices. Scroll down to display the following items: 2.5 Advanced menu The Advanced menu items allow you to malfunction.
User Guide
Page 41
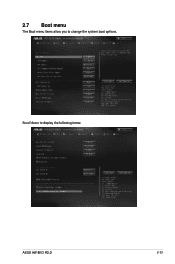
2.7 Boot menu The Boot menu items allow you to display the following items: ASUS H81M-D R2.0 2-13 Scroll down to change the system boot options.
2.7 Boot menu The Boot menu items allow you to display the following items: ASUS H81M-D R2.0 2-13 Scroll down to change the system boot options.

