
User Guide
Page 6
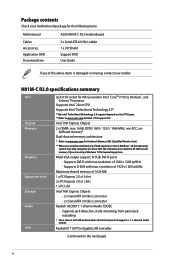
... 16GB, DDR3 1600 / 1333 / 1066 MHz, non-ECC, unbuffered memory* Dual-channel memory architecture * Refer to www.asus.com for the following items. Motherboard Cables Accessories Application DVD Documentation ASUS H81M-C R2.0 motherboard 2 x Serial ATA 6.0 Gb/s cables 1 x I/O Shield Support DVD User Guide If any of 1920 x ... Maximum shared memory of 4GB capacity or more, Windows® 32-bit operating system may only recognize less than 3GB. H81M-C R2.0 specifications summary CPU Chipset Memory Graphics Expansion slots Storage Audio LAN LGA1150 socket for Intel® CPU support list. We ...
... 16GB, DDR3 1600 / 1333 / 1066 MHz, non-ECC, unbuffered memory* Dual-channel memory architecture * Refer to www.asus.com for the following items. Motherboard Cables Accessories Application DVD Documentation ASUS H81M-C R2.0 motherboard 2 x Serial ATA 6.0 Gb/s cables 1 x I/O Shield Support DVD User Guide If any of 1920 x ... Maximum shared memory of 4GB capacity or more, Windows® 32-bit operating system may only recognize less than 3GB. H81M-C R2.0 specifications summary CPU Chipset Memory Graphics Expansion slots Storage Audio LAN LGA1150 socket for Intel® CPU support list. We ...

User Guide
Page 9
ASUS H81M-C R2.0 1-1 Product introduction 1 1.1 Before you install motherboard components or change any motherboard settings. • Unplug the power cord from the power supply. Failure to do so ...
ASUS H81M-C R2.0 1-1 Product introduction 1 1.1 Before you install motherboard components or change any motherboard settings. • Unplug the power cord from the power supply. Failure to do so ...
User Guide
Page 11
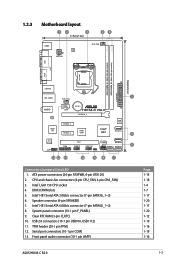
...) 2. Front panel audio connector (10-1 pin AAFP) Page 1-15 1-18 1-4 1-7 1-17 1-20 1-17 1-20 1-12 1-19 1-16 1-19 1-16 ASUS H81M-C R2.0 1-3 1.2.3 Motherboard layout 12 3 17.8cm(7.0in) 34 KBMS DIGI +VRM ATX12V CPU_FAN DVI DDR3 DIMM_A1 (64bit, 240-pin module) DDR3 DIMM_B1 (64bit, 240...-pin module) EATXPWR 24.4cm(9.6in) LPT VGA LGA1150 USB3456 LAN_USB34 CHA_FAN 1 AUDIO BATTERY COM H81M-C R2.0 PCIEX16_1 RTL 8111G PCIEX1_1 64Mb BIOS Super I/O PCIEX1_2 ASM 1083 Intel® H81 SATA3G_1 5 ALC 887-VD2 AAFP PCI1 SPEAKER F_PANEL...
...) 2. Front panel audio connector (10-1 pin AAFP) Page 1-15 1-18 1-4 1-7 1-17 1-20 1-17 1-20 1-12 1-19 1-16 1-19 1-16 ASUS H81M-C R2.0 1-3 1.2.3 Motherboard layout 12 3 17.8cm(7.0in) 34 KBMS DIGI +VRM ATX12V CPU_FAN DVI DDR3 DIMM_A1 (64bit, 240-pin module) DDR3 DIMM_B1 (64bit, 240...-pin module) EATXPWR 24.4cm(9.6in) LPT VGA LGA1150 USB3456 LAN_USB34 CHA_FAN 1 AUDIO BATTERY COM H81M-C R2.0 PCIEX16_1 RTL 8111G PCIEX1_1 64Mb BIOS Super I/O PCIEX1_2 ASM 1083 Intel® H81 SATA3G_1 5 ALC 887-VD2 AAFP PCI1 SPEAKER F_PANEL...

User Guide
Page 13
1.3.1 Installing the CPU 1 2 3 A B 4 C 5 A B ASUS H81M-C R2.0 1-5
1.3.1 Installing the CPU 1 2 3 A B 4 C 5 A B ASUS H81M-C R2.0 1-5

User Guide
Page 15
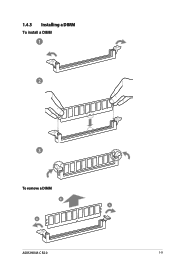
DDR3 modules are developed for better performance with two Double Data Rate 3 (DDR3) Dual Inline Memory Modules (DIMM) sockets. DIMM_A1 DIMM_B1 H81M-C R2.0 Channel Channel A Channel B Sockets DIMM_A1 DIMM_B1 H81M-C R2.0 240-pin DDR3 DIMM sockets ASUS H81M-C R2.0 1-7 To uninstall the CPU heatsink and fan assembly 1 2 B A B A 1.4 System memory 1.4.1 Overview This motherboard comes with less power consumption. A DDR3 module has the same physical dimensions as a DDR2 DIMM but is notched differently to prevent installation on a DDR2 DIMM socket.
DDR3 modules are developed for better performance with two Double Data Rate 3 (DDR3) Dual Inline Memory Modules (DIMM) sockets. DIMM_A1 DIMM_B1 H81M-C R2.0 Channel Channel A Channel B Sockets DIMM_A1 DIMM_B1 H81M-C R2.0 240-pin DDR3 DIMM sockets ASUS H81M-C R2.0 1-7 To uninstall the CPU heatsink and fan assembly 1 2 B A B A 1.4 System memory 1.4.1 Overview This motherboard comes with less power consumption. A DDR3 module has the same physical dimensions as a DDR2 DIMM but is notched differently to prevent installation on a DDR2 DIMM socket.
User Guide
Page 17
1.4.3 Installing a DIMM To install a DIMM 1 2 3 To remove a DIMM B A A ASUS H81M-C R2.0 1-9
1.4.3 Installing a DIMM To install a DIMM 1 2 3 To remove a DIMM B A A ASUS H81M-C R2.0 1-9

User Guide
Page 19
shared - - shared - shared - - shared - - - - - - - shared - - - IRQ assignments for this motherboard A B C D E PCIEx16 shared - - - - USB2.0 controller 1 - - - - - shared - shared - - - - Realtek 8111F controller - USB2.0 controller 2 HD audio SATA controller 1 SATA controller 2 - - - - - - - - - - - - - ASUS H81M-C R2.0 1-11 PCIEx1_1 PCIEx1_2 - - shared - - - - F G H - - - - - - - - - - - - - -
shared - - shared - shared - - shared - - - - - - - shared - - - IRQ assignments for this motherboard A B C D E PCIEx16 shared - - - - USB2.0 controller 1 - - - - - shared - shared - - - - Realtek 8111F controller - USB2.0 controller 2 HD audio SATA controller 1 SATA controller 2 - - - - - - - - - - - - - ASUS H81M-C R2.0 1-11 PCIEx1_1 PCIEx1_2 - - shared - - - - F G H - - - - - - - - - - - - - -

User Guide
Page 21
... in 2.1, 4.1, 5.1, or 7.1-channel configuration. Refer to the tape, CD, DVD player, or other devices. 3. Parallel port. USB 2.0 ports. Microphone port (pink). PS/2 mouse port (green). ASUS H81M-C R2.0 1-13 This port connects to a microphone. This port connects to a headphone or a speaker. LAN (RJ-45) port. 1.7 Connectors 1.7.1 Rear panel connectors 1 2 3 4 56 11 10 9 8 7 1. Line...
... in 2.1, 4.1, 5.1, or 7.1-channel configuration. Refer to the tape, CD, DVD player, or other devices. 3. Parallel port. USB 2.0 ports. Microphone port (pink). PS/2 mouse port (green). ASUS H81M-C R2.0 1-13 This port connects to a microphone. This port connects to a headphone or a speaker. LAN (RJ-45) port. 1.7 Connectors 1.7.1 Rear panel connectors 1 2 3 4 56 11 10 9 8 7 1. Line...

User Guide
Page 23
... +12 Volts PIN 1 +12 Volts +5V Standby Power OK +12V DC +12V DC GND +5 Volts GND +5 Volts GND +3 Volts +3 Volts PIN 1 H81M-C R2.0 ATX power connectors GND +5 Volts +5 Volts +5 Volts -5 Volts GND GND GND PSON# GND -12 Volts +3 Volts • For a fully configured system, we recommend that you ... orientation. Otherwise, the system will not boot up if the power is inadequate. • If you intend to connect the 4-pin ATX +12V power plug. ASUS H81M-C R2.0 1-15 The power supply plugs are designed to the Recommended Power Supply Wattage Calculator at http:// support...
... +12 Volts PIN 1 +12 Volts +5V Standby Power OK +12V DC +12V DC GND +5 Volts GND +5 Volts GND +3 Volts +3 Volts PIN 1 H81M-C R2.0 ATX power connectors GND +5 Volts +5 Volts +5 Volts -5 Volts GND GND GND PSON# GND -12 Volts +3 Volts • For a fully configured system, we recommend that you ... orientation. Otherwise, the system will not boot up if the power is inadequate. • If you intend to connect the 4-pin ATX +12V power plug. ASUS H81M-C R2.0 1-15 The power supply plugs are designed to the Recommended Power Supply Wattage Calculator at http:// support...
User Guide
Page 25
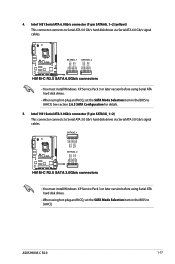
... item in the BIOS to Serial ATA 6.0 Gb/s hard disk drives via Serial ATA 3.0 Gb/s signal cables. ASUS H81M-C R2.0 1-17 H81M-C R2.0 SATA6G_1 SATA6G_2 GND RSATA_RXP1 RSATA_RXN1 GND RSATA_TXN1 RSATA_TXP1 GND GND RSATA_RXP2 RSATA_RXN2 GND RSATA_TXN2 RSATA_TXP2 GND H81M-C R2.0 SATA 6.0Gb/s connectors • You must install Windows. Intel® H81 Serial ATA 6.0Gb/s connector (7-pin...
... item in the BIOS to Serial ATA 6.0 Gb/s hard disk drives via Serial ATA 3.0 Gb/s signal cables. ASUS H81M-C R2.0 1-17 H81M-C R2.0 SATA6G_1 SATA6G_2 GND RSATA_RXP1 RSATA_RXN1 GND RSATA_TXN1 RSATA_TXP1 GND GND RSATA_RXP2 RSATA_RXN2 GND RSATA_TXN2 RSATA_TXP2 GND H81M-C R2.0 SATA 6.0Gb/s connectors • You must install Windows. Intel® H81 Serial ATA 6.0Gb/s connector (7-pin...

User Guide
Page 27
... the motherboard! Serial port connector (10-1 pin COM) This connector is purchased separately. 8. The USB 2.0 module is for USB 2.0 ports. ASUS H81M-C R2.0 1-19 Connect the serial port module cable to this connector, then install the module to 480Mbps connection speed. COM RXD DTR DSR CTS PIN ...1 DCD TXD GND RTS RI H81M-C R2.0 H81M-C R2.0 Serial port connectors The COM module is purchased separately. These USB connectors comply with USB 2.0 specifications and supports up to a slot...
... the motherboard! Serial port connector (10-1 pin COM) This connector is purchased separately. 8. The USB 2.0 module is for USB 2.0 ports. ASUS H81M-C R2.0 1-19 Connect the serial port module cable to this connector, then install the module to 480Mbps connection speed. COM RXD DTR DSR CTS PIN ...1 DCD TXD GND RTS RI H81M-C R2.0 H81M-C R2.0 Serial port connectors The COM module is purchased separately. These USB connectors comply with USB 2.0 specifications and supports up to a slot...
User Guide
Page 29
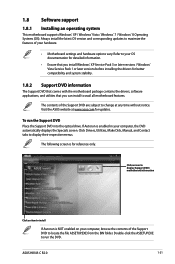
Click Drivers, Utilities, Make Disk, Manual, and Contact tabs to change at www.asus.com for updates. Refer to your OS documentation for detailed information. • Ensure that you install Windows® XP Service Pack 3 or later versions / Windows&#... the file ASSETUP.EXE from the BIN folder. The following screen is enabled in your hardware. • Motherboard settings and hardware options vary. Visit the ASUS website at any time without notice. ASUS H81M-C R2.0 1-21 The contents of the Support DVD are subject to display their respective menus.
Click Drivers, Utilities, Make Disk, Manual, and Contact tabs to change at www.asus.com for updates. Refer to your OS documentation for detailed information. • Ensure that you install Windows® XP Service Pack 3 or later versions / Windows&#... the file ASSETUP.EXE from the BIN folder. The following screen is enabled in your hardware. • Motherboard settings and hardware options vary. Visit the ASUS website at any time without notice. ASUS H81M-C R2.0 1-21 The contents of the Support DVD are subject to display their respective menus.
User Guide
Page 31
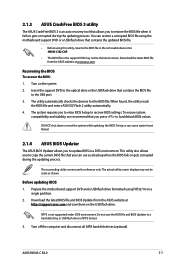
ASUS H81M-C R2.0 2-1 To launch EZ Update, click EZ Update on the AI Suite 3 main menu bar. Click to automatically update your BIOS Save a copy of the original ... update the BIOS EZ Update requires an Internet connection either through a network or an ISP (Internet Service Provider). Copy the original motherboard BIOS using the ASUS Update utility. 2.1.1 EZ Update EZ Update is a utility that allows you can also manually update the saved BIOS and select a boot logo when the system...
ASUS H81M-C R2.0 2-1 To launch EZ Update, click EZ Update on the AI Suite 3 main menu bar. Click to automatically update your BIOS Save a copy of the original ... update the BIOS EZ Update requires an Internet connection either through a network or an ISP (Internet Service Provider). Copy the original motherboard BIOS using the ASUS Update utility. 2.1.1 EZ Update EZ Update is a utility that allows you can also manually update the saved BIOS and select a boot logo when the system...
User Guide
Page 33
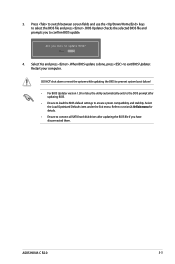
... contains the updated BIOS file. • Before using FAT32/16 on a single partition. 2. Turn off the computer and disconnect all SATA hard disk drives (optional). ASUS H81M-C R2.0 2-3 Do not save them on the system. 2. The succeeding utility screens are for the BIOS file. This utility also allows you to update BIOS in...
... contains the updated BIOS file. • Before using FAT32/16 on a single partition. 2. Turn off the computer and disconnect all SATA hard disk drives (optional). ASUS H81M-C R2.0 2-3 Do not save them on the system. 2. The succeeding utility screens are for the BIOS file. This utility also allows you to update BIOS in...
User Guide
Page 35
... details. • Ensure to connect all SATA hard disk drives after updating BIOS. • Ensure to load the BIOS default settings to confirm BIOS update. 4. ASUS H81M-C R2.0 2-5 Select Yes and press . 3. Press to switch between screen fields and use the keys to exit BIOS Updater.
... details. • Ensure to connect all SATA hard disk drives after updating BIOS. • Ensure to load the BIOS default settings to confirm BIOS update. 4. ASUS H81M-C R2.0 2-5 Select Yes and press . 3. Press to switch between screen fields and use the keys to exit BIOS Updater.

User Guide
Page 37
..., saves the changes and resets the system, or enters the Advanced Mode Selects the Advanced mode functions Power saving mode Normal mode ASUS Optimal mode Displays the Advanced mode menus Loads optimized default Displays the system properties of the selected mode on the right hand side ...the system. • The Boot Menu(F8) button is available only when the boot device is installed to the following sections for details. ASUS H81M-C R2.0 2-7 Refer to the system. Advanced Mode The Advanced Mode provides advanced options for experienced end-users to the Setup Mode item in section ...
..., saves the changes and resets the system, or enters the Advanced Mode Selects the Advanced mode functions Power saving mode Normal mode ASUS Optimal mode Displays the Advanced mode menus Loads optimized default Displays the system properties of the selected mode on the right hand side ...the system. • The Boot Menu(F8) button is available only when the boot device is installed to the following sections for details. ASUS H81M-C R2.0 2-7 Refer to the system. Advanced Mode The Advanced Mode provides advanced options for experienced end-users to the Setup Mode item in section ...

User Guide
Page 39
... function does not support the following keyboard functions: delete, cut, copy and paste. • You can change the value of the field opposite the item. ASUS H81M-C R2.0 2-9 Use the navigation keys to display the other items on the screen. Configuration fields These fields show the values for the BIOS setup program. Quick...
... function does not support the following keyboard functions: delete, cut, copy and paste. • You can change the value of the field opposite the item. ASUS H81M-C R2.0 2-9 Use the navigation keys to display the other items on the screen. Configuration fields These fields show the values for the BIOS setup program. Quick...

User Guide
Page 41
... section 1.6 Jumpers for information on how to erase the RTC RAM. • The Administrator or User Password items on top of the screen show Installed. ASUS H81M-C R2.0 2-11 Configuration options: [English] [Español 2.4.2 System Date [Day xx/xx/xxxx] Allows you to set the system date. 2.4.3 System Time [xx:xx:xx...
... section 1.6 Jumpers for information on how to erase the RTC RAM. • The Administrator or User Password items on top of the screen show Installed. ASUS H81M-C R2.0 2-11 Configuration options: [English] [Español 2.4.2 System Date [Day xx/xx/xxxx] Allows you to set the system date. 2.4.3 System Time [xx:xx:xx...

User Guide
Page 43
... speed. Target CPU Graphics Speed : xxxxMHz Displays the target iGPU speed. 2.5 Ai Tweaker menu The Ai Tweaker menu items allow you installed on the motherboard. ASUS H81M-C R2.0 2-13 Target DMI/PEG Clock : xxxxMHz Displays the target DMI/PEG clock. Target DRAM Speed : xxxxMHz Displays the target DRAM speed. Scroll down to malfunction...
... speed. Target CPU Graphics Speed : xxxxMHz Displays the target iGPU speed. 2.5 Ai Tweaker menu The Ai Tweaker menu items allow you installed on the motherboard. ASUS H81M-C R2.0 2-13 Target DMI/PEG Clock : xxxxMHz Displays the target DMI/PEG clock. Target DRAM Speed : xxxxMHz Displays the target DRAM speed. Scroll down to malfunction...

User Guide
Page 45
... RAS# ACT Time [Auto] Configuration options: [Auto] [1 DRAM Clock] - [63 DRAM Clock] DRAM COMMAND Rate [Auto] Configuration options: [Auto] [1 DRAM Clock] [2 DRAM Clock] [3 DRAM Clock] ASUS H81M-C R2.0 2-15 The frequency may vary depending on the system loading. To restore the default setting, type [auto] using the keyboard and press the key. CPU...
... RAS# ACT Time [Auto] Configuration options: [Auto] [1 DRAM Clock] - [63 DRAM Clock] DRAM COMMAND Rate [Auto] Configuration options: [Auto] [1 DRAM Clock] [2 DRAM Clock] [3 DRAM Clock] ASUS H81M-C R2.0 2-15 The frequency may vary depending on the system loading. To restore the default setting, type [auto] using the keyboard and press the key. CPU...

