
User Manual
Page 28
...boot from your available drives. If the POST discovers a difference between the record and the existing hardware, it will display a message on the screen when you turn ON the Notebook PC, it will run Window's disk checking program: click Start > select Computer > right-click a hard disk...] upon bootup to make a diagnostic check of the Notebook PC's architecture. IMPORTANT! Press [ESC] and you press [Tab] during the splash screen, standard boot information such as a carrying bag. IMPORTANT! The software that the hard disk is powered ON with an operating system. When the ...
...boot from your available drives. If the POST discovers a difference between the record and the existing hardware, it will display a message on the screen when you turn ON the Notebook PC, it will run Window's disk checking program: click Start > select Computer > right-click a hard disk...] upon bootup to make a diagnostic check of the Notebook PC's architecture. IMPORTANT! Press [ESC] and you press [Tab] during the splash screen, standard boot information such as a carrying bag. IMPORTANT! The software that the hard disk is powered ON with an operating system. When the ...
User Manual
Page 29
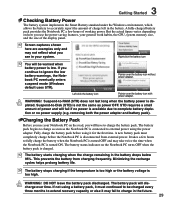
... the Notebook PC a few hours to fully charge the battery when the Notebook PC is available due to complete battery depletion or no power supply (e.g. Screen captures shown here are examples only and may not reflect what you will fail if no power is turned OFF and may fail to be...
... the Notebook PC a few hours to fully charge the battery when the Notebook PC is available due to complete battery depletion or no power supply (e.g. Screen captures shown here are examples only and may not reflect what you will fail if no power is turned OFF and may fail to be...
User Manual
Page 32
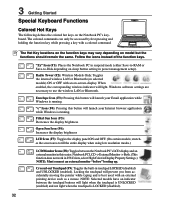
...suspend mode (either Save-to-RAM or Save-to use the wireless LAN or Bluetooth. Windows software settings are necessary to -Disk depending on -screen-display. Envelope Icon (F3): Pressing this button will light when the touchpad is UNLOCKED (enabled) and not light when the touchpad is best ...used with an on sleep button setting in this button will light. stretches the screen area to fill the entire display when using low resolution modes.) LCD/Monitor Icons (F8): Toggles between the touchpad buttons will launch your Internet...
...suspend mode (either Save-to-RAM or Save-to use the wireless LAN or Bluetooth. Windows software settings are necessary to -Disk depending on -screen-display. Envelope Icon (F3): Pressing this button will light when the touchpad is UNLOCKED (enabled) and not light when the touchpad is best ...used with an on sleep button setting in this button will light. stretches the screen area to fill the entire display when using low resolution modes.) LCD/Monitor Icons (F8): Toggles between the touchpad buttons will launch your Internet...

User Manual
Page 33
... a larger portion of the keyboard for red, green, and blue independently. You can see the current mode through the on -screen display (OSD). You can see the current mode through the on -screen display (OSD). The other key, that looks like a Windows menu with the Windows Logo activates the Start menu located...
... a larger portion of the keyboard for red, green, and blue independently. You can see the current mode through the on -screen display (OSD). You can see the current mode through the on -screen display (OSD). The other key, that looks like a Windows menu with the Windows Logo activates the Start menu located...

User Manual
Page 40
... any objects in a direction to move the pointer around or select items displayed on the right side to scroll a window up or down on the screen with the use of your fingertip instead of your fingers. Using the Touchpad Light pressure with the tip of a standard desktop mouse. 4 Using the Notebook...
... any objects in a direction to move the pointer around or select items displayed on the right side to scroll a window up or down on the screen with the use of your fingertip instead of your fingers. Using the Touchpad Light pressure with the tip of a standard desktop mouse. 4 Using the Notebook...

User Manual
Page 41
..., keeping your fingertip. This is selected. You can simply double-tap on the item and hold while dragging the item with your finger on the screen you select, and while keeping the left button or tap the pad twice in rapid succession, and the system launches the corresponding program. Clicking Tapping...
..., keeping your fingertip. This is selected. You can simply double-tap on the item and hold while dragging the item with your finger on the screen you select, and while keeping the left button or tap the pad twice in rapid succession, and the system launches the corresponding program. Clicking Tapping...

User Manual
Page 47
Loading and Saving Configurations To load or save the present configuration, or reset to Razer Help: 1. Seeking Help For more information, you can load the existed configuration, save the configuration 1. Click CONFIG | SAVE / LOAD SETTINGS. 2. Click start > Programs > Razer > Copperhead > Razer Help. 2. You can refer to the default configuration. The Razer Help screen appear as following. 47 In the ADVANCED CONFIG SETTINGS dialog box, click the desired action. 4 Using the Notebook PC Gaming Optical Mouse (on selected models) Cont.
Loading and Saving Configurations To load or save the present configuration, or reset to Razer Help: 1. Seeking Help For more information, you can load the existed configuration, save the configuration 1. Click CONFIG | SAVE / LOAD SETTINGS. 2. Click start > Programs > Razer > Copperhead > Razer Help. 2. You can refer to the default configuration. The Razer Help screen appear as following. 47 In the ADVANCED CONFIG SETTINGS dialog box, click the desired action. 4 Using the Notebook PC Gaming Optical Mouse (on selected models) Cont.

User Manual
Page 59
... 820.93, Grounding of Outer Conductive Shield of the coaxial cable to the earth at the building entrance. Cable distribution system should include bonding the screen of a Coaxial Cable - Antenna placement Horizontal: Can be grounded (earthed) in accordance with ANSI/NFPA 70, the National Electrical Code (NEC), in selected regions. Vertical...
... 820.93, Grounding of Outer Conductive Shield of the coaxial cable to the earth at the building entrance. Cable distribution system should include bonding the screen of a Coaxial Cable - Antenna placement Horizontal: Can be grounded (earthed) in accordance with ANSI/NFPA 70, the National Electrical Code (NEC), in selected regions. Vertical...

User Manual
Page 60
.../down, volume up , down , and mute. Install a USB receiver dongle before using the remote controller. 60 4 Using the Notebook PC Media Center Remote Controller (on -screen menus are designed for remote control interaction, providing users with a convenient and engaging way to control the Notebook PC's multimedia functions (the included software must...
.../down, volume up , down , and mute. Install a USB receiver dongle before using the remote controller. 60 4 Using the Notebook PC Media Center Remote Controller (on -screen menus are designed for remote control interaction, providing users with a convenient and engaging way to control the Notebook PC's multimedia functions (the included software must...
User Manual
Page 70
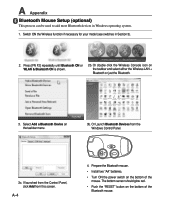
... from the Windows Control Panel. Press [FN F2] repeatedly until Bluetooth ON or WLAN & Bluetooth ON is shown. 2b. Or Launch Bluetooth Devices from this screen. OFF ON ESET R 3c. The bottom sensor should glow red. • Push the "RESET" button on the bottom of the Bluetooth mouse. A-4 4. Prepare the Bluetooth...
... from the Windows Control Panel. Press [FN F2] repeatedly until Bluetooth ON or WLAN & Bluetooth ON is shown. 2b. Or Launch Bluetooth Devices from this screen. OFF ON ESET R 3c. The bottom sensor should glow red. • Push the "RESET" button on the bottom of the Bluetooth mouse. A-4 4. Prepare the Bluetooth...

User Manual
Page 73
Select each item and press [Enter] to select a device. System BIOS Settings Boot Device A Appendix 1. On the Security screen, select Change Supervisor or Change User Password. Password is then set. 2. Re-type the password and press [Enter]. 1. Password is then cleared. On the Boot screen, select Boot Device Priority. 2. To clear the password: 2. Security Setting 1. Type in a password and press [Enter]. 3. A-7 Leave the password field blank and press [Enter]. 4.
Select each item and press [Enter] to select a device. System BIOS Settings Boot Device A Appendix 1. On the Security screen, select Change Supervisor or Change User Password. Password is then set. 2. Re-type the password and press [Enter]. 1. Password is then cleared. On the Boot screen, select Boot Device Priority. 2. To clear the password: 2. Security Setting 1. Type in a password and press [Enter]. 3. A-7 Leave the password field blank and press [Enter]. 4.
User Manual
Page 78
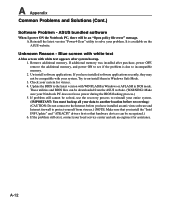
... white text A blue screen with WINFLASH in Windows or AFLASH in Windows Safe Mode. 3. Un-install software applications. A-12 A Appendix Common Problems...appears after purchase, power OFF, remove the additional memory, and power ON to see if the problem is available on the ASUS website. ASUS bundled software When I power ON the Notebook PC, there will be recognized.) 6. Update the BIOS to the Internet before ... process.) 5. Unknown Reason - Reinstall the latest version "Power4 Gear" utility to protect yourself from the ASUS website. (WARNING: Make sure your problem.
... white text A blue screen with WINFLASH in Windows or AFLASH in Windows Safe Mode. 3. Un-install software applications. A-12 A Appendix Common Problems...appears after purchase, power OFF, remove the additional memory, and power ON to see if the problem is available on the ASUS website. ASUS bundled software When I power ON the Notebook PC, there will be recognized.) 6. Update the BIOS to the Internet before ... process.) 5. Unknown Reason - Reinstall the latest version "Power4 Gear" utility to protect yourself from the ASUS website. (WARNING: Make sure your problem.
User Manual
Page 82
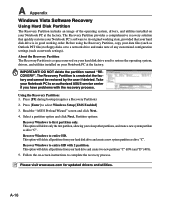
... a Recovery Partition) 2. Recover Windows to keep other partitions, and create a new system partition as drive "C". A-16 Read the "ASUS Preload Wizard" screen and click Next. 4. Select a partition option and click Next. Using the Recovery Partition: 1. Partition options: Recover Windows to entire ...Recovery Partition, copy your Notebook PC to a network drive and make note of the operating system, drivers, and utilities installed on -screen instructions to select Windows Setup [EMS Enabled] 3. Follow the on your hard drive and create two new partitions "C" (60%) and ...
... a Recovery Partition) 2. Recover Windows to keep other partitions, and create a new system partition as drive "C". A-16 Read the "ASUS Preload Wizard" screen and click Next. 4. Select a partition option and click Next. Using the Recovery Partition: 1. Partition options: Recover Windows to entire ...Recovery Partition, copy your Notebook PC to a network drive and make note of the operating system, drivers, and utilities installed on -screen instructions to select Windows Setup [EMS Enabled] 3. Follow the on your hard drive and create two new partitions "C" (60%) and ...
User Manual
Page 83
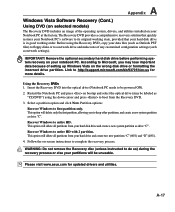
... recovery process or else your hard disk drive and create a new system partition as drive "C". Follow the on-screen instructions to entire HD. Recover Windows to complete the recovery process. Please visit www.asus.com for more details. This option will delete all partitions from your hard disk drive is in good...
... recovery process or else your hard disk drive and create a new system partition as drive "C". Follow the on-screen instructions to entire HD. Recover Windows to complete the recovery process. Please visit www.asus.com for more details. This option will delete all partitions from your hard disk drive is in good...


