
Fonepad 7 FE170CG E-Manual English
Page 10
... those used in conveyor belts for airport security), but do not touch the broken glass parts. The device screen is prohibited. If the glass gets broken, stop using the device and do not expose the device to ASUS-qualified service personnel only. 10 Do not listen at high volume levels...type of glass. Use only AC adapters and cables approved by ASUS for repair to use with your device near gas or fuel, construction sites, blasting sites and other areas. Disconnect the AC power before cleaning your device screen. Use only a clean cellulose sponge or chamois cloth when ...
... those used in conveyor belts for airport security), but do not touch the broken glass parts. The device screen is prohibited. If the glass gets broken, stop using the device and do not expose the device to ASUS-qualified service personnel only. 10 Do not listen at high volume levels...type of glass. Use only AC adapters and cables approved by ASUS for repair to use with your device near gas or fuel, construction sites, blasting sites and other areas. Disconnect the AC power before cleaning your device screen. Use only a clean cellulose sponge or chamois cloth when ...

Fonepad 7 FE170CG E-Manual English
Page 14
Parts and features Take a hold of your device and have it up and running in a jiffy. Receiver Front camera Touch screen Micro-USB connector Headphone jack Volume keys Power/lock button Rear camera Micro-SIM/memory card compartment Microphone 14
Parts and features Take a hold of your device and have it up and running in a jiffy. Receiver Front camera Touch screen Micro-USB connector Headphone jack Volume keys Power/lock button Rear camera Micro-SIM/memory card compartment Microphone 14
Fonepad 7 FE170CG E-Manual English
Page 15
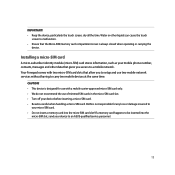
Your Fonepad comes with a mobile carrier-approved micro-SIM card only. • We do not recommend the use of trimmed SIM cards in the micro-SIM card slot. • Turn off your mobile phone number, contacts, messages and other liquids can cause the touch screen to malfunction. • Ensure that allow you ...and use with two micro-SIM card slots that the Micro-SIM/memory card compartment cover is always closed when operating or carrying the device. ASUS is designed for any loss or damage incurred to your device to be inserted into the micro-SIM slot, send your micro-SIM card. ...
Your Fonepad comes with a mobile carrier-approved micro-SIM card only. • We do not recommend the use of trimmed SIM cards in the micro-SIM card slot. • Turn off your mobile phone number, contacts, messages and other liquids can cause the touch screen to malfunction. • Ensure that allow you ...and use with two micro-SIM card slots that the Micro-SIM/memory card compartment cover is always closed when operating or carrying the device. ASUS is designed for any loss or damage incurred to your device to be inserted into the micro-SIM slot, send your micro-SIM card. ...
Fonepad 7 FE170CG E-Manual English
Page 42
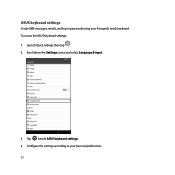
Launch Quick settings then tap . 2. Scroll down the Settings screen and select Language & input. 3. Tap beside ASUS keyboard settings. 4. To access the ASUS keyboard settings: 1. ASUS keyboard settings Create SMS messages, emails, and log-in passwords using your personal preferences. 42 Configure the settings according to your Fonepad's touch keyboard.
Launch Quick settings then tap . 2. Scroll down the Settings screen and select Language & input. 3. Tap beside ASUS keyboard settings. 4. To access the ASUS keyboard settings: 1. ASUS keyboard settings Create SMS messages, emails, and log-in passwords using your personal preferences. 42 Configure the settings according to your Fonepad's touch keyboard.
Fonepad 7 FE170CG E-Manual English
Page 46
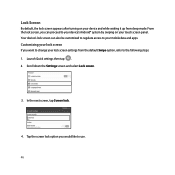
... also be customized to regulate access to the following steps: 1. Lock Screen By default, the lock screen appears after turning on your touch screen panel. Launch Quick settings then tap . 2. In the next screen, tap Screen lock. 4. Scroll down the Settings screen and select Lock screen. 3. Customizing your lock screen If you want to use. 46 From the lock...
... also be customized to regulate access to the following steps: 1. Lock Screen By default, the lock screen appears after turning on your touch screen panel. Launch Quick settings then tap . 2. In the next screen, tap Screen lock. 4. Scroll down the Settings screen and select Lock screen. 3. Customizing your lock screen If you want to use. 46 From the lock...
Fonepad 7 FE170CG E-Manual English
Page 55
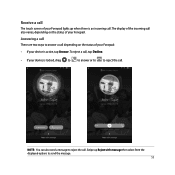
NOTE: You can also send a message to send the message. 55 Answering a call There are two ways to reject the call. Swipe up when there is an incoming call. To reject a call, tap Decline. • If your device is locked, drag to to answer or to to answer a call depending on the status of your Fonepad lights up Reject with message then select from the displayed options to reject the call. Receive a call The touch screen of your Fonepad. The display of the incoming call also varies, depending on the status of your Fonepad: • If your device is active, tap Answer.
NOTE: You can also send a message to send the message. 55 Answering a call There are two ways to reject the call. Swipe up when there is an incoming call. To reject a call, tap Decline. • If your device is locked, drag to to answer or to to answer a call depending on the status of your Fonepad lights up Reject with message then select from the displayed options to reject the call. Receive a call The touch screen of your Fonepad. The display of the incoming call also varies, depending on the status of your Fonepad: • If your device is active, tap Answer.

Fonepad 7 FE170CG E-Manual English
Page 79
IMPORTANT! Video settings Adjust the appearance of your recorded videos by configuring your camera's settings using these options. On the camera's home screen, tap > . 2. Exposure Enable Touch auto-exposure under this option. 79 Apply the settings first before taking images. 1. Image Configure the video quality using the steps below. Scroll down and configure the available options.
IMPORTANT! Video settings Adjust the appearance of your recorded videos by configuring your camera's settings using these options. On the camera's home screen, tap > . 2. Exposure Enable Touch auto-exposure under this option. 79 Apply the settings first before taking images. 1. Image Configure the video quality using the steps below. Scroll down and configure the available options.


