User Manual
Page 19
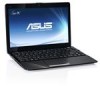
... match the manual. Crossed Screen Icon (F7): Turns off the display backlight. Zz Icon (F1): Places the Eee PC in the Notification area after activation. When enabled, the corresponding wireless indicator will light. LCD/Monitor Icons (F8): Toggles between the Eee PC's LCD display and an ...Speaker Icon (F10): Mutes the speaker. Sun Up Icon (F6): Increases the display brightness. ASUS Eee PC 1-11 The Hot Key locations on the function keys may vary depending on the Eee PC's keyboard. Volume Up Icon (F12): Increases the speaker volume. Keyboard Usage Special Function Keys...
... match the manual. Crossed Screen Icon (F7): Turns off the display backlight. Zz Icon (F1): Places the Eee PC in the Notification area after activation. When enabled, the corresponding wireless indicator will light. LCD/Monitor Icons (F8): Toggles between the Eee PC's LCD display and an ...Speaker Icon (F10): Mutes the speaker. Sun Up Icon (F6): Increases the display brightness. ASUS Eee PC 1-11 The Hot Key locations on the function keys may vary depending on the Eee PC's keyboard. Volume Up Icon (F12): Increases the speaker volume. Keyboard Usage Special Function Keys...
User Manual
Page 27
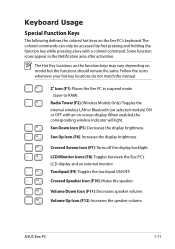
The initialization is finished. Some applications would form minimized icons in the Notification area. 9. Click Next to launch the corresponding applications and enter the specified folders. ASUS Eee PC 2-5 Double-click them to continue. Desktop There are several shortcuts on the desktop. The actual Desktop screen may vary according to different models. Select the network's location. 10.
The initialization is finished. Some applications would form minimized icons in the Notification area. 9. Click Next to launch the corresponding applications and enter the specified folders. ASUS Eee PC 2-5 Double-click them to continue. Desktop There are several shortcuts on the desktop. The actual Desktop screen may vary according to different models. Select the network's location. 10.
User Manual
Page 35
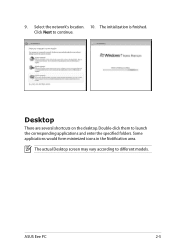
... site nearest you to complete the update process. The ASUS Update main window appears. 2. 3. Locate the BIOS file from the drop‑down menu, then click Next. 3. Follow the screen instructions to avoid network traffic, or click Auto Select. From the FTP ...the update process. Launch the ASUS Update utility from the Windows® desktop by clicking Start > Programs > ASUS > ASUSUpdate for EeePC> ASUSUpdate. The ASUS Update utility is capable of updating itself through a BIOS file: 1. Follow the screen instructions to avail all its features. Click Next. 4. ASUS Eee PC 3-3
... site nearest you to complete the update process. The ASUS Update main window appears. 2. 3. Locate the BIOS file from the drop‑down menu, then click Next. 3. Follow the screen instructions to avoid network traffic, or click Auto Select. From the FTP ...the update process. Launch the ASUS Update utility from the Windows® desktop by clicking Start > Programs > ASUS > ASUSUpdate for EeePC> ASUSUpdate. The ASUS Update utility is capable of updating itself through a BIOS file: 1. Follow the screen instructions to avail all its features. Click Next. 4. ASUS Eee PC 3-3
User Manual
Page 41
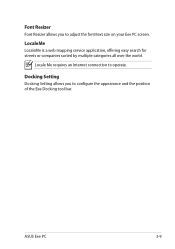
ASUS Eee PC 3-9 Docking Setting Docking Setting allows you to adjust the font/text size on your Eee PC screen. Locale Me requires an Internet connection to operate. LocaleMe LocaleMe is a web mapping service application, offering easy search for streets or companies sorted by multiple categories all over the world. Font Resizer Font Resizer allows you to configure the appearance and the position of the Eee Docking tool bar.
ASUS Eee PC 3-9 Docking Setting Docking Setting allows you to adjust the font/text size on your Eee PC screen. Locale Me requires an Internet connection to operate. LocaleMe LocaleMe is a web mapping service application, offering easy search for streets or companies sorted by multiple categories all over the world. Font Resizer Font Resizer allows you to configure the appearance and the position of the Eee Docking tool bar.
User Manual
Page 46
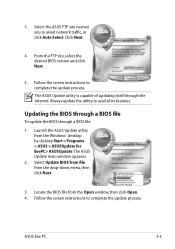
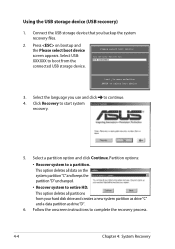
Connect the USB storage device that you use and click to a partition. Please select boot device: HDD:SM-ASUS-PHISON SSD USB:XXXXXXXX ↑ and ↓ to move selection ENTER to entire HD. This option deletes all partitions from the connected USB storage device.... This option deletes all data on bootup and the Please select boot device screen appears. Select USB: XXXXXX to start system recovery. 5. Click Recovery to boot from your hard disk drive and creates a new system partition as drive"C" ...
Connect the USB storage device that you use and click to a partition. Please select boot device: HDD:SM-ASUS-PHISON SSD USB:XXXXXXXX ↑ and ↓ to move selection ENTER to entire HD. This option deletes all partitions from the connected USB storage device.... This option deletes all data on bootup and the Please select boot device screen appears. Select USB: XXXXXX to start system recovery. 5. Click Recovery to boot from your hard disk drive and creates a new system partition as drive"C" ...
User Manual
Page 47
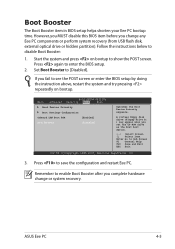
...Screen F1 General Help F10 Save and Exit ESC Exit v02.58 (C)Copyright 1985-2005, American Megatrends, Inc. 3. If you complete hardware change any Eee PC components or perform system recovery (from USB flash disk, external optical drive or hidden partition). Start the system and press on bootup. ASUS Eee PC... 4-5 Boot Booster The Boot Booster item in BIOS setup helps shorten your Eee PC bootup time. Set...
...Screen F1 General Help F10 Save and Exit ESC Exit v02.58 (C)Copyright 1985-2005, American Megatrends, Inc. 3. If you complete hardware change any Eee PC components or perform system recovery (from USB flash disk, external optical drive or hidden partition). Start the system and press on bootup. ASUS Eee PC... 4-5 Boot Booster The Boot Booster item in BIOS setup helps shorten your Eee PC bootup time. Set...


