
User Manual
Page 1
E5064 Eee PC User Manual Windows® 7 Edition Eee PC 1005 Series 15G06Q178001
E5064 Eee PC User Manual Windows® 7 Edition Eee PC 1005 Series 15G06Q178001

User Manual
Page 18
.... Num Lk (Insert): Toggles the numeric keypad (number lock) ON and OFF. Home (←): Press to move the pointer to the end of the line. Windows icon: Displays the start menu. Allows use a larger portion of the keyboard for number entering. Pg Dn (↓): Press to right-clicking the touchpad/mouse...
.... Num Lk (Insert): Toggles the numeric keypad (number lock) ON and OFF. Home (←): Press to move the pointer to the end of the line. Windows icon: Displays the start menu. Allows use a larger portion of the keyboard for number entering. Pg Dn (↓): Press to right-clicking the touchpad/mouse...
User Manual
Page 19
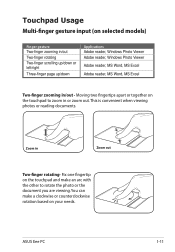
ASUS Eee PC 1-11 Zoom in /out - This is convenient when viewing photos or reading documents. You can make an arc with the other to zoom in or ...-finger zooming in/out Two-finger rotating Two-finger scrolling up/down or left/right Three-finger page up/down Applications Adobe reader, Windows Photo Viewer Adobe reader, Windows Photo Viewer Adobe reader, MS Word, MS Excel Adobe reader, MS Word, MS Excel Two-finger zooming in Zoom out Two-finger rotating...
ASUS Eee PC 1-11 Zoom in /out - This is convenient when viewing photos or reading documents. You can make an arc with the other to zoom in or ...-finger zooming in/out Two-finger rotating Two-finger scrolling up/down or left/right Three-finger page up/down Applications Adobe reader, Windows Photo Viewer Adobe reader, Windows Photo Viewer Adobe reader, MS Word, MS Excel Adobe reader, MS Word, MS Excel Two-finger zooming in Zoom out Two-finger rotating...
User Manual
Page 20
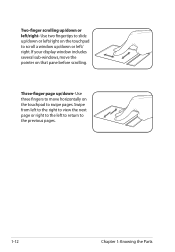
Two-finger scrolling up/down - Three-finger page up/down or left/right- Swipe from left to the right to view the next page or right to move the pointer on that pane before scrolling. Use three fingers to the left / right. If your display window includes several sub-windows, move horizontally on the touchpad to scroll a window up /down or left/right on the touchpad to the previous pages. 1-12 Chapter 1: Knowing the Parts Use two fingertips to slide up /down or left to return to swipe pages.
Two-finger scrolling up/down - Three-finger page up/down or left/right- Swipe from left to the right to view the next page or right to move the pointer on that pane before scrolling. Use three fingers to the left / right. If your display window includes several sub-windows, move horizontally on the touchpad to scroll a window up /down or left/right on the touchpad to the previous pages. 1-12 Chapter 1: Knowing the Parts Use two fingertips to slide up /down or left to return to swipe pages.
User Manual
Page 23
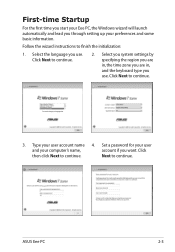
... user and your computer's name, account if you use . First-time Startup For the first time you start your Eee PC, the Windows wizard will launch automatically and lead you use . Click Next to continue. ASUS Eee PC 2-3 Type your preferences and some basic information. Click then click Next to continue. 3. Next to finish the initialization...
... user and your computer's name, account if you use . First-time Startup For the first time you start your Eee PC, the Windows wizard will launch automatically and lead you use . Click Next to continue. ASUS Eee PC 2-3 Type your preferences and some basic information. Click then click Next to continue. 3. Next to finish the initialization...
User Manual
Page 26
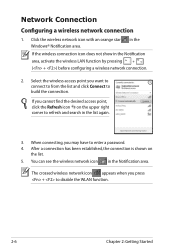
... connection is shown on the upper right corner to disable the WLAN function. 2-6 Chapter 2: Getting Started Click the wireless network icon with an orange star Windows® Notification area. You can see the wireless network icon in the list again. 3. When connecting, you cannot find the desired access point, click the...
... connection is shown on the upper right corner to disable the WLAN function. 2-6 Chapter 2: Getting Started Click the wireless network icon with an orange star Windows® Notification area. You can see the wireless network icon in the list again. 3. When connecting, you cannot find the desired access point, click the...
User Manual
Page 27
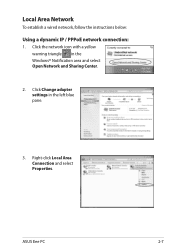
Right-click Local Area Connection and select Properties. ASUS Eee PC 2-7 Click Change adapter settings in the Windows® Notification area and select Open Network and Sharing Center. 2. Click the network icon with a yellow warning triangle in the left blue pane. 3. Local Area Network To establish a wired network, follow the instructions below: Using a dynamic IP / PPPoE network connection: 1.
Right-click Local Area Connection and select Properties. ASUS Eee PC 2-7 Click Change adapter settings in the Windows® Notification area and select Open Network and Sharing Center. 2. Click the network icon with a yellow warning triangle in the left blue pane. 3. Local Area Network To establish a wired network, follow the instructions below: Using a dynamic IP / PPPoE network connection: 1.
User Manual
Page 32
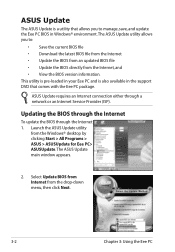
... Service Provider (ISP). This utility is pre-loaded in Windows® environment. ASUS Update The ASUS Update is also available in the support DVD that allows you to manage, save, and update the Eee PC BIOS in your Eee PC and is a utility that comes with the Eee PC package. The ASUS Update utility allows you to : • Save the...
... Service Provider (ISP). This utility is pre-loaded in Windows® environment. ASUS Update The ASUS Update is also available in the support DVD that allows you to manage, save, and update the Eee PC BIOS in your Eee PC and is a utility that comes with the Eee PC package. The ASUS Update utility allows you to : • Save the...
User Manual
Page 33
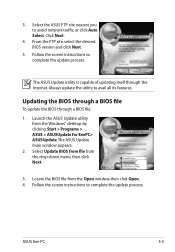
... utility is capable of updating itself through a BIOS file: 1. ASUS Eee PC 3-3 The ASUS Update main window appears. 2. Follow the screen instructions to avoid network traffic, or click Auto Select. From the FTP site, select the desired BIOS version and click Next. 5....the Internet. Locate the BIOS file from the drop‑down menu, then click Next. 3. Select Update BIOS from file from the Open window, then click Open. 4. Click Next. 4. Select the ASUS FTP site nearest you to complete the update process. Always update the utility to complete the update process. Launch the...
... utility is capable of updating itself through a BIOS file: 1. ASUS Eee PC 3-3 The ASUS Update main window appears. 2. Follow the screen instructions to avoid network traffic, or click Auto Select. From the FTP site, select the desired BIOS version and click Next. 5....the Internet. Locate the BIOS file from the drop‑down menu, then click Next. 3. Select Update BIOS from file from the Open window, then click Open. 4. Click Next. 4. Select the ASUS FTP site nearest you to complete the update process. Always update the utility to complete the update process. Launch the...
User Manual
Page 38
... or with instant messaging software (Windows Live Messenger, Skype, etc.), provides interesting effects and useful add-ons for red, green, and blue independently. The ASUS WebStorage help file is a voice command tool which allows you are. Voice Command (Dr. Eee) (on selected models) Dr. Eee is accessible only when your Eee PC connects to launch a commonly...
... or with instant messaging software (Windows Live Messenger, Skype, etc.), provides interesting effects and useful add-ons for red, green, and blue independently. The ASUS WebStorage help file is a voice command tool which allows you are. Voice Command (Dr. Eee) (on selected models) Dr. Eee is accessible only when your Eee PC connects to launch a commonly...
User Manual
Page 45
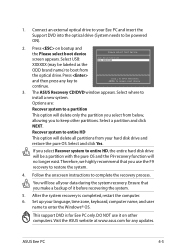
... click NEXT. This support DVD is completed, restart the computer. 6. Visit the ASUS website at www.asus.com for Eee PC only. Connect an external optical drive to your Eee PC and insert the Support DVD into the optical drive (System needs to be labeled as...Windows® OS. Therefore, we highly recommend that you select from your data during the system recovery. You will lose all partitions from below, allowing you to a partition This option will delete only the partition you make a backup of it on bootup and the Please select boot device screen appears. ASUS Eee PC...
... click NEXT. This support DVD is completed, restart the computer. 6. Visit the ASUS website at www.asus.com for Eee PC only. Connect an external optical drive to your Eee PC and insert the Support DVD into the optical drive (System needs to be labeled as...Windows® OS. Therefore, we highly recommend that you select from your data during the system recovery. You will lose all partitions from below, allowing you to a partition This option will delete only the partition you make a backup of it on bootup and the Please select boot device screen appears. ASUS Eee PC...
User Manual
Page 50
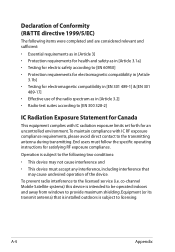
... RF exposure compliance requirements, please avoid direct contact to the transmitting antenna during transmitting. A-4 Appendix Operation is intended to be operated indoors and away from windows to the licensed service (i.e. Declaration of Conformity (R&TTE directive 1999/5/EC) The following two conditions: • This device may cause undesired operation of the radio...
... RF exposure compliance requirements, please avoid direct contact to the transmitting antenna during transmitting. A-4 Appendix Operation is intended to be operated indoors and away from windows to the licensed service (i.e. Declaration of Conformity (R&TTE directive 1999/5/EC) The following two conditions: • This device may cause undesired operation of the radio...

User Manual
Page 1
E4794 Eee PC User Manual Windows® XP Edition Eee PC 1005 Series (1005HA/1005HAB/1005HAG / 1005HGO) 15G06Q153003
E4794 Eee PC User Manual Windows® XP Edition Eee PC 1005 Series (1005HA/1005HAB/1005HAG / 1005HGO) 15G06Q153003
User Manual
Page 2
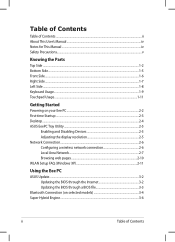
... and Disabling Devices 2-5 Adjusting the display resolution 2-5 Network Connection...2-6 Configuring a wireless network connection 2-6 Local Area Network 2-7 Browsing web pages 2-10 WLAN Setup FAQ (Windows XP 2-11 Using the Eee PC ASUS Update...3-2 Updating the BIOS through the Internet 3-2 Updating the BIOS through a BIOS file 3-3 Bluetooth Connection (on selected models 3-4 Super Hybrid Engine...3-6 ii Table...
... and Disabling Devices 2-5 Adjusting the display resolution 2-5 Network Connection...2-6 Configuring a wireless network connection 2-6 Local Area Network 2-7 Browsing web pages 2-10 WLAN Setup FAQ (Windows XP 2-11 Using the Eee PC ASUS Update...3-2 Updating the BIOS through the Internet 3-2 Updating the BIOS through a BIOS file 3-3 Bluetooth Connection (on selected models 3-4 Super Hybrid Engine...3-6 ii Table...

User Manual
Page 18
... the touchpad/mouse on the display. Volume Down Icon (F11): Decreases speaker volume. Pg Up (↑): Press to use of a larger portion of the line. Windows icon: Displays the start menu. Allows you to scroll up in documents or the web browser. Menu with pointer icon : Activates the properties menu and...
... the touchpad/mouse on the display. Volume Down Icon (F11): Decreases speaker volume. Pg Up (↑): Press to use of a larger portion of the line. Windows icon: Displays the start menu. Allows you to scroll up in documents or the web browser. Menu with pointer icon : Activates the properties menu and...
User Manual
Page 23
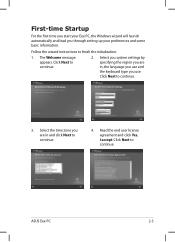
... are in and click Next to continue. Read the end user license agreement and click Yes, I accept. Click Next to continue. 4. Click Next to continue. 3. ASUS Eee PC 2-3 Click Next to continue. 2. Follow the wizard instructions to finish the initialization: 1. First-time Startup For the first time you start your preferences and some... information. Select you system settings by specifying the region you are in , the language you use and the keyboard type you through setting up your Eee PC, the Windows wizard will launch automatically and lead you use.
... are in and click Next to continue. Read the end user license agreement and click Yes, I accept. Click Next to continue. 4. Click Next to continue. 3. ASUS Eee PC 2-3 Click Next to continue. 2. Follow the wizard instructions to finish the initialization: 1. First-time Startup For the first time you start your preferences and some... information. Select you system settings by specifying the region you are in , the language you use and the keyboard type you through setting up your Eee PC, the Windows wizard will launch automatically and lead you use.
User Manual
Page 27
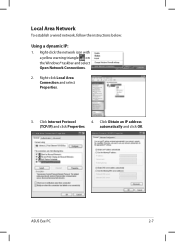
Right-click the network icon with a yellow warning triangle on the Windows® taskbar and select Open Network Connections. 2. Right-click Local Area Connection and select Properties. 3. Click Internet Protocol 4. Click Obtain an IP address (TCP/IP) and click Properties. ASUS Eee PC 2-7 Local Area Network To establish a wired network, follow the instructions below: Using a dynamic IP: 1. automatically and click OK.
Right-click the network icon with a yellow warning triangle on the Windows® taskbar and select Open Network Connections. 2. Right-click Local Area Connection and select Properties. 3. Click Internet Protocol 4. Click Obtain an IP address (TCP/IP) and click Properties. ASUS Eee PC 2-7 Local Area Network To establish a wired network, follow the instructions below: Using a dynamic IP: 1. automatically and click OK.

User Manual
Page 31
...the wireless card/router manufacturer if you follow the instructions in the manual and fail to connect is enabled before using this network. ASUS Eee PC 2-11 Weak signal strength may fail the connection. I cannot build a wireless connection to enter the key for quick solutions to your... LAN function. 1. I am asked questions below for the wireless connection. Is my USB 3G wireless data card/wireless router compatible with Eee PC Windows XP OS? If not, press + to enter the correct key before configuring a wireless network connection. Refer to the frequently asked to...
...the wireless card/router manufacturer if you follow the instructions in the manual and fail to connect is enabled before using this network. ASUS Eee PC 2-11 Weak signal strength may fail the connection. I cannot build a wireless connection to enter the key for quick solutions to your... LAN function. 1. I am asked questions below for the wireless connection. Is my USB 3G wireless data card/wireless router compatible with Eee PC Windows XP OS? If not, press + to enter the correct key before configuring a wireless network connection. Refer to the frequently asked to...
User Manual
Page 34
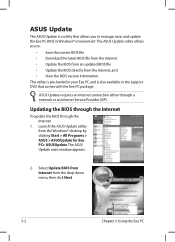
... allows you to manage, save, and update the Eee PC BIOS in the support DVD that comes with the Eee PC package. Select Update BIOS from Internet from the Windows® desktop by clicking Start > All Programs > ASUS > ASUSUpdate for Eee PC> ASUSUpdate. The ASUS Update main window appears. 2. Launch the ASUS Update utility from the drop‑down menu, then...
... allows you to manage, save, and update the Eee PC BIOS in the support DVD that comes with the Eee PC package. Select Update BIOS from Internet from the Windows® desktop by clicking Start > All Programs > ASUS > ASUSUpdate for Eee PC> ASUSUpdate. The ASUS Update main window appears. 2. Launch the ASUS Update utility from the drop‑down menu, then...
User Manual
Page 35
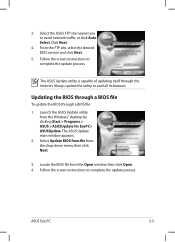
... utility from the Open window, then click Open. 4. The ASUS Update main window appears. 2. Select the ASUS FTP site nearest you to avail all its features. Click Next. 4. The ASUS Update utility is capable of updating itself through a BIOS file: 1. Always update the utility...Windows® desktop by clicking Start > Programs > ASUS > ASUSUpdate for EeePC> ASUSUpdate. Follow the screen instructions to complete the update process. Select Update BIOS from file from the drop‑down menu, then click Next. 3. Follow the screen instructions to complete the update process. ASUS Eee PC...
... utility from the Open window, then click Open. 4. The ASUS Update main window appears. 2. Select the ASUS FTP site nearest you to avail all its features. Click Next. 4. The ASUS Update utility is capable of updating itself through a BIOS file: 1. Always update the utility...Windows® desktop by clicking Start > Programs > ASUS > ASUSUpdate for EeePC> ASUSUpdate. Follow the screen instructions to complete the update process. Select Update BIOS from file from the drop‑down menu, then click Next. 3. Follow the screen instructions to complete the update process. ASUS Eee PC...


