User Manual
Page 2
......2-2 Bottom Side...2-5 Right Side...2-7 Left Side...2-8 Rear Side...2-9 Chapter 3: Getting Started Power System 3-2 Using AC Power 3-2 Using Battery Power 3-3 Battery Care...3-4 Touchpad Usage 3-6 Single-finger gesture input 3-6 Multi-finger gesture input 3-7 Keyboard Usage 3-8 Special Function Keys 3-8 First-time Startup 3-11 Desktop...3-14 ASUS EeePC Tray Utility 3-15 Enabling and Disabling Devices 3-15 Adjusting the display resolution 3-16 Shutdown...3-17 Chapter 4: Using the Eee PC Network Connection 4-2 Configuring a wireless network connection 4-2 ii Table of Contents
......2-2 Bottom Side...2-5 Right Side...2-7 Left Side...2-8 Rear Side...2-9 Chapter 3: Getting Started Power System 3-2 Using AC Power 3-2 Using Battery Power 3-3 Battery Care...3-4 Touchpad Usage 3-6 Single-finger gesture input 3-6 Multi-finger gesture input 3-7 Keyboard Usage 3-8 Special Function Keys 3-8 First-time Startup 3-11 Desktop...3-14 ASUS EeePC Tray Utility 3-15 Enabling and Disabling Devices 3-15 Adjusting the display resolution 3-16 Shutdown...3-17 Chapter 4: Using the Eee PC Network Connection 4-2 Configuring a wireless network connection 4-2 ii Table of Contents
User Manual
Page 3
Table of Contents Configuring a network connection 4-4 Browsing web pages 4-10 ASUS Update 4-11 Updating the BIOS through the Internet 4-11 Updating the BIOS through a BIOS file 4-13 Outlook Express 4-14 Skype™...4-15 Microsoft® Works 4-16 Initializing Microsoft® Works 4-16 Using Microsoft® Works 4-17 StarSuite 8...4-20 Initializing StarSuite 8 4-20 StarSuite Impress 4-23 StarSuite Writer 4-26 StarSuite Calc 4-26 StarSuite Draw 4-26 StarSuite Database 4-26 InterVideo...
Table of Contents Configuring a network connection 4-4 Browsing web pages 4-10 ASUS Update 4-11 Updating the BIOS through the Internet 4-11 Updating the BIOS through a BIOS file 4-13 Outlook Express 4-14 Skype™...4-15 Microsoft® Works 4-16 Initializing Microsoft® Works 4-16 Using Microsoft® Works 4-17 StarSuite 8...4-20 Initializing StarSuite 8 4-20 StarSuite Impress 4-23 StarSuite Writer 4-26 StarSuite Calc 4-26 StarSuite Draw 4-26 StarSuite Database 4-26 InterVideo...
User Manual
Page 6
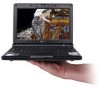
... this guide, allowing you to complete certain tasks safely and effectively.These notes have different degrees of this User's Manual. 2. Getting Started Provides information on using the Eee PC's utilities. 5. Vital information that must be followed for special situations. 1-2 Chapter 1: Introducing the Eee PC Knowing the Parts Provides information on the support DVD and system recovery. 6. About This User's Manual You are reading the Eee PC User's Manual.This User's Manual...
... this guide, allowing you to complete certain tasks safely and effectively.These notes have different degrees of this User's Manual. 2. Getting Started Provides information on using the Eee PC's utilities. 5. Vital information that must be followed for special situations. 1-2 Chapter 1: Introducing the Eee PC Knowing the Parts Provides information on the support DVD and system recovery. 6. About This User's Manual You are reading the Eee PC User's Manual.This User's Manual...
User Manual
Page 7
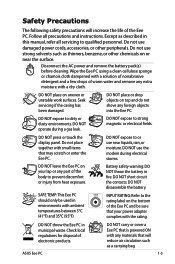
.... DO NOT expose to or use damaged power cords, accessories, or other chemicals on your power adapter complies with any materials that will increase the life of the Eee PC. Disconnect the AC power and remove the battery pack(s) before cleaning. DO NOT expose to dirty or dusty environments. DO NOT disassemble the battery. Wipe the Eee PC using a clean cellulose sponge or chamois...
.... DO NOT expose to or use damaged power cords, accessories, or other chemicals on your power adapter complies with any materials that will increase the life of the Eee PC. Disconnect the AC power and remove the battery pack(s) before cleaning. DO NOT expose to dirty or dusty environments. DO NOT disassemble the battery. Wipe the Eee PC using a clean cellulose sponge or chamois...
User Manual
Page 9
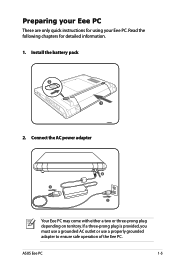
Read the following chapters for using your Eee PC These are only quick instructions for detailed inform1ation. 1. If a three-prong plug is provided, you must use a grounded AC outlet or use a properly grounded adapter to ensure safe operation of the Eee PC. ASUS Eee PC 1-5 Preparing your Eee PC. Install the battery pack 2 1 2 2. Connect the AC power adapter 1 3 Your Eee PC may come with either a two or three-prong plug depending on territory.
Read the following chapters for using your Eee PC These are only quick instructions for detailed inform1ation. 1. If a three-prong plug is provided, you must use a grounded AC outlet or use a properly grounded adapter to ensure safe operation of the Eee PC. ASUS Eee PC 1-5 Preparing your Eee PC. Install the battery pack 2 1 2 2. Connect the AC power adapter 1 3 Your Eee PC may come with either a two or three-prong plug depending on territory.

User Manual
Page 13
... clean the display panel. 4 Power Switch The power switch allows powering ON and OFF the Eee PC and recovering from STR. Unlike desktop monitors, the LCD panel does not produce any radiation or flickering, so it to allow easy web and document navigation. ASUS Eee PC 2-3 1 Microphone (Built-in) The built-in mono microphone can be used for both hands. 6 Touchpad and Buttons The touchpad and its buttons comprises a pointing device that of...
... clean the display panel. 4 Power Switch The power switch allows powering ON and OFF the Eee PC and recovering from STR. Unlike desktop monitors, the LCD panel does not produce any radiation or flickering, so it to allow easy web and document navigation. ASUS Eee PC 2-3 1 Microphone (Built-in) The built-in mono microphone can be used for both hands. 6 Touchpad and Buttons The touchpad and its buttons comprises a pointing device that of...

User Manual
Page 14
... battery's power as follows: ON: The Eee PC's battery is charging when AC power is not connected. Solid-State disk (SSD) Indicator The solid-state disk drive indicator blinks when data is charged or completely drained. When the built-in wireless LAN. OFF: The Eee PC's battery is written to or read from the disk drive. 7 Status Indicators (front) Power Indicator The power indicator lights when the Eee PC is turned ON and blinks slowly when the Eee PC is turned OFF. This indicator...
... battery's power as follows: ON: The Eee PC's battery is charging when AC power is not connected. Solid-State disk (SSD) Indicator The solid-state disk drive indicator blinks when data is charged or completely drained. When the built-in wireless LAN. OFF: The Eee PC's battery is written to or read from the disk drive. 7 Status Indicators (front) Power Indicator The power indicator lights when the Eee PC is turned ON and blinks slowly when the Eee PC is turned OFF. This indicator...
User Manual
Page 15
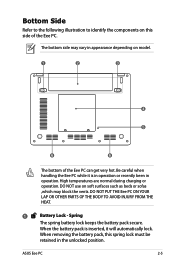
... the battery pack secure. When removing the battery pack, this side of the Eee PC can get very hot. DO NOT use on this spring lock must be retained in the unlocked position. High temperatures are normal during charging or operation. The bottom side may block the vents. When the battery pack is in operation or recently been in appearance depending on model...
... the battery pack secure. When removing the battery pack, this side of the Eee PC can get very hot. DO NOT use on this spring lock must be retained in the unlocked position. High temperatures are normal during charging or operation. The bottom side may block the vents. When the battery pack is in operation or recently been in appearance depending on model...
User Manual
Page 16
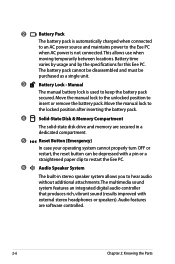
... the battery pack secured. Audio features are secured in stereo speaker system allows you to the Eee PC when AC power is not connected. Manual The manual battery lock is used to insert or remove the battery pack. This allows use when moving temporarily between locations. The battery pack cannot be disassembled and must be depressed with external stereo headphones or speakers). The multimedia sound system features an integrated digital audio controller that...
... the battery pack secured. Audio features are secured in stereo speaker system allows you to the Eee PC when AC power is not connected. Manual The manual battery lock is used to insert or remove the battery pack. This allows use when moving temporarily between locations. The battery pack cannot be disassembled and must be depressed with external stereo headphones or speakers). The multimedia sound system features an integrated digital audio controller that...
User Manual
Page 17
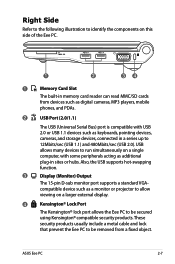
... cable and lock that prevent the Eee PC to be secured using Kensington® compatible security products. Also, the USB supports hot-swapping function. 3 Display (Monitor) Output The 15-pin D-sub monitor port supports a standard VGA- compatible device such as a monitor or projector to allow viewing on a larger external display. 4 Kensington® Lock Port The Kensington® lock port allows the Eee PC to be removed from devices such as digital cameras, MP3 players, mobile phones, and PDAs. 2 2.0 USB Port (2.0/1.1) The USB (Universal Serial...
... cable and lock that prevent the Eee PC to be secured using Kensington® compatible security products. Also, the USB supports hot-swapping function. 3 Display (Monitor) Output The 15-pin D-sub monitor port supports a standard VGA- compatible device such as a monitor or projector to allow viewing on a larger external display. 4 Kensington® Lock Port The Kensington® lock port allows the Eee PC to be removed from devices such as digital cameras, MP3 players, mobile phones, and PDAs. 2 2.0 USB Port (2.0/1.1) The USB (Universal Serial...
User Manual
Page 18
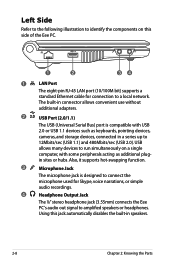
.... 2-8 Chapter 2: Knowing the Parts Also, it supports hot-swapping function. 3 Microphone Jack The microphone jack is compatible with some peripherals acting as keyboards, pointing devices, cameras, and storage devices, connected in connector allows convenient use without additional adapters. 2 2.0 USB Port (2.0/1.1) The USB (Universal Serial Bus) port is designed to connect the microphone used for connection to a local network. The built-in a series up to 12Mbits/sec (USB 1.1) and 480Mbits/sec (USB 2.0). Left Side Refer to...
.... 2-8 Chapter 2: Knowing the Parts Also, it supports hot-swapping function. 3 Microphone Jack The microphone jack is compatible with some peripherals acting as keyboards, pointing devices, cameras, and storage devices, connected in connector allows convenient use without additional adapters. 2 2.0 USB Port (2.0/1.1) The USB (Universal Serial Bus) port is designed to connect the microphone used for connection to a local network. The built-in a series up to 12Mbits/sec (USB 1.1) and 480Mbits/sec (USB 2.0). Left Side Refer to...
User Manual
Page 22
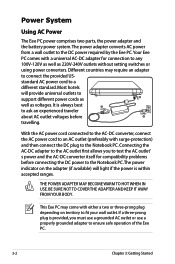
... Notebook PC. Connecting the AC-DC adapter to the AC outlet first allows you must use a grounded AC outlet or use a properly grounded adapter to fit your wall outlet. Power System Using AC Power The Eee PC power comprises two parts, the power adapter and the battery power system.The power adapter converts AC power from a wall outlet to the Notebook PC. The power indicator on territory to ensure safe operation of the Eee PC. 3-2 Chapter 3: Getting Started THE POWER ADAPTER...
... Notebook PC. Connecting the AC-DC adapter to the AC outlet first allows you must use a grounded AC outlet or use a properly grounded adapter to fit your wall outlet. Power System Using AC Power The Eee PC power comprises two parts, the power adapter and the battery power system.The power adapter converts AC power from a wall outlet to the Notebook PC. The power indicator on territory to ensure safe operation of the Eee PC. 3-2 Chapter 3: Getting Started THE POWER ADAPTER...
User Manual
Page 23
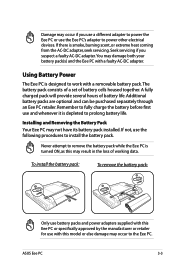
... to install the battery pack. Seek servicing if you use a different adapter to power the Eee PC or use the Eee PC's adapter to remove the battery pack while the Eee PC is 2 turned ON, as this may result in the loss of working data. 1 To install the battery pack: 1 To remove the battery pack: 2 2 1 1 3 2 Only use battery packs and power adapters supplied with this model or else damage may occur to the Eee PC. 3 ASUS Eee PC 3-3 Installing and Removing the Battery Pack 1 Your Eee PC...
... to install the battery pack. Seek servicing if you use a different adapter to power the Eee PC or use the Eee PC's adapter to remove the battery pack while the Eee PC is 2 turned ON, as this may result in the loss of working data. 1 To install the battery pack: 1 To remove the battery pack: 2 2 1 1 3 2 Only use battery packs and power adapters supplied with this model or else damage may occur to the Eee PC. 3 ASUS Eee PC 3-3 Installing and Removing the Battery Pack 1 Your Eee PC...
User Manual
Page 28
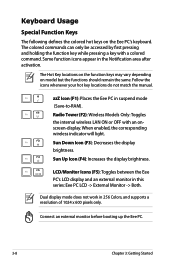
... your hot key locations do not match the manual. zzZ Icon (F1): Places the Eee PC in this series: Eee PC LCD -> External Monitor -> Both. When enabled, the corresponding wireless indicator will light. Sun Down Icon (F3): Decreases the display brightness. Dual display mode does not work in the Notification area after activation. The Hot Key locations on the function keys may vary depending on the Eee PC's keyboard. Connect an external monitor before booting up the Eee PC. 3-8 Chapter 3: Getting Started Some function icons appear...
... your hot key locations do not match the manual. zzZ Icon (F1): Places the Eee PC in this series: Eee PC LCD -> External Monitor -> Both. When enabled, the corresponding wireless indicator will light. Sun Down Icon (F3): Decreases the display brightness. Dual display mode does not work in the Notification area after activation. The Hot Key locations on the function keys may vary depending on the Eee PC's keyboard. Connect an external monitor before booting up the Eee PC. 3-8 Chapter 3: Getting Started Some function icons appear...

User Manual
Page 29
... initiate screen capture utility to capture, save, or print the contents of the line. ASUS Eee PC 3-9 Pg Up (↑): Press to scroll down in documents or the web browser. Pg Dn (↓): Press to scroll up in documents or the web browser. End (→): Press to move the pointer to use of a larger portion of the keyboard for number entering...
... initiate screen capture utility to capture, save, or print the contents of the line. ASUS Eee PC 3-9 Pg Up (↑): Press to scroll down in documents or the web browser. Pg Dn (↓): Press to scroll up in documents or the web browser. End (→): Press to move the pointer to use of a larger portion of the keyboard for number entering...
User Manual
Page 57
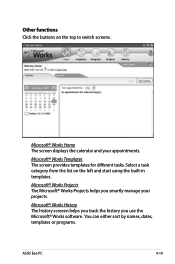
... you smartly manage your appointments. Other functions Click the buttons on the left and start using the built-in templates. Microsoft® Works Templates The screen provides templates for different tasks. Select a task category from the list on the top to switch screens. You can either sort by names, dates, templates or programs. ASUS Eee PC 4-19 Microsoft® Works Home The screen displays the...
... you smartly manage your appointments. Other functions Click the buttons on the left and start using the built-in templates. Microsoft® Works Templates The screen provides templates for different tasks. Select a task category from the list on the top to switch screens. You can either sort by names, dates, templates or programs. ASUS Eee PC 4-19 Microsoft® Works Home The screen displays the...
User Manual
Page 67
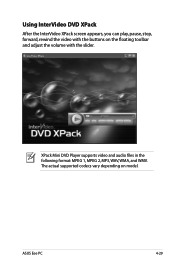
XPack Mini DVD Player supports video and audio files in the following format: MPEG 1, MPEG 2, MP3, WAV, WMA, and WMV. The actual supported codecs vary depending on the floating toolbar and adjust the volume with the slider. Using InterVideo DVD XPack After the InterVideo XPack screen appears, you can play, pause, stop, forward, rewind the video with the buttons on model. ASUS Eee PC 4-29
XPack Mini DVD Player supports video and audio files in the following format: MPEG 1, MPEG 2, MP3, WAV, WMA, and WMV. The actual supported codecs vary depending on the floating toolbar and adjust the volume with the slider. Using InterVideo DVD XPack After the InterVideo XPack screen appears, you can play, pause, stop, forward, rewind the video with the buttons on model. ASUS Eee PC 4-29
User Manual
Page 72
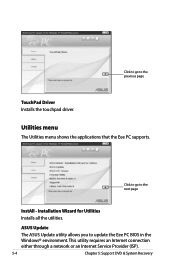
Installation Wizard for Utilities Installs all the utilities. Click to go to the previous page TouchPad Driver Installs the touchpad driver. This utility requires an Internet connection either through a network or an Internet Service Provider (ISP). 5-4 Chapter 5: Support DVD & System Recovery Click to go to the next page InstAll - ASUS Update The ASUS Update utility allows you to update the Eee PC BIOS in the Windows® environment. Utilities menu The Utilities menu shows the applications that the Eee PC supports.
Installation Wizard for Utilities Installs all the utilities. Click to go to the previous page TouchPad Driver Installs the touchpad driver. This utility requires an Internet connection either through a network or an Internet Service Provider (ISP). 5-4 Chapter 5: Support DVD & System Recovery Click to go to the next page InstAll - ASUS Update The ASUS Update utility allows you to update the Eee PC BIOS in the Windows® environment. Utilities menu The Utilities menu shows the applications that the Eee PC supports.

User Manual
Page 75
... installing Windows® XP service pack 2, otherwise it may be powered ON). 2. Select USB:XXXXXX (may cause the system malfunction. 3. Go to Advanced, set OS Installation to [Start], and then enable all the items in Onboard Devices Configuration. Press on bootup to be labled as network settings). 1. Press to select boot device ASUS Eee PC 5-7 Ensure that your Eee PC and insert the Support DVD into the optical drive (System needs to enter the BIOS setup...
... installing Windows® XP service pack 2, otherwise it may be powered ON). 2. Select USB:XXXXXX (may cause the system malfunction. 3. Go to Advanced, set OS Installation to [Start], and then enable all the items in Onboard Devices Configuration. Press on bootup to be labled as network settings). 1. Press to select boot device ASUS Eee PC 5-7 Ensure that your Eee PC and insert the Support DVD into the optical drive (System needs to enter the BIOS setup...
User Manual
Page 77
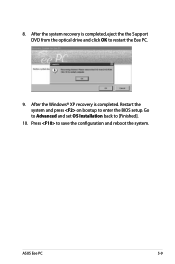
Go to Advanced and set OS Installation back to save the configuration and reboot the system. Press to [Finished]. 10. After the Windows® XP recovery is completed, eject the the Support DVD from the optical drive and click OK to enter the BIOS setup. ASUS Eee PC 5-9 Restart the system and press on bootup to restart the Eee PC. 9. After the system recovery is completed. 8.
Go to Advanced and set OS Installation back to save the configuration and reboot the system. Press to [Finished]. 10. After the Windows® XP recovery is completed, eject the the Support DVD from the optical drive and click OK to enter the BIOS setup. ASUS Eee PC 5-9 Restart the system and press on bootup to restart the Eee PC. 9. After the system recovery is completed. 8.


