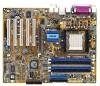
A8V-VM User's Manual for English Edition
Page 3
Table of contents Notices vi Safety information vii A8V-VM specifications summary viii Chapter 1: Product introduction 1.1 Welcome 1-2 1.2 Package contents 1-2 1.3 Special features 1-3 1.3.1 Product highlights 1-3 1.3.2 Innovative ASUS features 1-4 1.4 Before you proceed 1-5 1.5 Motherboard overview 1-6 1.5.1 Motherboard layout 1-6 1.5.2 Placement direction 1-6 1.5.3 Screw holes 1-7 1.6 Central Processing Unit (CPU 1-8 1.6.1 Overview 1-8 1.6.2 Installing the CPU 1-8 1.6.3 Installing the heatsink and fan 1-...
A8V-VM User's Manual for English Edition
Page 10
A8V-VM specifications summary CPU Chipset System Bus Memory VGA Expansion slots Storage Audio USB LAN ASUS special features BIOS features Back Panel I/O Ports Socket 939 for AMD® Athlon™ 64FX/ Athlon...;(C��P�U��P�a�r�a�m��e�t�e�r�R�e��c�a�ll�) ASUS MyLogo ASUS EZ Flash ASUS CrashFree BIOS 2 4 Mb Flash ROM, AMI BIOS, PnP, DMI2.0, WfM2.0, SM BIOS 2.3 1 x Parallel port 1 x Serial port 1 x PS/2 keyboard port 1...
A8V-VM User's Manual for English Edition
Page 11
A8V-VM specifications summary Internal I/O connectors Manageability Support CD contents Accessories Form Factor 1 x 24-pin ATX power connector 1 x 4-pin ATX 12V power connector 2 x USB connectors for four ... fan connectors CD audio-in connector Chassis intrusion connector System panel connector Wfm2.0, DMI2.0, WOL by PME, WOR by PME, PXE, RPL Device drivers ASUS PC Probe II ASUS LiveUpdate Utility Anti-Virus software User guide 1 x UltraDMA cable 1 x FDD cable I/0 shield 1 x SATA power cable 1 x SATA signal cable ATX Form Factor: 9.6 in x 9.0 in...
A8V-VM User's Manual for English Edition
Page 14
... the items in the long line of the above items is damaged or missing, contact your motherboard package for buying an ASUS® A8V-VM motherboard! Before you for the following items. Motherboard ASUS A8V-VM motherboard Cables Accessories 1 x floppy disk drive cable 1 x Ultral DMA 133/100/66 cable 1 x SATA power cable 1 x SATA signal cable I/O shield...
A8V-VM User's Manual for English Edition
Page 15
...;� desktop processors are based on AMD's 64-bit and 32-bit architecture, which represents the landmark introduction of the industry's first x86-64 technology. ASUS A8V-VM 1- See page 2-21 and 3-5. 6-Channel Audio and SoundMAX High Definition Audio System The onboard SoundMAX® ADI AD1986A 6-channel CODEC supports High Definition Audio standard...
A8V-VM User's Manual for English Edition
Page 17
... as the power supply case, before installing any component, place it on them. • Whenever you uninstall any system component. A8V-VM R A8V-VM Onboard LED SB_PWR ON Standby Power OFF Powered Off ASUS A8V-VM 1- Failure to do so may cause severe damage to avoid touching the ICs on a grounded antistatic pad or in softoff mode...
A8V-VM User's Manual for English Edition
Page 18
... fits into it into the holes indicated by circles to secure the motherboard to the chassis. Place this side towards the rear of the chassis A8V-VM R 1- Chapter 1: Product introduction Do not overtighten the screws! Doing so can cause you place it . Make sure to do so can damage the motherboard. Failure...
A8V-VM User's Manual for English Edition
Page 20
... data paths. Take note of these processors can run applications faster than processors with gold triangle) on the socket to ensure correct installation. Gold Arrow A8V-VM R A8V-VM CPU Socket 939 Before installing the CPU, make sure that the socket box is facing towards you and the load lever is on the motherboard...
A8V-VM User's Manual for English Edition
Page 21
... a 90°-100° angle. The CPU fits only in place, push down the socket lever to prevent bending the pins and damaging the CPU! 5. ASUS A8V-VM 1- 2. The lever clicks on the side tab to 90°-100° angle, otherwise the CPU does not fit in place. When the CPU is...
A8V-VM User's Manual for English Edition
Page 23
... CPU fan cable to the connector on the retention mechanism to secure the heatsink and fan to the module base. 5. CPU_FAN GND +12V Rotation A8V-VM R A8V-VM CPU Fan Connector ASUS A8V-VM Do not forget to plug this connector. 1-11 A clicking sound denotes that the fan and heatsink assembly perfectly fits the retention mechanism module...
A8V-VM User's Manual for English Edition
Page 24
... you install four 1 GB memory modules, the system may detect less than 3 GB of the total memory because of the sockets: DIMM_A1 DIMM_A2 DIMM_B1 DIMM_B2 A8V-VM R A8V-VM 184-pin DDR DIMM Sockets Dual-channel mode Pair 1 Pair 2 Sockets DIMM_A1 and DIMM_B1 DIMM_A2 and DIMM_B2 1.7.2 Memory configurations You may install 128 MB, 256...
A8V-VM User's Manual for English Edition
Page 25
...-5BC K4H560838F-TCCC K4H560838F-TCCC K4H560838F-TCB3 K4H560838F-TCB3 DD2508AKTA-5C DD2508AMTA AM3A568AJT-6B K4H560838E-TCCC V58C2256804SAT5B HYB25D256800BT-5B DIMM support A BC v v v v v v v v v v v v v v v v v v v v v v v v v v v v v v v v v v v v v v v v v v v v v v v v v v v v v v v v v v v v v v v v v v v v v v v v v v v v v v v v v v v v v v v v v v v v v v v v v v v v v v v v v v v v v v v v v v v v v ASUS A8V-VM 1-13 Table 1 Recommended memory configurations Mode DIMM_A1 Single-channel (1) - Dual-channel* (1) Populated (2) Populated Sockets DIMM_A2 DIMM_B1 -
A8V-VM User's Manual for English Edition
Page 27
... that it flips out with your fingers when pressing the retaining clips. Locked Retaining Clip 1.7.4 Removing a DIMM Follow these steps to avoid damaging the DIMM. 3. ASUS A8V-VM 1-15 Firmly insert the DIMM into a socket to remove a DIMM. 2 1. 1.7.3 Installing a DIMM Make sure to both the motherboard and the components. 1. Remove the DIMM from...
A8V-VM User's Manual for English Edition
Page 29
.... PCI Express x16 slot s� ha� r� ed PCI Express x1 slot 1 s� ha� r� ed Onboard USB controller 0 shared - - - - - - - Onboard Audio Controller - ASUS A8V-VM 1-17 shared - - - - - - PCI slot 2 - Onboard USB controller 2 - Onboard USB controller 1 - - Integrated graphics shared - - - - - - - IRQ assignments for ISA or PCI devices. shared...
A8V-VM User's Manual for English Edition
Page 31
... the jumper cap from pins 1-2 (default) to re-enter data. Plug the power cord and turn ON the computer. ASUS A8V-VM 1-19 The onboard button cell battery powers the RAM data in CMOS. A8V-VM R A8V-VM Clear RTC RAM CLRTC 12 23 Normal (Default) Clear CMOS • Except when clearing the RTC RAM, never remove...
A8V-VM User's Manual for English Edition
Page 32
...(+5VSB) whether under normal condition or in low power mode) using the connected USB devices. USBPW12 USBPW34 12 23 A8V-VM R +5V (Default) +5VSB USBPW78 USBPW56 12 23 A8V-VM USB Device Wake Up +5V (Default) +5VSB • The USB device wake-up feature. The USBPW56 and ... (no power to wake up from S1 sleep mode (CPU stopped, DRAM refreshed, system running in sleep mode. 3. A8V-VM R KBPWR 12 23 +5V (Default) +5VSB 1-20 A8V-VM Keyboard Power Setting Chapter 1: Product introduction USB device wake-up (3-pin USBPW12, USBPW34, USBPW56, USBPW78) Set these jumpers to...
A8V-VM User's Manual for English Edition
Page 33
... 10 Mbps connection BLINKING Transmitting and receiving BLINKING Transmitting and receiving LAN port 4. This 25-pin port connects a parallel printer, a scanner, or other audio sources. 5. ASUS A8V-VM 1-21 Line Out port (lime). 1.10 Connectors 1.10.1 Rear panel connectors 1 2 3 4 5 6 11 10 9 8 7 1. This port connects a microphone...
A8V-VM User's Manual for English Edition
Page 34
...11. This 15-pin VGA port connects to this connector, then connect the other devices that conform with a covered Pin 5. 1 - 22 FLOPPY A8V-VM R PIN 1 NOTE: Orient the red markings on the floppy ribbon cable to the audio configuration table below for the function of the cable to ...channel Light Blue Lime Pink Line In Line Out Mic In Back Surround Front Speaker Out Mic In Back Surround Front Speaker Out Center/Base 7. A8V-VM Floppy Disk Drive Connector Chapter 1: Product introduction These two 4-pin Universal Serial Bus (USB) ports are available for connecting USB 2.0 devices. 8....
A8V-VM User's Manual for English Edition
Page 35
2. PIN 1 PRI_IDE SEC_IDE A8V-VM R A8V-VM IDE Connectors PIN 1 ASUS A8V-VM 1-23 Connect the blue interface into the motherboad's IDE connector, then select the following modes to select the operating mode by hard-disk drive jumper. ...