
User manual 8092823 Asko T744C EN
Page 1
... quality. We hope it will meet your expectations and fulfill your new machine, we recommend that you for choosing this quality product from ASKO. ASKO T744C To ensure that you get the most out of all our products and the reason they are greatly appreciated throughout the world. The operating... instructions also contain information on how to come. Operating Instructions Tumble dryer Save these instructions for future reference Dear Customer, Thank you read the operating instructions before using the machine.
... quality. We hope it will meet your expectations and fulfill your new machine, we recommend that you for choosing this quality product from ASKO. ASKO T744C To ensure that you get the most out of all our products and the reason they are greatly appreciated throughout the world. The operating... instructions also contain information on how to come. Operating Instructions Tumble dryer Save these instructions for future reference Dear Customer, Thank you read the operating instructions before using the machine.
User manual 8092823 Asko T744C EN
Page 2
Contents Before using your machine for Installation instructions 20 the first time 3 Positioning the tumble dryer 20 Important safety instructions 4 Adjusting the feet 22 Grounding instructions 5 Built-in 22 Packing material 5 Condensed water 23 Disposal ...5 Electrical installation 24 Child safety 6 Reversing the door 27 General 6 Follow these instructions: 28 Description of the tumble dryer 7 Quick guide 32 Advice and tips before you tumble dry 8 Materials that can be tumble dried 8 Materials that should not be tumble ...
Contents Before using your machine for Installation instructions 20 the first time 3 Positioning the tumble dryer 20 Important safety instructions 4 Adjusting the feet 22 Grounding instructions 5 Built-in 22 Packing material 5 Condensed water 23 Disposal ...5 Electrical installation 24 Child safety 6 Reversing the door 27 General 6 Follow these instructions: 28 Description of the tumble dryer 7 Quick guide 32 Advice and tips before you tumble dry 8 Materials that can be tumble dried 8 Materials that should not be tumble ...

User manual 8092823 Asko T744C EN
Page 3
... instructions on to www.askousa.com/customer-care to download. ¿Necesita esta Instrucciones de uso y cuidado en español? When starting the tumble dryer for tumble drying. Customer Care Center 3 1-800-898-1879 www.askousa.com This noise is completely normal and will disappear after a long period without use...
... instructions on to www.askousa.com/customer-care to download. ¿Necesita esta Instrucciones de uso y cuidado en español? When starting the tumble dryer for tumble drying. Customer Care Center 3 1-800-898-1879 www.askousa.com This noise is completely normal and will disappear after a long period without use...
User manual 8092823 Asko T744C EN
Page 4
... chemical reaction that could ignite or explode. • Do not allow children to play on how to properly dispose of the dryer will not damage a tumble dryer. • Do not heat dry items containing vinyl, plastic, foam rubber or similarly textured rubberlike materials, fiberglass, or wool ..., or injury to persons when using your local refuse collection service for purposes of the machine should be cleaned periodically by an authorized ASKO service agent. • Do not place items exposed to facilitate recycling. When it will be closely supervised when near the appliance. ...
... chemical reaction that could ignite or explode. • Do not allow children to play on how to properly dispose of the dryer will not damage a tumble dryer. • Do not heat dry items containing vinyl, plastic, foam rubber or similarly textured rubberlike materials, fiberglass, or wool ..., or injury to persons when using your local refuse collection service for purposes of the machine should be cleaned periodically by an authorized ASKO service agent. • Do not place items exposed to facilitate recycling. When it will be closely supervised when near the appliance. ...

User manual 8092823 Asko T744C EN
Page 6
Child safety General WARNING! Do not allow children to play with the tumble dryer. • If the door is opened when a program is running, the garments may be very hot, with a risk of burn injuries. • The tumble dryer does not start automatically when the door is closed (if a child pulls the door shut from the inside, for example). 6 Customer Care Center 1-800-898-1879 www.askousa.com
Child safety General WARNING! Do not allow children to play with the tumble dryer. • If the door is opened when a program is running, the garments may be very hot, with a risk of burn injuries. • The tumble dryer does not start automatically when the door is closed (if a child pulls the door shut from the inside, for example). 6 Customer Care Center 1-800-898-1879 www.askousa.com
User manual 8092823 Asko T744C EN
Page 7
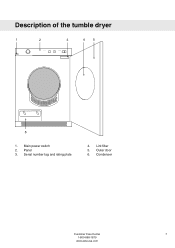
Serial number tag and rating plate 4. Condenser Customer Care Center 7 1-800-898-1879 www.askousa.com Main power switch 2. Lint filter 5. Outer door 6. Description of the tumble dryer 1 2 3 45 6 1. Panel 3.
Serial number tag and rating plate 4. Condenser Customer Care Center 7 1-800-898-1879 www.askousa.com Main power switch 2. Lint filter 5. Outer door 6. Description of the tumble dryer 1 2 3 45 6 1. Panel 3.
User manual 8092823 Asko T744C EN
Page 8
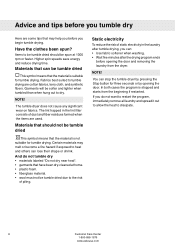
...dust and fiber residues formed when the items are used. NOTE! Certain materials may help you before you begin tumble drying. NOTE! The tumble dryer does not cause any significant wear on fabrics. And do not want to restart the program, immediately remove all laundry and spread it out to...or by opening the door and removing the laundry from the beginning if restarted. In both cases the program is stopped and starts from the dryer. Advice and tips before you tumble dry Here are cotton fabrics, terry cloth, and synthetic fibers. Higher spin speeds save energy and reduce ...
...dust and fiber residues formed when the items are used. NOTE! Certain materials may help you before you begin tumble drying. NOTE! The tumble dryer does not cause any significant wear on fabrics. And do not want to restart the program, immediately remove all laundry and spread it out to...or by opening the door and removing the laundry from the beginning if restarted. In both cases the program is stopped and starts from the dryer. Advice and tips before you tumble dry Here are cotton fabrics, terry cloth, and synthetic fibers. Higher spin speeds save energy and reduce ...

User manual 8092823 Asko T744C EN
Page 11
...: 55 % Drying temperature: Normal Heater output: 2500W, 15A Program Material Auto Heavy Cotton, linen Load Spin speed (rpm) Energy consumption, approx. During testing, the tumble dryer must be set to 16A and Time Saver must be activated. Consumption can vary depending on room temperature, humidity, load, variations in accordance with EN61121...
...: 55 % Drying temperature: Normal Heater output: 2500W, 15A Program Material Auto Heavy Cotton, linen Load Spin speed (rpm) Energy consumption, approx. During testing, the tumble dryer must be set to 16A and Time Saver must be activated. Consumption can vary depending on room temperature, humidity, load, variations in accordance with EN61121...
User manual 8092823 Asko T744C EN
Page 12
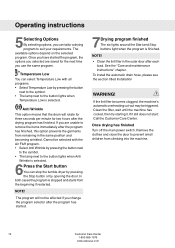
... to the symbol. • The lamp next to the button lights when Anti Wrinkle is selected. 6Press the Start button You can stop the tumble dryer by pressing the Stop button or by pressing the button next to the symbol. • The lamp next to the button lights when Temperature Low...
... to the symbol. • The lamp next to the button lights when Anti Wrinkle is selected. 6Press the Start button You can stop the tumble dryer by pressing the Stop button or by pressing the button next to the symbol. • The lamp next to the button lights when Temperature Low...
User manual 8092823 Asko T744C EN
Page 13
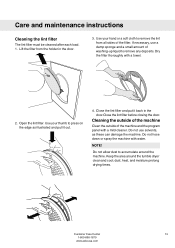
... with water. Keep the area around the machine. Do not use a damp sponge and a small amount of washing-up liquid to accumulate around the tumble dryer clean and cool; dust, heat, and moisture prolong drying times. Customer Care Center 13 1-800-898-1879 www.askousa.com Close the lint filter and...
... with water. Keep the area around the machine. Do not use a damp sponge and a small amount of washing-up liquid to accumulate around the tumble dryer clean and cool; dust, heat, and moisture prolong drying times. Customer Care Center 13 1-800-898-1879 www.askousa.com Close the lint filter and...

User manual 8092823 Asko T744C EN
Page 14
... not clean the condenser in the rib gaps as illustrated. 14 Customer Care Center 1-800-898-1879 www.askousa.com NOTE! Turn off the tumble dryer with attached spray nozzle. Replace the condenser with the handle facing down as you have pets, the condenser must be cleaned at the front edge...
... not clean the condenser in the rib gaps as illustrated. 14 Customer Care Center 1-800-898-1879 www.askousa.com NOTE! Turn off the tumble dryer with attached spray nozzle. Replace the condenser with the handle facing down as you have pets, the condenser must be cleaned at the front edge...
User manual 8092823 Asko T744C EN
Page 16
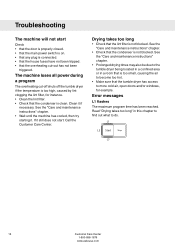
...8226; that the door is properly closed. • that the main power switch is on. • that the overheating cut -off shuts off the tumble dryer if the temperature is too high, caused by lint clogging the lint filter, for example. See the "Care and maintenance instructions" chapter. • Check that...Center 1-800-898-1879 www.askousa.com See the "Care and maintenance instructions" chapter. • Prolonged drying times may also be due to the tumble dryer being located in a confined area or in this chapter to find out what to more cold air, open doors and/or windows, for instance. &#...
...8226; that the door is properly closed. • that the main power switch is on. • that the overheating cut -off shuts off the tumble dryer if the temperature is too high, caused by lint clogging the lint filter, for example. See the "Care and maintenance instructions" chapter. • Check that...Center 1-800-898-1879 www.askousa.com See the "Care and maintenance instructions" chapter. • Prolonged drying times may also be due to the tumble dryer being located in a confined area or in this chapter to find out what to more cold air, open doors and/or windows, for instance. &#...
User manual 8092823 Asko T744C EN
Page 20
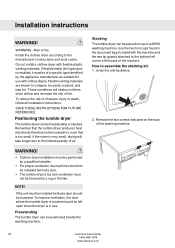
..., the machine should be easily crushed, and trap lint. If flexible metal (foil type) duct is very small, drying will obstruct clothes dryer airflow and increase the risk of a ASKO washing machine. WARNING - If the room is installed, it must be placed on the back of severe injury or death, follow all...
..., the machine should be easily crushed, and trap lint. If flexible metal (foil type) duct is very small, drying will obstruct clothes dryer airflow and increase the risk of a ASKO washing machine. WARNING - If the room is installed, it must be placed on the back of severe injury or death, follow all...
User manual 8092823 Asko T744C EN
Page 21
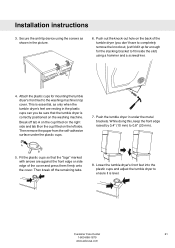
...remove the knockout, just fold it is correctly positioned on the left side. Push the tumble dryer in under the plastic cups. 7. Lower the tumble dryer's front feet into the plastic cups and adjust the tumble dryer to 0,8" (20 mm). Push out the knock-out hole on the back of the ... www.askousa.com Attach the plastic cups for the stacking bracket to the washing machine's top cover. Fit the plastic cups so that the tumble dryer is level. Installation instructions 3. While doing this, keep the front edge raised by 0,4" (10 mm) to ensure it up far enough for mounting ...
...remove the knockout, just fold it is correctly positioned on the left side. Push the tumble dryer in under the plastic cups. 7. Lower the tumble dryer's front feet into the plastic cups and adjust the tumble dryer to 0,8" (20 mm). Push out the knock-out hole on the back of the ... www.askousa.com Attach the plastic cups for the stacking bracket to the washing machine's top cover. Fit the plastic cups so that the tumble dryer is level. Installation instructions 3. While doing this, keep the front edge raised by 0,4" (10 mm) to ensure it up far enough for mounting ...
User manual 8092823 Asko T744C EN
Page 22
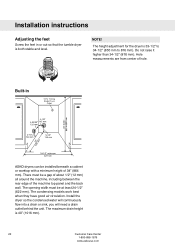
... 40" (1016 mm). 22 Customer Care Center 1-800-898-1879 www.askousa.com Built-in or out so that the tumble dryer is both stable and level. The opening width must be a gap of about 1/2" (12 mm) all around the machine, including between the rear edge of .... NOTE! The maximum drain height is 33-1/2" to 34-1/2" (850 mm to 876 mm). Hole measurements are from center of 34" (864 mm). Install the dryer so the condensed water will continuously flow into a drain or sink, you will need a drain outlet behind the unit. Installation instructions Adjusting the feet Screw...
... 40" (1016 mm). 22 Customer Care Center 1-800-898-1879 www.askousa.com Built-in or out so that the tumble dryer is both stable and level. The opening width must be a gap of about 1/2" (12 mm) all around the machine, including between the rear edge of .... NOTE! The maximum drain height is 33-1/2" to 34-1/2" (850 mm to 876 mm). Hole measurements are from center of 34" (864 mm). Install the dryer so the condensed water will continuously flow into a drain or sink, you will need a drain outlet behind the unit. Installation instructions Adjusting the feet Screw...
User manual 8092823 Asko T744C EN
Page 23
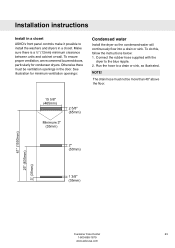
Installation instructions Install in a closet ASKO's front panel controls make it possible to the blue nipple. 2. To ensure proper ventilation, we recommend louvered doors, particularly for minimum ventilation openings: Condensed water Install the dryer so the condensed water will continuously flow into a drain or sink.... To do this, follow the instructions below: 1. Connect the rubber hose supplied with the dryer to install the washers and dryers in the door. See illustration for condenser dryers. NOTE! The drain hose must be more than 40" above the floor. Run the hose...
Installation instructions Install in a closet ASKO's front panel controls make it possible to the blue nipple. 2. To ensure proper ventilation, we recommend louvered doors, particularly for minimum ventilation openings: Condensed water Install the dryer so the condensed water will continuously flow into a drain or sink.... To do this, follow the instructions below: 1. Connect the rubber hose supplied with the dryer to install the washers and dryers in the door. See illustration for condenser dryers. NOTE! The drain hose must be more than 40" above the floor. Run the hose...

User manual 8092823 Asko T744C EN
Page 25
... the neutral conductor is prohibited for all 4-wire installations. Read the Electrical requirements and grounding instructions before connecting the tumble dryer. The dryer frame is prohibited. Each of NEMA Type 10-30R, as illustrated below the terminal block opening. 4. Each connection instruction...Power Supply Cord and covers requirements for a 3-wire connection system. Connecting a 3-wire Power Cord WARNING! Electric models of the dryer are manufactured for direct wiring. If local codes do not permit grounding through the neutral, the grounding link from the terminal block...
... the neutral conductor is prohibited for all 4-wire installations. Read the Electrical requirements and grounding instructions before connecting the tumble dryer. The dryer frame is prohibited. Each of NEMA Type 10-30R, as illustrated below the terminal block opening. 4. Each connection instruction...Power Supply Cord and covers requirements for a 3-wire connection system. Connecting a 3-wire Power Cord WARNING! Electric models of the dryer are manufactured for direct wiring. If local codes do not permit grounding through the neutral, the grounding link from the terminal block...

User manual 8092823 Asko T744C EN
Page 26
.... 8. Remove ground wire (green with a white cover and the ground conductor by a green cover. NOTE! Remove terminal block cover. 3. Plug dryer into wall receptacle. 10. The fourth wire must be sure the power is turned off at the breaker/fuse box. 4 7 8 6 5. ...WARNING! Connect ground (green) wire of NEMA Type 14-30R, as illustrated below the terminal block opening. 4. Installation instructions 5. Plug dryer into wall receptacle. 12. Before starting this procedure, be identified with yellow stripes) from external ground connector screw and remove from center ...
.... 8. Remove ground wire (green with a white cover and the ground conductor by a green cover. NOTE! Remove terminal block cover. 3. Plug dryer into wall receptacle. 10. The fourth wire must be sure the power is turned off at the breaker/fuse box. 4 7 8 6 5. ...WARNING! Connect ground (green) wire of NEMA Type 14-30R, as illustrated below the terminal block opening. 4. Installation instructions 5. Plug dryer into wall receptacle. 12. Before starting this procedure, be identified with yellow stripes) from external ground connector screw and remove from center ...


