
User manual 8092823 Asko T744C EN
Page 2
... 5 Electrical installation 24 Child safety 6 Reversing the door 27 General 6 Follow these instructions: 28 Description of the tumble dryer 7 Quick guide 32 Advice and tips before you tumble dry 8 Materials that can be tumble dried 8 Materials that should not be tumble dried 8 Static electricity 8 Operating instructions 9 Sort your fabrics 9 Select the program 10 Selecting Options 12 Press the Start button 12 Drying program finished 12 Care and maintenance instructions 13 Cleaning the lint filter...
... 5 Electrical installation 24 Child safety 6 Reversing the door 27 General 6 Follow these instructions: 28 Description of the tumble dryer 7 Quick guide 32 Advice and tips before you tumble dry 8 Materials that can be tumble dried 8 Materials that should not be tumble dried 8 Static electricity 8 Operating instructions 9 Sort your fabrics 9 Select the program 10 Selecting Options 12 Press the Start button 12 Drying program finished 12 Care and maintenance instructions 13 Cleaning the lint filter...
User manual 8092823 Asko T744C EN
Page 4
... into the appliance if the drum is made and marked to catch fire. • Electrical installation, if required, must be properly grounded. 4 Customer Care Center 1-800-898-1879 www.askousa.com Let the machine cool completely before using your dryer. During the program, the back of the dryer will not damage a tumble dryer. • Do not heat dry items containing vinyl, plastic...
... into the appliance if the drum is made and marked to catch fire. • Electrical installation, if required, must be properly grounded. 4 Customer Care Center 1-800-898-1879 www.askousa.com Let the machine cool completely before using your dryer. During the program, the back of the dryer will not damage a tumble dryer. • Do not heat dry items containing vinyl, plastic...

User manual 8092823 Asko T744C EN
Page 5
... circuit conductors and connected to take it will reduce the risk of the equipment-grounding conductor can be run with local guidelines. The plug must be made inoperable after deciding to the equipment-grounding terminal or lead on the appliance. Do not modify the plug provided with all local codes and ordinances. Use common sense and caution when installing, operating...
... circuit conductors and connected to take it will reduce the risk of the equipment-grounding conductor can be run with local guidelines. The plug must be made inoperable after deciding to the equipment-grounding terminal or lead on the appliance. Do not modify the plug provided with all local codes and ordinances. Use common sense and caution when installing, operating...
User manual 8092823 Asko T744C EN
Page 8
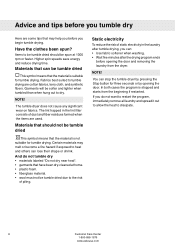
... the lint filter consists of piling. Have the clothes been spun? The tumble dryer does not cause any significant wear on fabrics. The lint trapped in the laundry after tumble drying, you can: • Use fabric softener when washing. • Wait five minutes after the drying program ends before opening the door. And do not want to restart the program, immediately remove...
... the lint filter consists of piling. Have the clothes been spun? The tumble dryer does not cause any significant wear on fabrics. The lint trapped in the laundry after tumble drying, you can: • Use fabric softener when washing. • Wait five minutes after the drying program ends before opening the door. And do not want to restart the program, immediately remove...

User manual 8092823 Asko T744C EN
Page 10
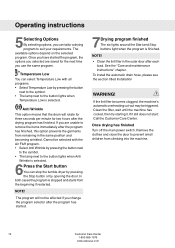
...when the load is just damp enough for items that are prone to what specific programs can be used for: Auto Heavy This program is for ironing or pressing. 10 Customer Care Center ...drier laundry than Auto Delicate. Operating instructions 4Select the program Program selector Options buttons Main power switch Start Stop Select a program by turning the program selector. Use the option buttons to the selected program. Auto Iron Dry This program shuts off the heat once the load is dry. Use the Auto Heavy, Auto Delicate, or Auto Iron Dry programs for these items. Stretch clothes...
...when the load is just damp enough for items that are prone to what specific programs can be used for: Auto Heavy This program is for ironing or pressing. 10 Customer Care Center ...drier laundry than Auto Delicate. Operating instructions 4Select the program Program selector Options buttons Main power switch Start Stop Select a program by turning the program selector. Use the option buttons to the selected program. Auto Iron Dry This program shuts off the heat once the load is dry. Use the Auto Heavy, Auto Delicate, or Auto Iron Dry programs for these items. Stretch clothes...

User manual 8092823 Asko T744C EN
Page 11
... power supply, and selected options. Operating instructions Program chart Here we present the energy and time consumption of a few different programs. The table shows the effect of intake air: 55 % Drying temperature: Normal Heater output: 2500W, 15A Program Material Auto Heavy Cotton, linen Load Spin speed (rpm) Energy consumption, approx. For the consumption values given below, the requirements are as follows: Temperature of intake air...
... power supply, and selected options. Operating instructions Program chart Here we present the energy and time consumption of a few different programs. The table shows the effect of intake air: 55 % Drying temperature: Normal Heater output: 2500W, 15A Program Material Auto Heavy Cotton, linen Load Spin speed (rpm) Energy consumption, approx. For the consumption values given below, the requirements are as follows: Temperature of intake air...
User manual 8092823 Asko T744C EN
Page 12
... lights around the Start and Stop buttons light when the program is selected. If you selected are unable to the button lights when Temperature Low is finished. Clean the filter, wait until the machine has cooled, then try starting it still does not start: Call the Customer Care Center. Remove the clothes and close the door to suit your requirements. Temperature Low You can select Temperature Low with the Air...
... lights around the Start and Stop buttons light when the program is selected. If you selected are unable to the button lights when Temperature Low is finished. Clean the filter, wait until the machine has cooled, then try starting it still does not start: Call the Customer Care Center. Remove the clothes and close the door to suit your requirements. Temperature Low You can select Temperature Low with the Air...
User manual 8092823 Asko T744C EN
Page 13
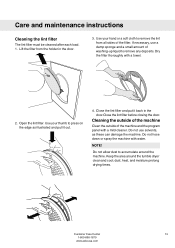
... spray the machine with a towel. 2. dust, heat, and moisture prolong drying times. Dry the filter thoroughly with water. Use your thumb to accumulate around the tumble dryer clean and cool; Cleaning the outside of the machine Clean the outside of washing-up liquid to remove the lint from the holder in the door.Close the lint filter before closing the door. Customer Care Center 13 1-800-898-1879 www...
... spray the machine with a towel. 2. dust, heat, and moisture prolong drying times. Dry the filter thoroughly with water. Use your thumb to accumulate around the tumble dryer clean and cool; Cleaning the outside of the machine Clean the outside of washing-up liquid to remove the lint from the holder in the door.Close the lint filter before closing the door. Customer Care Center 13 1-800-898-1879 www...

User manual 8092823 Asko T744C EN
Page 14
NOTE! Turn off the tumble dryer with attached spray nozzle. If you may damage the condenser. NOTE! Use a cotton bud or rag to collect in the channel in front of the compartment. 4. Care and maintenance instructions Cleaning the condenser The condenser should be cleaned more frequently. 1. Remove the Toe kick. 3. Open the condenser panel by turning the two knobs. Wipe any lint from the...
NOTE! Turn off the tumble dryer with attached spray nozzle. If you may damage the condenser. NOTE! Use a cotton bud or rag to collect in the channel in front of the compartment. 4. Care and maintenance instructions Cleaning the condenser The condenser should be cleaned more frequently. 1. Remove the Toe kick. 3. Open the condenser panel by turning the two knobs. Wipe any lint from the...
User manual 8092823 Asko T744C EN
Page 16
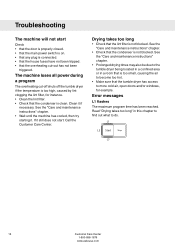
... power switch is on. • that any plug is clean. See the "Care and maintenance instructions" chapter. • Prolonged drying times may also be due to the tumble dryer being located in a confined area or in this chapter to find out what to more cold air, open doors and/or windows, for instance. • Clean the lint filter. • Check that the condenser is connected. • that the house fuses...
... power switch is on. • that any plug is clean. See the "Care and maintenance instructions" chapter. • Prolonged drying times may also be due to the tumble dryer being located in a confined area or in this chapter to find out what to more cold air, open doors and/or windows, for instance. • Clean the lint filter. • Check that the condenser is connected. • that the house fuses...

User manual 8092823 Asko T744C EN
Page 18
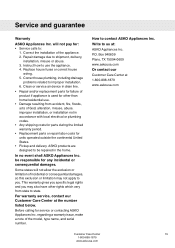
... Length of warranty Two-Year Full From date of purchase. performed by an authorized ASKO service agent. 18 Customer Care Center 1-800-898-1879 www.askousa.com Service must be provided by an authorized ASKO service agent. Lifetime ASKO replacement parts (labor cost not included) for : ASKO replacement parts and/or repair labor to correct defect in materials or workmanship. If you do not have access...
... Length of warranty Two-Year Full From date of purchase. performed by an authorized ASKO service agent. 18 Customer Care Center 1-800-898-1879 www.askousa.com Service must be provided by an authorized ASKO service agent. Lifetime ASKO replacement parts (labor cost not included) for : ASKO replacement parts and/or repair labor to correct defect in materials or workmanship. If you do not have access...
User manual 8092823 Asko T744C EN
Page 19
... Or contact our Customer Care Center at : ASKO Appliances Inc. Clean or service air device in accordance with local electrical or plumbing codes. • Any shipping costs for parts during the limited warranty period. • Replacement parts or repair labor costs for units operated outside the continental United States. • Pickup and delivery. Correct the installation of the model, type name, and serial number. ASKO products are designed to...
... Or contact our Customer Care Center at : ASKO Appliances Inc. Clean or service air device in accordance with local electrical or plumbing codes. • Any shipping costs for parts during the limited warranty period. • Replacement parts or repair labor costs for units operated outside the continental United States. • Pickup and delivery. Correct the installation of the model, type name, and serial number. ASKO products are designed to...
User manual 8092823 Asko T744C EN
Page 20
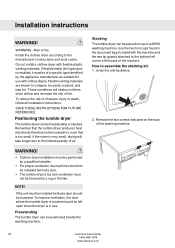
... plastic venting materials. Stacking The tumble dryer can be positioned beside the washing machine. How to the manufacturer's instructions and local codes. Risk of severe injury or death, follow all installation instructions. Install the clothes dryer according to assemble the stacking kit: 1. NOTE! Freestanding The tumble dryer can be blocked by a rug or the like. If flexible metal (foil type) duct is very small, drying will obstruct clothes dryer airflow...
... plastic venting materials. Stacking The tumble dryer can be positioned beside the washing machine. How to the manufacturer's instructions and local codes. Risk of severe injury or death, follow all installation instructions. Install the clothes dryer according to assemble the stacking kit: 1. NOTE! Freestanding The tumble dryer can be blocked by a rug or the like. If flexible metal (foil type) duct is very small, drying will obstruct clothes dryer airflow...
User manual 8092823 Asko T744C EN
Page 22
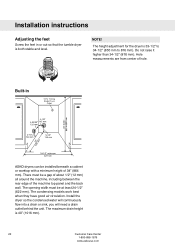
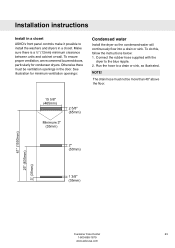
... the rear edge of hole. Install the dryer so the condensed water will continuously flow into a drain or sink, you will need a drain outlet behind the unit. Hole measurements are from center of the machine top panel and the back wall. Installation instructions Adjusting the feet Screw the feet in ASKO dryers can be... be installed beneath a cabinet or worktop with a minimum height of 34" (864 mm). The condensing models work best when they have good air circulation. NOTE! Do not raise it higher than 34-1/2" (876 mm). The maximum drain height is 40" (1016 mm). 22 Customer Care Center...
... the rear edge of hole. Install the dryer so the condensed water will continuously flow into a drain or sink, you will need a drain outlet behind the unit. Hole measurements are from center of the machine top panel and the back wall. Installation instructions Adjusting the feet Screw the feet in ASKO dryers can be... be installed beneath a cabinet or worktop with a minimum height of 34" (864 mm). The condensing models work best when they have good air circulation. NOTE! Do not raise it higher than 34-1/2" (876 mm). The maximum drain height is 40" (1016 mm). 22 Customer Care Center...
User manual 8092823 Asko T744C EN
Page 23
... water will continuously flow into a drain or sink. Otherwise there must not be ventilation openings in a closet. Connect the rubber hose supplied with the dryer to a drain or sink, as illustrated. The drain hose must be more than 40" above the floor. See illustration for condenser dryers. Installation instructions Install in a closet ASKO's front panel controls make it possible to install the washers and dryers in the door...
... water will continuously flow into a drain or sink. Otherwise there must not be ventilation openings in a closet. Connect the rubber hose supplied with the dryer to a drain or sink, as illustrated. The drain hose must be more than 40" above the floor. See illustration for condenser dryers. Installation instructions Install in a closet ASKO's front panel controls make it possible to install the washers and dryers in the door...
User manual 8092823 Asko T744C EN
Page 24
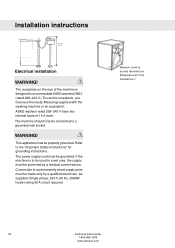
... two internal fuses of the machine is to a permanently wired supply point must be connected to accommodate ASKO washers ONLY (rated 208-240 V.) To use this receptacle, you must be grounded. Refer to access terminal box. (Requires a 20-Torx screwdriver.) 24 Customer Care Center 1-800-898-1879 www.askousa.com As supplied: Single-phase, 230 V, 60 Hz, 2500W heater rating 30 A circuit required Remove cover to the...
... two internal fuses of the machine is to a permanently wired supply point must be connected to accommodate ASKO washers ONLY (rated 208-240 V.) To use this receptacle, you must be grounded. Refer to access terminal box. (Requires a 20-Torx screwdriver.) 24 Customer Care Center 1-800-898-1879 www.askousa.com As supplied: Single-phase, 230 V, 60 Hz, 2500W heater rating 30 A circuit required Remove cover to the...

User manual 8092823 Asko T744C EN
Page 25
... and covers requirements for a 3-wire connection system. Connecting a 3-wire Power Cord WARNING! Before starting this procedure, be used when the appliance is grounded by direct wiring. The numbers in the illustration below the terminal block opening. 4. Turn the power off at the breaker or fuse box. 2. Loosen or remove center terminal block screw. 4 5 6 Customer Care Center 25 1-800-898-1879 www.askousa.com Installation instructions Electrical Connections WARNING! Read the Electrical requirements and grounding instructions before connecting the tumble dryer. Electric models...
... and covers requirements for a 3-wire connection system. Connecting a 3-wire Power Cord WARNING! Before starting this procedure, be used when the appliance is grounded by direct wiring. The numbers in the illustration below the terminal block opening. 4. Turn the power off at the breaker or fuse box. 2. Loosen or remove center terminal block screw. 4 5 6 Customer Care Center 25 1-800-898-1879 www.askousa.com Installation instructions Electrical Connections WARNING! Read the Electrical requirements and grounding instructions before connecting the tumble dryer. Electric models...

User manual 8092823 Asko T744C EN
Page 26
... Customer Care Center 1-800-898-1879 www.askousa.com Tighten the strain relief screws. 8. Connect ground (green) wire of power supply cord to the step numbers. 1. Power Supply Cord You will need a 4-wire power supply cord with yellow stripes) from external ground connector screw and remove from center terminal block. 6. Replace terminal box cover on at breaker/fuse box. To connect a 4-wire power cord to external ground conductor screw. 7. Installation instructions 5. Connect ground (center) wire of cord to the dryer, follow...
... Customer Care Center 1-800-898-1879 www.askousa.com Tighten the strain relief screws. 8. Connect ground (green) wire of power supply cord to the step numbers. 1. Power Supply Cord You will need a 4-wire power supply cord with yellow stripes) from external ground connector screw and remove from center terminal block. 6. Replace terminal box cover on at breaker/fuse box. To connect a 4-wire power cord to external ground conductor screw. 7. Installation instructions 5. Connect ground (center) wire of cord to the dryer, follow...

User manual 8092823 Asko T744C EN
Page 28
... the cover plate on the right or the left. Switch the catch and the cover plate. 1 2 28 Customer Care Center 1-800-898-1879 www.askousa.com Refit the door by loosening the hinge screws slightly, affixing the door, and closing it . Follow these instructions: 1. Use a flat screwdriver to remove the plugs. 7. Retighten the hinges. Remove both door pins (top and bottom). Replace the Toe...
... the cover plate on the right or the left. Switch the catch and the cover plate. 1 2 28 Customer Care Center 1-800-898-1879 www.askousa.com Refit the door by loosening the hinge screws slightly, affixing the door, and closing it . Follow these instructions: 1. Use a flat screwdriver to remove the plugs. 7. Retighten the hinges. Remove both door pins (top and bottom). Replace the Toe...
User manual 8092823 Asko T744C EN
Page 32
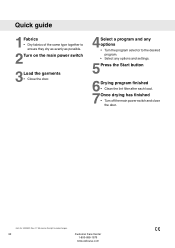
... lint filter after each load. 7Once drying has finished • Turn off the main power switch and close the door. Quick guide 1Fabrics • Dry fabrics of the same type together to ensure they dry as evenly as possible. 2Turn on the main power switch 3Load the garments • Close the door. 4Select a program and any options • Turn the program selector to make changes. 32 Customer Care...
... lint filter after each load. 7Once drying has finished • Turn off the main power switch and close the door. Quick guide 1Fabrics • Dry fabrics of the same type together to ensure they dry as evenly as possible. 2Turn on the main power switch 3Load the garments • Close the door. 4Select a program and any options • Turn the program selector to make changes. 32 Customer Care...


