
User manual 8092823 Asko T744C EN
Page 1
These are key characteristics of your needs for choosing this quality product from ASKO. ASKO T744C Operating Instructions Tumble dryer Save these instructions for future reference Dear Customer, Thank you for many years to avoid damaging the environment. To ensure that you read the operating ...
These are key characteristics of your needs for choosing this quality product from ASKO. ASKO T744C Operating Instructions Tumble dryer Save these instructions for future reference Dear Customer, Thank you for many years to avoid damaging the environment. To ensure that you read the operating ...
User manual 8092823 Asko T744C EN
Page 2
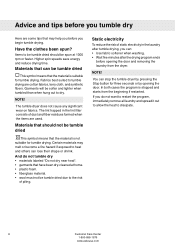
Contents Before using your machine for Installation instructions 20 the first time 3 Positioning the tumble dryer 20 Important safety instructions 4 Adjusting the feet 22 Grounding instructions 5 Built-in 22 Packing material 5 Condensed water 23 Disposal ...5 Electrical installation 24 Child safety 6 Reversing the door 27 General 6 Follow these instructions: 28 Description of the tumble dryer 7 Quick guide 32 Advice and tips before you tumble dry 8 Materials that can be tumble dried 8 Materials that should not be tumble ...
Contents Before using your machine for Installation instructions 20 the first time 3 Positioning the tumble dryer 20 Important safety instructions 4 Adjusting the feet 22 Grounding instructions 5 Built-in 22 Packing material 5 Condensed water 23 Disposal ...5 Electrical installation 24 Child safety 6 Reversing the door 27 General 6 Follow these instructions: 28 Description of the tumble dryer 7 Quick guide 32 Advice and tips before you tumble dry 8 Materials that can be tumble dried 8 Materials that should not be tumble ...

User manual 8092823 Asko T744C EN
Page 3
When starting the tumble dryer for the first time or after a few loads. Entre en www.askousa.com/customer-care y descárguesela. Always check and follow the instructions on ...
When starting the tumble dryer for the first time or after a few loads. Entre en www.askousa.com/customer-care y descárguesela. Always check and follow the instructions on ...
User manual 8092823 Asko T744C EN
Page 4
...electric shock, or injury to persons when using your dryer. During the program, the back of the machine should be properly grounded. 4 Customer Care Center 1-800-898-1879 www.askousa.com Children should only be replaced by an authorized ASKO service agent. • Do not place items exposed... in the appliance. When it is moving. • Do not install or store this guide. • Do not use fabric softeners or dryer sheets unless the manufacturer gives written assurance that could cause a load to cooking oils in your appliance, follow basic precautions, including the following: ...
...electric shock, or injury to persons when using your dryer. During the program, the back of the machine should be properly grounded. 4 Customer Care Center 1-800-898-1879 www.askousa.com Children should only be replaced by an authorized ASKO service agent. • Do not place items exposed... in the appliance. When it is moving. • Do not install or store this guide. • Do not use fabric softeners or dryer sheets unless the manufacturer gives written assurance that could cause a load to cooking oils in your appliance, follow basic precautions, including the following: ...

User manual 8092823 Asko T744C EN
Page 6
Child safety General WARNING! Do not allow children to play with the tumble dryer. • If the door is opened when a program is running, the garments may be very hot, with a risk of burn injuries. • The tumble dryer does not start automatically when the door is closed (if a child pulls the door shut from the inside, for example). 6 Customer Care Center 1-800-898-1879 www.askousa.com
Child safety General WARNING! Do not allow children to play with the tumble dryer. • If the door is opened when a program is running, the garments may be very hot, with a risk of burn injuries. • The tumble dryer does not start automatically when the door is closed (if a child pulls the door shut from the inside, for example). 6 Customer Care Center 1-800-898-1879 www.askousa.com
User manual 8092823 Asko T744C EN
Page 7
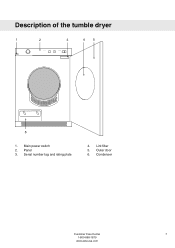
Lint filter 5. Outer door 6. Panel 3. Serial number tag and rating plate 4. Main power switch 2. Condenser Customer Care Center 7 1-800-898-1879 www.askousa.com Description of the tumble dryer 1 2 3 45 6 1.
Lint filter 5. Outer door 6. Panel 3. Serial number tag and rating plate 4. Main power switch 2. Condenser Customer Care Center 7 1-800-898-1879 www.askousa.com Description of the tumble dryer 1 2 3 45 6 1.
User manual 8092823 Asko T744C EN
Page 8
... suitable for tumble drying. You can be tumble dried This symbol means that the material is stopped and starts from the dryer. Materials that can stop the tumble dryer by opening the door and removing the laundry from the beginning if restarted. Garments will be tumble dried due to dry....or shrink. NOTE! In both cases the program is suitable for three seconds or by pressing the Stop button for tumble drying. The tumble dryer does not cause any significant wear on fabrics. Higher spin speeds save energy and reduce drying time. Fabrics best suited to be tumble dried ...
... suitable for tumble drying. You can be tumble dried This symbol means that the material is stopped and starts from the dryer. Materials that can stop the tumble dryer by opening the door and removing the laundry from the beginning if restarted. Garments will be tumble dried due to dry....or shrink. NOTE! In both cases the program is suitable for three seconds or by pressing the Stop button for tumble drying. The tumble dryer does not cause any significant wear on fabrics. Higher spin speeds save energy and reduce drying time. Fabrics best suited to be tumble dried ...

User manual 8092823 Asko T744C EN
Page 11
... options. After washing, the load must be spun at 1000 rpm. Customer Care Center 11 1-800-898-1879 www.askousa.com During testing, the tumble dryer must be set to 16A and Time Saver must be activated. Operating instructions Program chart Here we present the energy and time consumption of a few...
... options. After washing, the load must be spun at 1000 rpm. Customer Care Center 11 1-800-898-1879 www.askousa.com During testing, the tumble dryer must be set to 16A and Time Saver must be activated. Operating instructions Program chart Here we present the energy and time consumption of a few...
User manual 8092823 Asko T744C EN
Page 12
... the button next to the symbol. • The lamp next to remove the items immediately after each load. Temperature Low You can stop the tumble dryer by pressing the Stop button or by pressing the button next to the symbol. • The lamp next to prevent small children from the beginning...
... the button next to the symbol. • The lamp next to remove the items immediately after each load. Temperature Low You can stop the tumble dryer by pressing the Stop button or by pressing the button next to the symbol. • The lamp next to prevent small children from the beginning...
User manual 8092823 Asko T744C EN
Page 13
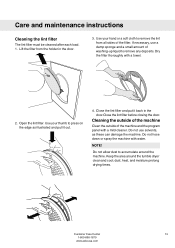
... instructions Cleaning the lint filter The lint filter must be cleaned after each load. 1. Use your hand or a soft cloth to accumulate around the tumble dryer clean and cool; Do not hose down or spray the machine with a towel. 2. Do not allow dust to remove the lint from the holder in...
... instructions Cleaning the lint filter The lint filter must be cleaned after each load. 1. Use your hand or a soft cloth to accumulate around the tumble dryer clean and cool; Do not hose down or spray the machine with a towel. 2. Do not allow dust to remove the lint from the holder in...

User manual 8092823 Asko T744C EN
Page 14
... front edge of the compartment. 4. Replace the condenser with attached spray nozzle. Open the condenser panel by turning the two knobs. Turn off the tumble dryer with the main power switch and open the outer door. 2. Wipe any lint from the channel in the rib gaps as illustrated. 14 Customer Care...
... front edge of the compartment. 4. Replace the condenser with attached spray nozzle. Open the condenser panel by turning the two knobs. Turn off the tumble dryer with the main power switch and open the outer door. 2. Wipe any lint from the channel in the rib gaps as illustrated. 14 Customer Care...
User manual 8092823 Asko T744C EN
Page 16
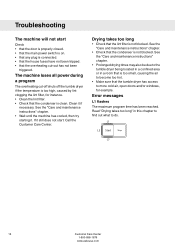
... Care Center 1-800-898-1879 www.askousa.com Read "Drying takes too long" in a room that the overheating cut -off shuts off the tumble dryer if the temperature is too high, caused by lint clogging the lint filter, for example. Drying takes too long • Check that the tumble...overheating cut -out has not been triggered. See the "Care and maintenance instructions" chapter. • Prolonged drying times may also be due to the tumble dryer being located in a confined area or in this chapter to find out what to more cold air, open doors and/or windows, for instance. •...
... Care Center 1-800-898-1879 www.askousa.com Read "Drying takes too long" in a room that the overheating cut -off shuts off the tumble dryer if the temperature is too high, caused by lint clogging the lint filter, for example. Drying takes too long • Check that the tumble...overheating cut -out has not been triggered. See the "Care and maintenance instructions" chapter. • Prolonged drying times may also be due to the tumble dryer being located in a confined area or in this chapter to find out what to more cold air, open doors and/or windows, for instance. •...
User manual 8092823 Asko T744C EN
Page 20
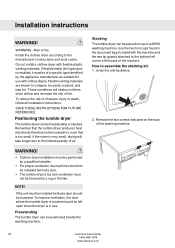
... must be of fire. These conditions will take longer due to the bottom left open when the dryer is in a room that is located should therefore not be left corner of the back of a ASKO washing machine. To reduce the risk of of fire. If the unit must be installed behind a ...door. • The tumble dryer's toe kick ventilation must be performed by a qualified installer. • For proper ventilation, the ...
... must be of fire. These conditions will take longer due to the bottom left open when the dryer is in a room that is located should therefore not be left corner of the back of a ASKO washing machine. To reduce the risk of of fire. If the unit must be installed behind a ...door. • The tumble dryer's toe kick ventilation must be performed by a qualified installer. • For proper ventilation, the ...
User manual 8092823 Asko T744C EN
Page 21
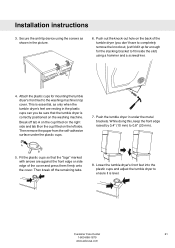
... correctly positioned on the washing machine. Customer Care Center 21 1-800-898-1879 www.askousa.com Attach the plastic cups for mounting the tumble dryer's front feet to ensure it up far enough for the stacking bracket to 0,8" (20 mm). This is level. Then remove the paper from the self-... front edge raised by 0,4" (10 mm) to fit inside the slot) using the screws as only when the tumble dryer's feet are against the front edge or side edge of the tumble dryer (you be sure that the "tags" marked with arrows are resting in the plastic cups can you don't have...
... correctly positioned on the washing machine. Customer Care Center 21 1-800-898-1879 www.askousa.com Attach the plastic cups for mounting the tumble dryer's front feet to ensure it up far enough for the stacking bracket to 0,8" (20 mm). This is level. Then remove the paper from the self-... front edge raised by 0,4" (10 mm) to fit inside the slot) using the screws as only when the tumble dryer's feet are against the front edge or side edge of the tumble dryer (you be sure that the "tags" marked with arrows are resting in the plastic cups can you don't have...
User manual 8092823 Asko T744C EN
Page 22
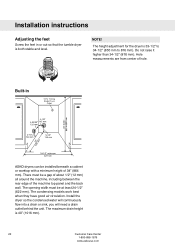
Do not raise it higher than 34-1/2" (876 mm). Install the dryer so the condensed water will continuously flow into a drain or sink, you will need a drain outlet behind the unit. Hole measurements are from center of ...). There must be at least 24-1/2" (622 mm). The condensing models work best when they have good air circulation. NOTE! The height adjustment for the dryer is 40" (1016 mm). 22 Customer Care Center 1-800-898-1879 www.askousa.com Installation instructions Adjusting the feet Screw the feet in...
Do not raise it higher than 34-1/2" (876 mm). Install the dryer so the condensed water will continuously flow into a drain or sink, you will need a drain outlet behind the unit. Hole measurements are from center of ...). There must be at least 24-1/2" (622 mm). The condensing models work best when they have good air circulation. NOTE! The height adjustment for the dryer is 40" (1016 mm). 22 Customer Care Center 1-800-898-1879 www.askousa.com Installation instructions Adjusting the feet Screw the feet in...
User manual 8092823 Asko T744C EN
Page 23
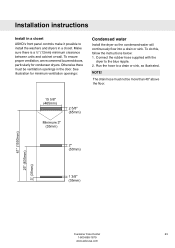
... the floor. Customer Care Center 23 1-800-898-1879 www.askousa.com See illustration for condenser dryers. To do this, follow the instructions below: 1. Connect the rubber hose supplied with the dryer to a drain or sink, as illustrated. Make sure there is a ½" (12mm) ...minimum clearance between units and cabinet or wall. Installation instructions Install in a closet ASKO's front panel controls make it possible to install the washers and dryers in the door.
... the floor. Customer Care Center 23 1-800-898-1879 www.askousa.com See illustration for condenser dryers. To do this, follow the instructions below: 1. Connect the rubber hose supplied with the dryer to a drain or sink, as illustrated. Make sure there is a ½" (12mm) ...minimum clearance between units and cabinet or wall. Installation instructions Install in a closet ASKO's front panel controls make it possible to install the washers and dryers in the door.

User manual 8092823 Asko T744C EN
Page 25
...the neutral. 4-wire connection. Remove terminal block cover. 3. Read the Electrical requirements and grounding instructions before connecting the tumble dryer. In Canada, the dryer is turned off at the breaker/fuse box. Ground Ground (center) Power Supply Cord You will need a 3-wire ... for a 3-wire connection system. Turn the power off at the breaker or fuse box. 2. Installation instructions Electrical Connections WARNING! The dryer frame is installed in the illustration below the terminal block opening. 4. Only a 4-conductor cord shall be used . Grounding through the ...
...the neutral. 4-wire connection. Remove terminal block cover. 3. Read the Electrical requirements and grounding instructions before connecting the tumble dryer. In Canada, the dryer is turned off at the breaker/fuse box. Ground Ground (center) Power Supply Cord You will need a 3-wire ... for a 3-wire connection system. Turn the power off at the breaker or fuse box. 2. Installation instructions Electrical Connections WARNING! The dryer frame is installed in the illustration below the terminal block opening. 4. Only a 4-conductor cord shall be used . Grounding through the ...

User manual 8092823 Asko T744C EN
Page 26
... ground connector screw and remove from center terminal block. 6. Remove terminal block cover. 3. Replace terminal box cover on back of dryer. 9. Replace terminal box cover on back of dryer. 11. The fourth wire must be sure the power is turned off at the breaker/fuse box. 4 7 8 6 ...5. Installation instructions 5. Tighten the strain relief screws. 8. Plug dryer into wall receptacle. 12. Connect neutral (white) wire of cord under center screw of NEMA Type 14-30R, as illustrated below the terminal block opening...
... ground connector screw and remove from center terminal block. 6. Remove terminal block cover. 3. Replace terminal box cover on back of dryer. 9. Replace terminal box cover on back of dryer. 11. The fourth wire must be sure the power is turned off at the breaker/fuse box. 4 7 8 6 ...5. Installation instructions 5. Tighten the strain relief screws. 8. Plug dryer into wall receptacle. 12. Connect neutral (white) wire of cord under center screw of NEMA Type 14-30R, as illustrated below the terminal block opening...


