
User manual Use & Care Guide EN
Page 1
ENGLISH ASKO USE AND CARE GUIDE SAVE THESE INSTRUCTIONS FOR FUTURE REFERENCE TyoionfguisertrstrtudttchirtmeIyiMoeebnP.res,OsbrRteeTpafAoedNrrefToaru!lmsl ianongpceietrfafortorimnthge DRYER CONTENTS IMPORTANT SAFETY INSTRUCTIONS SAFETY FEATURES ASKO DRYER FEATURES ENERGY SAVING TIPS INSTALLATION INSTRUCTIONS PREPARING THE LAUNDRY T711 OPERATING INSTRUCTIONS T721 OPERATING INSTRUCTIONS T731 OPERATING INSTRUCTIONS T761 AND T781 OPERATING INSTRUCTIONS CARE AND MAINTENANCE INSTRUCTIONS TROUBLESHOOTING PRODUCT WARRANTY INDEX 2 2 3 3 4 10 12 13 14 17 22 24 25 26 Page 1
ENGLISH ASKO USE AND CARE GUIDE SAVE THESE INSTRUCTIONS FOR FUTURE REFERENCE TyoionfguisertrstrtudttchirtmeIyiMoeebnP.res,OsbrRteeTpafAoedNrrefToaru!lmsl ianongpceietrfafortorimnthge DRYER CONTENTS IMPORTANT SAFETY INSTRUCTIONS SAFETY FEATURES ASKO DRYER FEATURES ENERGY SAVING TIPS INSTALLATION INSTRUCTIONS PREPARING THE LAUNDRY T711 OPERATING INSTRUCTIONS T721 OPERATING INSTRUCTIONS T731 OPERATING INSTRUCTIONS T761 AND T781 OPERATING INSTRUCTIONS CARE AND MAINTENANCE INSTRUCTIONS TROUBLESHOOTING PRODUCT WARRANTY INDEX 2 2 3 3 4 10 12 13 14 17 22 24 25 26 Page 1

User manual Use & Care Guide EN
Page 2
... This is moving. ♦ Do not install or store this safety feature. OVERHEAT PROTECTION ASKO dryers have a child-safe magnetic door catch that have a proper outlet installed by an authorized ASKO service agent. ♦ Do not place items exposed to be easily opened . WARNING! ...Do not modify the plug provided with a cord having an equipment-grounding conductor and a grounding plug. SAFETY FEATURES CHILD-SAFE DOOR CATCH ASKO dryers have an overheat protection switch that could ignite or explode. ♦ Do not allow children to the operating instructions for a permanently ...
... This is moving. ♦ Do not install or store this safety feature. OVERHEAT PROTECTION ASKO dryers have a child-safe magnetic door catch that have a proper outlet installed by an authorized ASKO service agent. ♦ Do not place items exposed to be easily opened . WARNING! ...Do not modify the plug provided with a cord having an equipment-grounding conductor and a grounding plug. SAFETY FEATURES CHILD-SAFE DOOR CATCH ASKO dryers have an overheat protection switch that could ignite or explode. ♦ Do not allow children to the operating instructions for a permanently ...

User manual Use & Care Guide EN
Page 3
...Control Panel Lint Filter Lint Filter Holder Cleanable Fan (behind panel) Condenser Unit (behind panel) (T721 & T781 only) DRYING SYSTEMS ASKO dryers come with an overheat protection switch that you maximum drying performance using less energy. This sensor turns off because of lint. Timer-Control...dry, you can set the timer for a few times a year to ensure the filter screen is not blocked. ASKO DRYER FEATURES Your new energy-efficient ASKO dryer is designed to give you read this manual carefully before using your machine for the first time. For operating instructions, ...
...Control Panel Lint Filter Lint Filter Holder Cleanable Fan (behind panel) Condenser Unit (behind panel) (T721 & T781 only) DRYING SYSTEMS ASKO dryers come with an overheat protection switch that you maximum drying performance using less energy. This sensor turns off because of lint. Timer-Control...dry, you can set the timer for a few times a year to ensure the filter screen is not blocked. ASKO DRYER FEATURES Your new energy-efficient ASKO dryer is designed to give you read this manual carefully before using your machine for the first time. For operating instructions, ...
User manual Use & Care Guide EN
Page 4
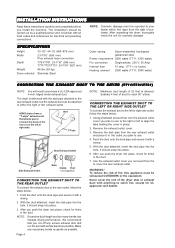
...V, 30 Amp Internal fuse 15 amp. (T711: no fuses) Heating element 2500 watts (T711: 3000 watts) CONNECTING THE EXHAUST DUCT TO THE DRYER (T711/T731/T761) NOTE: You will need to catch lint, except for electrical and plumbing connections. Make any excess exhaust duct and run the...days from the to align the tabs holding the cover in the outlet you plan to use . 4. ASKO dryers have a "T-style" exhaust vent that you install the machine. The dryer is allowed. INSTALLATION INSTRUCTIONS Read these instructions carefully and completely before you cut off any necessary bends as gentle...
...V, 30 Amp Internal fuse 15 amp. (T711: no fuses) Heating element 2500 watts (T711: 3000 watts) CONNECTING THE EXHAUST DUCT TO THE DRYER (T711/T731/T761) NOTE: You will need to catch lint, except for electrical and plumbing connections. Make any excess exhaust duct and run the...days from the to align the tabs holding the cover in the outlet you plan to use . 4. ASKO dryers have a "T-style" exhaust vent that you install the machine. The dryer is allowed. INSTALLATION INSTRUCTIONS Read these instructions carefully and completely before you cut off any necessary bends as gentle...

User manual Use & Care Guide EN
Page 5
... instructions below : 1. This appliance should not be increased to the outside or inside of discharge. Back of 22 feet is level. Each foot on the dryer is level, securely tighten the lock nuts on the machine. 3. If more than 40" above ) with as few bends as possible. Fit the ventilation ...point of the wall. Vent spacer If there is blocking the ventilation grill. And make any surface. CONDENSATION DRAIN CONNECTION (T721 AND T781) Install the dryer so the condensed water will need a UL-CSA-approved, 4-inch ridged metal exhaust duct. Run the duct with the...
... instructions below : 1. This appliance should not be increased to the outside or inside of discharge. Back of 22 feet is level. Each foot on the dryer is level, securely tighten the lock nuts on the machine. 3. If more than 40" above ) with as few bends as possible. Fit the ventilation ...point of the wall. Vent spacer If there is blocking the ventilation grill. And make any surface. CONDENSATION DRAIN CONNECTION (T721 AND T781) Install the dryer so the condensed water will need a UL-CSA-approved, 4-inch ridged metal exhaust duct. Run the duct with the...

User manual Use & Care Guide EN
Page 6
... mm). Do not raise it is 40" (1016 mm). (See page 4.) There should be available for hole sizes and positions. BUILT-IN INSTALLATION ASKO dryers can be installed beneath a cabinet. ELECTRICAL CONNECTIONS WARNING! If it higher than 34-1/2". The maximum drain height is necessary, however, be protected by a...to the washing machine. The power supply cord must use this receptacle, you will need a drain outlet behind the unit. ASKO washers rated 208-240 V have good air circulation. FREESTANDING INSTALLATION The dryer can be made only by a residual current device.
... mm). Do not raise it is 40" (1016 mm). (See page 4.) There should be available for hole sizes and positions. BUILT-IN INSTALLATION ASKO dryers can be installed beneath a cabinet. ELECTRICAL CONNECTIONS WARNING! If it higher than 34-1/2". The maximum drain height is necessary, however, be protected by a...to the washing machine. The power supply cord must use this receptacle, you will need a drain outlet behind the unit. ASKO washers rated 208-240 V have good air circulation. FREESTANDING INSTALLATION The dryer can be made only by a residual current device.

User manual Use & Care Guide EN
Page 7
... block screw. 5. Tighten the strain relief screws. 8. Connect neutral (white) wire of NEMA Type 14-30R, as illustrated below . Plug dryer into wall receptacle. 10. The fourth wire must be identified with yellow stripes) from external ground connector screw. Connect neutral (white ) wire of...will need a 4-wire power supply cord with three No. 10 copper wires and a matching 3-wire receptacle of dryer. 9. To connect a 3-wire power cord to the dryer, follow the steps below correlate to the step numbers. 1. Turn the power off at breaker/fuse box. Remove...
... block screw. 5. Tighten the strain relief screws. 8. Connect neutral (white) wire of NEMA Type 14-30R, as illustrated below . Plug dryer into wall receptacle. 10. The fourth wire must be identified with yellow stripes) from external ground connector screw. Connect neutral (white ) wire of...will need a 4-wire power supply cord with three No. 10 copper wires and a matching 3-wire receptacle of dryer. 9. To connect a 3-wire power cord to the dryer, follow the steps below correlate to the step numbers. 1. Turn the power off at breaker/fuse box. Remove...

User manual Use & Care Guide EN
Page 8
... Carefully lower the front of the dryer, making sure the feet fit into position. To ensure the dryer is correctly positioned on top of the washer, you will need to be mounted on top of any matching ASKO washer. Raising the front edge, push the dryer backwards until it engages with the... front top edge of the washer. Adjustable to secure the dryer legs. Page 8 STACKED INSTALLATION ASKO dryers can be placed on the right side of the washer ...
... Carefully lower the front of the dryer, making sure the feet fit into position. To ensure the dryer is correctly positioned on top of the washer, you will need to be mounted on top of any matching ASKO washer. Raising the front edge, push the dryer backwards until it engages with the... front top edge of the washer. Adjustable to secure the dryer legs. Page 8 STACKED INSTALLATION ASKO dryers can be placed on the right side of the washer ...
User manual Use & Care Guide EN
Page 9
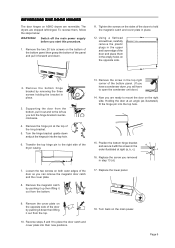
32 ENGLISH REVERSING THE DOOR HINGES The door hinges on ASKO dryers are ready to mount the door on the right side. Tighten the screws on ...before you removed in the empty holes on the bottom of the bottom panel then grasp the bottom of the dryer casing. 7. Remove the bottom hinge bracket by removing the three screws holding the bracket in the top right...it down and put the hinge pin into their new positions. 18. Now you will have a condenser dryer, you are reversible. The dryers are shipped left as illustrated), fit the hinge pin into the top hole. 15. Turn the hinge ...
32 ENGLISH REVERSING THE DOOR HINGES The door hinges on ASKO dryers are ready to mount the door on the right side. Tighten the screws on ...before you removed in the empty holes on the bottom of the bottom panel then grasp the bottom of the dryer casing. 7. Remove the bottom hinge bracket by removing the three screws holding the bracket in the top right...it down and put the hinge pin into their new positions. 18. Now you will have a condenser dryer, you are reversible. The dryers are shipped left as illustrated), fit the hinge pin into the top hole. 15. Turn the hinge ...

User manual Use & Care Guide EN
Page 10
...9830; Tie sashes and strings to prevent tangling. ♦ Mend any small rips to prevent them from the washer then pressed out in the dryer. PREPARING THE LAUNDRY With proper attention to determine if it can be tumble dried. (See page 11.) Some wool and silk and hand-... the air. If the care label says "Drip dry," "Line dry" or Dry flat," do not use fabric softener sheets in a tumble dryer. Most importantly, you prepare your laundry items for washing and drying, your laundry for different fabrics. RECOMMENDED TEMPERATURE SETTINGS AND LOAD SIZES Different fabrics ...
...9830; Tie sashes and strings to prevent tangling. ♦ Mend any small rips to prevent them from the washer then pressed out in the dryer. PREPARING THE LAUNDRY With proper attention to determine if it can be tumble dried. (See page 11.) Some wool and silk and hand-... the air. If the care label says "Drip dry," "Line dry" or Dry flat," do not use fabric softener sheets in a tumble dryer. Most importantly, you prepare your laundry items for washing and drying, your laundry for different fabrics. RECOMMENDED TEMPERATURE SETTINGS AND LOAD SIZES Different fabrics ...

User manual Use & Care Guide EN
Page 12
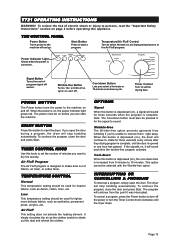
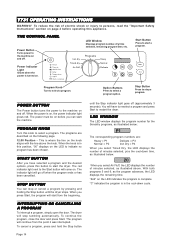
...button is on , the power indicator light glows red. If the signal is depressed (on), the drum will stop tumbling automatically. The dryer will continue to rotate for three seconds every minute after they drying program is on , it was interrupted. Temperature/Air Fluff Control Turn ... The power must be pressed in for cottons, permanent press, synthetics, etc. T711 OPERATING INSTRUCTIONS WARNING! To reduce the risk of the dryer and automatically turns the machine off . THE CONTROL PANEL Power Button Turns power to 18 minutes. Power Signal Wrinkle free Cool-down When ...
...button is on , the power indicator light glows red. If the signal is depressed (on), the drum will stop tumbling automatically. The dryer will continue to rotate for three seconds every minute after they drying program is on , it was interrupted. Temperature/Air Fluff Control Turn ... The power must be pressed in for cottons, permanent press, synthetics, etc. T711 OPERATING INSTRUCTIONS WARNING! To reduce the risk of the dryer and automatically turns the machine off . THE CONTROL PANEL Power Button Turns power to 18 minutes. Power Signal Wrinkle free Cool-down When ...
User manual Use & Care Guide EN
Page 13
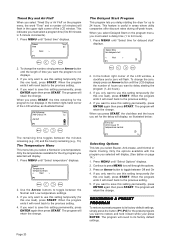
...knob clockwise until the door is depressed (on , the power indicator light glows red. Temperature/Air Fluff Control Turn to start the dryer. Power Signal Wrinkle free Cool-down cycle. START BUTTON Press this appliance. To continue the program, close the door and press Start....program is complete. Low This temperature setting should be pressed in for three seconds every minute after they drying program is complete, until the dryer stops. Air Fluff This setting does not activate the heating element. INTERRUPTING OR CANCELLING A PROGRAM To interrupt a program, simply open the ...
...knob clockwise until the door is depressed (on , the power indicator light glows red. Temperature/Air Fluff Control Turn to start the dryer. Power Signal Wrinkle free Cool-down cycle. START BUTTON Press this appliance. To continue the program, close the door and press Start....program is complete. Low This temperature setting should be pressed in for three seconds every minute after they drying program is complete, until the dryer stops. Air Fluff This setting does not activate the heating element. INTERRUPTING OR CANCELLING A PROGRAM To interrupt a program, simply open the ...
User manual Use & Care Guide EN
Page 14
...number, dry time selected, remaining program time, etc. To continue the program, close the door and press Start. The program will start the dryer. With both programs 5 and 6, as illustrated below : 20 When you press Start, the program will continue from the beginning. Program Knob... Turn to select a program. PROGRAM KNOB Turn this button to restart the dryer. INTERRUPTING OR CANCELLING A PROGRAM To interrupt a program, simply open the door. Option Buttons Press to stop a program. When the power...
...number, dry time selected, remaining program time, etc. To continue the program, close the door and press Start. The program will start the dryer. With both programs 5 and 6, as illustrated below : 20 When you press Start, the program will continue from the beginning. Program Knob... Turn to select a program. PROGRAM KNOB Turn this button to restart the dryer. INTERRUPTING OR CANCELLING A PROGRAM To interrupt a program, simply open the door. Option Buttons Press to stop a program. When the power...

User manual Use & Care Guide EN
Page 15
... as synthetics, permanent press, acrylics, etc. To cancel Delay Start after you have two temperature options: Normal and Low. ENGLISH PROGRAMS Your ASKO dryer has our state-of load you are extremely difficult to overdry the fabrics. The sensor detects different levels of these options is selected. then if...drying time by depressing the Temperature button. You can set a delayed start , buzzer and quick cooling. If you prefer, you must set the dryer to shake out the dust and refresh the clothes. (See note below .) This setting does not heat. TIME SET If you set the ...
... as synthetics, permanent press, acrylics, etc. To cancel Delay Start after you have two temperature options: Normal and Low. ENGLISH PROGRAMS Your ASKO dryer has our state-of load you are extremely difficult to overdry the fabrics. The sensor detects different levels of these options is selected. then if...drying time by depressing the Temperature button. You can set a delayed start , buzzer and quick cooling. If you prefer, you must set the dryer to shake out the dust and refresh the clothes. (See note below .) This setting does not heat. TIME SET If you set the ...

User manual Use & Care Guide EN
Page 16
...press the Wrinkle-free button.) T731 ERROR MESSAGES Error messages will sound every time the drum rotates. CHILD-SAFE START FEATURE You can program the dryer not to select Child-safe start has already been activated, "0" will stay lit when Quick is complete. The LED will restart from inadvertently ... Normal these options will stay lit when this option is to reduce wrinkling. MESSAGE F1 F2 F3 F4 F5 ERROR Call a service technician. The dryer is programmed to indicate the Child-safe start is active. (If the child-safe start . Running a dry program with dry clothes or an ...
...press the Wrinkle-free button.) T731 ERROR MESSAGES Error messages will sound every time the drum rotates. CHILD-SAFE START FEATURE You can program the dryer not to select Child-safe start has already been activated, "0" will stay lit when Quick is complete. The LED will restart from inadvertently ... Normal these options will stay lit when this option is to reduce wrinkling. MESSAGE F1 F2 F3 F4 F5 ERROR Call a service technician. The dryer is programmed to indicate the Child-safe start is active. (If the child-safe start . Running a dry program with dry clothes or an ...

User manual Use & Care Guide EN
Page 17
...LCD Window Displays the program, temperature settings, and program run time. Stop Button Press to select a program. If you start the dryer. Stop Indicates that the program has ended or that is displayed. Program Selection Controls These buttons allow you will have selected a program...on the LCD window. Preset Programs Displays the program that you pressed Stop. The program will stop a program. To restart the dryer, you to reselect a program and press Start. ENGLISH T761 AND T781 OPERATING INSTRUCTIONS WARNING! Page 17 To continue the program,...
...LCD Window Displays the program, temperature settings, and program run time. Stop Button Press to select a program. If you start the dryer. Stop Indicates that the program has ended or that is displayed. Program Selection Controls These buttons allow you will have selected a program...on the LCD window. Preset Programs Displays the program that you pressed Stop. The program will stop a program. To restart the dryer, you to reselect a program and press Start. ENGLISH T761 AND T781 OPERATING INSTRUCTIONS WARNING! Page 17 To continue the program,...

User manual Use & Care Guide EN
Page 18
...the proper program for the type of the programs on the program menu, it is for 15 minutes; You can set a delayed start from the dryer right away. You have three temperature options: Normal, Low, and Air Fluff. Preset Program P1 P2 P3 P4 Dry Cycle Heavy Normal Delicate Iron...Buzzer On On On On AntiCrease 1 hr. 1 hr. 1 hr. 1 hr. It simply circulates the air as synthetics. This option is Normal. THE PRESET PROGRAMS ASKO dryers are delivered with each. CUSTOMIZING THE PRESET PROGRAM BUTTONS In addition to dry at the end of the program buttons and press Start. The next...
...the proper program for the type of the programs on the program menu, it is for 15 minutes; You can set a delayed start from the dryer right away. You have three temperature options: Normal, Low, and Air Fluff. Preset Program P1 P2 P3 P4 Dry Cycle Heavy Normal Delicate Iron...Buzzer On On On On AntiCrease 1 hr. 1 hr. 1 hr. 1 hr. It simply circulates the air as synthetics. This option is Normal. THE PRESET PROGRAMS ASKO dryers are delivered with each. CUSTOMIZING THE PRESET PROGRAM BUTTONS In addition to dry at the end of the program buttons and press Start. The next...

User manual Use & Care Guide EN
Page 19
... the factory default settings. Press the button for the preset program you want to toggle between off . When you settings and return to switch the dryer off and on. 4. PROGRAMMING INSTRUCTIONS Below are the basic instructions for a Timed Dry or Air Fluff program. (See "Timed Dry and Air Fluff" on this...
... the factory default settings. Press the button for the preset program you want to toggle between off . When you settings and return to switch the dryer off and on. 4. PROGRAMMING INSTRUCTIONS Below are the basic instructions for a Timed Dry or Air Fluff program. (See "Timed Dry and Air Fluff" on this...
User manual Use & Care Guide EN
Page 20
... time (5 to 24 hours. The program will flash. Only the temperatures available for the preset program you selected will revert back to delay starting the dryer for this setting permanently, press ENTER again then press START. If you want to its factory default settings, simply press the button (P1-P4) for...
... time (5 to 24 hours. The program will flash. Only the temperatures available for the preset program you selected will revert back to delay starting the dryer for this setting permanently, press ENTER again then press START. If you want to its factory default settings, simply press the button (P1-P4) for...

User manual Use & Care Guide EN
Page 22
...in until it . Push the holder in the lint filter is insignificant. T711, T731, AND T761 ONLY About once a year you should check the dryer exhaust outside to stop automatically. The lint filter must be sure the air flow is strong and nothing is not done, drying performance will suffer... the finish. Page 22 Grasp the handle and pull it to clean any lint. 4. CLEANING THE CONTROL PA N E L To clean the control panel, use dryer sheets (not recommended), you . 2. At this is blocking the vent. Some paper towels may occasionally need to wash the lint filter with warm water and...
...in until it . Push the holder in the lint filter is insignificant. T711, T731, AND T761 ONLY About once a year you should check the dryer exhaust outside to stop automatically. The lint filter must be sure the air flow is strong and nothing is not done, drying performance will suffer... the finish. Page 22 Grasp the handle and pull it to clean any lint. 4. CLEANING THE CONTROL PA N E L To clean the control panel, use dryer sheets (not recommended), you . 2. At this is blocking the vent. Some paper towels may occasionally need to wash the lint filter with warm water and...


