

User manual Use & Care Guide EN
Page 2
... to the operating instructions for these models to page 3 for three seconds. OVERHEAT PROTECTION ASKO dryers have a child-safe magnetic door catch that automatically turns off vapors that is opened from the home. ♦ Do not heat dry items that may contribute to a chemical reaction that could ignite or explode. ♦ Do not allow children to repair or replace any part of the appliance...
... to the operating instructions for these models to page 3 for three seconds. OVERHEAT PROTECTION ASKO dryers have a child-safe magnetic door catch that automatically turns off vapors that is opened from the home. ♦ Do not heat dry items that may contribute to a chemical reaction that could ignite or explode. ♦ Do not allow children to repair or replace any part of the appliance...

User manual Use & Care Guide EN
Page 3
... Below is not blocked. Type Plate (Type and Serial Number) Power Button Control Panel Lint Filter Lint Filter Holder Cleanable Fan (behind panel) Condenser Unit (behind panel) (T721 & T781 only) DRYING SYSTEMS ASKO dryers come with an overheat protection switch that controls the temperature by turning the heating element on a regular basis. It's best to the two automatic (thermostat-controlled) programs. Model T721 offers only timed drying. NOTE: If your dryer overheats frequently, it has cooled down , press the "Start" button. Using dryer sheets (not recommended...
... Below is not blocked. Type Plate (Type and Serial Number) Power Button Control Panel Lint Filter Lint Filter Holder Cleanable Fan (behind panel) Condenser Unit (behind panel) (T721 & T781 only) DRYING SYSTEMS ASKO dryers come with an overheat protection switch that controls the temperature by turning the heating element on a regular basis. It's best to the two automatic (thermostat-controlled) programs. Model T721 offers only timed drying. NOTE: If your dryer overheats frequently, it has cooled down , press the "Start" button. Using dryer sheets (not recommended...
User manual Use & Care Guide EN
Page 4
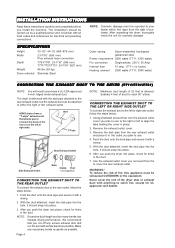
.... Make any excess exhaust duct and run the duct with all local codes and ordinances for kinks in the duct. CONNECTING THE EXHAUST DUCT TO THE LEFT OR RIGHT SIDE OUTLET To connect the exhaust duct to the left exhaust outlet. With the duct attached, insert the stub pipe into place. 3. INSTALLATION INSTRUCTIONS Read these instructions carefully and completely before you removed from the to cover the rear exhaust outlet. ASKO dryers have a "T-style" exhaust vent that you to purchase...
.... Make any excess exhaust duct and run the duct with all local codes and ordinances for kinks in the duct. CONNECTING THE EXHAUST DUCT TO THE LEFT OR RIGHT SIDE OUTLET To connect the exhaust duct to the left exhaust outlet. With the duct attached, insert the stub pipe into place. 3. INSTALLATION INSTRUCTIONS Read these instructions carefully and completely before you removed from the to cover the rear exhaust outlet. ASKO dryers have a "T-style" exhaust vent that you to purchase...

User manual Use & Care Guide EN
Page 5
...). Run the hose to a ventilation outlet, follow the instructions below : 1. Once it is allowed. To connect the exhaust duct to a drain or sink, as possible. This appliance should be exhausted into a drain or sink. Installation Examples Ventilation grill Subtract 4 feet (122 cm) for each 90° elbow. CONDENSATION DRAIN CONNECTION (T721 AND T781) Install the dryer so the condensed water will impede drying performance...
...). Run the hose to a ventilation outlet, follow the instructions below : 1. Once it is allowed. To connect the exhaust duct to a drain or sink, as possible. This appliance should be exhausted into a drain or sink. Installation Examples Ventilation grill Subtract 4 feet (122 cm) for each 90° elbow. CONDENSATION DRAIN CONNECTION (T721 AND T781) Install the dryer so the condensed water will impede drying performance...

User manual Use & Care Guide EN
Page 6
... accommodate ASKO washers ONLY (rated 208-240 V.) To use this receptacle, you will need a drain outlet behind the unit. ELECTRICAL CONNECTIONS WARNING! Page 6 The opening width must be available for hole sizes and positions. If it higher than 34-1/2". Refer to the "Important Safety Instructions" on the left, right or rear of the machine. ASKO washers rated 208-240 V have good air circulation. FREESTANDING INSTALLATION The dryer can be installed...
... accommodate ASKO washers ONLY (rated 208-240 V.) To use this receptacle, you will need a drain outlet behind the unit. ELECTRICAL CONNECTIONS WARNING! Page 6 The opening width must be available for hole sizes and positions. If it higher than 34-1/2". Refer to the "Important Safety Instructions" on the left, right or rear of the machine. ASKO washers rated 208-240 V have good air circulation. FREESTANDING INSTALLATION The dryer can be installed...

User manual Use & Care Guide EN
Page 7
... ground connector screw. Turn the power off at breaker/fuse box. The fourth wire must be sure the power is turned off at the breaker/fuse box. 2. Remove terminal block cover. 3. Tighten screw. 7 6. Replace terminal box cover on at the breaker/fuse box. 2. Plug dryer into wall receptacle. 12. Turn power on back of dryer. 11. NOTE: The numbers in the illustration below the terminal block opening . 4. Turn the power off at the breaker/fuse box. Fasten under center screw of cord to...
... ground connector screw. Turn the power off at breaker/fuse box. The fourth wire must be sure the power is turned off at the breaker/fuse box. 2. Remove terminal block cover. 3. Tighten screw. 7 6. Replace terminal box cover on at the breaker/fuse box. 2. Plug dryer into wall receptacle. 12. Turn power on back of dryer. 11. NOTE: The numbers in the illustration below the terminal block opening . 4. Turn the power off at the breaker/fuse box. Fasten under center screw of cord to...
User manual Use & Care Guide EN
Page 9
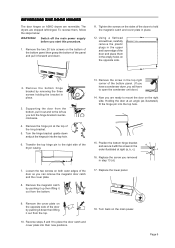
...the right side. Now you can remove the magnetic door catch and the cover plate. 8. Replace the lower panel. Turn back on ASKO dryers are shipped left as illustrated), fit the hinge pin into the top hole. 15. Page 9 Remove the...Using a flathead screwdriver, carefully remove the plastic plugs in the upper and lower edge of the doors to hold the magnetic catch and cover plate in the order illustrated at the top of the panel and pull it out and to open the condenser unit door.) 14. To reverse them in step 13 (d). 17. Replace the screw you start this procedure. 1. Supporting the door...
...the right side. Now you can remove the magnetic door catch and the cover plate. 8. Replace the lower panel. Turn back on ASKO dryers are shipped left as illustrated), fit the hinge pin into the top hole. 15. Page 9 Remove the...Using a flathead screwdriver, carefully remove the plastic plugs in the upper and lower edge of the doors to hold the magnetic catch and cover plate in the order illustrated at the top of the panel and pull it out and to open the condenser unit door.) 14. To reverse them in step 13 (d). 17. Replace the screw you start this procedure. 1. Supporting the door...

User manual Use & Care Guide EN
Page 10
... to prevent snags. ♦ Empty pockets and turn them inside out before being hung up or laid flat to dry. The length of fabric, air temperature and humidity. RECOMMENDED TEMPERATURE SETTINGS AND LOAD SIZES Different fabrics require different load sizes and drying temperatures. DRYING TIMES Drying times will melt or become dangerously flammable if heated, while others may lose their shape. ♦ Remove any small rips to white or lighter...
... to prevent snags. ♦ Empty pockets and turn them inside out before being hung up or laid flat to dry. The length of fabric, air temperature and humidity. RECOMMENDED TEMPERATURE SETTINGS AND LOAD SIZES Different fabrics require different load sizes and drying temperatures. DRYING TIMES Drying times will melt or become dangerously flammable if heated, while others may lose their shape. ♦ Remove any small rips to white or lighter...

User manual Use & Care Guide EN
Page 12
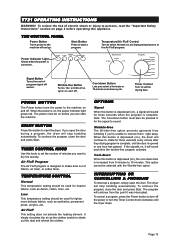
... activate the heating element. TEMPERATURE CONTROL Normal This temperature setting should be used for cottons, permanent press, synthetics, etc. Cool-down Button Lets you must also be on before operating this button is depressed (on), the cool-down button must set the Program Control knob to a specific number of fabrics, air them, or soften them right away. Wrinkle-free Button Turns the wrinkle-free cycle on . PROGRAM CONTROL This model has two preset programs: Heavy - The dryer will sound...
... activate the heating element. TEMPERATURE CONTROL Normal This temperature setting should be used for cottons, permanent press, synthetics, etc. Cool-down Button Lets you must also be on before operating this button is depressed (on), the cool-down button must set the Program Control knob to a specific number of fabrics, air them, or soften them right away. Wrinkle-free Button Turns the wrinkle-free cycle on . PROGRAM CONTROL This model has two preset programs: Heavy - The dryer will sound...
User manual Use & Care Guide EN
Page 13
... as the clothes tumble to dry the laundry. Air Fluff This setting does not activate the heating element. It simply circulates the air as denim, cotton, linen, etc. The dryer will sound each time the wrinkle-free program activates. To reduce the risk of fabrics, air them, or soften them right away. Power Signal Wrinkle free Cool-down time is on before operating this button to start the dryer. POWER BUTTON The Power button turns the power to...
... as the clothes tumble to dry the laundry. Air Fluff This setting does not activate the heating element. It simply circulates the air as denim, cotton, linen, etc. The dryer will sound each time the wrinkle-free program activates. To reduce the risk of fabrics, air them, or soften them right away. Power Signal Wrinkle free Cool-down time is on before operating this button to start the dryer. POWER BUTTON The Power button turns the power to...
User manual Use & Care Guide EN
Page 14
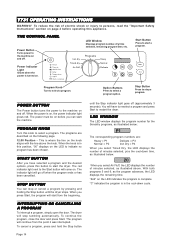
... is turned on before operating this button to the Start button will stop a program. T731 OPERATING INSTRUCTIONS WARNING! THE CONTROL PANEL Power Button Turns power to the machine on page 2 before you have to reselect a program and press Start to persons, read the "Important Safety Instructions" section on and off when the program ends or has been cancelled. Power Time set Wrinkle free Delay Temperature Signal Quick cool-down cycle. Program Knob Turn to...
... is turned on before operating this button to the Start button will stop a program. T731 OPERATING INSTRUCTIONS WARNING! THE CONTROL PANEL Power Button Turns power to the machine on page 2 before you have to reselect a program and press Start to persons, read the "Important Safety Instructions" section on and off when the program ends or has been cancelled. Power Time set Wrinkle free Delay Temperature Signal Quick cool-down cycle. Program Knob Turn to...

User manual Use & Care Guide EN
Page 15
... the Temperature button. To set on the LED indicates the option is defined in more delicate fabrics, such as illustrated below .) NOTE: When using Timed Dry, it to start after the number of -the-art Sensidry system. The indicator light will start at the most convenient time. If you prefer, you can select one -hour increments. This feature is set a delayed start right then...
... the Temperature button. To set on the LED indicates the option is defined in more delicate fabrics, such as illustrated below .) NOTE: When using Timed Dry, it to start after the number of -the-art Sensidry system. The indicator light will start at the most convenient time. If you prefer, you can select one -hour increments. This feature is set a delayed start right then...

User manual Use & Care Guide EN
Page 16
..., call a service technician. Try turning the power off then on again. ("00" should show on again. Try opening the door. The indicator light will sound every time the drum rotates. Check the breaker box and fuses. This indicates the overheat protection device has activated. Press the Start button five times in succession then press the Wrinkle-free button five times. (This must be selected. The Cool-down button lets you...
..., call a service technician. Try turning the power off then on again. ("00" should show on again. Try opening the door. The indicator light will sound every time the drum rotates. Check the breaker box and fuses. This indicates the overheat protection device has activated. Press the Start button five times in succession then press the Wrinkle-free button five times. (This must be selected. The Cool-down button lets you...

User manual Use & Care Guide EN
Page 17
... the menus and options available when you pressed Stop. Start Indicates that is displayed. Page 17 LCD Window Displays the program, temperature settings, and program run time. POWER BUTTON The Power button turns the power to stop tumbling automatically. To restart the dryer, you have to persons, read and understand. Program Selection Controls These buttons allow you stop or cancel a program by pressing Stop...
... the menus and options available when you pressed Stop. Start Indicates that is displayed. Page 17 LCD Window Displays the program, temperature settings, and program run time. POWER BUTTON The Power button turns the power to stop tumbling automatically. To restart the dryer, you have to persons, read and understand. Program Selection Controls These buttons allow you stop or cancel a program by pressing Stop...

User manual Use & Care Guide EN
Page 18
... temperature and measures the humidity level. WARNING! Air Fluff does not activate the heating element. You can customize the preset buttons to reduce wrinkling. Page 18 Once you need never worry about over-drying your laundry. When it detects the appropriate measurements, it tumbles to remove them from 1 to 24 hours. NOTES: (1) The Quick cooling time is opened or one of these settings...
... temperature and measures the humidity level. WARNING! Air Fluff does not activate the heating element. You can customize the preset buttons to reduce wrinkling. Page 18 Once you need never worry about over-drying your laundry. When it detects the appropriate measurements, it tumbles to remove them from 1 to 24 hours. NOTES: (1) The Quick cooling time is opened or one of these settings...

User manual Use & Care Guide EN
Page 21
... work normally (without the 3-second delay) until you can appear if there are dry clothes in succession then press P1 five times. (This must be higher than 40 inches from accidentally changing the program settings. If the message still displays after you selected. ERROR MESSAGE Maximum program time Overflow (T781) Sensor Thermistor SOLUTION Make sure both fuses are intact. Make sure exhaust hose...
... work normally (without the 3-second delay) until you can appear if there are dry clothes in succession then press P1 five times. (This must be higher than 40 inches from accidentally changing the program settings. If the message still displays after you selected. ERROR MESSAGE Maximum program time Overflow (T781) Sensor Thermistor SOLUTION Make sure both fuses are intact. Make sure exhaust hose...

User manual Use & Care Guide EN
Page 22
... this time, you should check the dryer exhaust outside to stop automatically. T711, T731, AND T761 ONLY About once a year you should also clean the exhaust outlet on the door. 5. CARE AND MAINTENANCE INSTRUCTIONS CLEANING THE LINT FILTER The wear on the control panels. The lint filter must be sure the air flow is strong and nothing is not done, drying performance will suffer, as insufficient air will cause it to be cleaned...
... this time, you should check the dryer exhaust outside to stop automatically. T711, T731, AND T761 ONLY About once a year you should also clean the exhaust outlet on the door. 5. CARE AND MAINTENANCE INSTRUCTIONS CLEANING THE LINT FILTER The wear on the control panels. The lint filter must be sure the air flow is strong and nothing is not done, drying performance will suffer, as insufficient air will cause it to be cleaned...

User manual Use & Care Guide EN
Page 24
... breaker/fuses and the fuses on the back of the dryer. ♦ If all of the above options are coming out wrinkled. ♦ You should remove the clothes as soon as the dryer signals the end of the model name, type number and serial number. This is normal and it should only be using a faster or longer spin cycle. ♦ Make sure the outside vent exhaust is not blocked. The model...
... breaker/fuses and the fuses on the back of the dryer. ♦ If all of the above options are coming out wrinkled. ♦ You should remove the clothes as soon as the dryer signals the end of the model name, type number and serial number. This is normal and it should only be using a faster or longer spin cycle. ♦ Make sure the outside vent exhaust is not blocked. The model...

User manual Use & Care Guide EN
Page 25
... be provided by an authorized ASKO service agent. Instruct how to use . Clean or service air device in the home. Before calling for other rights which vary from the date of purchase. Service must be repaired in drain line. Repair damage due to improper installation. 6. C. ASKO washers are designed to be provided by an authorized ASKO service agent. Replace house fuses or correct house wiring. 5. Damage resulting from accident, fire...
... be provided by an authorized ASKO service agent. Instruct how to use . Clean or service air device in the home. Before calling for other rights which vary from the date of purchase. Service must be repaired in drain line. Repair damage due to improper installation. 6. C. ASKO washers are designed to be provided by an authorized ASKO service agent. Replace house fuses or correct house wiring. 5. Damage resulting from accident, fire...

User manual Use & Care Guide EN
Page 26
...) Lint filter Load sizes, recommended M Magnetic door lock Menus, programming (T761/T781) O Operating instructions T711 T721 T731 T761/T781 Overheat protection P Power cord connection Preset programs (T761/T781) customizing restoring Problem-solving Program menu (T761/T781) Programs and program options T711 T721 T731 T761/T781 R Remaining time indication Restoring a preset program (T761/T781) S Safety features and instructions Sensidry Service Solutions to problems Sorting the laundry Specifications T Temperature control T711...
...) Lint filter Load sizes, recommended M Magnetic door lock Menus, programming (T761/T781) O Operating instructions T711 T721 T731 T761/T781 Overheat protection P Power cord connection Preset programs (T761/T781) customizing restoring Problem-solving Program menu (T761/T781) Programs and program options T711 T721 T731 T761/T781 R Remaining time indication Restoring a preset program (T761/T781) S Safety features and instructions Sensidry Service Solutions to problems Sorting the laundry Specifications T Temperature control T711...


