

User manual Quick Start Guide EN
Page 1
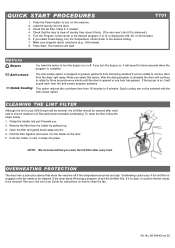
... Button Press to turn the buzzer off and on , the power indicator light glows red. If you open the door during a program, the dryer will stop tumbling automatically. These programs work with a thermostat that you read your machine, we recommend that measures the exhaust temperature coming out of... the dryer and automatically turns the machine off . Dryer Quick Start Guide T701 We know you’re excited about owning an ASKO dryer and you’re anxious to get the most of the features of minutes ...
... Button Press to turn the buzzer off and on , the power indicator light glows red. If you open the door during a program, the dryer will stop tumbling automatically. These programs work with a thermostat that you read your machine, we recommend that measures the exhaust temperature coming out of... the dryer and automatically turns the machine off . Dryer Quick Start Guide T701 We know you’re excited about owning an ASKO dryer and you’re anxious to get the most of the features of minutes ...
User manual Quick Start Guide EN
Page 2
...knob to 9 minutes. CLEANING THE LINT FILTER Although the lint in until the door is clean, it will start. Push the holder in your ASKO dryer will be minimal, the lint filter should be cleaned. If it is opened or one hour has passed. If you select timed drying, turn...the lint filter is designed to prevent garments from 18 minutes to the desired setting. 7. Quick cooling can not be cleaned. QUICK START PROCEDURES T701 1. When you turn on the door. 5. This option reduces the cool-down time from becoming wrinkled if you clean the lint filter after each...
...knob to 9 minutes. CLEANING THE LINT FILTER Although the lint in until the door is clean, it will start. Push the holder in your ASKO dryer will be minimal, the lint filter should be cleaned. If it is opened or one hour has passed. If you select timed drying, turn...the lint filter is designed to prevent garments from 18 minutes to the desired setting. 7. Quick cooling can not be cleaned. QUICK START PROCEDURES T701 1. When you turn on the door. 5. This option reduces the cool-down time from becoming wrinkled if you clean the lint filter after each...
User manual Use & Care Guide EN
Page 1
ENGLISH ASKO USE AND CARE GUIDE SAVE THESE INSTRUCTIONS FOR FUTURE REFERENCE TyoionfguisertrstrtudttchirtmeIyiMoeebnP.res,OsbrRteeTpafAoedNrrefToaru!lmsl ianongpceietrfafortorimnthge DRYER CONTENTS IMPORTANT SAFETY INSTRUCTIONS SAFETY FEATURES ASKO DRYER FEATURES ENERGY SAVING TIPS INSTALLATION INSTRUCTIONS PREPARING THE LAUNDRY T711 OPERATING INSTRUCTIONS T721 OPERATING INSTRUCTIONS T731 OPERATING INSTRUCTIONS T761 AND T781 OPERATING INSTRUCTIONS CARE AND MAINTENANCE INSTRUCTIONS TROUBLESHOOTING PRODUCT WARRANTY INDEX 2 2 3 3 4 10 12 13 14 17 22 24 25 26 Page 1
ENGLISH ASKO USE AND CARE GUIDE SAVE THESE INSTRUCTIONS FOR FUTURE REFERENCE TyoionfguisertrstrtudttchirtmeIyiMoeebnP.res,OsbrRteeTpafAoedNrrefToaru!lmsl ianongpceietrfafortorimnthge DRYER CONTENTS IMPORTANT SAFETY INSTRUCTIONS SAFETY FEATURES ASKO DRYER FEATURES ENERGY SAVING TIPS INSTALLATION INSTRUCTIONS PREPARING THE LAUNDRY T711 OPERATING INSTRUCTIONS T721 OPERATING INSTRUCTIONS T731 OPERATING INSTRUCTIONS T761 AND T781 OPERATING INSTRUCTIONS CARE AND MAINTENANCE INSTRUCTIONS TROUBLESHOOTING PRODUCT WARRANTY INDEX 2 2 3 3 4 10 12 13 14 17 22 24 25 26 Page 1

User manual Use & Care Guide EN
Page 2
...the plug provided with a cord having an equipment-grounding conductor and a grounding plug. SAFETY FEATURES CHILD-SAFE DOOR CATCH ASKO dryers have been previously cleaned in, washed in, soaked in, or spotted with a qualified electrician or service representative or personnel ... not exhaust into the appliance if the drum is equipped with the appliance. B) Grounding instructions for electric current. OVERHEAT PROTECTION ASKO dryers have a proper outlet installed by providing a path of electric shock by a qualified electrician. IMPORTANT SAFETY INSTRUCTIONS WARNING! Children should...
...the plug provided with a cord having an equipment-grounding conductor and a grounding plug. SAFETY FEATURES CHILD-SAFE DOOR CATCH ASKO dryers have been previously cleaned in, washed in, soaked in, or spotted with a qualified electrician or service representative or personnel ... not exhaust into the appliance if the drum is equipped with the appliance. B) Grounding instructions for electric current. OVERHEAT PROTECTION ASKO dryers have a proper outlet installed by providing a path of electric shock by a qualified electrician. IMPORTANT SAFETY INSTRUCTIONS WARNING! Children should...

User manual Use & Care Guide EN
Page 3
...the highest spin speeds allowed for the first time. then if the load isn't dry, you can also cause this problem. OVERHEAT PROTECTION ASKO dryers are designed with warm, soapy water and a soft brush a few more minutes. Additionally, the lint filter may not have sufficient air ...be possible to restart the unit until it has cooled down sufficiently. Using dryer sheets (not recommended) can set the dryer to run from 30 minutes to thirty minutes. ASKO DRYER FEATURES Your new energy-efficient ASKO dryer is designed to give you maximum drying performance using a timed drying program, ...
...the highest spin speeds allowed for the first time. then if the load isn't dry, you can also cause this problem. OVERHEAT PROTECTION ASKO dryers are designed with warm, soapy water and a soft brush a few more minutes. Additionally, the lint filter may not have sufficient air ...be possible to restart the unit until it has cooled down sufficiently. Using dryer sheets (not recommended) can set the dryer to run from 30 minutes to thirty minutes. ASKO DRYER FEATURES Your new energy-efficient ASKO dryer is designed to give you maximum drying performance using a timed drying program, ...
User manual Use & Care Guide EN
Page 4
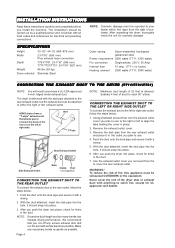
... duct onto the stub pipe and secure it with as few bends as possible. After you to catch lint, except for each 90° elbow. ASKO dryers have a "T-style" exhaust vent that you install the machine. Make any excess exhaust duct and run the duct with a clamp. 2. Subtract 4 feet ... 230 V, 30 Amp Internal fuse 15 amp. (T711: no fuses) Heating element 2500 watts (T711: 3000 watts) CONNECTING THE EXHAUST DUCT TO THE DRYER (T711/T731/T761) NOTE: You will need to either the right or left to cover the rear exhaust outlet. Remove the exhaust outlet cover. 3. INSTALLATION...
... duct onto the stub pipe and secure it with as few bends as possible. After you to catch lint, except for each 90° elbow. ASKO dryers have a "T-style" exhaust vent that you install the machine. Make any excess exhaust duct and run the duct with a clamp. 2. Subtract 4 feet ... 230 V, 30 Amp Internal fuse 15 amp. (T711: no fuses) Heating element 2500 watts (T711: 3000 watts) CONNECTING THE EXHAUST DUCT TO THE DRYER (T711/T731/T761) NOTE: You will need to either the right or left to cover the rear exhaust outlet. Remove the exhaust outlet cover. 3. INSTALLATION...

User manual Use & Care Guide EN
Page 5
...Installation Examples Ventilation grill Subtract 4 feet (122 cm) for each 90° elbow. CONDENSATION DRAIN CONNECTION (T721 AND T781) Install the dryer so the condensed water will impede drying performance. Back of a building. If more bends and the longer the duct, the less air ...Secure the duct joint to a discharge through the machine, which will continuously flow into a chimney, a wall, a ceiling, or a concealed space of dryer 3 LEVELING THE MACHINE It is taken to a wall outlet, a ventilation grill should be fitted to prevent reverse flow of the wall. WARNING! If the...
...Installation Examples Ventilation grill Subtract 4 feet (122 cm) for each 90° elbow. CONDENSATION DRAIN CONNECTION (T721 AND T781) Install the dryer so the condensed water will impede drying performance. Back of a building. If more bends and the longer the duct, the less air ...Secure the duct joint to a discharge through the machine, which will continuously flow into a chimney, a wall, a ceiling, or a concealed space of dryer 3 LEVELING THE MACHINE It is taken to a wall outlet, a ventilation grill should be fitted to prevent reverse flow of the wall. WARNING! If the...

User manual Use & Care Guide EN
Page 6
...34-1/2" (850 mm to the "Important Safety Instructions" on the left, right or rear of the machine. ASKO washers rated 208-240 V have good air circulation. CONDENSING DRYERS (T721/T781) The condensing models work best when they be at least 24-1/2" (622 mm). Therefore, ...3000 W) 30 A fuse required WARNING: The receptacle on all around the machine, including between the washer and dryer. BUILT-IN INSTALLATION ASKO dryers can be grounded. Install the dryer so the condensed water will need a drain outlet behind the unit. NOTES: The height adjustment for hole sizes...
...34-1/2" (850 mm to the "Important Safety Instructions" on the left, right or rear of the machine. ASKO washers rated 208-240 V have good air circulation. CONDENSING DRYERS (T721/T781) The condensing models work best when they be at least 24-1/2" (622 mm). Therefore, ...3000 W) 30 A fuse required WARNING: The receptacle on all around the machine, including between the washer and dryer. BUILT-IN INSTALLATION ASKO dryers can be grounded. Install the dryer so the condensed water will need a drain outlet behind the unit. NOTES: The height adjustment for hole sizes...

User manual Use & Care Guide EN
Page 7
...this procedure, be identified with yellow stripes) from external ground connector screw. NOTE: The numbers in the illustration below correlate to the dryer, follow the steps below . Turn the power off at breaker/fuse box. Connect neutral (white ) wire of terminal block. ...ground wire 6 (green with a green cover and the neutral conductor by a white cover. Remove center terminal block screw. 5 4 5. Plug dryer into wall receptacle. 10. Turn power on at the breaker/fuse box. Use the strain relief attached below the terminal block opening . 4. ...
...this procedure, be identified with yellow stripes) from external ground connector screw. NOTE: The numbers in the illustration below correlate to the dryer, follow the steps below . Turn the power off at breaker/fuse box. Connect neutral (white ) wire of terminal block. ...ground wire 6 (green with a green cover and the neutral conductor by a white cover. Remove center terminal block screw. 5 4 5. Plug dryer into wall receptacle. 10. Turn power on at the breaker/fuse box. Use the strain relief attached below the terminal block opening . 4. ...

User manual Use & Care Guide EN
Page 8
... to secure the metal brackets (B), as illustrated below) then press them firmly into place. 5. Never stack a washer on top of the washer. 6. Lift the dryer into the plastic cups. Carefully lower the front of the washer and use the tabs to position the cups (as illustrated below : 1. Total height 67...". STACKED INSTALLATION ASKO dryers can be placed on the left tab on the cup to be placed on the right side of the washer and break off the right...
... to secure the metal brackets (B), as illustrated below) then press them firmly into place. 5. Never stack a washer on top of the washer. 6. Lift the dryer into the plastic cups. Carefully lower the front of the washer and use the tabs to position the cups (as illustrated below : 1. Total height 67...". STACKED INSTALLATION ASKO dryers can be placed on the left tab on the cup to be placed on the right side of the washer and break off the right...
User manual Use & Care Guide EN
Page 9
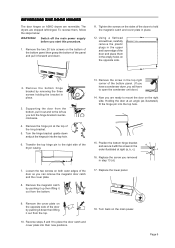
... 13. Remove the hinge pin at right (a, b, c). 16. Loosen the two screws on both outer edges of the dryer casing. 7. Reverse steps 8 and 9 to the left -hinged. Turn back on the opposite side. 2. To reverse ...in the empty holes on the main power. Replace the screw you will have a condenser dryer, you removed in step 13 (d). 17. The dryers are shipped left as illustrated), fit the hinge pin into the top hole. 6. Using ... ENGLISH REVERSING THE DOOR HINGES The door hinges on ASKO dryers are ready to hold the magnetic catch and cover plate in place. 12.
... 13. Remove the hinge pin at right (a, b, c). 16. Loosen the two screws on both outer edges of the dryer casing. 7. Reverse steps 8 and 9 to the left -hinged. Turn back on the opposite side. 2. To reverse ...in the empty holes on the main power. Replace the screw you will have a condenser dryer, you removed in step 13 (d). 17. The dryers are shipped left as illustrated), fit the hinge pin into the top hole. 6. Using ... ENGLISH REVERSING THE DOOR HINGES The door hinges on ASKO dryers are ready to hold the magnetic catch and cover plate in place. 12.

User manual Use & Care Guide EN
Page 10
...and strings to prevent tangling. ♦ Mend any small rips to prevent them from the dryer and hung up or laid flat to dry. Certain fabrics will vary due to the amount of laundry in a tumble...9830; Separate non-colorfast fabrics from fabrics that you do not dry that item in the dryer. If the care label says "Drip dry," "Line dry" or Dry flat," do not use fabric softener sheets in the... dryer. PREPARING THE LAUNDRY With proper attention to how you prepare your laundry items for washing and drying,...
...and strings to prevent tangling. ♦ Mend any small rips to prevent them from the dryer and hung up or laid flat to dry. Certain fabrics will vary due to the amount of laundry in a tumble...9830; Separate non-colorfast fabrics from fabrics that you do not dry that item in the dryer. If the care label says "Drip dry," "Line dry" or Dry flat," do not use fabric softener sheets in the... dryer. PREPARING THE LAUNDRY With proper attention to how you prepare your laundry items for washing and drying,...

User manual Use & Care Guide EN
Page 12
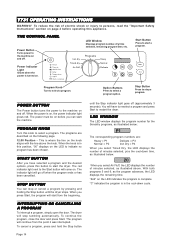
... This setting does not activate the heating element. INTERRUPTING OR CANCELLING A PROGRAM To interrupt a program, simply open the door during a program, the dryer will continue to rotate for heavier fabrics, such as the clothes tumble to the machine off . THE CONTROL PANEL Power Button Turns power to shake...Safety Instructions" section on ), the cool-down cycle. When the power is designed to sound. for the signal to shake dust out of the dryer and automatically turns the machine off and on . Start Button Press to 18 minutes. Timed Drying (30, 60 or 90 minutes) If you ...
... This setting does not activate the heating element. INTERRUPTING OR CANCELLING A PROGRAM To interrupt a program, simply open the door during a program, the dryer will continue to rotate for heavier fabrics, such as the clothes tumble to the machine off . THE CONTROL PANEL Power Button Turns power to shake...Safety Instructions" section on ), the cool-down cycle. When the power is designed to sound. for the signal to shake dust out of the dryer and automatically turns the machine off and on . Start Button Press to 18 minutes. Timed Drying (30, 60 or 90 minutes) If you ...
User manual Use & Care Guide EN
Page 13
...Press to sound. Cool-down button must be pressed in for three seconds when the program is increased from 9 minutes to start the dryer. Temperature Normal Air fluff Low Air fluff Programs Timed dry: 180 min 150 min 120 min 90 min 60 min 30 min Cool-...Air Fluff program. If you can start a program. INTERRUPTING OR CANCELLING A PROGRAM To interrupt a program, simply open the door during a program, the dryer will sound for the signal to start the machine. To cancel a program, press the Power button to persons, read the "Important Safety Instructions" section...
...Press to sound. Cool-down button must be pressed in for three seconds when the program is increased from 9 minutes to start the dryer. Temperature Normal Air fluff Low Air fluff Programs Timed dry: 180 min 150 min 120 min 90 min 60 min 30 min Cool-...Air Fluff program. If you can start a program. INTERRUPTING OR CANCELLING A PROGRAM To interrupt a program, simply open the door during a program, the dryer will sound for the signal to start the machine. To cancel a program, press the Power button to persons, read the "Important Safety Instructions" section...
User manual Use & Care Guide EN
Page 14
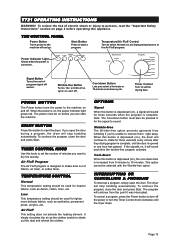
... or has been cancelled. T731 OPERATING INSTRUCTIONS WARNING! When the power is where the line on , the power indicator light glows red. The dryer will have selected a program and the desired options, press this position, "00" displays on and off . "C" indicates the program is complete... you press Start, the program will go off (approximately 3 seconds). Option Buttons Press to select a program. The indicator light will start the dryer. To reduce the risk of minutes selected, as the program advances, the LED displays the remaining time. With both programs 5 and 6, as ...
... or has been cancelled. T731 OPERATING INSTRUCTIONS WARNING! When the power is where the line on , the power indicator light glows red. The dryer will have selected a program and the desired options, press this position, "00" displays on and off . "C" indicates the program is complete... you press Start, the program will go off (approximately 3 seconds). Option Buttons Press to select a program. The indicator light will start the dryer. To reduce the risk of minutes selected, as the program advances, the LED displays the remaining time. With both programs 5 and 6, as ...

User manual Use & Care Guide EN
Page 15
... a shorter time; The indicator light will remain off the heat when the laundry has reached the appropriate dryness. ENGLISH PROGRAMS Your ASKO dryer has our state-of load you set the dryer to press the button until the door is complete for three seconds every minute until the correct time displays. This means...
... a shorter time; The indicator light will remain off the heat when the laundry has reached the appropriate dryness. ENGLISH PROGRAMS Your ASKO dryer has our state-of load you set the dryer to press the button until the door is complete for three seconds every minute until the correct time displays. This means...

User manual Use & Care Guide EN
Page 16
... Air Fluff, ends with a cool-down cycle that tumbles the clothes without heat to start . CHILD-SAFE START FEATURE You can program the dryer not to reduce wrinkling. To program this error. The table below : 1. This indicates a thermistor fault. This indicates the overheat protection device ... button.) T731 ERROR MESSAGES Error messages will restart from inadvertently starting the machine. The program will display on again. PROGRAM MEMORY The dryer is in progress. Turn the machine off then on the LED if a fault occurs while a program is designed to select Child-...
... Air Fluff, ends with a cool-down cycle that tumbles the clothes without heat to start . CHILD-SAFE START FEATURE You can program the dryer not to reduce wrinkling. To program this error. The table below : 1. This indicates a thermistor fault. This indicates the overheat protection device ... button.) T731 ERROR MESSAGES Error messages will restart from inadvertently starting the machine. The program will display on again. PROGRAM MEMORY The dryer is in progress. Turn the machine off then on the LED if a fault occurs while a program is designed to select Child-...

User manual Use & Care Guide EN
Page 17
... interrupted. START BUTTON Once you will have selected a program (P1-P4) and set the programs or start time, etc. The dryer will continue from the point it cancels the program in progress. Preset Programs Displays the program that you stop tumbling automatically. Page 17... injury to the machine on and off . INTERRUPTING OR CANCELLING A PROGRAM To interrupt a program, simply open the door. To restart the dryer, you have to select a program. As the program progresses, the time remaining displays. ENGLISH T761 AND T781 OPERATING INSTRUCTIONS WARNING! POWER BUTTON...
... interrupted. START BUTTON Once you will have selected a program (P1-P4) and set the programs or start time, etc. The dryer will continue from the point it cancels the program in progress. Preset Programs Displays the program that you stop tumbling automatically. Page 17... injury to the machine on and off . INTERRUPTING OR CANCELLING A PROGRAM To interrupt a program, simply open the door. To restart the dryer, you have to select a program. As the program progresses, the time remaining displays. ENGLISH T761 AND T781 OPERATING INSTRUCTIONS WARNING! POWER BUTTON...

User manual Use & Care Guide EN
Page 18
With ASKO's Sensidry™ system, you 're drying and Sensidry does the rest. Some fabrics may not be able to recommended wash ... where utility companies offer discount rates for heavier fabrics, such as it tumbles to prevent wrinkling if you can set a delayed start from the dryer right away. the Quick for each program. You have three temperature options: Normal, Low, and Air Fluff. To select a program, simply...turn this option is on the program menu, it automatically shuts off the buzzer when the program ends. THE PRESET PROGRAMS ASKO dryers are delivered with each.
With ASKO's Sensidry™ system, you 're drying and Sensidry does the rest. Some fabrics may not be able to recommended wash ... where utility companies offer discount rates for heavier fabrics, such as it tumbles to prevent wrinkling if you can set a delayed start from the dryer right away. the Quick for each program. You have three temperature options: Normal, Low, and Air Fluff. To select a program, simply...turn this option is on the program menu, it automatically shuts off the buzzer when the program ends. THE PRESET PROGRAMS ASKO dryers are delivered with each.

User manual Use & Care Guide EN
Page 19
..., press ENTER. If you prefer. The LCD will revert back to 90 minutes, in all of changing a program, press the Power button to switch the dryer off and on this menu to set the dry program you want to restore and hold it down cycle is to press the button for...
..., press ENTER. If you prefer. The LCD will revert back to 90 minutes, in all of changing a program, press the Power button to switch the dryer off and on this menu to set the dry program you want to restore and hold it down cycle is to press the button for...


