User Guide
Page 1
...://arnovatech.com/faq Contact our Technical Support Team: Visit http://arnovatech.com/support for choosing this Quick Start Guide. This will give you to get access to register it (http://arnovatech.com/register). Please register your product before contacting Technical Support (see Register your device's software may have a slightly different appearance or modified functionality than presented in this ARNOVA...
...://arnovatech.com/faq Contact our Technical Support Team: Visit http://arnovatech.com/support for choosing this Quick Start Guide. This will give you to get access to register it (http://arnovatech.com/register). Please register your product before contacting Technical Support (see Register your device's software may have a slightly different appearance or modified functionality than presented in this ARNOVA...

User Guide
Page 2
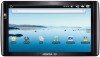
... jack 10 5 USB Host port: to connect a keyboard, a mouse or a mass storage USB device. English Description of the device 1 Volume + / Volume - 2 Charging indicator: Red light: battery charging / Yellow: battery charged. 9 3 On/Off button: enables to turn on or turn off the Host port after use. 6 Micro-USB port: to connect your ARNOVA to your computer, using the included USB cable (to transfer files) 7 Micro-SD card 8 Power connector 9 Camera: enables to take pictures, to record videos or to make video chats using downloaded applications. 10 Microphone Hardware Reset: In the...
... jack 10 5 USB Host port: to connect a keyboard, a mouse or a mass storage USB device. English Description of the device 1 Volume + / Volume - 2 Charging indicator: Red light: battery charging / Yellow: battery charged. 9 3 On/Off button: enables to turn on or turn off the Host port after use. 6 Micro-USB port: to connect your ARNOVA to your computer, using the included USB cable (to transfer files) 7 Micro-SD card 8 Power connector 9 Camera: enables to take pictures, to record videos or to make video chats using downloaded applications. 10 Microphone Hardware Reset: In the...

User Guide
Page 3
Before using your ARNOVA, the installation wizard will bring you through a few screens to help you set up ▲! English Starting up the principal settings: Language, country, time, etc. 3 UserGuide_Arnova_10_PN109563_book.indd 3 15/02/2011 17:46:56 Charging the Battery 1 Connect the supplied power cable to the ARNOVA Power connector and to a wall outlet. 2 The ARNOVA device will turn on and start charging. 1 UK EUR US Installation Wizard The first time you start up your ARNOVA for the first time, completely charge the battery!
Before using your ARNOVA, the installation wizard will bring you through a few screens to help you set up ▲! English Starting up the principal settings: Language, country, time, etc. 3 UserGuide_Arnova_10_PN109563_book.indd 3 15/02/2011 17:46:56 Charging the Battery 1 Connect the supplied power cable to the ARNOVA Power connector and to a wall outlet. 2 The ARNOVA device will turn on and start charging. 1 UK EUR US Installation Wizard The first time you start up your ARNOVA for the first time, completely charge the battery!
User Guide
Page 4
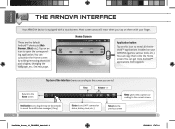
Time Volume -/+ ▼ ▼ ▼ Status icons: (WiFi connection status, battery level, etc.) Menu: gives menu options according to the current screen. ▼ Return to reveal the notification messages (if any). Home Screen Application button Tap on this icon to open the corresponding application. See next page. You can copy them with a touchscreen. English ▼ The ARNOVA INTERFACE Your ARNOVA device is equipped with your ARNOVA...
Time Volume -/+ ▼ ▼ ▼ Status icons: (WiFi connection status, battery level, etc.) Menu: gives menu options according to the current screen. ▼ Return to reveal the notification messages (if any). Home Screen Application button Tap on this icon to open the corresponding application. See next page. You can copy them with a touchscreen. English ▼ The ARNOVA INTERFACE Your ARNOVA device is equipped with your ARNOVA...
User Guide
Page 5
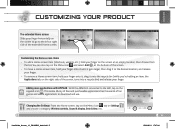
... the right side of the screen, turns into a recycle bin) and release your finger. To remove a Home screen item, hold your finger onto it until it gets larger, then drag it onto the recycle bin (while you're holding an item, the Applications tab, on the screen to go to the Wifi, tap on Settings and choose a category: Wireless controls, Sound & display, Date & time, etc.
... the right side of the screen, turns into a recycle bin) and release your finger. To remove a Home screen item, hold your finger onto it until it gets larger, then drag it onto the recycle bin (while you're holding an item, the Applications tab, on the screen to go to the Wifi, tap on Settings and choose a category: Wireless controls, Sound & display, Date & time, etc.

User Guide
Page 6
... work, you need either a key (a series of numbers and/or letters) of the screen. 4 Tap on the network you will scan for available WiFi networks and display them at �tempt to make a connection. 1 To configure a new WiFi network, go on the Home screen, tap on Connect. For secured networks, you want to connect to, enter the required network information* and then tap on the Menu icon , then select Settings . 2 In the Settings screen, select Wireless & networks...
... work, you need either a key (a series of numbers and/or letters) of the screen. 4 Tap on the network you will scan for available WiFi networks and display them at �tempt to make a connection. 1 To configure a new WiFi network, go on the Home screen, tap on Connect. For secured networks, you want to connect to, enter the required network information* and then tap on the Menu icon , then select Settings . 2 In the Settings screen, select Wireless & networks...

User Guide
Page 7
Use the icons / and the progression bar as Photo To start playing it. To go to display/hide the on-screen controls, tap anywhere on the screen. Only in Video and Photo modes: to any particular point in the video, Music To play the next or previous song, tap on the icons in the video player screen (see above). / . To view the next or previous photo...
Use the icons / and the progression bar as Photo To start playing it. To go to display/hide the on-screen controls, tap anywhere on the screen. Only in Video and Photo modes: to any particular point in the video, Music To play the next or previous song, tap on the icons in the video player screen (see above). / . To view the next or previous photo...
User Guide
Page 8
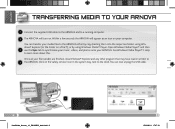
... your ARNOVA. Computer turned on USB 1 8 UserGuide_Arnova_10_PN109563_book.indd 8 32 15/02/2011 17:47:13 Open Windows Media Player® and then 3 use the Sync tab to synchronize your music, videos, and photos onto your file transfers are finished, close Windows® Explorer and any other program that may have read or written to 4 the ARNOVA. Click on the 'safely remove' icon in...
... your ARNOVA. Computer turned on USB 1 8 UserGuide_Arnova_10_PN109563_book.indd 8 32 15/02/2011 17:47:13 Open Windows Media Player® and then 3 use the Sync tab to synchronize your music, videos, and photos onto your file transfers are finished, close Windows® Explorer and any other program that may have read or written to 4 the ARNOVA. Click on the 'safely remove' icon in...


