User Guide
Page 2
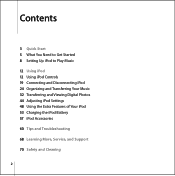
Contents 3 Quick Start 5 What You Need to Get Started 8 Setting Up iPod to Play Music 12 Using iPod 12 Using iPod Controls 19 Connecting and Disconnecting iPod 24 Organizing and Transferring Your Music 32 Transferring and Viewing Digital Photos 44 Adjusting iPod Settings 48 Using the Extra Features of Your iPod 53 Charging the iPod Battery 57 iPod Accessories 60 Tips and Troubleshooting 68 Learning More, Service, and Support 70 Safety and Cleaning 2
Contents 3 Quick Start 5 What You Need to Get Started 8 Setting Up iPod to Play Music 12 Using iPod 12 Using iPod Controls 19 Connecting and Disconnecting iPod 24 Organizing and Transferring Your Music 32 Transferring and Viewing Digital Photos 44 Adjusting iPod Settings 48 Using the Extra Features of Your iPod 53 Charging the iPod Battery 57 iPod Accessories 60 Tips and Troubleshooting 68 Learning More, Service, and Support 70 Safety and Cleaning 2
User Guide
Page 3
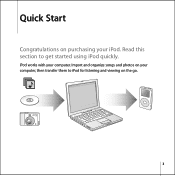
Read this section to iPod for listening and viewing on purchasing your iPod. Quick Start 1 Congratulations on the go. 3 Import and organize songs and photos on your computer. iPod works with your computer, then transfer them to get started using iPod quickly.
Read this section to iPod for listening and viewing on purchasing your iPod. Quick Start 1 Congratulations on the go. 3 Import and organize songs and photos on your computer. iPod works with your computer, then transfer them to get started using iPod quickly.
User Guide
Page 4
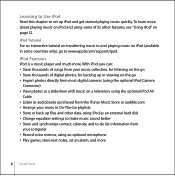
... cameras (using some countries only), go to set an alarm, and more . Learning to Use iPod Read this chapter to www.apple.com/support/ipod. iPod Tutorial For an interactive tutorial on transferring music to and playing music on iPod (available in some of digital photos, for listening on the go • Import photos directly...
... cameras (using some countries only), go to set an alarm, and more . Learning to Use iPod Read this chapter to www.apple.com/support/ipod. iPod Tutorial For an interactive tutorial on transferring music to and playing music on iPod (available in some of digital photos, for listening on the go • Import photos directly...
User Guide
Page 5
...This software is also part of a suite of iTunes, go to www.apple.com/itunes. • iPod software (included on the iPod CD) • iPhoto 4.0.3 or later (recommended for transferring photos and albums to FireWire Cable (available for purchase at www.apple.com/ilife. What You Need to Get Started To use... iPod with : • Built-in high-power USB 2.0 • Or built-in FireWire and the optional iPod Dock Connector to iPod) Note: iPhoto may already be sure you can also ...
...This software is also part of a suite of iTunes, go to www.apple.com/itunes. • iPod software (included on the iPod CD) • iPhoto 4.0.3 or later (recommended for transferring photos and albums to FireWire Cable (available for purchase at www.apple.com/ilife. What You Need to Get Started To use... iPod with : • Built-in high-power USB 2.0 • Or built-in FireWire and the optional iPod Dock Connector to iPod) Note: iPhoto may already be sure you can also ...
User Guide
Page 6
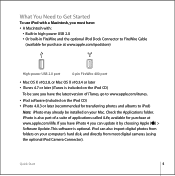
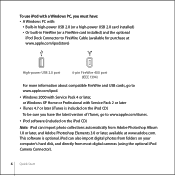
... USB 2.0 (or a high-power USB 2.0 card installed) • Or built-in FireWire (or a FireWire card installed) and the optional iPod Dock Connector to www.apple.com/ipod. • Windows 2000 with Service Pack 4 or later, or Windows XP Home or Professional with Service Pack 2 or later • iTunes ...4.7 or later (iTunes is optional. This software is included on the iPod CD) To be sure you must have the latest version of iTunes, go to www.apple.com/itunes. • iPod software (included on your computer's hard disk, and directly from Adobe Photoshop Album 1.0 or ...
... USB 2.0 (or a high-power USB 2.0 card installed) • Or built-in FireWire (or a FireWire card installed) and the optional iPod Dock Connector to www.apple.com/ipod. • Windows 2000 with Service Pack 4 or later, or Windows XP Home or Professional with Service Pack 2 or later • iTunes ...4.7 or later (iTunes is optional. This software is included on the iPod CD) To be sure you must have the latest version of iTunes, go to www.apple.com/itunes. • iPod software (included on your computer's hard disk, and directly from Adobe Photoshop Album 1.0 or ...
User Guide
Page 7
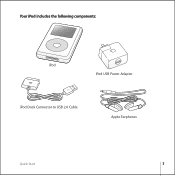
Your iPod includes the following components: iPod iPod USB Power Adapter iPod Dock Connector to USB 2.0 Cable Apple Earphones Quick Start 7
Your iPod includes the following components: iPod iPod USB Power Adapter iPod Dock Connector to USB 2.0 Cable Apple Earphones Quick Start 7
User Guide
Page 8
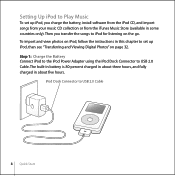
...on page 32. To import and view photos on iPod, follow the instructions in this chapter to set up iPod, then see "Transferring and Viewing Digital Photos" on the go. Step 1: Charge the Battery Connect iPod to the iPod Power Adapter using the iPod Dock Connector to USB 2.0 Cable 8 Quick Start The...in battery is 80-percent charged in about three hours, and fully charged in some countries only). iPod Dock Connector to USB 2.0 Cable. Then you charge the battery, install software from the iPod CD, and import songs from your music CD collection or from the iTunes Music Store (available ...
...on page 32. To import and view photos on iPod, follow the instructions in this chapter to set up iPod, then see "Transferring and Viewing Digital Photos" on the go. Step 1: Charge the Battery Connect iPod to the iPod Power Adapter using the iPod Dock Connector to USB 2.0 Cable 8 Quick Start The...in battery is 80-percent charged in about three hours, and fully charged in some countries only). iPod Dock Connector to USB 2.0 Cable. Then you charge the battery, install software from the iPod CD, and import songs from your music CD collection or from the iTunes Music Store (available ...

User Guide
Page 9
...or if you have an Internet connection, you can browse over a million songs and listen to a 30-second preview of any other CDs with songs you haven't already transferred music to transfer, then click ... 3 Repeat for any song. To import music to import. Step 2: Install the Software Insert the iPod CD into your computer. iTunes opens automatically and the CD is available in the Source list. 2 Click...Account button and follow the onscreen instructions to set up an account or enter your existing Apple Account or America Online (AOL) account information (this step if you 'd like to your computer ...
...or if you have an Internet connection, you can browse over a million songs and listen to a 30-second preview of any other CDs with songs you haven't already transferred music to transfer, then click ... 3 Repeat for any song. To import music to import. Step 2: Install the Software Insert the iPod CD into your computer. iTunes opens automatically and the CD is available in the Source list. 2 Click...Account button and follow the onscreen instructions to set up an account or enter your existing Apple Account or America Online (AOL) account information (this step if you 'd like to your computer ...
User Guide
Page 10
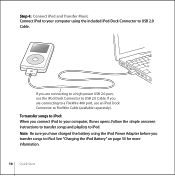
... connecting to a high-power USB 2.0 port, use an iPod Dock Connector to USB 2.0 Cable. If you are connecting to a FireWire 400 port, use the iPod Dock Connector to FireWire Cable (available separately). See "Charging the iPod Battery" on page 53 for more information. 10 Quick Start... transfer songs and playlists to your computer using the iPod Power Adapter before you have charged the battery using the included iPod Dock Connector to iPod. Note: Be sure you transfer songs to USB 2.0 Cable. Step 4: Connect iPod and Transfer Music Connect iPod to your computer, iTunes opens.
... connecting to a high-power USB 2.0 port, use an iPod Dock Connector to USB 2.0 Cable. If you are connecting to a FireWire 400 port, use the iPod Dock Connector to FireWire Cable (available separately). See "Charging the iPod Battery" on page 53 for more information. 10 Quick Start... transfer songs and playlists to your computer using the iPod Power Adapter before you have charged the battery using the included iPod Dock Connector to iPod. Note: Be sure you transfer songs to USB 2.0 Cable. Step 4: Connect iPod and Transfer Music Connect iPod to your computer, iTunes opens.
User Guide
Page 11
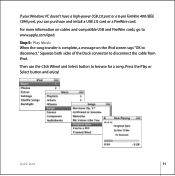
Press the Play or Select button and enjoy! Then use the Click Wheel and Select button to disconnect the cable from iPod. Squeeze both sides of the Dock connector to browse for a song. Quick Start 11 If your Windows PC doesn't have a high-power USB 2.0 port or a 6-pin FireWire 400 (IEEE 1394) port, you can purchase and install a USB 2.0 card or a FireWire card. Step 5: Play Music When the song transfer is complete, a message on cables and compatible USB and FireWire cards, go to disconnect." For more information on the iPod screen says "OK to www.apple.com/ipod.
Press the Play or Select button and enjoy! Then use the Click Wheel and Select button to disconnect the cable from iPod. Squeeze both sides of the Dock connector to browse for a song. Quick Start 11 If your Windows PC doesn't have a high-power USB 2.0 port or a 6-pin FireWire 400 (IEEE 1394) port, you can purchase and install a USB 2.0 card or a FireWire card. Step 5: Play Music When the song transfer is complete, a message on cables and compatible USB and FireWire cards, go to disconnect." For more information on the iPod screen says "OK to www.apple.com/ipod.

User Guide
Page 12
Using iPod 1 Read this section to turn on iPod. Using iPod Controls Press any button to learn about using iPod controls, transferring music, transferring and viewing photos, charging the battery, and using the extra features of your iPod. The main menu appears. 12
Using iPod 1 Read this section to turn on iPod. Using iPod Controls Press any button to learn about using iPod controls, transferring music, transferring and viewing photos, charging the battery, and using the extra features of your iPod. The main menu appears. 12

User Guide
Page 13
To select the item, press the Select button. iPod Remote port Headphones and AV port Hold switch Menu button Previous/Rewind button Click Wheel Apple Earphones Select button Next/Fast-forward button Play/Pause button Dock connector port Using iPod 13 Use the Click Wheel and Select button to the previous menu, press Menu on the Click Wheel. To go back to navigate through onscreen menus, play songs, change settings, and view information. Move your thumb lightly around the Click Wheel to highlight a menu item.
To select the item, press the Select button. iPod Remote port Headphones and AV port Hold switch Menu button Previous/Rewind button Click Wheel Apple Earphones Select button Next/Fast-forward button Play/Pause button Dock connector port Using iPod 13 Use the Click Wheel and Select button to the previous menu, press Menu on the Click Wheel. To go back to navigate through onscreen menus, play songs, change settings, and view information. Move your thumb lightly around the Click Wheel to highlight a menu item.
User Guide
Page 14
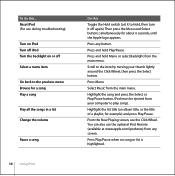
...the Click Wheel. Press Menu. Highlight the song and press the Select or Play/Pause button. You can also use the optional iPod Remote (available at www.apple.com/ipodstore) from the main menu. Then press the Menu and Select buttons simultaneously for example) and press Play/Pause. Press ...Play/Pause when no song or list is highlighted. Press and hold Play/Pause. iPod must be ejected from the main menu. Press any ...
...the Click Wheel. Press Menu. Highlight the song and press the Select or Play/Pause button. You can also use the optional iPod Remote (available at www.apple.com/ipodstore) from the main menu. Then press the Menu and Select buttons simultaneously for example) and press Play/Pause. Press ...Play/Pause when no song or list is highlighted. Press and hold Play/Pause. iPod must be ejected from the main menu. Press any ...
User Guide
Page 15
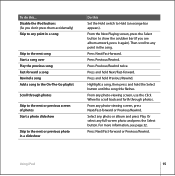
Disable the iPod buttons (So you see page 32. Highlight a song, then press and hold Next/Fast-forward. Then scroll to any point in a song Skip to the ... screen, press Next/Fast-forward or Previous/Rewind. Press Next/Fast-forward or Previous/Rewind. For more information, see album artwork, press it again). Using iPod 15 Press Previous/Rewind twice. Or select any photo-viewing screen, use the Click Wheel to scroll back and forth through photos Skip to the...
Disable the iPod buttons (So you see page 32. Highlight a song, then press and hold Next/Fast-forward. Then scroll to any point in a song Skip to the ... screen, press Next/Fast-forward or Previous/Rewind. Press Next/Fast-forward or Previous/Rewind. For more information, see album artwork, press it again). Using iPod 15 Press Previous/Rewind twice. Or select any photo-viewing screen, use the Click Wheel to scroll back and forth through photos Skip to the...
User Guide
Page 16
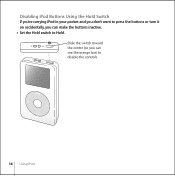
Slide the switch toward the center (so you can see the orange bar) to Hold. Disabling iPod Buttons Using the Hold Switch If you're carrying iPod in your pocket and you don't want to press the buttons or turn it on accidentally, you can make the buttons inactive. n Set the Hold switch to disable the controls. 16 Using iPod
Slide the switch toward the center (so you can see the orange bar) to Hold. Disabling iPod Buttons Using the Hold Switch If you're carrying iPod in your pocket and you don't want to press the buttons or turn it on accidentally, you can make the buttons inactive. n Set the Hold switch to disable the controls. 16 Using iPod
User Guide
Page 17
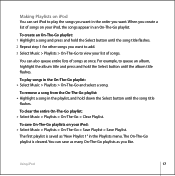
... view your list of songs on your iPod, the songs appear in an On-The-Go playlist. To create an On-The-Go playlist: 1 Highlight a song and press and hold the Select button ... playlists as "New Playlist 1" in the On-The-Go playlist: n Select Music > Playlists > On-The-Go and select a song. Using iPod 17 You can save On-The-Go playlists on your iPod: n Select Music > Playlists > On-The-Go > Save Playlist > Save Playlist. The On-The-Go playlist is saved as you create...
... view your list of songs on your iPod, the songs appear in an On-The-Go playlist. To create an On-The-Go playlist: 1 Highlight a song and press and hold the Select button ... playlists as "New Playlist 1" in the On-The-Go playlist: n Select Music > Playlists > On-The-Go and select a song. Using iPod 17 You can save On-The-Go playlists on your iPod: n Select Music > Playlists > On-The-Go > Save Playlist > Save Playlist. The On-The-Go playlist is saved as you create...
User Guide
Page 18
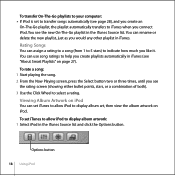
..., stars, or a combination of both). 3 Use the Click Wheel to select a rating. To transfer On-The-Go playlists to your computer: n If iPod is set iTunes to allow iPod to display album art, then view the album artwork on page 27). Rating Songs You can rename or delete the new playlist, just... as you like it. Options button 18 Using iPod You can assign a rating to a song (from 1 to 5 stars) to iTunes when you see the new On-The-Go playlist in iTunes. To set to...
..., stars, or a combination of both). 3 Use the Click Wheel to select a rating. To transfer On-The-Go playlists to your computer: n If iPod is set iTunes to allow iPod to display album art, then view the album artwork on page 27). Rating Songs You can rename or delete the new playlist, just... as you like it. Options button 18 Using iPod You can assign a rating to a song (from 1 to 5 stars) to iTunes when you see the new On-The-Go playlist in iTunes. To set to...
User Guide
Page 19
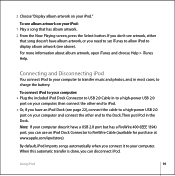
... press the Select button. To connect iPod to your computer: n Plug the included iPod Dock Connector to USB 2.0 Cable in the Dock. Note: If your computer, then connect the other end to FireWire Cable (available for purchase at www.apple.com/ipodstore). For more information about ...album artwork, open iTunes and choose Help > iTunes Help. By default, iPod imports songs automatically when you can disconnect iPod. Then put iPod in to a high-power USB 2.0 port on your...
... press the Select button. To connect iPod to your computer: n Plug the included iPod Dock Connector to USB 2.0 Cable in the Dock. Note: If your computer, then connect the other end to FireWire Cable (available for purchase at www.apple.com/ipodstore). For more information about ...album artwork, open iTunes and choose Help > iTunes Help. By default, iPod imports songs automatically when you can disconnect iPod. Then put iPod in to a high-power USB 2.0 port on your...
User Guide
Page 20
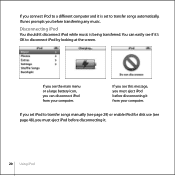
...transfer songs manually (see page 29) or enable iPod for disk use (see the main menu or a large battery icon, you must eject iPod before disconnecting it. 20 Using iPod If you see this message, you can easily see if it's OK to disconnect iPod by looking at the screen. If you see... page 48), you must eject iPod before transferring any music. You can disconnect iPod from your computer. If you set to transfer songs automatically, iTunes prompts you before disconnecting ...
...transfer songs manually (see page 29) or enable iPod for disk use (see the main menu or a large battery icon, you must eject iPod before disconnecting it. 20 Using iPod If you see this message, you can easily see if it's OK to disconnect iPod by looking at the screen. If you see... page 48), you must eject iPod before transferring any music. You can disconnect iPod from your computer. If you set to transfer songs automatically, iTunes prompts you before disconnecting ...
User Guide
Page 21
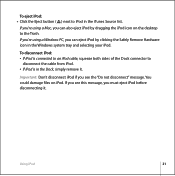
...using a Windows PC, you can eject iPod by dragging the iPod icon on iPod. If you're using a Mac, you can also eject iPod by clicking the Safely Remove Hardware icon in the Dock, simply remove it . To disconnect iPod: • If iPod is connected to an iPod cable, squeeze both sides of the Dock... connector to disconnect the cable from iPod. • If iPod is in the Windows system tray and selecting your iPod. You could damage files on the desktop to iPod in the iTunes Source list. Using iPod 21 If you see this message, you see the "Do not ...
...using a Windows PC, you can eject iPod by dragging the iPod icon on iPod. If you're using a Mac, you can also eject iPod by clicking the Safely Remove Hardware icon in the Dock, simply remove it . To disconnect iPod: • If iPod is connected to an iPod cable, squeeze both sides of the Dock... connector to disconnect the cable from iPod. • If iPod is in the Windows system tray and selecting your iPod. You could damage files on the desktop to iPod in the iTunes Source list. Using iPod 21 If you see this message, you see the "Do not ...