Installation Guide
Page 2
...new features, the Shake 3 user interface, image input and output, the compositing nodes and Node View, file formats and footage, keying, color correction and color space, using masks and transforms, working with expressions, color correction on the Shake 3 installation CD. m Shake 3 Reference Guide m Shake 3 Tutorials m Shake 3 Installation Guide m Shake Qmaster User's Manual m Shake Qmaster Late-Breaking News About Online Help The Shake 3 Reference Guide, Shake 3 Tutorials, Customizing Shake, Getting Help, and LateBreaking News are available in the Help menu of the Shake application...
...new features, the Shake 3 user interface, image input and output, the compositing nodes and Node View, file formats and footage, keying, color correction and color space, using masks and transforms, working with expressions, color correction on the Shake 3 installation CD. m Shake 3 Reference Guide m Shake 3 Tutorials m Shake 3 Installation Guide m Shake Qmaster User's Manual m Shake Qmaster Late-Breaking News About Online Help The Shake 3 Reference Guide, Shake 3 Tutorials, Customizing Shake, Getting Help, and LateBreaking News are available in the Help menu of the Shake application...

Installation Guide
Page 3
... about the software, new features, and known bugs. in Shake Qadministrator, choose Help > Shake Qmaster Help; To access the online help for easy navigation. Note: In the Shake 3 Reference Guide, extensive information on customizing Shake can also be accessed from the Shake 3 Help menu. Late-Breaking News The late-breaking news is the utility installed with the Shake Qadministrator and Shake Qmaster Client components). The online PDFs are interactive and contain links for a specific Shake function...
... about the software, new features, and known bugs. in Shake Qadministrator, choose Help > Shake Qmaster Help; To access the online help for easy navigation. Note: In the Shake 3 Reference Guide, extensive information on customizing Shake can also be accessed from the Shake 3 Help menu. Late-Breaking News The late-breaking news is the utility installed with the Shake Qadministrator and Shake Qmaster Client components). The online PDFs are interactive and contain links for a specific Shake function...

Installation Guide
Page 4
... with 1280 x 1024 display with a required minimum of 24-bit color Minimum Server Hardware and Software Configuration m 1 Ghz PowerPC G4 or higher XServe m Mac OS X Server 10.2.5 (or later) m 3-button mouse (optional for render station, required for compositing seat) m QuickTime 6.1 (or later) m 1 GB local disk space for caching and temporary files m 256 MB of RAM m A video display card with 32 MB...
... with 1280 x 1024 display with a required minimum of 24-bit color Minimum Server Hardware and Software Configuration m 1 Ghz PowerPC G4 or higher XServe m Mac OS X Server 10.2.5 (or later) m 3-button mouse (optional for render station, required for compositing seat) m QuickTime 6.1 (or later) m 1 GB local disk space for caching and temporary files m 256 MB of RAM m A video display card with 32 MB...

Installation Guide
Page 5
... real time. m 1280 x 1024 display with a required minimum of 24-bit color (optional for render station, required for compositing seat) Minimum Requirements for caching and temporary files m 256 MB of RAM RAM Requirements Real-time playback is a function of RAM, processor, image size, clip length, and graphics card. In Shake, images are loaded into memory and then played back. Use...
... real time. m 1280 x 1024 display with a required minimum of 24-bit color (optional for render station, required for compositing seat) Minimum Requirements for caching and temporary files m 256 MB of RAM RAM Requirements Real-time playback is a function of RAM, processor, image size, clip length, and graphics card. In Shake, images are loaded into memory and then played back. Use...

Installation Guide
Page 6
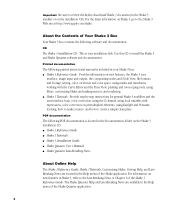
... or PowerPC G4 m Mac OS X 10.2.5 (or later) m QuickTime 6.1 (or later) m 256 MB of RAM m 5 MB of disk space for Client Tools m 5 MB of local disk space for the software Minimum Requirements for the Shake Qmaster client and administrator tools (see "Shake Qmaster System Requirements"). 6 Minimum Hardware and Software Configurations Shake Qmaster Client Tools and Admin Tools require the following minimum requirements. Shake Qmaster System Requirements Before you install any Tower, PowerBook...
... or PowerPC G4 m Mac OS X 10.2.5 (or later) m QuickTime 6.1 (or later) m 256 MB of RAM m 5 MB of disk space for Client Tools m 5 MB of local disk space for the software Minimum Requirements for the Shake Qmaster client and administrator tools (see "Shake Qmaster System Requirements"). 6 Minimum Hardware and Software Configurations Shake Qmaster Client Tools and Admin Tools require the following minimum requirements. Shake Qmaster System Requirements Before you install any Tower, PowerBook...

Installation Guide
Page 7
...the Installation Type dialog, select the installation type: m Easy Install: Click Install to install Shake, the Shake Qmaster Client Tools, the Shake 3 Reference Guide PDF and Shake 3 Tutorials PDF, but no tutorial images. By default, Shake is installed in the Shake 3 install, select Tutorial Images. Also, review any virus protection and security software that you may have installed on your administrator name and password and click OK. 4 Read the Introduction, then click Continue. 5 Read the Before You Install Shake 3 document, then click Continue. 6 Read the Software License Agreement...
...the Installation Type dialog, select the installation type: m Easy Install: Click Install to install Shake, the Shake Qmaster Client Tools, the Shake 3 Reference Guide PDF and Shake 3 Tutorials PDF, but no tutorial images. By default, Shake is installed in the Shake 3 install, select Tutorial Images. Also, review any virus protection and security software that you may have installed on your administrator name and password and click OK. 4 Read the Introduction, then click Continue. 5 Read the Before You Install Shake 3 document, then click Continue. 6 Read the Software License Agreement...

Installation Guide
Page 8
... in the Dock. The Shake Qmaster Client Tools (installed by default with the Easy Install) places a Shake Qmaster icon in your Address Book: 1 Fill out the Name, Address, Organization, and Email address fields. 2 If you want information about Apple news and software updates sent to your email account, select the checkbox. 3 If you want to begin using Shake 3. The shkv icon represents the Shake Viewer application (the Flipbook player for...
... in the Dock. The Shake Qmaster Client Tools (installed by default with the Easy Install) places a Shake Qmaster icon in your Address Book: 1 Fill out the Name, Address, Organization, and Email address fields. 2 If you want information about Apple news and software updates sent to your email account, select the checkbox. 3 If you want to begin using Shake 3. The shkv icon represents the Shake Viewer application (the Flipbook player for...
Installation Guide
Page 9
... email address you use to Shake Qmaster clusters for a different part of Shake 3, perform the CD install as described in "Installing Shake 3" on page 7 on the same network as the clusters. Be sure to register for Render-Only Workstations To install the render-only version of a Shake Qmaster system. Installing and Licensing Shake 3 for the Shake 3 unlimited render license. Next, go to http://shake.apple.com/OSXrender to have your serial number...
... email address you use to Shake Qmaster clusters for a different part of Shake 3, perform the CD install as described in "Installing Shake 3" on page 7 on the same network as the clusters. Be sure to register for Render-Only Workstations To install the render-only version of a Shake Qmaster system. Installing and Licensing Shake 3 for the Shake 3 unlimited render license. Next, go to http://shake.apple.com/OSXrender to have your serial number...
Installation Guide
Page 10
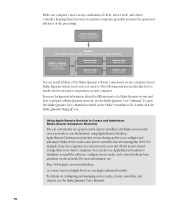
... Shake 3 installation CD, double-click the Shake Qmaster Help.pdf icon. For more information, see the Shake Qmaster User's Manual. 10 For example, from anywhere on cluster computers. The following instructions describe how to . You can also use Apple Remote Desktop to Create and Administer Shake Cluster Computers Remotely You can turn services on and off and mount shared storage devices on the network. To open the Shake Qmaster User's Manual included on each computer. Apple Remote Desktop uses...
... Shake 3 installation CD, double-click the Shake Qmaster Help.pdf icon. For more information, see the Shake Qmaster User's Manual. 10 For example, from anywhere on cluster computers. The following instructions describe how to . You can also use Apple Remote Desktop to Create and Administer Shake Cluster Computers Remotely You can turn services on and off and mount shared storage devices on the network. To open the Shake Qmaster User's Manual included on each computer. Apple Remote Desktop uses...
Installation Guide
Page 11
Note: Shake, or any other tool you may use in the Applications/ Utilities folder. In the Easy Install window, click Customize. 3 Select Shake Qmaster Client Tools, then continue following the onscreen instructions. Installing Shake Qmaster on Administrator Computers Select Shake Qmaster Admin Tools for installation on any Shake Qmaster software on extended service nodes. See "Special Installation Instructions for Extended Node Clusters" on page 13 for installation. To install Shake Qmaster without Shake on client computers: 1 Double-click the Install Shake 3 icon. 2 Follow the ...
Note: Shake, or any other tool you may use in the Applications/ Utilities folder. In the Easy Install window, click Customize. 3 Select Shake Qmaster Client Tools, then continue following the onscreen instructions. Installing Shake Qmaster on Administrator Computers Select Shake Qmaster Admin Tools for installation on any Shake Qmaster software on extended service nodes. See "Special Installation Instructions for Extended Node Clusters" on page 13 for installation. To install Shake Qmaster without Shake on client computers: 1 Double-click the Install Shake 3 icon. 2 Follow the ...

Installation Guide
Page 12
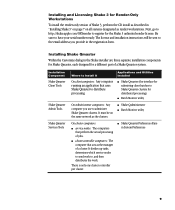
... Shake clusters, install Shake 3 and the render license on page 9 for files. 12 See "Installing and Licensing Shake 3 for distributed rendering Client Client Client LAN Client Highspeed switches (chained together) Rack of Shake that you get to the Easy Install window. Example of a network setup for Render-Only Workstations" on the service nodes, since the only component of servers containing cluster controller and render-only Shake service nodes, plus rackmounted shared storage device. To install Shake...
... Shake clusters, install Shake 3 and the render license on page 9 for files. 12 See "Installing and Licensing Shake 3 for distributed rendering Client Client Client LAN Client Highspeed switches (chained together) Rack of Shake that you get to the Easy Install window. Example of a network setup for Render-Only Workstations" on the service nodes, since the only component of servers containing cluster controller and render-only Shake service nodes, plus rackmounted shared storage device. To install Shake...
Installation Guide
Page 13
... they do this Shared folder in the Users directory on a volume root. In the Easy Install window, click Customize. 3 Select Shake Qmaster Services Tools, then continue following to help determine where to locate files: m Shared folder within a user's home directory: The user must turn on file sharing in an extended cluster. Computer/Volume/Users/Shared For example, if you can save files that aren't accessible to use computers as the...
... they do this Shared folder in the Users directory on a volume root. In the Easy Install window, click Customize. 3 Select Shake Qmaster Services Tools, then continue following to help determine where to locate files: m Shared folder within a user's home directory: The user must turn on file sharing in an extended cluster. Computer/Volume/Users/Shared For example, if you can save files that aren't accessible to use computers as the...
Installation Guide
Page 15
... an administrator password in the Shake directory that you want to installing Shake again, the Shake Installer shows that may be stored in the authentication window and click OK. This process does not remove the nreal folder in the Extras folder, and removes the Shake Qmaster application and its associated files. Uninstalling Shake Qmaster To remove Shake Qmaster, use the Uninstall Shake Qmaster application. To uninstall Shake Qmaster: 1 Insert the Shake 3 installation CD and...
... an administrator password in the Shake directory that you want to installing Shake again, the Shake Installer shows that may be stored in the authentication window and click OK. This process does not remove the nreal folder in the Extras folder, and removes the Shake Qmaster application and its associated files. Uninstalling Shake Qmaster To remove Shake Qmaster, use the Uninstall Shake Qmaster application. To uninstall Shake Qmaster: 1 Insert the Shake 3 installation CD and...
User Manual
Page 1
... Printer Setup Utility allows you to view print jobs submitted to a printer, the Batch Monitor lets you view the status of batches submitted for recently completed batches and jobs. This document covers the following: Â About the Batch Monitor (p. 2) Â Viewing or Changing the Status of completion, and the estimated time before completion. Batch Monitor User Manual You can also use the...
... Printer Setup Utility allows you to view print jobs submitted to a printer, the Batch Monitor lets you view the status of batches submitted for recently completed batches and jobs. This document covers the following: Â About the Batch Monitor (p. 2) Â Viewing or Changing the Status of completion, and the estimated time before completion. Batch Monitor User Manual You can also use the...

User Manual
Page 2
... transcoded. Possible transcoding states are Successful, Canceled, or Failed (with relevant error messages describing the failure). About the Batch Monitor The Batch Monitor contains the following headings: Â Batch Name: Name given to the batch when it has been stopped. Â Delete button: Removes the selected batch from the Status table. Â Info button: Opens the Status Information window, which headings appear.
... transcoded. Possible transcoding states are Successful, Canceled, or Failed (with relevant error messages describing the failure). About the Batch Monitor The Batch Monitor contains the following headings: Â Batch Name: Name given to the batch when it has been stopped. Â Delete button: Removes the selected batch from the Status table. Â Info button: Opens the Status Information window, which headings appear.
User Manual
Page 3
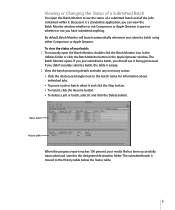
... History table below the Status table. 3 Status table History table When the progress report reaches 100 percent, your batch: 1 To manually open the Batch Monitor, double-click the Batch Monitor icon in the Utilities folder or click the Batch Monitor button in the designated destination folder. To view the status of your media file has been successfully transcoded and saved in the Apple Qmaster window. By default, Batch...
... History table below the Status table. 3 Status table History table When the progress report reaches 100 percent, your batch: 1 To manually open the Batch Monitor, double-click the Batch Monitor icon in the Utilities folder or click the Batch Monitor button in the designated destination folder. To view the status of your media file has been successfully transcoded and saved in the Apple Qmaster window. By default, Batch...

User Manual
Page 5
... the amount of processing completed. Â Job Type: Name of the application (Compressor, Apple Qmaster, etc.) that is no need to select a cluster.) Â Lock button: Click to enter a cluster password that allows you to view the status of batches. The batch number shown is always the overall time, while the job time can click the disclosure triangles next to batch...
... the amount of processing completed. Â Job Type: Name of the application (Compressor, Apple Qmaster, etc.) that is no need to select a cluster.) Â Lock button: Click to enter a cluster password that allows you to view the status of batches. The batch number shown is always the overall time, while the job time can click the disclosure triangles next to batch...
User Manual
Page 7
... to view the selected cluster's batches in the Batch Monitor. User Password If you create this password before being allowed to add the computer to the computer. Administrators can use the Batch Monitor to view those batches in the Batch Monitor. For example, both administrators and client users can stop or cancel their own batches. To create an administrator password, click the Security tab in Apple Qadministrator. To create a service node password, click...
... to view the selected cluster's batches in the Batch Monitor. User Password If you create this password before being allowed to add the computer to the computer. Administrators can use the Batch Monitor to view those batches in the Batch Monitor. For example, both administrators and client users can stop or cancel their own batches. To create an administrator password, click the Security tab in Apple Qadministrator. To create a service node password, click...

User Manual
Page 8
... are created with Apple Qadministrator or with the Apple Qmaster pane in the History table displays Successful, it and click the Stop or Delete button. Viewing or Changing Batch Status for Distributed Processing To view or change batch status: 1 Open the Batch Monitor in one of the following ways: Â Administrators who want to see from the Cluster pop-up menu. See the Distributed Processing Setup guide for...
... are created with Apple Qadministrator or with the Apple Qmaster pane in the History table displays Successful, it and click the Stop or Delete button. Viewing or Changing Batch Status for Distributed Processing To view or change batch status: 1 Open the Batch Monitor in one of the following ways: Â Administrators who want to see from the Cluster pop-up menu. See the Distributed Processing Setup guide for...
User Manual
Page 9
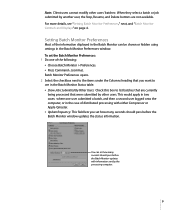
... computer. 9 Batch Monitor Preferences opens. 2 Select the checkbox next to the items under the Columns heading that you set how many seconds should pass before the Batch Monitor window updates the status information. Note: Client users cannot modify other users. This would apply in two cases: where one of the information displayed in the Batch Monitor can set how many seconds should pass...
... computer. 9 Batch Monitor Preferences opens. 2 Select the checkbox next to the items under the Columns heading that you set how many seconds should pass before the Batch Monitor window updates the status information. Note: Client users cannot modify other users. This would apply in two cases: where one of the information displayed in the Batch Monitor can set how many seconds should pass...
