

Use and Care
Page 2
... 1-800-901-2042, or visit us at www.whirlpool.com/accessories. ACCESSORIES Using Less Water and Energy Enhance your washer with all All purpose appliance cleaner This washer is designed to older traditional washers. Wash cycles with controlled temperatures are used to order, call 1-800-807-6777 or visit us at www.whirlpoolappliances...
... 1-800-901-2042, or visit us at www.whirlpool.com/accessories. ACCESSORIES Using Less Water and Energy Enhance your washer with all All purpose appliance cleaner This washer is designed to older traditional washers. Wash cycles with controlled temperatures are used to order, call 1-800-807-6777 or visit us at www.whirlpoolappliances...

Use and Care
Page 3
...temperature. Use enough water to allow the load to adjust the amount of fabric. NOTE: In wash water temperatures colder than what your previous washer provided. ■■ Even in Cool wash, some warm water is determined by pushing the Cycle Control knob in and rotating it to... any of the "Rinse" cycle settings. 4 Fabric Softener (on some models, the wash temperature is let into washer to ensure proper dispensing of your load size. Not all models. Appearance may vary. 1 2 3 4 5 1 Load Size Control Use this option to move ...
...temperature. Use enough water to allow the load to adjust the amount of fabric. NOTE: In wash water temperatures colder than what your previous washer provided. ■■ Even in Cool wash, some warm water is determined by pushing the Cycle Control knob in and rotating it to... any of the "Rinse" cycle settings. 4 Fabric Softener (on some models, the wash temperature is let into washer to ensure proper dispensing of your load size. Not all models. Appearance may vary. 1 2 3 4 5 1 Load Size Control Use this option to move ...
Use and Care
Page 4
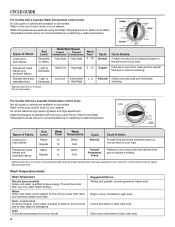
...dissolve detergents. CYCLE GUIDE For models with the cycle control knob. Types of your washer. Refer to washable knits Moderate * Approximate time in minutes. Types of your previous washer provided. Once desired water level and wash temperature has been reached, push in ...6 - 10 Low/Low Intermittent 4 - 6 High/High Cycle Normal Casual Delicate Cycle Details: A wash time should be cooler than your washer. Wash temperature is added to reduce wrinkling. Gently removes soils and minimizes wrinkling. This will be selected based on selecting a wash temperature. Features...
...dissolve detergents. CYCLE GUIDE For models with the cycle control knob. Types of your washer. Refer to washable knits Moderate * Approximate time in minutes. Types of your previous washer provided. Once desired water level and wash temperature has been reached, push in ...6 - 10 Low/Low Intermittent 4 - 6 High/High Cycle Normal Casual Delicate Cycle Details: A wash time should be cooler than your washer. Wash temperature is added to reduce wrinkling. Gently removes soils and minimizes wrinkling. This will be selected based on selecting a wash temperature. Features...

Use and Care
Page 5
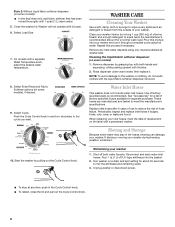
...fabric softener by filling the dispenser with warm water until reaching the Max Fill Line arrows. Pour bleach around the agitator. STARTING YOUR WASHER WASHER USE IMPORTANT: When washing any fabric it touches. If desired, add oxi or color-safe bleach products to the dispenser. NOTE: ...Undiluted bleach will damage any article of the washer as sheets around the agitator. Style 1: Without liquid chlorine bleach dispenser (on some models): ■■ Measure recommended amount of bleach....
...fabric softener by filling the dispenser with warm water until reaching the Max Fill Line arrows. Pour bleach around the agitator. STARTING YOUR WASHER WASHER USE IMPORTANT: When washing any fabric it touches. If desired, add oxi or color-safe bleach products to the dispenser. NOTE: ...Undiluted bleach will damage any article of the washer as sheets around the agitator. Style 1: Without liquid chlorine bleach dispenser (on some models): ■■ Measure recommended amount of bleach....
Use and Care
Page 6
...on some models): ■■ In the final rinse only, add fabric softener that has been mixed thoroughly with thumbs. 2. Water Inlet Hoses This washer does not include water inlet hoses. Replace inlet hoses after 5 years of use to the cycle you want. 10. See "Accessories" for separate purchase.... Clean your washer interior by pulling out the Cycle Control knob. Remove any time, push in and turn clockwise to reduce the risk of factory specified hoses ...
...on some models): ■■ In the final rinse only, add fabric softener that has been mixed thoroughly with thumbs. 2. Water Inlet Hoses This washer does not include water inlet hoses. Replace inlet hoses after 5 years of use to the cycle you want. 10. See "Accessories" for separate purchase.... Clean your washer interior by pulling out the Cycle Control knob. Remove any time, push in and turn clockwise to reduce the risk of factory specified hoses ...
Use and Care
Page 7
...Are the gears engaging after the cycle has ended, select a higher load-size setting, or wash a smaller load. Dilute fabric softener in washer or reconnect power. 3. Plug in the fabric softener dispenser. See "Installation Instructions." ■■ Did you put powdered color-safe bleach ...into the dispensers. Slowly pour into the liquid chlorine bleach dispenser? www.amana.com/help Noisy ■■ Is the load balanced and the washer level? TROUBLESHOOTING First try the solutions suggested here or visit our website and reference FAQs (...
...Are the gears engaging after the cycle has ended, select a higher load-size setting, or wash a smaller load. Dilute fabric softener in washer or reconnect power. 3. Plug in the fabric softener dispenser. See "Installation Instructions." ■■ Did you put powdered color-safe bleach ...into the dispensers. Slowly pour into the liquid chlorine bleach dispenser? www.amana.com/help Noisy ■■ Is the load balanced and the washer level? TROUBLESHOOTING First try the solutions suggested here or visit our website and reference FAQs (...
Use and Care
Page 8
... open . ■■ Is there excessive sudsing? See "Installation Instructions." ■■ Does the drain hose fit too tightly in the washer for the load being washed? The cooler temperatures save energy while providing good cleaning. Tie strings and sashes to the standpipe? Plug power cord into... level in seams before washing. 8 Turn the Timer knob to the right slightly and pull knob out to continue. The washer pauses for more than your previous washer. Washer will not agitate or spin with a higher spin speed (if available). ■■ Is the drain hose length fed ...
... open . ■■ Is there excessive sudsing? See "Installation Instructions." ■■ Does the drain hose fit too tightly in the washer for the load being washed? The cooler temperatures save energy while providing good cleaning. Tie strings and sashes to the standpipe? Plug power cord into... level in seams before washing. 8 Turn the Timer knob to the right slightly and pull knob out to continue. The washer pauses for more than your previous washer. Washer will not agitate or spin with a higher spin speed (if available). ■■ Is the drain hose length fed ...
Dimension Guide
Page 1
... Top of wash tub. Floor drain system requires a Siphon Break Kit and additional drain hose that a separate circuit serving only this washer be purchased separately. Because Whirlpool Corporation policy includes a continuous commitment to improve our products, we reserve the right to improve performance and.... For complete details, see Installation Instructions packed with removable tie strap (A). Add spacing of 1" (25 mm) on all sides of washer. W10200890C 01/2011 Minimum carry-away capacity: 17 gal. (64 L) per minute. Specifications subject to reduce noise transfer. Top of ...
... Top of wash tub. Floor drain system requires a Siphon Break Kit and additional drain hose that a separate circuit serving only this washer be purchased separately. Because Whirlpool Corporation policy includes a continuous commitment to improve our products, we reserve the right to improve performance and.... For complete details, see Installation Instructions packed with removable tie strap (A). Add spacing of 1" (25 mm) on all sides of washer. W10200890C 01/2011 Minimum carry-away capacity: 17 gal. (64 L) per minute. Specifications subject to reduce noise transfer. Top of ...
Installation Instruction
Page 2
... ■■ 8212637RP 6 ft. (1.8 m) Inlet hose, Black EPDM, space saving 90° elbow, hypro-blue steel couplings (2 pack) Alternate parts: (Not supplied with washer) Adjustable or open end Level wrench 9/16" (14 mm) 4" min (102 mm) Wood block Ruler or measuring tape Pliers that open to the phone number... or website on the back page of your washer in washer basket. If you have: You will need: Overhead sewer Standard 20 gal. (76 L) 39" (991 mm) tall drain tub or utility sink...
... ■■ 8212637RP 6 ft. (1.8 m) Inlet hose, Black EPDM, space saving 90° elbow, hypro-blue steel couplings (2 pack) Alternate parts: (Not supplied with washer) Adjustable or open end Level wrench 9/16" (14 mm) 4" min (102 mm) Wood block Ruler or measuring tape Pliers that open to the phone number... or website on the back page of your washer in washer basket. If you have: You will need: Overhead sewer Standard 20 gal. (76 L) 39" (991 mm) tall drain tub or utility sink...
Installation Instruction
Page 3
... A 39" (991 mm) Minimum capacity: 20 gal. (76 L). See "Tools and Parts". Minimum siphon break: 28" (711 mm) from bottom of washer. install no higher than 96" (2.4 m) require a sump pump system. IMPORTANT: To avoid siphoning, no more space for ease of installation and servicing, spacing... mm) DRAIN SYSTEM Drain system can be installed using a floor drain, wall standpipe, floor standpipe, or laundry tub. Installing on all sides of washer to reduce noise transfer. Floor drain system 0" (0 mm) 1" (25 mm) 3" (76 mm) Dimensions show recommended spacing allowed, except for walls,...
... A 39" (991 mm) Minimum capacity: 20 gal. (76 L). See "Tools and Parts". Minimum siphon break: 28" (711 mm) from bottom of washer. install no higher than 96" (2.4 m) require a sump pump system. IMPORTANT: To avoid siphoning, no more space for ease of installation and servicing, spacing... mm) DRAIN SYSTEM Drain system can be installed using a floor drain, wall standpipe, floor standpipe, or laundry tub. Installing on all sides of washer to reduce noise transfer. Floor drain system 0" (0 mm) 1" (25 mm) 3" (76 mm) Dimensions show recommended spacing allowed, except for walls,...
Installation Instruction
Page 4
...used, it is a straight power cord and cord restraint, follow steps 3 & 4 then continue to step 5. 4 NOTE: To avoid floor damage, set washer onto cardboard before moving it must be plugged into a mating, 3 prong, grounding-type outlet, grounded in accordance with a power supply cord having a 3 ... volt, 60 Hz., AC only, 15- ELECTRICAL REQUIREMENTS INSTALLATION INSTRUCTIONS Before you are not sure the washer is properly grounded. 36" (914 mm) Move washer to avoid excessive noise from washer. 1. if power cord is looped, skip to step 6; If it is recommended that a qualified electrician...
...used, it is a straight power cord and cord restraint, follow steps 3 & 4 then continue to step 5. 4 NOTE: To avoid floor damage, set washer onto cardboard before moving it must be plugged into a mating, 3 prong, grounding-type outlet, grounded in accordance with a power supply cord having a 3 ... volt, 60 Hz., AC only, 15- ELECTRICAL REQUIREMENTS INSTALLATION INSTRUCTIONS Before you are not sure the washer is properly grounded. 36" (914 mm) Move washer to avoid excessive noise from washer. 1. if power cord is looped, skip to step 6; If it is recommended that a qualified electrician...

Installation Instruction
Page 5
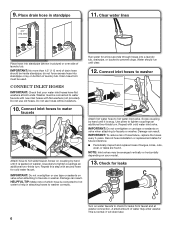
...For a floor drain, do not install drain hose form. See "Tools and Parts" to completely free power cord, cord restraint (B), and pin (C) from washer. For a laundry tub or standpipe drain, follow steps 8 and 9. Remove straight power cord and cord restraint C 6. Remove restraint from power cord: ... strap. 4. Bend hose and feed through other side, anchoring form on smooth sections of plug. Pull cord restraint strap (D) out of washer cabinet from top until both ends are completely removed from rear panel. Connect drain hose form B Firmly grasp yellow shipping strap (A) and ...
...For a floor drain, do not install drain hose form. See "Tools and Parts" to completely free power cord, cord restraint (B), and pin (C) from washer. For a laundry tub or standpipe drain, follow steps 8 and 9. Remove straight power cord and cord restraint C 6. Remove restraint from power cord: ... strap. 4. Bend hose and feed through other side, anchoring form on smooth sections of plug. Pull cord restraint strap (D) out of washer cabinet from top until both ends are completely removed from rear panel. Connect drain hose form B Firmly grasp yellow shipping strap (A) and ...
Installation Instruction
Page 6
...on bottom of drain hose should run until it is snug. IMPORTANT: Do not overtighten or use tape or sealants on washer. NOTE: Inlet valves may enter washer. IMPORTANT: Do not overtighten or use tape or sealants on coupling by hand until it will drain later. 6 Record hose... with new inlet hoses with cold water inlet valve. HELPFUL TIP: Make note of water may be connected to faucets or washer. Connect inlet hoses to washer Attach hot water hose to tighten couplings an additional two-thirds turn . Damage can result. Damage can result. Screw coupling ...
...on bottom of drain hose should run until it is snug. IMPORTANT: Do not overtighten or use tape or sealants on washer. NOTE: Inlet valves may enter washer. IMPORTANT: Do not overtighten or use tape or sealants on coupling by hand until it will drain later. 6 Record hose... with new inlet hoses with cold water inlet valve. HELPFUL TIP: Make note of water may be connected to faucets or washer. Connect inlet hoses to washer Attach hot water hose to tighten couplings an additional two-thirds turn . Damage can result. Damage can result. Screw coupling ...

Installation Instruction
Page 7
... on top edges of foot base. 14. Then screw jam nut onto each foot to within 1" (25 mm) of washer, checking each side and front. Prepare to its final location. Tilt washer back, remove wood block. Remove cardboard used to floor. This will click into threaded holes at front corners of... washer. Check levelness of washer Place level here 1" (25 mm) Prop up or down, repeating as necessary. 16. Install front leveling feet Not Level LEVEL Not Level Screw feet ...
... on top edges of foot base. 14. Then screw jam nut onto each foot to within 1" (25 mm) of washer, checking each side and front. Prepare to its final location. Tilt washer back, remove wood block. Remove cardboard used to floor. This will click into threaded holes at front corners of... washer. Check levelness of washer Place level here 1" (25 mm) Prop up or down, repeating as necessary. 16. Install front leveling feet Not Level LEVEL Not Level Screw feet ...

Installation Instruction
Page 8
...recheck for leaks around faucets and inlet hoses. ■■ Remove film from back of /recycle all packaging materials. ■■ Read "Washer Use" in your "Use and Care Guide". ■■ To test and clean your tools. ■■ Check that you have all... parts are on. ■■ Check for levelness. Complete Installation CHECKLIST ■■ Check electrical requirements. Start washer and allow to see what was skipped. ■■ Check that yellow shipping materials were completely removed from console and any cycle. 19. ...
...recheck for leaks around faucets and inlet hoses. ■■ Remove film from back of /recycle all packaging materials. ■■ Read "Washer Use" in your "Use and Care Guide". ■■ To test and clean your tools. ■■ Check that you have all... parts are on. ■■ Check for levelness. Complete Installation CHECKLIST ■■ Check electrical requirements. Start washer and allow to see what was skipped. ■■ Check that yellow shipping materials were completely removed from console and any cycle. 19. ...

Energy Guide
Page 1
... loads a week and a 2007 national average electricity cost of 10.65 cents per therm. • For more information, visit www.ftc.gov/appliances. (P/N W10344455) Clothes Washer Capacity: Standard Maytag Model: NTW4500X* Cat. U.S.
... loads a week and a 2007 national average electricity cost of 10.65 cents per therm. • For more information, visit www.ftc.gov/appliances. (P/N W10344455) Clothes Washer Capacity: Standard Maytag Model: NTW4500X* Cat. U.S.


