
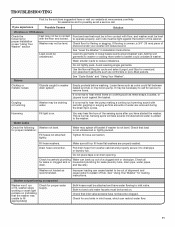
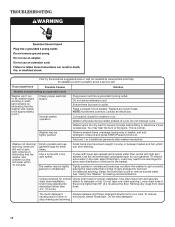
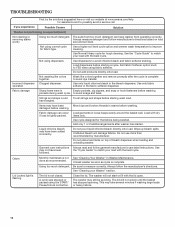
Amana NTW4610YQ Support Question
Amana NTW4610YQ Support Question
Find answers below for this question about Amana NTW4610YQ.Need a Amana NTW4610YQ manual? We have 3 online manuals for this item!
Question posted by tstiversdrone on June 16th, 2021
Amana Washer Drum Is Tipped Drastically To One Side.
Current Answers
Answer #1: Posted by Odin on June 16th, 2021 12:04 PM

Member since:
April 10th, 2010 Points: 41,236,680

If the issue persists or if you require further advice, you may want to consult the company: use the contact information at https://www.contacthelp.com/amana.
Hope this is useful. Please don't forget to click the Accept This Answer button if you do accept it. My aim is to provide reliable helpful answers, not just a lot of them. See https://www.helpowl.com/profile/Odin.
Answer #2: Posted by SonuKumar on June 16th, 2021 6:18 PM

Member since:
May 9th, 2021 Points: 16,621,290
https://www.manualslib.com/products/Amana-Ntw4610yq-134529.html
Opening a Solid Cabinet Washer
1
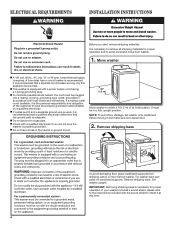
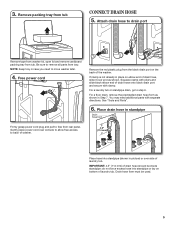
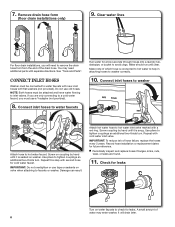
Pull the washer's power cord from the wall outlet. Slide the washer out from the wall far enough to access the water supply and drain lines. Turn off the hot and cold water supply valves. Disconnect the supply lines from the supply valves and pull the drain hose from the floor drain or the drain outlet in the wall. Place the supply lines and the drain line into a bucket to catch water left in the lines.
2
Remove the screws from both ends of the control console. The screws could be in the front of the control console, in the back of the control console or beneath plastic beauty caps snapped to the ends of the control console. When your console does not have these screws, slide a flexible putty knife between each end of the console and the top of the washer cabinet to release the clips holding the control console to the cabinet.
3
Rotate the control console to the back of the washer to expose the lid switch wire harness and the retaining clips holding the back panel of the washer to the cabinet. Squeeze the tabs on the wire harness and pull it apart. Insert a flat-blade screwdriver into the small holes on top of the retaining clips. Press down with the screwdriver while pushing it towards the front of the washer to release the clips.
4
Open the lid on your washer. Stand in front of the washer. Reach inside the washer opening and grab the cabinet. Lift up on the cabinet, and pull it towards you as you lift it off the washer frame. Set the cabinet aside.
Opening a Washer with a Separate Front Panel
1
Disconnect the washer's power cord from the outlet in the wall. Pull the washer from the rear wall far enough to access the water supply and drain lines. Turn off the two water supply valves. Untwist the supply lines from the supply valves, and disconnect the drain hose from the floor drain or pull it from the drain outlet in the wall. Place the lines into a bucket on the floor to catch any water in the lines.
2
Insert a steel putty knife into the horizontal seam along the front of the washer between the washer cabinet and the top of the washer. Slide the putty knife along the seam until you find the clips on each side of the cabinet.
3
Push against the front of the clips with the putty knife to release the top of the washer from the cabinet. Lift the top of the washer up and let it rest against the wall.
4
Look for the two screws in the front top corners of the cabinet. Remove the screws to release the front panel from the rest of the washer cabinet. Lift the panel up and off the washer frame and set it aside.
Replace Springs on Belt-Driven Washers
1
Look beneath the washtub for the six suspensions springs. Three of the springs connect to the tub support legs and three connect to a ring on the tub support. When you replace the broken suspension spring, you should replace all six to ensure you have even suspension on the tub.
2
Grab the top of the spring with locking pliers. Use your hand to pull the washtub toward the spring you are removing. Pull up on the spring to unhook it from the tub support. Rotate the bottom of the spring to release it from the holes in the bottom of the washer.
3
Place a dab of grease on the spring hook that installs into the bottom of the washer. Insert the spring hook into the bottom of the washer. Use the locking pliers to stretch the spring and hook it into the tub support as you pull the tub towards the spring you are installing.
4
Repeat these steps to replace each suspension spring on a belt-driven washer. Reassemble the washer by reversing the steps you used to open the washer cabinet.
Replace Springs on Direct Drive Washers
1
Move your direct drive washer to an open work area once you've remove the washer cabinet. Have an assistant help you carefully lay the washer on its back.
2
Look for the three suspension springs connected to the washer frame at the front left, front right and the rear of the washtub. The springs are held to the washtub by retaining brackets.
3
Remove the screw holding the retaining bracket to the washtub. Once the retaining bracket is disconnected from the washtub, unhook the bracket from the end of the spring. Grab the spring and unhook it from the washer frame.
4
Place a dab of grease on the replacement spring's hook. Place the greased end back into the hole on the washer frame. Install the bracket onto the hook on the other end of the spring.
5
Reposition the bracket onto the washtub. Replace the screw in the bracket to secure it to the washtub. You can repeat this process for both the front left and right suspension springs.
6
Return the washing machine to the upright position to access the rear suspension spring. Reach into the washer from the side of the tub. Grab the suspension spring with locking pliers. Pull down on the spring to release it from the bottom of the washer, and then unhook it from the retaining bracket.
7
Place a dab of grease on the suspension spring hook that inserts into the retaining bracket. Insert it in the bracket and use the locking pliers to pull down on the spring and hook it in the bottom of the washer. Reassemble your washer by reversing the steps it took to disassemble it.
Please respond to my effort to provide you with the best possible solution by using the "Acceptable Solution" and/or the "Helpful" buttons when the answer has proven to be helpful.
Regards,
Sonu
Your search handyman for all e-support needs!!
Related Amana NTW4610YQ Manual Pages


Similar Questions

washer shakes wildly.

washer starts to fill but stops after a few seconds and starts to operate. Fill sensor light blink

was making a very loud banging noise during spin cycle. When i opened the lid, the drum was tipped. ...

