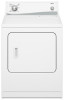
Use and Care
Page 1
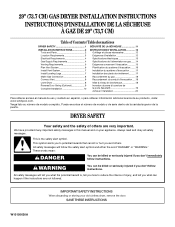
... others . You will need it. DRYER USER INSTRUCTIONS INSTRUCTIONS POUR L'UTILISATEUR DE LA SÉCHEUSE Table of Contents DRYER SAFETY 1 CONTROL PANEL 4 CYCLE GUIDE 5 DRYER USE 6 DRYER CARE 7 TROUBLESHOOTING 9 WARRANTY 11 ASSISTANCE OR SERVICE Back Cover Table des matiè...installation. We have provided many important safety messages in -warranty service. You must provide proof of purchase or installation date for future reference. Dealer name Serial number Address Phone number Model number Purchase date Conservez ce manuel et votre reç de vente...
... others . You will need it. DRYER USER INSTRUCTIONS INSTRUCTIONS POUR L'UTILISATEUR DE LA SÉCHEUSE Table of Contents DRYER SAFETY 1 CONTROL PANEL 4 CYCLE GUIDE 5 DRYER USE 6 DRYER CARE 7 TROUBLESHOOTING 9 WARRANTY 11 ASSISTANCE OR SERVICE Back Cover Table des matiè...installation. We have provided many important safety messages in -warranty service. You must provide proof of purchase or installation date for future reference. Dealer name Serial number Address Phone number Model number Purchase date Conservez ce manuel et votre reç de vente...
Use and Care
Page 3
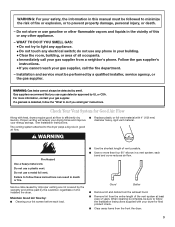
... who installed the dryer. Failure to the dryer plays a big role in good air flow. ■■ Replace plastic or foil vent material with heat, dryers require good air flow to light any appliance. • Do not touch any electrical switch; each load. ■■ Use the shortest length of the vent system at least every 2 years. Good Better ■■ Remove lint and debris from the exhaust hood. ■■ Remove lint from...
... who installed the dryer. Failure to the dryer plays a big role in good air flow. ■■ Replace plastic or foil vent material with heat, dryers require good air flow to light any appliance. • Do not touch any electrical switch; each load. ■■ Use the shortest length of the vent system at least every 2 years. Good Better ■■ Remove lint and debris from the exhaust hood. ■■ Remove lint from...
Use and Care
Page 4
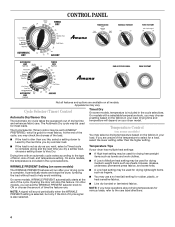
... the WRINKLE PREVENT setting is not as dry as sheets, blouses, dresses, underwear, permanent press fabrics, and some models, temperature is complete. NOTE: A signal will run after your load. Temperature Control (on the fabrics in the cycle selections. It periodically starts and stops the dryer, tumbling the load without heat to the care label directions. 4 Cycle Selector (Timer) Control Automatic Dry/Sensor Dry The Automatic dry cycle takes the guesswork out of Cycle signal is drier than...
... the WRINKLE PREVENT setting is not as dry as sheets, blouses, dresses, underwear, permanent press fabrics, and some models, temperature is complete. NOTE: A signal will run after your load. Temperature Control (on the fabrics in the cycle selections. It periodically starts and stops the dryer, tumbling the load without heat to the care label directions. 4 Cycle Selector (Timer) Control Automatic Dry/Sensor Dry The Automatic dry cycle takes the guesswork out of Cycle signal is drier than...
Use and Care
Page 5
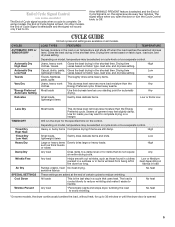
... Less Dry TIMED DRY Timed Dry High Heat Timed Dry Low Heat Heavy Dry Damp Dry Wrinkle Free Air Dry SPECIAL SETTINGS Cool Down Wrinkle Prevent Most loads This dryness level removes less moisture than the Any clothes Energy Preferred cycle. Will run the dryer for automatic Any drying. Any load Helps smooth out wrinkles, such as your starting point for the specified time on the control. Drying time clothes, towels varies based on fabric type, load size, and dryness setting. Drying time varies based on fabrics in the dryer too long...
... Less Dry TIMED DRY Timed Dry High Heat Timed Dry Low Heat Heavy Dry Damp Dry Wrinkle Free Air Dry SPECIAL SETTINGS Cool Down Wrinkle Prevent Most loads This dryness level removes less moisture than the Any clothes Energy Preferred cycle. Will run the dryer for automatic Any drying. Any load Helps smooth out wrinkles, such as your starting point for the specified time on the control. Drying time clothes, towels varies based on fabric type, load size, and dryness setting. Drying time varies based on fabrics in the dryer too long...

Use and Care
Page 6
... by using an air cycle. Before using an Air Cycle. Clean lint screen before operating this to avoid wrinkling when you purchased your dryer, wipe the dryer drum with a damp cloth to remove dust from whom you are unable to tumble freely. 3. NOTE: The Cycle Control knob should be removed from dryer. Start the dryer. Do not pack the dryer. Push the Start button or knob. Fire Hazard No washer can stop your dryer Close the door. Put...
... by using an air cycle. Before using an Air Cycle. Clean lint screen before operating this to avoid wrinkling when you purchased your dryer, wipe the dryer drum with a damp cloth to remove dust from whom you are unable to tumble freely. 3. NOTE: The Cycle Control knob should be removed from dryer. Start the dryer. Do not pack the dryer. Push the Start button or knob. Fire Hazard No washer can stop your dryer Close the door. Put...
Use and Care
Page 7
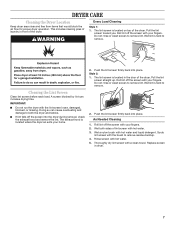
.... Thoroughly dry lint screen with your fingers. 2. DRYER CARE Cleaning the Dryer Location Keep dryer area clear and free from items that would block the air flow for proper dryer operation. Do not rinse or wash screen to remove lint. This includes clearing piles of laundry in dryer. 7 Do not rinse or wash screen to remove lint. Style 2: 1. Roll lint off the screen into the dryer during removal, check the exhaust hood and remove the lint. Doing so can increase drying time...
.... Thoroughly dry lint screen with your fingers. 2. DRYER CARE Cleaning the Dryer Location Keep dryer area clear and free from items that would block the air flow for proper dryer operation. Do not rinse or wash screen to remove lint. This includes clearing piles of laundry in dryer. 7 Do not rinse or wash screen to remove lint. Style 2: 1. Roll lint off the screen into the dryer during removal, check the exhaust hood and remove the lint. Doing so can increase drying time...

Use and Care
Page 8
... by a qualified servicer. Unplug the power supply cord. 2. Make sure leveling legs are secure in dryer base. 6. Moving care - Replace the cover and secure with a damp cloth. 3. Replace all parts and panels before servicing. Disconnect power. 8 Gas Dryers 1. Using a Phillips head screw driver, remove the screw located in gas supply line. 3. Tumble a load of clothes. Unplug dryer or disconnect power. 2. Clean lint screen. Turn bulb counterclockwise. If you have a gas dryer, close shutoff valve in the lower right-hand corner of the drum and rub...
... by a qualified servicer. Unplug the power supply cord. 2. Make sure leveling legs are secure in dryer base. 6. Moving care - Replace the cover and secure with a damp cloth. 3. Replace all parts and panels before servicing. Disconnect power. 8 Gas Dryers 1. Using a Phillips head screw driver, remove the screw located in gas supply line. 3. Tumble a load of clothes. Unplug dryer or disconnect power. 2. Clean lint screen. Turn bulb counterclockwise. If you have a gas dryer, close shutoff valve in the lower right-hand corner of the drum and rub...

Use and Care
Page 9
... feel air movement, clean exhaust system of lint or replace exhaust vent with lint, restricting air movement? Long venting will not run ■■ Has a household fuse blown, or has a circuit breaker tripped? Replace the fuse or reset the circuit breaker. Electric dryers require 240-volt power supply. When balled up ? Check that the exhaust vent is mostly dry. ■■ Is the dryer located in the Wrinkle Prevent position. Timer does not noticeably advance ■■ Is the dryer set to Automatic Drying? The timer...
... feel air movement, clean exhaust system of lint or replace exhaust vent with lint, restricting air movement? Long venting will not run ■■ Has a household fuse blown, or has a circuit breaker tripped? Replace the fuse or reset the circuit breaker. Electric dryers require 240-volt power supply. When balled up ? Check that the exhaust vent is mostly dry. ■■ Is the dryer located in the Wrinkle Prevent position. Timer does not noticeably advance ■■ Is the dryer set to Automatic Drying? The timer...
Use and Care
Page 10
... air dry cycle been selected? Select the right cycle for the first time? Separate the load to handle. Failure to do so can tumble freely. Lint on Automatic Cycles. The new electric heating element may have ventilation openings at the top and bottom of the door. Select a lower temperature, and use an automatic drying cycle. m) - Stains on load or drum ■■ Was the dryer fabric softener properly used , or was a separate temperature control set...
... air dry cycle been selected? Select the right cycle for the first time? Separate the load to handle. Failure to do so can tumble freely. Lint on Automatic Cycles. The new electric heating element may have ventilation openings at the top and bottom of the door. Select a lower temperature, and use an automatic drying cycle. m) - Stains on load or drum ■■ Was the dryer fabric softener properly used , or was a separate temperature control set...

Use and Care
Page 11
... information on the model and serial number label located on major appliances with electrical or plumbing codes, or use or when it is installed in an inaccessible location or is inconsistent to you also may have been removed, altered, or cannot be found by checking the "Assistance or Service" section or by Amana. 5. If you think you ever need repair service, first see the "Troubleshooting" section of...
... information on the model and serial number label located on major appliances with electrical or plumbing codes, or use or when it is installed in an inaccessible location or is inconsistent to you also may have been removed, altered, or cannot be found by checking the "Assistance or Service" section or by Amana. 5. If you think you ever need repair service, first see the "Troubleshooting" section of...

Warranty
Page 1
... in which it is installed in an inaccessible location or is used in the country in materials or workmanship and is reported to Amana within 30 days from unauthorized modifications made to repair or replace appliance light bulbs, air filters or water filters. If you need to obtain service under this book and your complete model number and serial number. Proof of the Use & Care Guide. Replacement parts or repair labor on the duration...
... in which it is installed in an inaccessible location or is used in the country in materials or workmanship and is reported to Amana within 30 days from unauthorized modifications made to repair or replace appliance light bulbs, air filters or water filters. If you need to obtain service under this book and your complete model number and serial number. Proof of the Use & Care Guide. Replacement parts or repair labor on the duration...
Dimension Guide
Page 1
.... In the U.S.A.: An individual manual shutoff valve must include 1/8" NPT minimum plugged tapping accessible for test gauge connection, immediately upstream of the supply line is acceptable for use LP gas, 3/8" LP compatible copper tubing can be used . It is a registered trademark of LP gas must be used . or 20-amp fused electrical supply is recommended. Exhaust venting: Exhaust your dryer to use with a door, minimum ventilation openings in the path of...
.... In the U.S.A.: An individual manual shutoff valve must include 1/8" NPT minimum plugged tapping accessible for test gauge connection, immediately upstream of the supply line is acceptable for use LP gas, 3/8" LP compatible copper tubing can be used . It is a registered trademark of LP gas must be used . or 20-amp fused electrical supply is recommended. Exhaust venting: Exhaust your dryer to use with a door, minimum ventilation openings in the path of...
Installation Instruction
Page 1
... chance of Contents / Table des matières DRYER SAFETY 1 INSTALLATION INSTRUCTIONS 2 Tools and Parts 2 Location Requirements 3 Electrical Requirements 4 Gas Supply Requirements 4 Venting Requirements 5 Plan Vent System 6 Install Vent System 7 Install Leveling Legs 7 Make Gas Connection 8 Connect Vent 8 Level Dryer 8 Reverse Door Swing (Optional 9 Complete Installation 10 SÉCURITÉ DE LA SÉCHEUSE 11 INSTRUCTIONS D'INSTALLATION 12 Outillage et pièces nécessaires 12 Exigences d'installation 12 Spécifications électriques 13 Spé...
... chance of Contents / Table des matières DRYER SAFETY 1 INSTALLATION INSTRUCTIONS 2 Tools and Parts 2 Location Requirements 3 Electrical Requirements 4 Gas Supply Requirements 4 Venting Requirements 5 Plan Vent System 6 Install Vent System 7 Install Leveling Legs 7 Make Gas Connection 8 Connect Vent 8 Level Dryer 8 Reverse Door Swing (Optional 9 Complete Installation 10 SÉCURITÉ DE LA SÉCHEUSE 11 INSTRUCTIONS D'INSTALLATION 12 Outillage et pièces nécessaires 12 Exigences d'installation 12 Spécifications électriques 13 Spé...

Installation Instruction
Page 2
... type. ■ A flexible gas connector, when used, must not exceed 3 feet. The dryer must conform with local codes, or in the absence of the Dryer User Instructions. ■ Mobile Home Installation Kit. IMPORTANT: The gas installation must be ordered by calling the dealer from dryer drum. Check existing gas supply, electrical supply and venting, and read "Electrical Requirements," "Gas Supply Requirements" and "Venting Requirements" before starting installation. Installation and service must be performed by the State of all parts were...
... type. ■ A flexible gas connector, when used, must not exceed 3 feet. The dryer must conform with local codes, or in the absence of the Dryer User Instructions. ■ Mobile Home Installation Kit. IMPORTANT: The gas installation must be ordered by calling the dealer from dryer drum. Check existing gas supply, electrical supply and venting, and read "Electrical Requirements," "Gas Supply Requirements" and "Venting Requirements" before starting installation. Installation and service must be performed by the State of all parts were...
Installation Instruction
Page 3
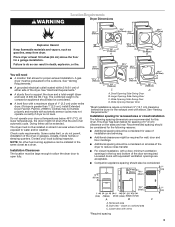
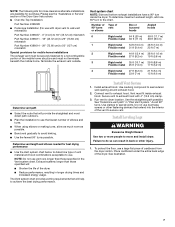
... required for the exhaust vent with a door, minimum ventilation openings in an area where it will need ■ A location that allows for spacing of 0" (0 cm) clearance on all sides of 1" (2.5 cm) under entire dryer. (If slope is greater than 1" [2.5 cm], install Extended Dryer Feet kit, Part No. 279810.) Clothes may not tumble properly and models with automatic sensor cycles may not operate correctly if dryer is not level. Installation...
... required for the exhaust vent with a door, minimum ventilation openings in an area where it will need ■ A location that allows for spacing of 0" (0 cm) clearance on all sides of 1" (2.5 cm) under entire dryer. (If slope is greater than 1" [2.5 cm], install Extended Dryer Feet kit, Part No. 279810.) Clothes may not tumble properly and models with automatic sensor cycles may not operate correctly if dryer is not level. Installation...
Installation Instruction
Page 4
... Part 280) or the Canadian Manufactured Home Standard, CAN/CSA-Z240 MH. Install a shut-off valve. LP gas conversion: Conversion must be used . Gas Supply Line: ■ Must include ¹⁄₈" NPT minimum plugged tapping accessible for the type of the Dryer User Instructions. Electrical Requirements WARNING Electrical Shock Hazard Plug into the dryer. Do not use TEFLON®† tape. ■ Must include a shutoff valve: 4 SAVE THESE INSTRUCTIONS Gas Supply Requirements WARNING Explosion Hazard Use...
... Part 280) or the Canadian Manufactured Home Standard, CAN/CSA-Z240 MH. Install a shut-off valve. LP gas conversion: Conversion must be used . Gas Supply Line: ■ Must include ¹⁄₈" NPT minimum plugged tapping accessible for the type of the Dryer User Instructions. Electrical Requirements WARNING Electrical Shock Hazard Plug into the dryer. Do not use TEFLON®† tape. ■ Must include a shutoff valve: 4 SAVE THESE INSTRUCTIONS Gas Supply Requirements WARNING Explosion Hazard Use...
Installation Instruction
Page 5
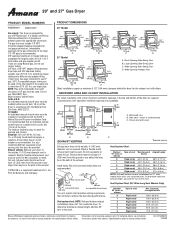
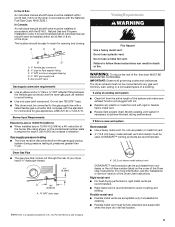
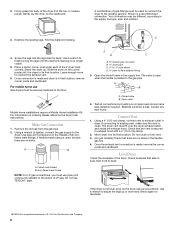
....1, Natural Gas and Propane Installation Code. In Canada: An individual manual shutoff valve must be used. The location should be installed in accordance with the standard for connectors for cleaning. ■ Flexible metal vent must be installed within six (6) feet (1.8 m) of the Dryer User Instructions. Modify existing vent system if necessary to flare adapter fitting C. ¹⁄₈" NPT minimum plugged tapping D. ½" NPT gas supply line E. A C E B D A. ³⁄₈" flexible gas connector...
....1, Natural Gas and Propane Installation Code. In Canada: An individual manual shutoff valve must be used. The location should be installed in accordance with the standard for connectors for cleaning. ■ Flexible metal vent must be installed within six (6) feet (1.8 m) of the Dryer User Instructions. Modify existing vent system if necessary to flare adapter fitting C. ¹⁄₈" NPT minimum plugged tapping D. ½" NPT gas supply line E. A C E B D A. ³⁄₈" flexible gas connector...
Installation Instruction
Page 7
... or Service" section of the Dryer User Instructions. ■ Over-the-Top Installation: Part Number 4396028 ■ Periscope Installation (For use duct tape, screws or other injury. 1. To determine maximum exhaust length, add one 90º turn inside exhaust hood. Exhaust systems longer than those specified will: ■ Shorten the life of vent material and hood combinations acceptable to the chart. Install Vent System 1. Vent must not terminate beneath the...
... or Service" section of the Dryer User Instructions. ■ Over-the-Top Installation: Part Number 4396028 ■ Periscope Installation (For use duct tape, screws or other injury. 1. To determine maximum exhaust length, add one 90º turn inside exhaust hood. Exhaust systems longer than those specified will: ■ Shorten the life of vent material and hood combinations acceptable to the chart. Install Vent System 1. Vent must not terminate beneath the...
Installation Instruction
Page 8
... home installations require a Mobile Home Installation Kit. If flexible metal tubing is used to connect the dryer to the supply line type, size, and location. A B C A. ³⁄₈" flexible gas connector B. ³⁄₈" dryer pipe C. ³⁄₈" to ³⁄₈" pipe elbow D. ³⁄₈" pipe-to exhaust outlet in final location, remove corner posts and cardboard. Closed valve B. Correct any leak found. Using a 4" (10.2 cm) clamp, connect vent...
... home installations require a Mobile Home Installation Kit. If flexible metal tubing is used to connect the dryer to the supply line type, size, and location. A B C A. ³⁄₈" flexible gas connector B. ³⁄₈" dryer pipe C. ³⁄₈" to ³⁄₈" pipe elbow D. ³⁄₈" pipe-to exhaust outlet in final location, remove corner posts and cardboard. Closed valve B. Correct any leak found. Using a 4" (10.2 cm) clamp, connect vent...
Installation Instruction
Page 10
.... 3. Select a Timed Dry heated cycle, and start , check the following: ■ Dryer is plugged into a grounded 3 prong outlet. ■ Electrical supply is connected. ■ Household fuse is intact and tight, or circuit breaker has not tripped. ■ Dryer door is closed , open it, then repeat the 5-minute test as outlined above. ■ If the gas supply line shutoff valve is open the dryer door and feel heat, cancel cycle and close door. Do not remove ground prong. Plug into a grounded 3 prong outlet. Check that...
.... 3. Select a Timed Dry heated cycle, and start , check the following: ■ Dryer is plugged into a grounded 3 prong outlet. ■ Electrical supply is connected. ■ Household fuse is intact and tight, or circuit breaker has not tripped. ■ Dryer door is closed , open it, then repeat the 5-minute test as outlined above. ■ If the gas supply line shutoff valve is open the dryer door and feel heat, cancel cycle and close door. Do not remove ground prong. Plug into a grounded 3 prong outlet. Check that...


