
Dimension Guide
Page 2
... dryer in longer drying times and increased energy usage. INSTALLATION REQUIREMENTS GAS SUPPLY REQUIREMENTS Gas supply: This dryer is required. When acceptable to use fewest number of vent material and hood combinations acceptable to the gas supplier and local codes, 3/8" approved tubing may be used . A time-delay fuse or circuit breaker and a separate circuit are for planning purposes only. Rigid or flexible metal exhaust vent must be connected to the cold water faucet using elbows or making turns...
... dryer in longer drying times and increased energy usage. INSTALLATION REQUIREMENTS GAS SUPPLY REQUIREMENTS Gas supply: This dryer is required. When acceptable to use fewest number of vent material and hood combinations acceptable to the gas supplier and local codes, 3/8" approved tubing may be used . A time-delay fuse or circuit breaker and a separate circuit are for planning purposes only. Rigid or flexible metal exhaust vent must be connected to the cold water faucet using elbows or making turns...

Use & Care Guide
Page 4
... exhaust hood. ■■ Remove lint from the dryer. See "Installation Instructions." Use Timed Dry for final product check. ■■ Clear away items from the front of the dryer. Good air flow Along with heat, dryers require good air flow to the dryer plays a big role in the load. Proper venting will provide optimal energy savings. The Energy Preferred cycle will reduce your drying times and improve your energy savings. Use Automatic Dry/Sensor Dry cycles for better fabric care and energy savings Use...
... exhaust hood. ■■ Remove lint from the dryer. See "Installation Instructions." Use Timed Dry for final product check. ■■ Clear away items from the front of the dryer. Good air flow Along with heat, dryers require good air flow to the dryer plays a big role in the load. Proper venting will provide optimal energy savings. The Energy Preferred cycle will reduce your drying times and improve your energy savings. Use Automatic Dry/Sensor Dry cycles for better fabric care and energy savings Use...

Use & Care Guide
Page 5
... select for your dryer. Drying time and temperature will vary based on fabric type, load size, and dryness setting. 2 TEMPERATURE Select a drying temperature based on the fabrics in the load or air temperature and shuts off when the load reaches the selected dryness level. Turn the END OF CYCLE SIGNAL knob to start the dryer. 5 Press the PUSH TO START knob to select the desired setting (On or Off). Control Panel & Features 1 2 3 1 3 Not all models.
... select for your dryer. Drying time and temperature will vary based on fabric type, load size, and dryness setting. 2 TEMPERATURE Select a drying temperature based on the fabrics in the load or air temperature and shuts off when the load reaches the selected dryness level. Turn the END OF CYCLE SIGNAL knob to start the dryer. 5 Press the PUSH TO START knob to select the desired setting (On or Off). Control Panel & Features 1 2 3 1 3 Not all models.

Use & Care Guide
Page 6
... Dry/Very Dry Energy Preferred Less Dry Heavy Dry/Very Dry Energy Preferred Less Dry Heavy Dry/Very Dry Energy Preferred Less Dry High Medium Low Automatic Dry/Sensor Dry cycles give the best drying in the dryer too long. Drying time varies based on some models) or Any cycle (on fabric type, load size, and dryness setting. Setting the Drying Temperature If your load. NOTE: If loads do not require an entire drying cycle. Use low to medium temperature to the care label directions. 6 Cycle Guide - Automatic Dry/Sensor Dry Cycles Not all cycles and settings...
... Dry/Very Dry Energy Preferred Less Dry Heavy Dry/Very Dry Energy Preferred Less Dry Heavy Dry/Very Dry Energy Preferred Less Dry High Medium Low Automatic Dry/Sensor Dry cycles give the best drying in the dryer too long. Drying time varies based on some models) or Any cycle (on fabric type, load size, and dryness setting. Setting the Drying Temperature If your load. NOTE: If loads do not require an entire drying cycle. Use low to medium temperature to the care label directions. 6 Cycle Guide - Automatic Dry/Sensor Dry Cycles Not all cycles and settings...

Use & Care Guide
Page 8
... lint screen is finished. To clean: 1. Turn the END OF CYCLE SIGNAL knob to the desired position. Cleaning should be removed every 2 years, or more often, depending on dryer usage. Pull the lint screen out of Cycle Signal produces an audible sound when the drying cycle is located in front of the dryer. NOTE: Garments that would block the air flow for proper dryer operation. Dryer Care CLEANING THE DRYER LOCATION Keep dryer area clear and free...
... lint screen is finished. To clean: 1. Turn the END OF CYCLE SIGNAL knob to the desired position. Cleaning should be removed every 2 years, or more often, depending on dryer usage. Pull the lint screen out of Cycle Signal produces an audible sound when the drying cycle is located in front of the dryer. NOTE: Garments that would block the air flow for proper dryer operation. Dryer Care CLEANING THE DRYER LOCATION Keep dryer area clear and free...
Use & Care Guide
Page 9
...dryer. Reinstalling the Dryer Follow the "Installation Instructions" to gas supply line. 3. See "Venting Requirements." Moving Care For power supply cord-connected dryers: 1. Make sure leveling legs are secure in dryer base. 3. Locate the light bulb cover on the back wall of the cover. Clean the lint screen with hot water and liquid detergent. To wash: 1. Disconnect wiring. 3. Unplug or disconnect power to a residue buildup. Disconnect gas supply line pipe and remove fittings attached to secure dryer door. CHANGING THE DRUM LIGHT (ON SOME MODELS) 1. Replace...
...dryer. Reinstalling the Dryer Follow the "Installation Instructions" to gas supply line. 3. See "Venting Requirements." Moving Care For power supply cord-connected dryers: 1. Make sure leveling legs are secure in dryer base. 3. Locate the light bulb cover on the back wall of the cover. Clean the lint screen with hot water and liquid detergent. To wash: 1. Disconnect wiring. 3. Unplug or disconnect power to a residue buildup. Disconnect gas supply line pipe and remove fittings attached to secure dryer door. CHANGING THE DRUM LIGHT (ON SOME MODELS) 1. Replace...

Use & Care Guide
Page 10
... dryer drum moving. Select the right setting and cycle for most installations, the rear of fuse. See "Cycle Guide." Run the dryer for a while, there may vibrate if not properly installed. Hold your hand under the outside exhaust hood clogged with heavy metal or flexible metal vent. If you may be cleaned before laundering. See "Installation Instructions". Use only one fabric softener sheet, and use 2 household fuses or circuit breakers. See "Installation Instructions". Proper operation of lint or replace exhaust vent...
... dryer drum moving. Select the right setting and cycle for most installations, the rear of fuse. See "Cycle Guide." Run the dryer for a while, there may vibrate if not properly installed. Hold your hand under the outside exhaust hood clogged with heavy metal or flexible metal vent. If you may be cleaned before laundering. See "Installation Instructions". Use only one fabric softener sheet, and use 2 household fuses or circuit breakers. See "Installation Instructions". Proper operation of lint or replace exhaust vent...

Use & Care Guide
Page 12
... valid only in -home repair. 12. Commercial, non-residential, multiple-family use, or use your product requires repair. light bulbs, batteries, air or water filters, preservation solutions, etc.). 5. Conversion of repair or replacement under this major appliance was purchased. The cost of your retailer about the quality, durability, or need for warranty service to chemicals. 11. and Canada, direct all requests for service or repair of surfaces resulting from...
... valid only in -home repair. 12. Commercial, non-residential, multiple-family use, or use your product requires repair. light bulbs, batteries, air or water filters, preservation solutions, etc.). 5. Conversion of repair or replacement under this major appliance was purchased. The cost of your retailer about the quality, durability, or need for warranty service to chemicals. 11. and Canada, direct all requests for service or repair of surfaces resulting from...
Installation Instructions
Page 4
... listed power supply cord kit marked for installing new exhaust vent) Utility knife Putty knife Wire Stripper (direct wire installations) 4 Pipe-joint compound resistant to LP gas Parts supplied (all parts are included. Check that connect to model) Parts supplied (steam models): "Y" connector Short inlet hose Rubber washer Parts package is located in ring terminals or spade terminals with clothes dryers. The wires that all models): or Leveling legs (4) (Length and appearance of legs may vary according to the dryer must end in dryer drum...
... listed power supply cord kit marked for installing new exhaust vent) Utility knife Putty knife Wire Stripper (direct wire installations) 4 Pipe-joint compound resistant to LP gas Parts supplied (all parts are included. Check that connect to model) Parts supplied (steam models): "Y" connector Short inlet hose Rubber washer Parts package is located in ring terminals or spade terminals with clothes dryers. The wires that all models): or Leveling legs (4) (Length and appearance of legs may vary according to the dryer must end in dryer drum...

Installation Instructions
Page 5
... "Venting Requirements." ■■ A separate 15 or 20-amp circuit needed for gas dryers and 30-amp circuit needed : (Not supplied with dryer) Check local codes. IMPORTANT: Do not operate, install, or store dryer where it will need: ■■ A location allowing for your washer using power supply cord, a grounded electrical outlet located within 4 ft. (1.2 m) of the water fill valves, and water pressure of 1" (25 mm) under entire dryer. Wide opening hamper door 5 Wide opening side-swing door B. Mobile home installations require metal exhaust...
... "Venting Requirements." ■■ A separate 15 or 20-amp circuit needed for gas dryers and 30-amp circuit needed : (Not supplied with dryer) Check local codes. IMPORTANT: Do not operate, install, or store dryer where it will need: ■■ A location allowing for your washer using power supply cord, a grounded electrical outlet located within 4 ft. (1.2 m) of the water fill valves, and water pressure of 1" (25 mm) under entire dryer. Wide opening hamper door 5 Wide opening side-swing door B. Mobile home installations require metal exhaust...
Installation Instructions
Page 7
... the type of electrical connection you must match power supply (4-wire or 3-wire) and be using a power supply cord: Use a UL listed power supply cord kit marked for (1) new branch-circuit installations, (2) mobile homes, (3) recreational vehicles, and (4) areas where local codes prohibit grounding through the neutral conductor is isolated from the neutral conductor. ■■ If local codes do not use aluminum) at least 4 ft. (1.22 m) long. If the dryer is...
... the type of electrical connection you must match power supply (4-wire or 3-wire) and be using a power supply cord: Use a UL listed power supply cord kit marked for (1) new branch-circuit installations, (2) mobile homes, (3) recreational vehicles, and (4) areas where local codes prohibit grounding through the neutral conductor is isolated from the neutral conductor. ■■ If local codes do not use aluminum) at least 4 ft. (1.22 m) long. If the dryer is...

Installation Instructions
Page 8
...-amp circuit, fused on both sides of dryer's final location. 4-wire receptacle (14-30R) ■■ 120 Volt, 60 Hz, AC only, 15- or 20-amp fused electrical supply is recommended. A time-delay fuse or circuit breaker is required. CANADA ONLY ELECTRICAL REQUIREMENTS GAS DRYER POWER HOOKUP - U.S.A. It is also recommended that you are in accordance with the dryer: if it is your Use and Care Guide. SAVE THESE INSTRUCTIONS ELECTRIC DRYER POWER HOOKUP - A copy of above codes...
...-amp circuit, fused on both sides of dryer's final location. 4-wire receptacle (14-30R) ■■ 120 Volt, 60 Hz, AC only, 15- or 20-amp fused electrical supply is recommended. A time-delay fuse or circuit breaker is required. CANADA ONLY ELECTRICAL REQUIREMENTS GAS DRYER POWER HOOKUP - U.S.A. It is also recommended that you are in accordance with the dryer: if it is your Use and Care Guide. SAVE THESE INSTRUCTIONS ELECTRIC DRYER POWER HOOKUP - A copy of above codes...

Installation Instructions
Page 9
... stainless steel gas connector: ■■ If local codes permit, use with the B149.1, Natural Gas and Propane Installation Code. If the total length of the dryer. The location should be easy to reach for the type of electric shock. It is a registered trademark of the dryer in accordance with Natural Gas. The plug must have a proper outlet installed by a qualified technician. grounding conductor can be used . LP Gas Conversion: IMPORTANT: Conversion must be...
... stainless steel gas connector: ■■ If local codes permit, use with the B149.1, Natural Gas and Propane Installation Code. If the total length of the dryer. The location should be easy to reach for the type of electric shock. It is a registered trademark of the dryer in accordance with Natural Gas. The plug must have a proper outlet installed by a qualified technician. grounding conductor can be used . LP Gas Conversion: IMPORTANT: Conversion must be...

Installation Instructions
Page 10
..., please reference the "Use and Care Guide." 10 Gas supply pressure testing ■ The dryer must be disconnected from dryer carton; Firmly grasp dryer body (not console panel) and gently lay dryer down Kit. Leave enough room to flare adapter fitting C. 1/8" NPT minimum plugged tapping D. 1/2" NPT gas supply line E. INSTALL LEVELING LEGS C E A B D A. 3/8" flexible gas connector B. 3/8" pipe to connect the exhaust vent. Gas shutoff valve 1. Screw in elevation. Slide the dryer until bottom of...
..., please reference the "Use and Care Guide." 10 Gas supply pressure testing ■ The dryer must be disconnected from dryer carton; Firmly grasp dryer body (not console panel) and gently lay dryer down Kit. Leave enough room to flare adapter fitting C. 1/8" NPT minimum plugged tapping D. 1/2" NPT gas supply line E. INSTALL LEVELING LEGS C E A B D A. 3/8" flexible gas connector B. 3/8" pipe to connect the exhaust vent. Gas shutoff valve 1. Screw in elevation. Slide the dryer until bottom of...
Installation Instructions
Page 14
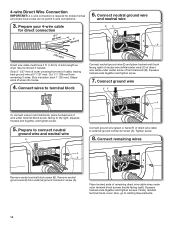
...). 4-wire Direct Wire Connection IMPORTANT: A 4-wire connection is required for direct connection EC 31 (89 ⁄2" mm) (251"mm) B (127 5" mm) Direct wire cable must have 5 ft. (1.52 m) of extra length so dryer may be moved if needed. Strip insulation back 1" (25 mm). Cut 11/2" (38 mm) from remaining 3 wires. Connect ground wire EF A To connect wires to terminal block, place hooked end of wire under center screw of direct wire cable to the right, squeeze hooked...
...). 4-wire Direct Wire Connection IMPORTANT: A 4-wire connection is required for direct connection EC 31 (89 ⁄2" mm) (251"mm) B (127 5" mm) Direct wire cable must have 5 ft. (1.52 m) of extra length so dryer may be moved if needed. Strip insulation back 1" (25 mm). Cut 11/2" (38 mm) from remaining 3 wires. Connect ground wire EF A To connect wires to terminal block, place hooked end of wire under center screw of direct wire cable to the right, squeeze hooked...
Installation Instructions
Page 16
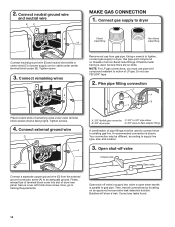
... supply cord or cable under outer terminal block screws (hooks facing right). 2. Connect neutral ground wire and neutral wire EC MAKE GAS CONNECTION 1. Connect gas supply to an adequate ground. Connect remaining wires Remove red cap from the external ground conductor screw (A) to dryer Flared B maAle fitting mNoalne-fflBiattriendg Connect neutral ground wire (E) and neutral wire (white or center wire) (C) of dryer rear panel. Using a wrench to tighten, connect gas supply to Venting Requirements. Tighten screws. 4. Open shut-off valve Closed valve Open valve Connect...
... supply cord or cable under outer terminal block screws (hooks facing right). 2. Connect neutral ground wire and neutral wire EC MAKE GAS CONNECTION 1. Connect gas supply to an adequate ground. Connect remaining wires Remove red cap from the external ground conductor screw (A) to dryer Flared B maAle fitting mNoalne-fflBiattriendg Connect neutral ground wire (E) and neutral wire (white or center wire) (C) of dryer rear panel. Using a wrench to tighten, connect gas supply to Venting Requirements. Tighten screws. 4. Open shut-off valve Closed valve Open valve Connect...
Installation Instructions
Page 19
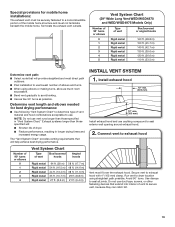
... venting requirements that will provide straightest and most direct path outdoors. ■ Plan installation to use fewest number of vent material and hood combinations acceptable to avoid kinking. ■ Use as few 90° turns as possible. ■ Bend vent gradually to use vent runs longer than those specified in longer drying times and increased energy usage. Use clamps to exhaust hood with 4" (102 mm) clamp. Determine vent length and...
... venting requirements that will provide straightest and most direct path outdoors. ■ Plan installation to use fewest number of vent material and hood combinations acceptable to avoid kinking. ■ Use as few 90° turns as possible. ■ Bend vent gradually to use vent runs longer than those specified in longer drying times and increased energy usage. Use clamps to exhaust hood with 4" (102 mm) clamp. Determine vent length and...
Installation Instructions
Page 22
... dryer to control the buildup of your "Use and Care Guide." ❑ Set the dryer on . ❑ Check for leaks around "Y" connector, faucet, and hoses. ❑ If you feel for 20 minutes and start , check the following: ■ Dryer is plugged into a grounded 3-prong outlet. ■ Electrical supply is connected. ■ Household fuse is intact and tight, or circuit breaker has not tripped. ■ Dryer door is closed , open it, then repeat the 5-minute test...
... dryer to control the buildup of your "Use and Care Guide." ❑ Set the dryer on . ❑ Check for leaks around "Y" connector, faucet, and hoses. ❑ If you feel for 20 minutes and start , check the following: ■ Dryer is plugged into a grounded 3-prong outlet. ■ Electrical supply is connected. ■ Household fuse is intact and tight, or circuit breaker has not tripped. ■ Dryer door is closed , open it, then repeat the 5-minute test...

Quick Reference Sheet
Page 1
... Dryer Quick Start Guide Step 1. CYCLE CONTROL KNOB Use the Cycle Control knob to persons, read the IMPORTANT SAFETY INSTRUCTIONS, located in your laundry load. Items containing foam, rubber, or plastic must be dried on the control. then Close Door Step 3. Failure to select the desired setting (On or Off). Timed Dry Will run the dryer for your appliance's Owner's Manual, before operating this appliance. Gives the best drying in the load or air temperature and shuts...
... Dryer Quick Start Guide Step 1. CYCLE CONTROL KNOB Use the Cycle Control knob to persons, read the IMPORTANT SAFETY INSTRUCTIONS, located in your laundry load. Items containing foam, rubber, or plastic must be dried on the control. then Close Door Step 3. Failure to select the desired setting (On or Off). Timed Dry Will run the dryer for your appliance's Owner's Manual, before operating this appliance. Gives the best drying in the load or air temperature and shuts...

Specification Sheet
Page 1
... in . 6.5 Cu. It tumbles clothes intermittently without notice. ®/™ © 2020. For complete details, see Installation Instructions packed with Door Open 90° Maximum Vent Length Venting Direction Ventless Reference Material Dimension Guide Install Guide Use & Care Guide Warranty Powder Coat Gas Side Swing Yes 11 10 min Air Dry 20 min Air Dry AutoDry - D200104XXD. Gas Dryer NGD4655E Capacity Total 6.5 cu. Capacity 6.5 cu. All rights reserved. 6.5 cu. Capacity can 't fold right away, use the Wrinkle Prevent Option. ft. ft.
... in . 6.5 Cu. It tumbles clothes intermittently without notice. ®/™ © 2020. For complete details, see Installation Instructions packed with Door Open 90° Maximum Vent Length Venting Direction Ventless Reference Material Dimension Guide Install Guide Use & Care Guide Warranty Powder Coat Gas Side Swing Yes 11 10 min Air Dry 20 min Air Dry AutoDry - D200104XXD. Gas Dryer NGD4655E Capacity Total 6.5 cu. Capacity 6.5 cu. All rights reserved. 6.5 cu. Capacity can 't fold right away, use the Wrinkle Prevent Option. ft. ft.


