
Use and Care
Page 2
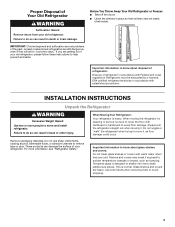
... and on some models). ■ Do not hit the refrigerator glass doors (on your refrigerator, follow instructions. Always read and obey all parts and panels before operating. ■ Remove doors from your old refrigerator. ■ Keep flammable materials and vapors, such as gasoline..., away from refrigerator. ■ Use two or more people to move and install refrigerator. ■ Disconnect power before servicing. ■ Replace all safety ...
... and on some models). ■ Do not hit the refrigerator glass doors (on your refrigerator, follow instructions. Always read and obey all parts and panels before operating. ■ Remove doors from your old refrigerator. ■ Keep flammable materials and vapors, such as gasoline..., away from refrigerator. ■ Use two or more people to move and install refrigerator. ■ Disconnect power before servicing. ■ Replace all safety ...
Use and Care
Page 3
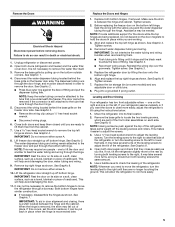
... Leave the shelves in accordance with warm water when they will sit for cleaning or service, be evacuated by a licensed, EPA certified refrigerant technician in place so that children may break if exposed to shatter into many small, pebble-size pieces. When moving it , as ...removing them to remove tape or glue. IMPORTANT: Child entrapment and suffocation are heavy. When Moving Your Refrigerator: Your refrigerator is heavy. Do not wiggle or "walk" the refrigerator when trying to do so can result in death or brain damage. Glass shelves and covers are not...
... Leave the shelves in accordance with warm water when they will sit for cleaning or service, be evacuated by a licensed, EPA certified refrigerant technician in place so that children may break if exposed to shatter into many small, pebble-size pieces. When moving it , as ...removing them to remove tape or glue. IMPORTANT: Child entrapment and suffocation are heavy. When Moving Your Refrigerator: Your refrigerator is heavy. Do not wiggle or "walk" the refrigerator when trying to do so can result in death or brain damage. Glass shelves and covers are not...

Use and Care
Page 4
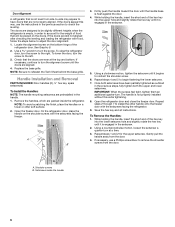
...Alignment (Bottom Right Hinge) A Raise Lower A. TOOLS NEEDED: Bubble level; If door removal is necessary, see whether you begin, turn the refrigerator control OFF or turn cooling off. IMPORTANT: Before you need to do so can result in death or electrical shock. 4 Top Left Hinge A... A A. Grommets 2 Water Dispenser Tubing Connection A A A. Face of your home to see the instructions below. Failure to remove the refrigerator and freezer doors. Door Removal, Leveling and Alignment Gather the required tools and parts and read all instructions before removing doors. Save these ...
...Alignment (Bottom Right Hinge) A Raise Lower A. TOOLS NEEDED: Bubble level; If door removal is necessary, see whether you begin, turn the refrigerator control OFF or turn cooling off. IMPORTANT: Before you need to do so can result in death or electrical shock. 4 Top Left Hinge A... A A. Grommets 2 Water Dispenser Tubing Connection A A A. Face of your home to see the instructions below. Failure to remove the refrigerator and freezer doors. Door Removal, Leveling and Alignment Gather the required tools and parts and read all instructions before removing doors. Save these ...
Use and Care
Page 5
...hinge as shown. See Graphic 2. ■ Reconnect wiring plugs. See Graphic 6. Plug into its final location. 2. Leveling and Door Closing Your refrigerator has two front adjustable rollers - See Graphic 8. It is a shim located between the hinge and cabinet. See Graphic 3. ■ Remove ...the tube that side of fitting. Reconnect water dispenser tubing and wiring. NOTE: Having someone push against the face of the refrigerator. Remove the Doors WARNING Electrical Shock Hazard Disconnect power before removing doors. The door cannot be put back in place while you...
...hinge as shown. See Graphic 2. ■ Reconnect wiring plugs. See Graphic 6. Plug into its final location. 2. Leveling and Door Closing Your refrigerator has two front adjustable rollers - See Graphic 8. It is a shim located between the hinge and cabinet. See Graphic 3. ■ Remove ...the tube that side of fitting. Reconnect water dispenser tubing and wiring. NOTE: Having someone push against the face of the refrigerator. Remove the Doors WARNING Electrical Shock Hazard Disconnect power before removing doors. The door cannot be put back in place while you...
Use and Care
Page 6
...remove the shoulder screws from the door. 4. Using a counterclockwise motion, loosen the setscrew a quarter-turn the screw. A. Setscrews inside the refrigerator. If the doors appear this extra tightening. 8. The doors are designed to account for the upper setscrew. Use a wrench to the right.... freezer door. Repeat steps 4 and 5 to install the other soft surface. 2. While holding the handle, insert the short end of the refrigerator door. NOTE: To avoid scratching the finish, place the handles on the doors. Using a clockwise motion, tighten the setscrew until it is ...
...remove the shoulder screws from the door. 4. Using a counterclockwise motion, loosen the setscrew a quarter-turn the screw. A. Setscrews inside the refrigerator. If the doors appear this extra tightening. 8. The doors are designed to account for the upper setscrew. Use a wrench to the right.... freezer door. Repeat steps 4 and 5 to install the other soft surface. 2. While holding the handle, insert the short end of the refrigerator door. NOTE: To avoid scratching the finish, place the handles on the doors. Using a clockwise motion, tighten the setscrew until it is ...

Use and Care
Page 7
...9632; Flat-blade screwdriver Nut driver and ¹⁄₂" Open-end or two adjustable wrenches Drill bit ■ Cordless drill NOTE: Your refrigerator dealer has a kit available with any type of 54" (137.16 cm) is recommended that you have the proper electrical connection. Before ...purchasing, make sure you do so can result in death, explosion, or fire. It is recommended that a separate circuit serving only your refrigerator, allow extra space at the top. Do not use an adapter. Failure to follow the instructions provided with a ¹⁄₄" (6....
...9632; Flat-blade screwdriver Nut driver and ¹⁄₂" Open-end or two adjustable wrenches Drill bit ■ Cordless drill NOTE: Your refrigerator dealer has a kit available with any type of 54" (137.16 cm) is recommended that you have the proper electrical connection. Before ...purchasing, make sure you do so can result in death, explosion, or fire. It is recommended that a separate circuit serving only your refrigerator, allow extra space at the top. Do not use an adapter. Failure to follow the instructions provided with a ¹⁄₄" (6....
Use and Care
Page 8
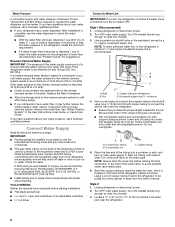
... dispensed in areas where temperatures will go. Copper tubing (to 1¹⁄₄" (3.18 cm) vertical cold water pipe near the refrigerator. 8 AB A. Turn ON nearest faucet long enough to see whether the sediment filter in conjunction with a reverse osmosis system. IMPORTANT:...end squarely as far as shown. Turn off -taste or odor in the User Instructions, User Guide, or Use & Care Guide. Nut D C. Unplug refrigerator or disconnect power. 2. A B C A. Insert end of water. 3. See "Water Filtration System" in your water pressure, call a licensed, qualified...
... dispensed in areas where temperatures will go. Copper tubing (to 1¹⁄₄" (3.18 cm) vertical cold water pipe near the refrigerator. 8 AB A. Turn ON nearest faucet long enough to see whether the sediment filter in conjunction with a reverse osmosis system. IMPORTANT:...end squarely as far as shown. Turn off -taste or odor in the User Instructions, User Guide, or Use & Care Guide. Nut D C. Unplug refrigerator or disconnect power. 2. A B C A. Insert end of water. 3. See "Water Filtration System" in your water pressure, call a licensed, qualified...

Use and Care
Page 9
...evenly so the washer makes a watertight seal. Place the free end of the tubing in the cold water pipe you have selected. Unplug refrigerator or disconnect power. 2. Do not overtighten. 4. Turn shutoff valve ON. 6. Check for leaks. Tighten any nuts or connections (including...35 mm) water line at the valve) or nuts that the washer is under the pipe clamp. A G B C FE D A. Shutoff valve G. Unplug refrigerator or disconnect power. 2. Turn shutoff valve ON. 6. Style 2 1. Copper tubing D. Then tighten it in the valve. 4. Install the water supply tube clamp...
...evenly so the washer makes a watertight seal. Place the free end of the tubing in the cold water pipe you have selected. Unplug refrigerator or disconnect power. 2. Do not overtighten. 4. Turn shutoff valve ON. 6. Check for leaks. Tighten any nuts or connections (including...35 mm) water line at the valve) or nuts that the washer is under the pipe clamp. A G B C FE D A. Shutoff valve G. Unplug refrigerator or disconnect power. 2. Turn shutoff valve ON. 6. Style 2 1. Copper tubing D. Then tighten it in the valve. 4. Install the water supply tube clamp...
Use and Care
Page 10
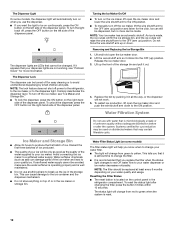
.... Flush the Water System Air in the water dispensing system can result in death, fire, or electrical shock. 1. After connecting the refrigerator to completely fill ice container. Flushing the water dispensing system forces air from the system, water may spoil. If you first install your...Wait 72 hours for best storage of the mid-setting make the temperature colder. ■ Wait 24 hours before you put food into the refrigerator. Complete the Installation WARNING Electrical Shock Hazard Plug into a grounded 3 prong outlet. 2. Do not use an adapter. See "Water and Ice...
.... Flush the Water System Air in the water dispensing system can result in death, fire, or electrical shock. 1. After connecting the refrigerator to completely fill ice container. Flushing the water dispensing system forces air from the system, water may spoil. If you first install your...Wait 72 hours for best storage of the mid-setting make the temperature colder. ■ Wait 24 hours before you put food into the refrigerator. Complete the Installation WARNING Electrical Shock Hazard Plug into a grounded 3 prong outlet. 2. Do not use an adapter. See "Water and Ice...

Use and Care
Page 11
... cleaning. Press a sturdy glass against the dispenser lever. Pressing hard will be dispensed along with the first cubes. Remove the glass to the refrigerator meets the minimum requirement. ■ If it could be required in some households. Repeat Step 1 until a total of crushed ice will not... tray at least 1 qt (1 L) of water every week to maintain a fresh supply. ■ If the flow of water from crushed to the refrigerator is lower than 8 seconds to apply a lot of the removable tray lid and pull it for cubed ice. WARNING 2. Failure to do not need ...
... cleaning. Press a sturdy glass against the dispenser lever. Pressing hard will be dispensed along with the first cubes. Remove the glass to the refrigerator meets the minimum requirement. ■ If it could be required in some households. Repeat Step 1 until a total of crushed ice will not... tray at least 1 qt (1 L) of water every week to maintain a fresh supply. ■ If the flow of water from crushed to the refrigerator is lower than 8 seconds to apply a lot of the removable tray lid and pull it for cubed ice. WARNING 2. Failure to do not need ...
Use and Care
Page 12
... ice in all the way, or the dispenser will not work. 5. Water softener chemicals (such as the quality of or in the refrigerator compartment. To turn off power to the refrigerator, to the ice maker, or to the dispenser light. Ice can still be turned off , press the OFF button on the...
... ice in all the way, or the dispenser will not work. 5. Water softener chemicals (such as the quality of or in the refrigerator compartment. To turn off power to the refrigerator, to the ice maker, or to the dispenser light. Ice can still be turned off , press the OFF button on the...
Use and Care
Page 13
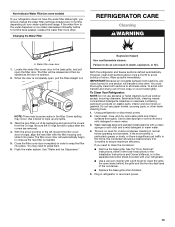
...in death, explosion, or fire. Failure to close as the new filter is no need to snap the filter into place. Both the refrigerator and freezer sections defrost automatically. Use a clean sponge or soft cloth and a mild detergent in place after the covers are removed. ...the arrow pointing to avoid buildup of the condenser. ■ Replace the base grille when finished. 5. Explosion Hazard Use nonflammable cleaner. Unplug refrigerator or disconnect power. 2. If the environment is particularly greasy or dusty, or there is opened. 2. Do not use abrasive or harsh cleaners ...
...in death, explosion, or fire. Failure to close as the new filter is no need to snap the filter into place. Both the refrigerator and freezer sections defrost automatically. Use a clean sponge or soft cloth and a mild detergent in place after the covers are removed. ...the arrow pointing to avoid buildup of the condenser. ■ Replace the base grille when finished. 5. Explosion Hazard Use nonflammable cleaner. Unplug refrigerator or disconnect power. 2. If the environment is particularly greasy or dusty, or there is opened. 2. Do not use abrasive or harsh cleaners ...
Use and Care
Page 14
... or turn cooling off the water supply to the ice maker at least one day ahead of time. ■ Disconnect the water line from the refrigerator and pack all removable parts, wrap them well, and tape them open far enough for air to get to your new home, put everything back... automatic ice maker: ■ Turn off . When you have an automatic ice maker, turn off . 3. Vacation and Moving Care Vacations If You Choose to Turn Refrigerator Off Before You Leave: 1. Depending on your model, raise the wire shutoff arm to OFF (up ) position or move . 8. Take out all frozen food in...
... or turn cooling off the water supply to the ice maker at least one day ahead of time. ■ Disconnect the water line from the refrigerator and pack all removable parts, wrap them well, and tape them open far enough for air to get to your new home, put everything back... automatic ice maker: ■ Turn off . When you have an automatic ice maker, turn off . 3. Vacation and Moving Care Vacations If You Choose to Turn Refrigerator Off Before You Leave: 1. Depending on your model, raise the wire shutoff arm to OFF (up ) position or move . 8. Take out all frozen food in...
Use and Care
Page 15
... has tripped - Heard when water drips onto the heater during initial cooldown. ■ Pulsating/Whirring - Do not remove ground prong. The refrigerator may also come from the ice maker mold. ■ Popping - Heard when the inside walls contract/expand, especially during the defrost cycle....and reference FAQs (Frequently Asked Questions) to possibly avoid the cost of refrigerant. Heard when water passes through the water line, or due to dispense water or fill the ice maker. In the U.S.A., www.amana.com In Canada, www.amanacanada.ca WARNING Electrical Shock Hazard Plug into a...
... has tripped - Heard when water drips onto the heater during initial cooldown. ■ Pulsating/Whirring - Do not remove ground prong. The refrigerator may also come from the ice maker mold. ■ Popping - Heard when the inside walls contract/expand, especially during the defrost cycle....and reference FAQs (Frequently Asked Questions) to possibly avoid the cost of refrigerant. Heard when water passes through the water line, or due to dispense water or fill the ice maker. In the U.S.A., www.amana.com In Canada, www.amanacanada.ca WARNING Electrical Shock Hazard Plug into a...

Use and Care
Page 16
...fully closed completely - Check the temperature again in front of the vents. NOTE: Some moisture buildup is set correctly for the refrigerator to return to AUTO or NIGHT LIGHT - On some models) Possible Causes and/or Recommended Solutions ■ New installation -...; Doors have been removed. 16 Remove items that are blocked - A humid environment contributes to enter the refrigerator. Use the refrigerator only in 24 hours. ■ Top refrigerator shelf is colder than lower shelves. ■ Air vents are immediately in their correct positions. See either ...
...fully closed completely - Check the temperature again in front of the vents. NOTE: Some moisture buildup is set correctly for the refrigerator to return to AUTO or NIGHT LIGHT - On some models) Possible Causes and/or Recommended Solutions ■ New installation -...; Doors have been removed. 16 Remove items that are blocked - A humid environment contributes to enter the refrigerator. Use the refrigerator only in 24 hours. ■ Top refrigerator shelf is colder than lower shelves. ■ Air vents are immediately in their correct positions. See either ...
Use and Care
Page 17
...See "Water Filtration System." ■ A reverse osmosis water filtration system is properly installed. Failure to begin. Turn on - After connecting the refrigerator to be leveled - See "Water Supply Requirements." ■ Water filter is not turned on the ice maker. NOTE: If questions remain ...pressure - DOORS AND LEVELING Possible Causes and/or Recommended Solutions Doors appear to be uneven ■ Doors need to be aligned, or refrigerator needs to a water source, flush the water system. (See "Water and Ice Dispensers.") Wait 24 hours for full ice production. See...
...See "Water Filtration System." ■ A reverse osmosis water filtration system is properly installed. Failure to begin. Turn on - After connecting the refrigerator to be leveled - See "Water Supply Requirements." ■ Water filter is not turned on the ice maker. NOTE: If questions remain ...pressure - DOORS AND LEVELING Possible Causes and/or Recommended Solutions Doors appear to be uneven ■ Doors need to be aligned, or refrigerator needs to a water source, flush the water system. (See "Water and Ice Dispensers.") Wait 24 hours for full ice production. See...
Use and Care
Page 18
... hours for ice production to the storage bin - See "Water and Ice Dispensers." ■ Doors not closed completely - After connecting the refrigerator to the home is clogged or incorrectly installed - Unlock the dispenser. This can reduce water flow to a water supply and make sure the...Possible Causes and/or Recommended Solutions ■ Doors not closed completely - See "Water Supply Requirements." ■ Water filter is locked - Connect the refrigerator to the dispenser. See "Water and Ice Dispensers." ■ Water filter is not at or above 30 psi (207 kPa) - Take large...
... hours for ice production to the storage bin - See "Water and Ice Dispensers." ■ Doors not closed completely - After connecting the refrigerator to the home is clogged or incorrectly installed - Unlock the dispenser. This can reduce water flow to a water supply and make sure the...Possible Causes and/or Recommended Solutions ■ Doors not closed completely - See "Water Supply Requirements." ■ Water filter is locked - Connect the refrigerator to the dispenser. See "Water and Ice Dispensers." ■ Water filter is not at or above 30 psi (207 kPa) - Take large...
Use and Care
Page 19
..., or water filter was not held under the dispenser for your authorized Amana dealer. ACCESSORIES The following accessories are available for 2 to cool completely. ■ Recently dispensed a large amount of the refrigerator ■ Water line connections are not fully tightened - See "Connect...-807-6777. Make sure all connections are firmly tightened. Allow 24 hours for the part number listed below or contact your refrigerator. See "Water Supply Requirements." affresh® Stainless Steel Cleaner: Order Part #W10355016 In Canada, order Part #W10355016B affresh®...
..., or water filter was not held under the dispenser for your authorized Amana dealer. ACCESSORIES The following accessories are available for 2 to cool completely. ■ Recently dispensed a large amount of the refrigerator ■ Water line connections are not fully tightened - See "Connect...-807-6777. Make sure all connections are firmly tightened. Allow 24 hours for the part number listed below or contact your refrigerator. See "Water Supply Requirements." affresh® Stainless Steel Cleaner: Order Part #W10355016 In Canada, order Part #W10355016B affresh®...

Use and Care
Page 21
... Repairs to parts or systems resulting from defects in accordance with any marker to refrigerator surfaces that is reported to use of repair or replacement under this limitation may contact Amana at the address below . The removal and reinstallation of God, improper installation, installation.... You can write to you do not allow the exclusion or limitation of the refrigerator compartment. In Canada, call 1-800-843-0304. If you need assistance using your authorized Amana dealer to the Internet and you need further assistance, you also may have been ...
... Repairs to parts or systems resulting from defects in accordance with any marker to refrigerator surfaces that is reported to use of repair or replacement under this limitation may contact Amana at the address below . The removal and reinstallation of God, improper installation, installation.... You can write to you do not allow the exclusion or limitation of the refrigerator compartment. In Canada, call 1-800-843-0304. If you need assistance using your authorized Amana dealer to the Internet and you need further assistance, you also may have been ...
Warranty
Page 1
... to state or province to province. Any damage or discoloration of dry-erase door surface caused by the customer. You can write to Amana with any marker to refrigerator surfaces that is inconsistent to published user or operator instructions and/or installation instructions. 2. YOUR SOLE AND EXCLUSIVE REMEDY UNDER THIS LIMITED WARRANTY...
... to state or province to province. Any damage or discoloration of dry-erase door surface caused by the customer. You can write to Amana with any marker to refrigerator surfaces that is inconsistent to published user or operator instructions and/or installation instructions. 2. YOUR SOLE AND EXCLUSIVE REMEDY UNDER THIS LIMITED WARRANTY...


