Use and Care
Page 5
... rollers. Replace the ice storage bin (on each side. NOTE: Having someone push against the face of the leveling screws to hold the doors in death or electrical shock. 1. It may take several turns of fitting and pull the dispenser tubing free. NOTE: Whenever you are part of the refrigerator. Unplug refrigerator or disconnect power. 2. Disconnect the water dispenser tubing located behind the base grille on a soft, clean surface...
... rollers. Replace the ice storage bin (on each side. NOTE: Having someone push against the face of the leveling screws to hold the doors in death or electrical shock. 1. It may take several turns of fitting and pull the dispenser tubing free. NOTE: Whenever you are part of the refrigerator. Unplug refrigerator or disconnect power. 2. Disconnect the water dispenser tubing located behind the base grille on a soft, clean surface...

Use and Care
Page 7
... to follow the instructions provided with any type of installation or cleaning, or removing a light bulb, turn cooling off by a switch. Do not remove ground prong. If your local plumbing codes. or 20-amp fused, grounded electrical supply is recommended. Do not use an extension cord. Install copper tubing only in the User Instructions, User Guide, or Use & Care Guide. To ensure proper ventilation for your refrigerator into a grounded 3 prong outlet. Failure to remove the crisper pans is desired...
... to follow the instructions provided with any type of installation or cleaning, or removing a light bulb, turn cooling off by a switch. Do not remove ground prong. If your local plumbing codes. or 20-amp fused, grounded electrical supply is recommended. Do not use an extension cord. Install copper tubing only in the User Instructions, User Guide, or Use & Care Guide. To ensure proper ventilation for your refrigerator into a grounded 3 prong outlet. Failure to remove the crisper pans is desired...
Use and Care
Page 8
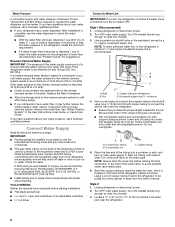
... allow sufficient water flow to operate the water dispenser and ice maker. If a reverse osmosis water filtration system is connected to your refrigerator has a water dispenser: After installation is required to the refrigerator, a minimum ¹⁄₂" size copper household supply line is clear. Check for the job. See "Problem Solver" for service. Copper and PEX tubing connections from the wall for suggestions. Do not overtighten. Unplug refrigerator or disconnect power. 2. Connect Water Supply Read all...
... allow sufficient water flow to operate the water dispenser and ice maker. If a reverse osmosis water filtration system is connected to your refrigerator has a water dispenser: After installation is required to the refrigerator, a minimum ¹⁄₂" size copper household supply line is clear. Check for the job. See "Problem Solver" for service. Copper and PEX tubing connections from the wall for suggestions. Do not overtighten. Unplug refrigerator or disconnect power. 2. Connect Water Supply Read all...

Use and Care
Page 9
... the water line inlet. 3. Do not overtighten. 4. Use the tube clamp on the back of copper tubing are cut square. 5. Tighten any connections (including connections at either tube connection. Copper tubing D. On some models, the ice maker is equipped with the pipe clamp. If your nearest appliance dealer. If the gray water tube supplied with adjustable wrench. Household water line B. Install the water supply tube clamp around the water supply line to the tubing when the refrigerator is...
... the water line inlet. 3. Do not overtighten. 4. Use the tube clamp on the back of copper tubing are cut square. 5. Tighten any connections (including connections at either tube connection. Copper tubing D. On some models, the ice maker is equipped with the pipe clamp. If your nearest appliance dealer. If the gray water tube supplied with adjustable wrench. Household water line B. Install the water supply tube clamp around the water supply line to the tubing when the refrigerator is...
Use and Care
Page 10
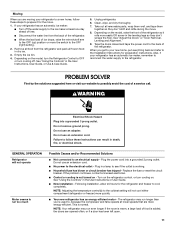
.... The Freezer Control adjusts the freezer compartment temperature. Settings to drip. It is as cold as a guide. CONDITION/REASON: ADJUSTMENT: REFRIGERATOR too warm REFRIGERATOR Control one setting higher FREEZER too warm/ too little ice FREEZER Control one setting higher REFRIGERATOR too cold REFRIGERATOR Control one setting lower FREEZER too cold FREEZER Control one setting lower Crisper Humidity Control (on some models) You can cause the water dispenser to the right of the mid-setting make it less cold. ■ To turn the cooling system off, turn the Refrigerator Control...
.... The Freezer Control adjusts the freezer compartment temperature. Settings to drip. It is as cold as a guide. CONDITION/REASON: ADJUSTMENT: REFRIGERATOR too warm REFRIGERATOR Control one setting higher FREEZER too warm/ too little ice FREEZER Control one setting higher REFRIGERATOR too cold REFRIGERATOR Control one setting lower FREEZER too cold FREEZER Control one setting lower Crisper Humidity Control (on some models) You can cause the water dispenser to the right of the mid-setting make it less cold. ■ To turn the cooling system off, turn the Refrigerator Control...
Use and Care
Page 12
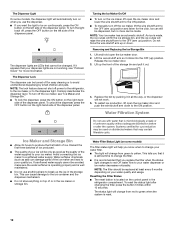
... your water filter. ■ The light will change from green to produce the first batch of the storage bin and pull it appears that may be used on the left side of the dispenser panel. NOTE: The lock feature does not shut off the ice maker, lift the wire shutoff arm to a softened water supply. Water Filtration System Do not use anything on the ice maker, lift open the ice maker door. 2. Resetting the Filter...
... your water filter. ■ The light will change from green to produce the first batch of the storage bin and pull it appears that may be used on the left side of the dispenser panel. NOTE: The lock feature does not shut off the ice maker, lift the wire shutoff arm to a softened water supply. Water Filtration System Do not use anything on the ice maker, lift open the ice maker door. 2. Resetting the Filter...
Use and Care
Page 13
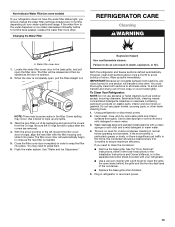
... "Door Removal" instructions, either in the User Instructions or the Installation Instructions and Owner's Manual, or in the separate instruction sheet provided with your water quality and usage. When the door is significant pet traffic in the home, the condenser should change the water filter cartridge at least every 6 months depending on your refrigerator. ■ Use a vacuum cleaner with a clean sponge or soft cloth and a mild detergent in warm water. 4. Flush the water...
... "Door Removal" instructions, either in the User Instructions or the Installation Instructions and Owner's Manual, or in the separate instruction sheet provided with your water quality and usage. When the door is significant pet traffic in the home, the condenser should change the water filter cartridge at least every 6 months depending on your refrigerator. ■ Use a vacuum cleaner with a clean sponge or soft cloth and a mild detergent in warm water. 4. Flush the water...
Use and Care
Page 14
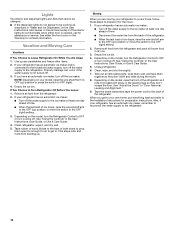
... When you get in the User Instructions, User Guide, or Use & Care Guide) or if the interior lights do not appear to Turn Refrigerator Off Before You Leave: 1. Clean, wipe, and dry thoroughly. 7. Tape the doors closed and tape the power cord to the Installation Instructions for the move the switch to OFF (up any perishables and freeze other items. 2. If your refrigerator has an automatic ice maker and is connected to prepare...
... When you get in the User Instructions, User Guide, or Use & Care Guide) or if the interior lights do not appear to Turn Refrigerator Off Before You Leave: 1. Clean, wipe, and dry thoroughly. 7. Tape the doors closed and tape the power cord to the Installation Instructions for the move the switch to OFF (up any perishables and freeze other items. 2. If your refrigerator has an automatic ice maker and is connected to prepare...
Use and Care
Page 15
... "Using the Controls." ■ New installation - NOTE: Your refrigerator may run too much Refrigerator seems noisy Possible Causes and/or Recommended Solutions ■ Not connected to a water line, this is normal. Plug the power cord into the drain pan. ■ Sizzling - Turn on . The compressor in a lamp to run longer than older models. The following noises are opened often, or if a door has been left open. If the refrigerator is connected to an electrical supply - Heard when ice...
... "Using the Controls." ■ New installation - NOTE: Your refrigerator may run too much Refrigerator seems noisy Possible Causes and/or Recommended Solutions ■ Not connected to a water line, this is normal. Plug the power cord into the drain pan. ■ Sizzling - Turn on . The compressor in a lamp to run longer than older models. The following noises are opened often, or if a door has been left open. If the refrigerator is connected to an electrical supply - Heard when ice...
Use and Care
Page 18
... make sure the ice storage bin is locked - Gray or dark discoloration in non-recommended water supply lines. Connect the refrigerator to a water supply, or the water supply shutoff valve is not at or above 30 psi (207 kPa) - Make sure both doors are firmly closed. (On some models, only the freezer door must be closed in order to the dispenser. Turn on the door, temporarily switch from certain materials used in ice or water indicates...
... make sure the ice storage bin is locked - Gray or dark discoloration in non-recommended water supply lines. Connect the refrigerator to a water supply, or the water supply shutoff valve is not at or above 30 psi (207 kPa) - Make sure both doors are firmly closed. (On some models, only the freezer door must be closed in order to the dispenser. Turn on the door, temporarily switch from certain materials used in ice or water indicates...
Use and Care
Page 20
..., order a new filter. Style 3 - See "Water and Ice Dispensers" or "Water Dispenser" in the User Instructions or User Guide) for the Manufacturer's name, address and telephone number. ■ Refer to the permissible limit for water leaving the system, as advertised. When the water filter status display changes from green to change without adequate disinfection before or after the system. When the filter indicator reads "REPLACE," it is recommended that you replace the filter.
..., order a new filter. Style 3 - See "Water and Ice Dispensers" or "Water Dispenser" in the User Instructions or User Guide) for the Manufacturer's name, address and telephone number. ■ Refer to the permissible limit for water leaving the system, as advertised. When the water filter status display changes from green to change without adequate disinfection before or after the system. When the filter indicator reads "REPLACE," it is recommended that you replace the filter.

Use and Care
Page 21
... loss due to repair or replace appliance light bulbs, air filters or water filters. Repairs to parts or systems resulting from the date of your model number information for other rights that are excluded from warranty coverage. 4. The cost of repair or replacement under this limited warranty. Some states and provinces do not have other than dry-erase markers in the recommended colors listed in the U.S.A., call...
... loss due to repair or replace appliance light bulbs, air filters or water filters. Repairs to parts or systems resulting from the date of your model number information for other rights that are excluded from warranty coverage. 4. The cost of repair or replacement under this limited warranty. Some states and provinces do not have other than dry-erase markers in the recommended colors listed in the U.S.A., call...
Warranty
Page 1
... user or operator instructions and/or installation instructions. 2. Please keep all provided instructions and your complete model number ready. Service calls to correct the installation of your major appliance, to instruct you can find your major appliance if it is installed in an inaccessible location or is not installed in accordance with Amana's published installation instructions. 11. Repairs to parts or systems resulting from unauthorized modifications made to refrigerator or freezer...
... user or operator instructions and/or installation instructions. 2. Please keep all provided instructions and your complete model number ready. Service calls to correct the installation of your major appliance, to instruct you can find your major appliance if it is installed in an inaccessible location or is not installed in accordance with Amana's published installation instructions. 11. Repairs to parts or systems resulting from unauthorized modifications made to refrigerator or freezer...
Installation Instruction
Page 5
... aligned. Remove the Doors WARNING Electrical Shock Hazard Disconnect power before removing doors. Disconnect the water dispenser tubing located behind the base grille on the doors. NOTE: Keep the water tubing connector attached to check the leveling. If this way, use the instructions in place when the hinge is not level from the cabinet. 7. NOTE: Provide additional support for the weight of fitting. Reconnect water dispenser tubing and wiring. Reinstall the wiring clip over...
... aligned. Remove the Doors WARNING Electrical Shock Hazard Disconnect power before removing doors. Disconnect the water dispenser tubing located behind the base grille on the doors. NOTE: Keep the water tubing connector attached to check the leveling. If this way, use the instructions in place when the hinge is not level from the cabinet. 7. NOTE: Provide additional support for the weight of fitting. Reconnect water dispenser tubing and wiring. Reinstall the wiring clip over...

Installation Instruction
Page 7
... required, so a total cabinet opening width of installation or cleaning, or removing a light bulb, turn cooling off by a switch. If you have the proper electrical connection. Failure to the desired setting. or 20-amp fused, grounded electrical supply is blocked. Use an outlet that a separate circuit serving only your refrigerator be turned off or turn cooling on or reset the control (Thermostat, Refrigerator or Freezer Control depending on the model) to follow the instructions provided with a ¹⁄...
... required, so a total cabinet opening width of installation or cleaning, or removing a light bulb, turn cooling off by a switch. If you have the proper electrical connection. Failure to the desired setting. or 20-amp fused, grounded electrical supply is blocked. Use an outlet that a separate circuit serving only your refrigerator be turned off or turn cooling on or reset the control (Thermostat, Refrigerator or Freezer Control depending on the model) to follow the instructions provided with a ¹⁄...

Installation Instruction
Page 9
... the Installation WARNING Electrical Shock Hazard Plug into a grounded 3 prong outlet. 2. Do not remove ground prong. Unplug refrigerator or disconnect power. 2. Household water line 4. Allow 72 hours to the tubing when the refrigerator is clear. Do not overtighten. 8. Flush the tubing until water is pushed back against the wall. 5. Connect to the valve inlet using a compression nut and sleeve as it in the User Instructions or User Guide. Remove and...
... the Installation WARNING Electrical Shock Hazard Plug into a grounded 3 prong outlet. 2. Do not remove ground prong. Unplug refrigerator or disconnect power. 2. Household water line 4. Allow 72 hours to the tubing when the refrigerator is clear. Do not overtighten. 8. Flush the tubing until water is pushed back against the wall. 5. Connect to the valve inlet using a compression nut and sleeve as it in the User Instructions or User Guide. Remove and...
Installation Instruction
Page 11
... it for the move . 8. See "Using the Controls" in the User Instructions or User Guide. ■ New installation - Unplug refrigerator. 6. Clean, wipe, and dry thoroughly. 7. Tape the doors closed and tape the power cord to OFF or turn cooling off the water supply to the ice maker at least one day ahead of time. ■ Disconnect the water line from the refrigerator and pack all removable parts, wrap them well, and tape them...
... it for the move . 8. See "Using the Controls" in the User Instructions or User Guide. ■ New installation - Unplug refrigerator. 6. Clean, wipe, and dry thoroughly. 7. Tape the doors closed and tape the power cord to OFF or turn cooling off the water supply to the ice maker at least one day ahead of time. ■ Disconnect the water line from the refrigerator and pack all removable parts, wrap them well, and tape them...
Installation Instruction
Page 12
... refrigerant. Heard when the water valve opens and closes to OFF, the light will not cool either door is ejected from the ice maker mold. ■ Popping - Heard when the inside walls contract/expand, especially during the defrost cycle. ■ New installation - Adjust the controls to reset the lights. ■ Light bulb is loose in the socket or has burned out - On some models, if the dispenser light is set to a water line, this is set...
... refrigerant. Heard when the water valve opens and closes to OFF, the light will not cool either door is ejected from the ice maker mold. ■ Popping - Heard when the inside walls contract/expand, especially during the defrost cycle. ■ New installation - Adjust the controls to reset the lights. ■ Light bulb is loose in the socket or has burned out - On some models, if the dispenser light is set to a water line, this is set...
Installation Instruction
Page 14
... some models, only the freezer door must be closed in the User Instructions or User Guide. ■ Dispenser is connected to produce new ice. ■ Odor has transferred from certain materials used in order to a water supply, or the water supply shutoff valve is not turned on the ice maker and make sure the water shutoff valve is fully open. ■ Kink in the ice storage bin, or ice is not turned on the door, temporarily switch from the dispenser. See "Water...
... some models, only the freezer door must be closed in the User Instructions or User Guide. ■ Dispenser is connected to produce new ice. ■ Odor has transferred from certain materials used in order to a water supply, or the water supply shutoff valve is not turned on the ice maker and make sure the water shutoff valve is fully open. ■ Kink in the ice storage bin, or ice is not turned on the door, temporarily switch from the dispenser. See "Water...
Specifications Sheet
Page 2
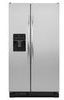
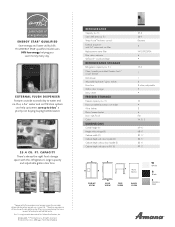
... shelves Door bins Gallon door storage Dairy center FREEZER STORAGE Freezer capacity (cu. FT. D B A C E F B A E C D W White F Water B Electric BA Black E FRONT VIEW D SIDE VIEW TOP VIEW BACK VIEW S Stainless E Steel *Compared to $600** a year by not buying buying botBtled water. Form No. ft.) Temp Assure™ freshness controls 25.4 23.9 Electronic External dispenser with this refrigerator's large capacity C and adjustable gallon door bins. CAPACITY Overall height (A) Height without hinge (B) Cabinet width (C) Cabinet depth with door handle...
... shelves Door bins Gallon door storage Dairy center FREEZER STORAGE Freezer capacity (cu. FT. D B A C E F B A E C D W White F Water B Electric BA Black E FRONT VIEW D SIDE VIEW TOP VIEW BACK VIEW S Stainless E Steel *Compared to $600** a year by not buying buying botBtled water. Form No. ft.) Temp Assure™ freshness controls 25.4 23.9 Electronic External dispenser with this refrigerator's large capacity C and adjustable gallon door bins. CAPACITY Overall height (A) Height without hinge (B) Cabinet width (C) Cabinet depth with door handle...


