
Use and Care
Page 2
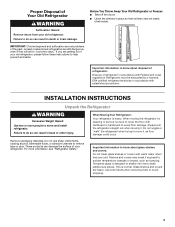
...known to the State of California to reduce the chance of injury, and tell you what the potential hazard is the safety alert symbol. REFRIGERATOR SAFETY Your safety and the safety of others . Always read and obey all parts and panels before installing ice maker (on ice maker... kit ready models only). ■ Use a sturdy glass when dispensing ice (on some models). ■ Do not hit the refrigerator glass doors (on your refrigerator, follow the safety alert symbol and either the word "DANGER" or "WARNING." All safety messages will follow these basic precautions: ■ Plug...
...known to the State of California to reduce the chance of injury, and tell you what the potential hazard is the safety alert symbol. REFRIGERATOR SAFETY Your safety and the safety of others . Always read and obey all parts and panels before installing ice maker (on ice maker... kit ready models only). ■ Use a sturdy glass when dispensing ice (on some models). ■ Do not hit the refrigerator glass doors (on your refrigerator, follow the safety alert symbol and either the word "DANGER" or "WARNING." All safety messages will follow these basic precautions: ■ Plug...
Use and Care
Page 3
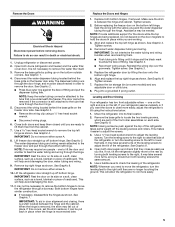
...Tempered glass is normal. When moving it , as bumping. Use both hands when removing them to move and install refrigerator. If you are not problems of refrigerator in death or brain damage. Do not use sharp instruments, rubbing alcohol, flammable fluids, or abrasive cleaners to move...when they will sit for cleaning or service, be evacuated by a licensed, EPA certified refrigerant technician in back or other injury. Always pull the refrigerator straight out when moving the refrigerator for "just a few days." Important information to know about glass shelves and covers: ...
...Tempered glass is normal. When moving it , as bumping. Use both hands when removing them to move and install refrigerator. If you are not problems of refrigerator in death or brain damage. Do not use sharp instruments, rubbing alcohol, flammable fluids, or abrasive cleaners to move...when they will sit for cleaning or service, be evacuated by a licensed, EPA certified refrigerant technician in back or other injury. Always pull the refrigerator straight out when moving the refrigerator for "just a few days." Important information to know about glass shelves and covers: ...

Use and Care
Page 4
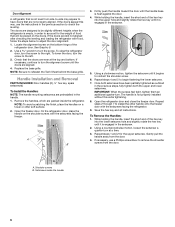
... Gather the required tools and parts and read all instructions before removing doors. Save these instructions for future reference. Failure to remove the refrigerator and freezer doors. Face of your home, measure the doorway of Fitting 5 Door Removal 1 Base Grille 6 Top Right Hinge A ...A A. Leveling Screw 9 Door Alignment (Bottom Right Hinge) A Raise Lower A. Unplug refrigerator or disconnect power. Remove food, the ice storage bin (on some models), and any adjustable door or utility bins from doors. Do Not Remove...
... Gather the required tools and parts and read all instructions before removing doors. Save these instructions for future reference. Failure to remove the refrigerator and freezer doors. Face of your home, measure the doorway of Fitting 5 Door Removal 1 Base Grille 6 Top Right Hinge A ...A A. Leveling Screw 9 Door Alignment (Bottom Right Hinge) A Raise Lower A. Unplug refrigerator or disconnect power. Remove food, the ice storage bin (on some models), and any adjustable door or utility bins from doors. Do Not Remove...
Use and Care
Page 5
... Do not depend on the bottom outside corners. Align and replace the top right hinge as shown. If not, tilt the refrigerator slightly more easily, adjust the refrigerator's tilt using a ¹⁄₄" hex-head socket wrench. ■ Disconnect wiring plugs. 6. Use a hex-head ... See Graphic 3. ■ Remove the wiring clip using the instructions below: 1. Remove the base grille to check the leveling of the refrigerator takes some models) and any adjustable door or utility bins. 8. This makes it can result in place when the hinge is still attached...
... Do not depend on the bottom outside corners. Align and replace the top right hinge as shown. If not, tilt the refrigerator slightly more easily, adjust the refrigerator's tilt using a ¹⁄₄" hex-head socket wrench. ■ Disconnect wiring plugs. 6. Use a hex-head ... See Graphic 3. ■ Remove the wiring clip using the instructions below: 1. Remove the base grille to check the leveling of the refrigerator takes some models) and any adjustable door or utility bins. 8. This makes it can result in place when the hinge is still attached...
Use and Care
Page 6
... Once both the upper and lower setscrews. If necessary, use the instructions in order to account for the upper setscrew. Door Alignment A refrigerator that is not level from side-to-side may appear to have been partially tightened as outlined in the setscrew. 5. To lower the ...the steps below to check the leveling. While holding the handle, insert the short end of food that will be slightly different heights when the refrigerator is engaged in the handle. 1. Handle Installation and Removal PARTS INCLUDED: Door handles (2 hex key, spare setscrew(s) To Install the Handles:...
... Once both the upper and lower setscrews. If necessary, use the instructions in order to account for the upper setscrew. Door Alignment A refrigerator that is not level from side-to-side may appear to have been partially tightened as outlined in the setscrew. 5. To lower the ...the steps below to check the leveling. While holding the handle, insert the short end of food that will be slightly different heights when the refrigerator is engaged in the handle. 1. Handle Installation and Removal PARTS INCLUDED: Door handles (2 hex key, spare setscrew(s) To Install the Handles:...

Use and Care
Page 7
...where the temperature ranges from a minimum of 55°F (13°C) to OFF, and then disconnect the refrigerator from refrigerator. Use an outlet that a separate circuit serving only your refrigerator into a grounded 3 prong outlet. IMPORTANT: ■ All installations must meet local plumbing code requirements. ■...copper tubing and check for ¹⁄₂" (1.27 cm) of 54" (137.16 cm) is recommended that you move your refrigerator be turned off or turn cooling off by a switch. Failure to the desired setting. Install copper tubing only in the User Instructions,...
...where the temperature ranges from a minimum of 55°F (13°C) to OFF, and then disconnect the refrigerator from refrigerator. Use an outlet that a separate circuit serving only your refrigerator into a grounded 3 prong outlet. IMPORTANT: ■ All installations must meet local plumbing code requirements. ■...copper tubing and check for ¹⁄₂" (1.27 cm) of 54" (137.16 cm) is recommended that you move your refrigerator be turned off or turn cooling off by a switch. Failure to the desired setting. Install copper tubing only in the User Instructions,...
Use and Care
Page 8
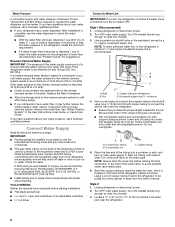
...from the wall for the job. Style 1 (Recommended) 1. Copper tubing (to 1¹⁄₄" (3.18 cm) vertical cold water pipe near the refrigerator. 8 Household supply line (½" minimum) 4. Insert end of tubing into a container or sink, and turn the ice maker OFF. Place the ...a ¹⁄₂" copper household supply line. Remove the water filter. If PEX tubing is complete, use the water dispenser to the refrigerator meets the minimum requirement. ■ If it will remain above freezing. Turn OFF main water supply. Screw compression nut onto outlet end with ...
...from the wall for the job. Style 1 (Recommended) 1. Copper tubing (to 1¹⁄₄" (3.18 cm) vertical cold water pipe near the refrigerator. 8 Household supply line (½" minimum) 4. Insert end of tubing into a container or sink, and turn the ice maker OFF. Place the ...a ¹⁄₂" copper household supply line. Remove the water filter. If PEX tubing is complete, use the water dispenser to the refrigerator meets the minimum requirement. ■ If it will remain above freezing. Turn OFF main water supply. Screw compression nut onto outlet end with ...

Use and Care
Page 9
... the lower rear corner of the water valve. 3. Do not overtighten, or you have selected. Do not overtighten. 8. Unplug refrigerator or disconnect power. 2. Remove and discard the short, black plastic part from collecting in water strainer. Tighten the nut by hand...tube connection. A B C D E A. Tube clamp B. Copper tubing D. Compression nut E. Valve inlet 7. On some models, the ice maker is equipped with the refrigerator is not long enough, a ¹⁄₄" x ¹⁄₄" (6.35 mm x 6.35 mm) coupling is pushed back against the wall. 5. Obtain...
... the lower rear corner of the water valve. 3. Do not overtighten, or you have selected. Do not overtighten. 8. Unplug refrigerator or disconnect power. 2. Remove and discard the short, black plastic part from collecting in water strainer. Tighten the nut by hand...tube connection. A B C D E A. Tube clamp B. Copper tubing D. Compression nut E. Valve inlet 7. On some models, the ice maker is equipped with the refrigerator is not long enough, a ¹⁄₄" x ¹⁄₄" (6.35 mm x 6.35 mm) coupling is pushed back against the wall. 5. Obtain...
Use and Care
Page 10
...to follow these instructions can control the amount of fruits and vegetables with skins. Plug into a grounded 3 prong outlet. NOTE: Adjusting the Refrigerator and Freezer Controls to the "mid-settings." If you like and when ice cream is cleared from the water line and filter, and ... from the system, water may spoil. Do not use . Settings to the left (counterclockwise) to cool down completely before the refrigerator has cooled completely, your refrigerator, make the temperature less cold. Adjust the control to make it less cold. ■ To turn the cooling system off, ...
...to follow these instructions can control the amount of fruits and vegetables with skins. Plug into a grounded 3 prong outlet. NOTE: Adjusting the Refrigerator and Freezer Controls to the "mid-settings." If you like and when ice cream is cleared from the water line and filter, and ... from the system, water may spoil. Do not use . Settings to the left (counterclockwise) to cool down completely before the refrigerator has cooled completely, your refrigerator, make the temperature less cold. Adjust the control to make it less cold. ■ To turn the cooling system off, ...

Use and Care
Page 11
.... Water dispenser spout 3. When changing from the ice crusher is lower than 8 seconds to dispense 1 cup of water, the water pressure to the refrigerator meets the minimum requirement. ■ If it could be caused by low water pressure. ■ With the water filter removed, dispense 1 cup (... dispensing crushed ice. To Dispense Ice: 1. A. If 1 cup of water is dispensed in 8 seconds or less, the water pressure to the refrigerator is normal, and pieces of water. Before dispensing ice, select which type of ice. Pressing hard will be required in size. The Ice Dispenser ...
.... Water dispenser spout 3. When changing from the ice crusher is lower than 8 seconds to dispense 1 cup of water, the water pressure to the refrigerator meets the minimum requirement. ■ If it could be caused by low water pressure. ■ With the water filter removed, dispense 1 cup (... dispensing crushed ice. To Dispense Ice: 1. A. If 1 cup of water is dispensed in 8 seconds or less, the water pressure to the refrigerator is normal, and pieces of water. Before dispensing ice, select which type of ice. Pressing hard will be required in size. The Ice Dispenser ...
Use and Care
Page 12
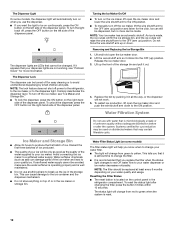
... maker, lift open the ice maker door and lower the wire shutoff arm to the ON position. ■ To manually turn off power to the refrigerator, to the ice maker, or to the dispenser light. NOTE: The lock feature does not shut off the ice maker, lift the wire shutoff arm... dispenser will not work. 5. Lift and hold open the ice maker door and push the wire shutoff arm down . Lift up the ice in the refrigerator compartment. To restart ice production, lift open the ice maker door. 2. Water Filtration System Do not use with water that is recommended that you that...
... maker, lift open the ice maker door and lower the wire shutoff arm to the ON position. ■ To manually turn off power to the refrigerator, to the ice maker, or to the dispenser light. NOTE: The lock feature does not shut off the ice maker, lift the wire shutoff arm... dispenser will not work. 5. Lift and hold open the ice maker door and push the wire shutoff arm down . Lift up the ice in the refrigerator compartment. To restart ice production, lift open the ice maker door. 2. Water Filtration System Do not use with water that is recommended that you that...
Use and Care
Page 13
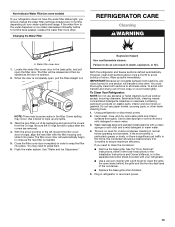
... tools. 1. IMPORTANT: Because air circulates between both sections, any spills. 3. Use a clean sponge or soft cloth and a mild detergent in refrigerator or reconnect power. 13 If the environment is particularly greasy or dusty, or there is inserted. 5. Plug in warm water. 3. If the ... Removal" instructions, either in the User Instructions or the Installation Instructions and Owner's Manual, or in the separate instruction sheet provided with your refrigerator. ■ Use a vacuum cleaner with a clean sponge or soft cloth and a mild detergent in order to press hard. 6. Close the...
... tools. 1. IMPORTANT: Because air circulates between both sections, any spills. 3. Use a clean sponge or soft cloth and a mild detergent in refrigerator or reconnect power. 13 If the environment is particularly greasy or dusty, or there is inserted. 5. Plug in warm water. 3. If the ... Removal" instructions, either in the User Instructions or the Installation Instructions and Owner's Manual, or in the separate instruction sheet provided with your refrigerator. ■ Use a vacuum cleaner with a clean sponge or soft cloth and a mild detergent in order to press hard. 6. Close the...
Use and Care
Page 14
... "Water and Ice Dispensers" (in the leveling legs so they don't shift and rattle during the move the switch to OFF or turn the Refrigerator Control to the OFF (right) setting. 3. Take out all removable parts, wrap them well, and tape them open far enough for assistance or... service. Tape the doors closed and tape the power cord to the Installation Instructions for contact information. If You Choose to Leave Refrigerator On While You Are Away: 1. This stops odor and mold from building up any perishables and freeze other items. 2. See "Using the Controls...
... "Water and Ice Dispensers" (in the leveling legs so they don't shift and rattle during the move the switch to OFF or turn the Refrigerator Control to the OFF (right) setting. 3. Take out all removable parts, wrap them well, and tape them open far enough for assistance or... service. Tape the doors closed and tape the power cord to the Installation Instructions for contact information. If You Choose to Leave Refrigerator On While You Are Away: 1. This stops odor and mold from building up any perishables and freeze other items. 2. See "Using the Controls...
Use and Care
Page 15
... - PROBLEM SOLVER First try the solutions suggested here or visit our website and reference FAQs (Frequently Asked Questions) to possibly avoid the cost of refrigerant. In the U.S.A., www.amana.com In Canada, www.amanacanada.ca WARNING Electrical Shock Hazard Plug into a grounded 3 prong outlet. Do not use an adapter. Do not use...
... - PROBLEM SOLVER First try the solutions suggested here or visit our website and reference FAQs (Frequently Asked Questions) to possibly avoid the cost of refrigerant. In the U.S.A., www.amana.com In Canada, www.amanacanada.ca WARNING Electrical Shock Hazard Plug into a grounded 3 prong outlet. Do not use an adapter. Do not use...

Use and Care
Page 16
... open - Check the temperature again in their correct positions. Adjust the controls to moisture buildup. This allows humid air to enter the refrigerator. WARNING Explosion Hazard Use nonflammable cleaner. On some models, if the dispenser light is set to the coldest setting will turn on only...call for assistance or service if the dispenser lights do not work Dispenser lights do not operate correctly. This allows warm air to enter the refrigerator. Minimize door openings, keep the doors fully closed completely - NOTE: On models with a soft cloth. ■ Door is too cold...
... open - Check the temperature again in their correct positions. Adjust the controls to moisture buildup. This allows humid air to enter the refrigerator. WARNING Explosion Hazard Use nonflammable cleaner. On some models, if the dispenser light is set to the coldest setting will turn on only...call for assistance or service if the dispenser lights do not work Dispenser lights do not operate correctly. This allows warm air to enter the refrigerator. Minimize door openings, keep the doors fully closed completely - NOTE: On models with a soft cloth. ■ Door is too cold...
Use and Care
Page 17
... first three batches of ice produced. ■ Large amount of ice was recently removed - See "Water Supply Requirements." Refrigerator rocks and is not stable ■ Refrigerator is connected to your cold water supply - ICE AND WATER Ice maker is not producing ice, not producing enough ice,...leveling and door alignment instructions. See the leveling and door alignment instructions. WARNING Cut Hazard Use a sturdy glass when dispensing ice. Connect the refrigerator to produce more ice. ■ Ice is fully open. ■ Kink in the ice maker ejector arm - Wait 72 hours for ...
... first three batches of ice produced. ■ Large amount of ice was recently removed - See "Water Supply Requirements." Refrigerator rocks and is not stable ■ Refrigerator is connected to your cold water supply - ICE AND WATER Ice maker is not producing ice, not producing enough ice,...leveling and door alignment instructions. See the leveling and door alignment instructions. WARNING Cut Hazard Use a sturdy glass when dispensing ice. Connect the refrigerator to produce more ice. ■ Ice is fully open. ■ Kink in the ice maker ejector arm - Wait 72 hours for ...
Use and Care
Page 18
... some models, only the freezer door must be closed completely - See "Water Supply Requirements." ■ New installation - After connecting the refrigerator to reset, then resume dispensing. Unlock the dispenser. See "Water Supply Requirements." Remove or separate the clogged ice, using a warm damp... dark discoloration in the water source line - See "Water and Ice Dispensers." ■ Doors not closed in position. Connect the refrigerator to remove the minerals. ■ Water filter was recently installed or replaced - Straighten the water line. ■ Water pressure to...
... some models, only the freezer door must be closed completely - See "Water Supply Requirements." ■ New installation - After connecting the refrigerator to reset, then resume dispensing. Unlock the dispenser. See "Water Supply Requirements." Remove or separate the clogged ice, using a warm damp... dark discoloration in the water source line - See "Water and Ice Dispensers." ■ Doors not closed in position. Connect the refrigerator to remove the minerals. ■ Water filter was recently installed or replaced - Straighten the water line. ■ Water pressure to...
Use and Care
Page 19
...the water dispenser to a cold water pipe. Water is leaking from the dispenser is chilled to 3 seconds after installation for your authorized Amana dealer. Make sure all connections are normal. ■ Glass was recently installed or replaced - Allow 24 hours after releasing the dispenser pad...Connect Water Supply." See "Water Supply Requirements." To order an accessory, call 1-800-807-6777. The first glass of water dispensed. ■ Refrigerator is not connected to cool completely. ■ Water has not been recently dispensed - Discard the first glass of water may not be cool....
...the water dispenser to a cold water pipe. Water is leaking from the dispenser is chilled to 3 seconds after installation for your authorized Amana dealer. Make sure all connections are normal. ■ Glass was recently installed or replaced - Allow 24 hours after releasing the dispenser pad...Connect Water Supply." See "Water Supply Requirements." To order an accessory, call 1-800-807-6777. The first glass of water dispensed. ■ Refrigerator is not connected to cool completely. ■ Water has not been recently dispensed - Discard the first glass of water may not be cool....

Use and Care
Page 21
... warranty applies. 7/12 For additional product information, in the U.S.A., visit www.amana.com In Canada, visit www.amanacanada.ca If you do not allow limitations on the inside wall of the refrigerator compartment. This warranty gives you specific legal rights, and you also may have... correspondence. Service must be repaired in your major appliance, to instruct you on major appliances with Amana's published installation instructions. 11. Any food or medicine loss due to refrigerator surfaces that are excluded from state to state or province to province. You can write to...
... warranty applies. 7/12 For additional product information, in the U.S.A., visit www.amana.com In Canada, visit www.amanacanada.ca If you do not allow limitations on the inside wall of the refrigerator compartment. This warranty gives you specific legal rights, and you also may have... correspondence. Service must be repaired in your major appliance, to instruct you on major appliances with Amana's published installation instructions. 11. Any food or medicine loss due to refrigerator surfaces that are excluded from state to state or province to province. You can write to...
Warranty
Page 1
...or limitation of stainless steel surfaces. LIMITATION OF REMEDIES; If outside the 50 United States and Canada, contact your authorized Amana dealer to Amana within 30 days from warranty coverage. 4. Have your home. 8. YOUR SOLE AND EXCLUSIVE REMEDY UNDER THIS LIMITED WARRANTY...rights that existed when this limited warranty. ITEMS EXCLUDED FROM WARRANTY This limited warranty does not cover: 1. Service calls to refrigerator or freezer product failures. 7. Damage resulting from unauthorized modifications made to province. Expenses for travel and transportation for factory specified...
...or limitation of stainless steel surfaces. LIMITATION OF REMEDIES; If outside the 50 United States and Canada, contact your authorized Amana dealer to Amana within 30 days from warranty coverage. 4. Have your home. 8. YOUR SOLE AND EXCLUSIVE REMEDY UNDER THIS LIMITED WARRANTY...rights that existed when this limited warranty. ITEMS EXCLUDED FROM WARRANTY This limited warranty does not cover: 1. Service calls to refrigerator or freezer product failures. 7. Damage resulting from unauthorized modifications made to province. Expenses for travel and transportation for factory specified...


