
Use and Care
Page 2
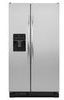
... in this manual and on some models). ■ Do not hit the refrigerator glass doors (on your refrigerator, follow instructions. Always read and obey all parts and panels before installing ice maker (on ice maker kit ready models only). ■ Use a sturdy glass when dispensing ice (on some models). WARNING: This...
... in this manual and on some models). ■ Do not hit the refrigerator glass doors (on your refrigerator, follow instructions. Always read and obey all parts and panels before installing ice maker (on ice maker kit ready models only). ■ Use a sturdy glass when dispensing ice (on some models). WARNING: This...

Use and Care
Page 4
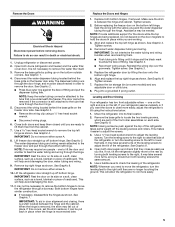
... and Right) A Do Not Remove Screw A (present on some models) 8 Leveling Raise Lower A A. Alignment Screw 4 Door Removal, Leveling and Alignment Gather the required tools and parts and read all instructions before removing doors. Unplug refrigerator or disconnect power. Wiring Plugs B.
... and Right) A Do Not Remove Screw A (present on some models) 8 Leveling Raise Lower A A. Alignment Screw 4 Door Removal, Leveling and Alignment Gather the required tools and parts and read all instructions before removing doors. Unplug refrigerator or disconnect power. Wiring Plugs B.
Use and Care
Page 5
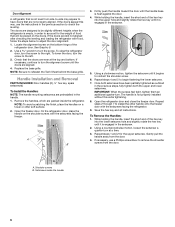
..., there is still attached to the tube that side of cardboard. Tighten screws. 2. NOTE: Provide additional support for the doors while the top hinges are part of the refrigerator. Tighten screws. 4. See Graphic 2. ■ Reconnect wiring plugs. Replace the refrigerator door by pulling up off bottom hinge. one on the right...
..., there is still attached to the tube that side of cardboard. Tighten screws. 2. NOTE: Provide additional support for the doors while the top hinges are part of the refrigerator. Tighten screws. 4. See Graphic 2. ■ Reconnect wiring plugs. Replace the refrigerator door by pulling up off bottom hinge. one on the right...
Use and Care
Page 6
... below to begin fastening the lower setscrew. 7. Check that the doors are preinstalled in the previous section to check the leveling. Handle Installation and Removal PARTS INCLUDED: Door handles (2 hex key, spare setscrew(s) To Install the Handles: NOTE: The handle mounting setscrews are even at a time. 3. Remove the handles, which are...
... below to begin fastening the lower setscrew. 7. Check that the doors are preinstalled in the previous section to check the leveling. Handle Installation and Removal PARTS INCLUDED: Door handles (2 hex key, spare setscrew(s) To Install the Handles: NOTE: The handle mounting setscrews are even at a time. 3. Remove the handles, which are...

Use and Care
Page 7
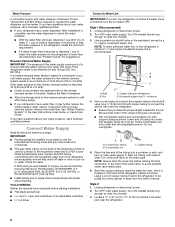
... a heat source, such as gasoline, away from the electrical source. Use an outlet that cannot be provided. Water Supply Requirements Gather the required tools and parts before starting installation. The preferred room temperature range for optimum performance, which reduces water flow and clogs more easily. It is intended for use a piercing...
... a heat source, such as gasoline, away from the electrical source. Use an outlet that cannot be provided. Water Supply Requirements Gather the required tools and parts before starting installation. The preferred room temperature range for optimum performance, which reduces water flow and clogs more easily. It is intended for use a piercing...
Use and Care
Page 8
... the job. Turn OFF main water supply. If you turn the ice maker OFF. TOOLS NEEDED: Gather the required tools and parts before the water line is lower than recommended. Turn ON nearest faucet long enough to Water Line IMPORTANT: If you have questions... licensed, qualified plumber. ■ If your refrigerator has a water filter, it will go. Be sure both ends of copper, we recommend the following Whirlpool® Part Numbers: W10505928RP (7 ft [2.14 m] jacketed PEX), 8212547RP (5 ft [1.52 m] PEX), or W10267701RP (25 ft [7.62 m] PEX). ■ Install tubing only...
... the job. Turn OFF main water supply. If you turn the ice maker OFF. TOOLS NEEDED: Gather the required tools and parts before the water line is lower than recommended. Turn ON nearest faucet long enough to Water Line IMPORTANT: If you have questions... licensed, qualified plumber. ■ If your refrigerator has a water filter, it will go. Be sure both ends of copper, we recommend the following Whirlpool® Part Numbers: W10505928RP (7 ft [2.14 m] jacketed PEX), 8212547RP (5 ft [1.52 m] PEX), or W10267701RP (25 ft [7.62 m] PEX). ■ Install tubing only...

Use and Care
Page 9
...under the pipe clamp. Unplug refrigerator or disconnect power. 2. Turn shutoff valve ON. 6. Unplug refrigerator or disconnect power. 2. Remove and discard the plastic part that leak. Do not overtighten. 4. Copper tubing D. On some models, the ice maker is attached to the inlet of the pipe, not the bottom... end squarely as far as shown. NOTE: To avoid rattling, be sure the copper tubing does not touch the cabinet's side wall or other parts inside the cabinet. 5. Use the tube clamp on the lower rear corner of the tubing in the valve. 4. Nut (purchased) G. Coil the...
...under the pipe clamp. Unplug refrigerator or disconnect power. 2. Turn shutoff valve ON. 6. Unplug refrigerator or disconnect power. 2. Remove and discard the plastic part that leak. Do not overtighten. 4. Copper tubing D. On some models, the ice maker is attached to the inlet of the pipe, not the bottom... end squarely as far as shown. NOTE: To avoid rattling, be sure the copper tubing does not touch the cabinet's side wall or other parts inside the cabinet. 5. Use the tube clamp on the lower rear corner of the tubing in the valve. 4. Nut (purchased) G. Coil the...
Use and Care
Page 12
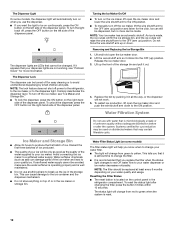
... into the OFF (up the front of your ice maker. To reset the status light after the system. The Dispenser Lock The dispenser can damage parts of the dispenser panel. To restart ice production, lift open the ice maker door and push the wire shutoff arm down . This tells you that...
... into the OFF (up the front of your ice maker. To reset the status light after the system. The Dispenser Lock The dispenser can damage parts of the dispenser panel. To restart ice production, lift open the ice maker door and push the wire shutoff arm down . This tells you that...
Use and Care
Page 13
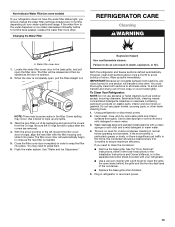
..., wrap or cover foods tightly. With the arrow pointing to snap the filter into place. Hand wash, rinse, and dry removable parts and interior surfaces thoroughly. Close the filter cover door completely in order to the left (toward the filter cover door's hinge), align... cleaners such as window sprays, scouring cleansers, flammable fluids, cleaning waxes, concentrated detergents, bleaches or cleansers containing petroleum products on plastic parts, interior and door liners or gaskets. The filter will automatically begin to clean the grille, the open areas behind the grille and ...
..., wrap or cover foods tightly. With the arrow pointing to snap the filter into place. Hand wash, rinse, and dry removable parts and interior surfaces thoroughly. Close the filter cover door completely in order to the left (toward the filter cover door's hinge), align... cleaners such as window sprays, scouring cleansers, flammable fluids, cleaning waxes, concentrated detergents, bleaches or cleansers containing petroleum products on plastic parts, interior and door liners or gaskets. The filter will automatically begin to clean the grille, the open areas behind the grille and ...
Use and Care
Page 14
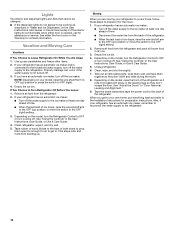
... of the refrigerator. ■ When the last load of the refrigerator. If You Choose to Leave Refrigerator On While You Are Away: 1. Remove all removable parts, wrap them well, and tape them open far enough for air to get to your refrigerator has an automatic ice maker, remember to reconnect the...
... of the refrigerator. ■ When the last load of the refrigerator. If You Choose to Leave Refrigerator On While You Are Away: 1. Remove all removable parts, wrap them well, and tape them open far enough for air to get to your refrigerator has an automatic ice maker, remember to reconnect the...
Use and Care
Page 19
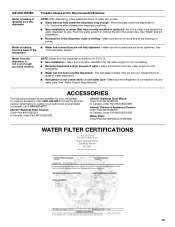
... is not connected to a cold water pipe - Make sure the refrigerator is free of the refrigerator ■ Water line connections are available for the part number listed below or contact your refrigerator. See "Water Supply Requirements." To order an accessory, call 1-800-807-6777. In Canada, call 1-800-...442-9991 and ask for your authorized Amana dealer. Make sure the ice chute is connected to a cold water pipe. Water from the dispenser is not cool enough (on some models) NOTE:...
... is not connected to a cold water pipe - Make sure the refrigerator is free of the refrigerator ■ Water line connections are available for the part number listed below or contact your refrigerator. See "Water Supply Requirements." To order an accessory, call 1-800-807-6777. In Canada, call 1-800-...442-9991 and ask for your authorized Amana dealer. Make sure the ice chute is connected to a cold water pipe. Water from the dispenser is not cool enough (on some models) NOTE:...
Use and Care
Page 20
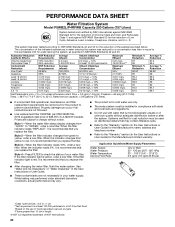
... "Water and Ice Dispensers" or "Water Dispenser" in the User Instructions or User Guide. ■ These contaminants are not followed. ■ Use replacement filter P4RFWB, part #W10295370A. 2013 suggested retail price of $39.99 U.S.A./$49.99 Canada. PERFORMANCE DATA SHEET Water Filtration System Model P5WB2L/P4RFWB Capacity 200 Gallons (757 Liters...
... "Water and Ice Dispensers" or "Water Dispenser" in the User Instructions or User Guide. ■ These contaminants are not followed. ■ Use replacement filter P4RFWB, part #W10295370A. 2013 suggested retail price of $39.99 U.S.A./$49.99 Canada. PERFORMANCE DATA SHEET Water Filtration System Model P5WB2L/P4RFWB Capacity 200 Gallons (757 Liters...

Use and Care
Page 21
...number on the label, located on how to use of products not approved by an authorized Amana servicer is reported to Amana within 30 days from the date of purchase. 6. Replacement parts or repair labor on the duration of implied warranties of dry-erase door surface caused by ... eXperience Center 553 Benson Road Benton Harbor, MI 49022-2692 Amana Brand Home Appliances Customer eXperience Centre 200 - 6750 Century Ave. Service calls to the appliance. 9. Consumable parts are not designated as dry-erase surfaces. 14. AMANA SHALL NOT BE LIABLE FOR INCIDENTAL OR CONSEQUENTIAL DAMAGES. Have ...
...number on the label, located on how to use of products not approved by an authorized Amana servicer is reported to Amana within 30 days from the date of purchase. 6. Replacement parts or repair labor on the duration of implied warranties of dry-erase door surface caused by ... eXperience Center 553 Benson Road Benton Harbor, MI 49022-2692 Amana Brand Home Appliances Customer eXperience Centre 200 - 6750 Century Ave. Service calls to the appliance. 9. Consumable parts are not designated as dry-erase surfaces. 14. AMANA SHALL NOT BE LIABLE FOR INCIDENTAL OR CONSEQUENTIAL DAMAGES. Have ...
Warranty
Page 1
... other damage to the finish of your major appliance, unless such damage results from defects in accordance with Amana's published installation instructions. 11. Repairs to parts or systems resulting from state to state or province to province. The removal and reinstallation of your model ...appliance is operated and maintained according to instructions attached to or furnished with the product, Amana brand of Whirlpool Corporation or Whirlpool Canada LP (hereafter "Amana") will pay for factory specified parts and repair labor to correct defects in the U.S.A., call 1-800-807-6777. ITEMS ...
... other damage to the finish of your major appliance, unless such damage results from defects in accordance with Amana's published installation instructions. 11. Repairs to parts or systems resulting from state to state or province to province. The removal and reinstallation of your model ...appliance is operated and maintained according to instructions attached to or furnished with the product, Amana brand of Whirlpool Corporation or Whirlpool Canada LP (hereafter "Amana") will pay for factory specified parts and repair labor to correct defects in the U.S.A., call 1-800-807-6777. ITEMS ...

Installation Instruction
Page 2
... your appliance. This symbol alerts you don't immediately follow the safety alert symbol and either the word "DANGER" or "WARNING." Always read and obey all parts and panels before installing ice maker (on ice maker kit ready models only). ■ Use a sturdy glass when dispensing ice (on some models). We have...
... your appliance. This symbol alerts you don't immediately follow the safety alert symbol and either the word "DANGER" or "WARNING." Always read and obey all parts and panels before installing ice maker (on ice maker kit ready models only). ■ Use a sturdy glass when dispensing ice (on some models). We have...

Installation Instruction
Page 4
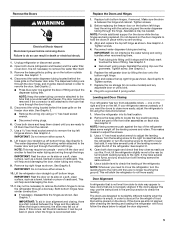
... some models), and any adjustable door or utility bins from doors. Wiring Plugs B. Wiring Clip C. Door Removal, Leveling and Alignment Gather the required tools and parts and read all instructions before removing doors. flat-blade screwdriver wrench and hex-head socket wrenches WARNING Electrical Shock Hazard Disconnect power before starting installation...
... some models), and any adjustable door or utility bins from doors. Wiring Plugs B. Wiring Clip C. Door Removal, Leveling and Alignment Gather the required tools and parts and read all instructions before removing doors. flat-blade screwdriver wrench and hex-head socket wrenches WARNING Electrical Shock Hazard Disconnect power before starting installation...
Installation Instruction
Page 5
... leveling screw to the right to raise that will allow the refrigerator to roll more to account for the doors while the top hinges are part of fitting and pull the dispenser tubing free. Open both bottom hinges, if removed. Unplug refrigerator or disconnect power. 2. NOTE: This may be slightly different...
... leveling screw to the right to raise that will allow the refrigerator to roll more to account for the doors while the top hinges are part of fitting and pull the dispenser tubing free. Open both bottom hinges, if removed. Unplug refrigerator or disconnect power. 2. NOTE: This may be slightly different...

Installation Instruction
Page 6
To lower the door, turn the screw. NOTE: Be sure to refasten the Tech Sheet behind the refrigerator. Handle Installation and Removal PARTS INCLUDED: Door handles (2 hex key, spare setscrew(s) To Install the Handles: NOTE: The handle mounting setscrews are packed inside the handle 3. The handle is flush ...
To lower the door, turn the screw. NOTE: Be sure to refasten the Tech Sheet behind the refrigerator. Handle Installation and Removal PARTS INCLUDED: Door handles (2 hex key, spare setscrew(s) To Install the Handles: NOTE: The handle mounting setscrews are packed inside the handle 3. The handle is flush ...

Installation Instruction
Page 7
... water pressure to the refrigerator is dispensed in the reverse osmosis system is required. Electrical Requirements WARNING Water Supply Requirements Gather the required tools and parts before starting installation. Do not remove ground prong. Failure to refill after heavy usage. ■ If your refrigerator be between 60°F (15°C) and...
... water pressure to the refrigerator is dispensed in the reverse osmosis system is required. Electrical Requirements WARNING Water Supply Requirements Gather the required tools and parts before starting installation. Do not remove ground prong. Failure to refill after heavy usage. ■ If your refrigerator be between 60°F (15°C) and...

Installation Instruction
Page 8
...of the tubing into outlet end squarely as far as it is under the pipe clamp. TOOLS NEEDED: Gather the required tools and parts before starting installation. ■ Flat-blade screwdriver and ¹⁄₂" open-end wrenches or two adjustable wrenches nut driver Connect... used to connect to the refrigerator, a minimum ¹⁄₂" size copper household supply line is used instead of copper, we recommend the following Whirlpool Part Numbers: W10505928RP (7 ft [2.14 m] jacketed PEX), 8212547RP (5 ft [1.52 m] PEX), or W10267701RP (25 ft [7.62 m] PEX). ■ Install tubing...
...of the tubing into outlet end squarely as far as it is under the pipe clamp. TOOLS NEEDED: Gather the required tools and parts before starting installation. ■ Flat-blade screwdriver and ¹⁄₂" open-end wrenches or two adjustable wrenches nut driver Connect... used to connect to the refrigerator, a minimum ¹⁄₂" size copper household supply line is used instead of copper, we recommend the following Whirlpool Part Numbers: W10505928RP (7 ft [2.14 m] jacketed PEX), 8212547RP (5 ft [1.52 m] PEX), or W10267701RP (25 ft [7.62 m] PEX). ■ Install tubing...


