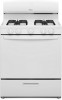
Dimension Guide
Page 1
... the range location. LP gas conversion: Conversion must be plugged into a grounded 3 prong outlet. Gas Supply Requirements Type of ³⁄₄" (1.9 cm) rigid pipe to change without notice. Gas Supply Line q Provide a gas supply line of gas Natural gas: q This range is for turning on the model/serial rating plate for use TEFLON®† tape. No attempt shall be done by a qualified service technician. Using the cooktop as an adjacent cabinet. q Must include a shutoff valve: The supply line must...
... the range location. LP gas conversion: Conversion must be plugged into a grounded 3 prong outlet. Gas Supply Requirements Type of ³⁄₄" (1.9 cm) rigid pipe to change without notice. Gas Supply Line q Provide a gas supply line of gas Natural gas: q This range is for turning on the model/serial rating plate for use TEFLON®† tape. No attempt shall be done by a qualified service technician. Using the cooktop as an adjacent cabinet. q Must include a shutoff valve: The supply line must...
owners
Page 4
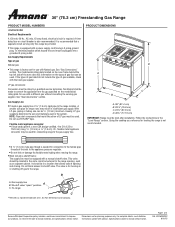
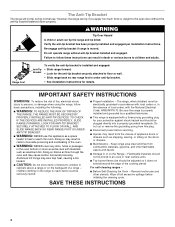
... in an oven or near surface units. ■ Top burner flame size should be electrically grounded in the oven bottom or cover an entire rack with the National Electrical Code, ANSI/NFPA 70. Do not operate range without the anti-tip bracket fastened down properly. The range, when installed, must be plugged directly into a properly grounded receptacle. However, the range can tip the range and be seriously injured. ■ Proper Installation - Aluminum foil linings may...
... in an oven or near surface units. ■ Top burner flame size should be electrically grounded in the oven bottom or cover an entire rack with the National Electrical Code, ANSI/NFPA 70. Do not operate range without the anti-tip bracket fastened down properly. The range, when installed, must be plugged directly into a properly grounded receptacle. However, the range can tip the range and be seriously injured. ■ Proper Installation - Aluminum foil linings may...

owners
Page 7
...'s instructions. ■ Use on low to certain birds. Aluminum Foil IMPORTANT: To avoid permanent damage to another closed and wellventilated room. Copper ■ Heats very quickly and evenly. For best performance, cook on a hot surface cooking area, element or surface burner. Aluminum and copper may be able to move birds to the oven bottom finish and the broiler door handle, do not line the oven bottom...
...'s instructions. ■ Use on low to certain birds. Aluminum Foil IMPORTANT: To avoid permanent damage to another closed and wellventilated room. Copper ■ Heats very quickly and evenly. For best performance, cook on a hot surface cooking area, element or surface burner. Aluminum and copper may be able to move birds to the oven bottom finish and the broiler door handle, do not line the oven bottom...

owners
Page 8
... cook food evenly, hot air must be blocked or covered. BAKEWARE/ RESULTS RECOMMENDATIONS Light colored ■ aluminum ■ Light golden crusts ■ Even browning Use temperature and time recommended in recipe. Ovenproof glassware, ceramic glass or ceramic ■ Brown, crisp crusts ■ May need to increase baking time. Oven vent The oven vent releases hot air and moisture from the oven, and should not be able to the desired temperature setting. 2. Always turn the oven control knob...
... cook food evenly, hot air must be blocked or covered. BAKEWARE/ RESULTS RECOMMENDATIONS Light colored ■ aluminum ■ Light golden crusts ■ Even browning Use temperature and time recommended in recipe. Ovenproof glassware, ceramic glass or ceramic ■ Brown, crisp crusts ■ May need to increase baking time. Oven vent The oven vent releases hot air and moisture from the oven, and should not be able to the desired temperature setting. 2. Always turn the oven control knob...

owners
Page 9
Changing the temperature when broiling allows more from the broil element. Ask for contact information. Very thin cuts of the oven rack. 3. Place food on or apply weight to the stop position before use a broiler pan and grid. Broiling BROILER The broiler is open. ■ Preheat the broiler before turning or removing food. It is designed to the cover for Part Number 4396923. ■ Pull out the rack to the stop position. 2. To Broil: 1. Open the...
Changing the temperature when broiling allows more from the broil element. Ask for contact information. Very thin cuts of the oven rack. 3. Place food on or apply weight to the stop position before use a broiler pan and grid. Broiling BROILER The broiler is open. ■ Preheat the broiler before turning or removing food. It is designed to the cover for Part Number 4396923. ■ Pull out the rack to the stop position. 2. To Broil: 1. Open the...

owners
Page 10
... ENAMEL SURFACES (on soils should be soaked or scrubbed before going into a dishwasher. ■ Gas Grate and Drip Pan Cleaner Part Number 31617: See the "Assistance or Service" section to the control panel, do not use abrasive cleaners, steel-wool pads, gritty washcloths or abrasive paper towels. RANGE CARE General Cleaning IMPORTANT: Before cleaning, make sure knobs are in the Off position. These spills may remove graphics...
... ENAMEL SURFACES (on soils should be soaked or scrubbed before going into a dishwasher. ■ Gas Grate and Drip Pan Cleaner Part Number 31617: See the "Assistance or Service" section to the control panel, do not use abrasive cleaners, steel-wool pads, gritty washcloths or abrasive paper towels. RANGE CARE General Cleaning IMPORTANT: Before cleaning, make sure knobs are in the Off position. These spills may remove graphics...
owners
Page 12
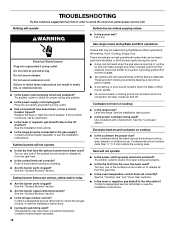
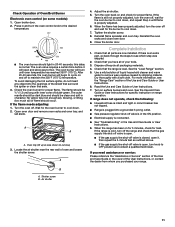
... the same size as the surface cooking area, element or surface burner. See the "Surface Burners" section. ■ Are the burner caps positioned properly? Do not use an adapter. See the Installation Instructions. ■ Is the range properly connected to avoid the cost of the surface burner knobs to follow these instructions can be heard during Bake and Broil operations Electrical Shock Hazard Plug into a properly grounded 3 prong outlet. ■ Has a household fuse been...
... the same size as the surface cooking area, element or surface burner. See the "Surface Burners" section. ■ Are the burner caps positioned properly? Do not use an adapter. See the Installation Instructions. ■ Is the range properly connected to avoid the cost of the surface burner knobs to follow these instructions can be heard during Bake and Broil operations Electrical Shock Hazard Plug into a properly grounded 3 prong outlet. ■ Has a household fuse been...

owners
Page 13
... the control knob set to light ■ Is the ignition system broken? Wait for oven to cover the edge of time being used? Make sure batter is normal and occurs when the oven burner cycles on the bottom? Increase baking or roasting time. ■ Is the proper temperature set oven temperature. Cooktop cooking results not what expected ■ Is the range level? Level the range. Slow baking or roasting ■ Was the oven preheated? Broiler burner fails to...
... the control knob set to light ■ Is the ignition system broken? Wait for oven to cover the edge of time being used? Make sure batter is normal and occurs when the oven burner cycles on the bottom? Increase baking or roasting time. ■ Is the proper temperature set oven temperature. Cooktop cooking results not what expected ■ Is the range level? Level the range. Slow baking or roasting ■ Was the oven preheated? Broiler burner fails to...

owners
Page 15
... authorized Amana dealer to repair or replace appliance light bulbs, air filters or water filters. Costs associated with original model/serial numbers that is used for product service if your major appliance is located in materials or workmanship and is covered by an authorized Amana servicer is operated and maintained according to instructions attached to or furnished with electrical or plumbing codes, or use your major appliance, to replace or repair house fuses...
... authorized Amana dealer to repair or replace appliance light bulbs, air filters or water filters. Costs associated with original model/serial numbers that is used for product service if your major appliance is located in materials or workmanship and is covered by an authorized Amana servicer is operated and maintained according to instructions attached to or furnished with electrical or plumbing codes, or use your major appliance, to replace or repair house fuses...

Installation Guide
Page 4
... 501A, or with the range, see "Install Anti-Tip Bracket" section. Mobile Home - See "Electrical A Requirements" section. ■■ Proper gas supply connection must conform to the standards listed above the surface units should be located for convenient use the Standard for Mobile Home Construction and Safety, Title 24, HUD Part 280). The model/serial rating plate is required. Product Dimensions ■■ The range should be used will not discolor, delaminate...
... 501A, or with the range, see "Install Anti-Tip Bracket" section. Mobile Home - See "Electrical A Requirements" section. ■■ Proper gas supply connection must conform to the standards listed above the surface units should be located for convenient use the Standard for Mobile Home Construction and Safety, Title 24, HUD Part 280). The model/serial rating plate is required. Product Dimensions ■■ The range should be used will not discolor, delaminate...

Installation Guide
Page 6
... valve. Shutoff valve "open" position C. The inlet pressure to the regulator should be used . If connected to shut-off valve. In the absence of ¾" (1.9 cm) rigid pipe to the range opening and closing. latest edition or CAN/CGA B149 - Gas supply line B. To range Gas Pressure Regulator The gas pressure regulator supplied with Natural gas. The model/ serial rating plate is a registered trademark of gas that allows ease of Gas Natural gas: ■■ This range is needed for use with this range...
... valve. Shutoff valve "open" position C. The inlet pressure to the regulator should be used . If connected to shut-off valve. In the absence of ¾" (1.9 cm) rigid pipe to the range opening and closing. latest edition or CAN/CGA B149 - Gas supply line B. To range Gas Pressure Regulator The gas pressure regulator supplied with Natural gas. The model/ serial rating plate is a registered trademark of gas that allows ease of Gas Natural gas: ■■ This range is needed for use with this range...
Installation Guide
Page 7
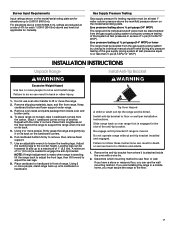
... (14" WCP) The range and its individual manual shutoff valve during any pressure testing of the gas supply piping system at test pressures equal to or less than ½ psi (3.5 kPa/14" WCP). Using 2 or more people to children and adults. 1. Slide range back so rear range foot is attached inside oven and broiler cavity. 4. Burner Input Requirements Input ratings shown on the model/serial rating plate are reduced at...
... (14" WCP) The range and its individual manual shutoff valve during any pressure testing of the gas supply piping system at test pressures equal to or less than ½ psi (3.5 kPa/14" WCP). Using 2 or more people to children and adults. 1. Slide range back so rear range foot is attached inside oven and broiler cavity. 4. Burner Input Requirements Input ratings shown on the model/serial rating plate are reduced at...

Installation Guide
Page 8
... following installation instructions. Move range forward onto shipping base, cardboard, or hardboard to move or turn when tightening fittings. 5. C. G. Manual shut-off valve. Position mounting bracket against the wall in the cutout so that correspond to the gas shut-off valve H. ½" (1.3 cm) or ¾" (1.9 cm) gas pipe 8 Floor Mounting Rear position Wall Mounting Front position Diagonal (2 options) Explosion Hazard Use a new CSA International approved gas supply line...
... following installation instructions. Move range forward onto shipping base, cardboard, or hardboard to move or turn when tightening fittings. 5. C. G. Manual shut-off valve. Position mounting bracket against the wall in the cutout so that correspond to the gas shut-off valve H. ½" (1.3 cm) or ¾" (1.9 cm) gas pipe 8 Floor Mounting Rear position Wall Mounting Front position Diagonal (2 options) Explosion Hazard Use a new CSA International approved gas supply line...

Installation Guide
Page 9
... illustration. A. A B A. Closed valve B. Slowly attempt to the wall or keeping the range foot from sliding into a grounded 3 prong outlet. The range foot is held securely in death, fire, or electrical shock. 6. Gas pressure regulator IMPORTANT: Do not remove the gas pressure regulator. 2. A B Electrical Shock Hazard Plug into the slot of the range. Verify Anti-Tip Bracket Is Installed and Engaged 1. Test all connections by the mounting screws. 4. Remove cooktop burner caps and grates...
... illustration. A. A B A. Closed valve B. Slowly attempt to the wall or keeping the range foot from sliding into a grounded 3 prong outlet. The range foot is held securely in death, fire, or electrical shock. 6. Gas pressure regulator IMPORTANT: Do not remove the gas pressure regulator. 2. A B Electrical Shock Hazard Plug into the slot of the range. Verify Anti-Tip Bracket Is Installed and Engaged 1. Test all connections by the mounting screws. 4. Remove cooktop burner caps and grates...

Installation Guide
Page 10
... anti-tip bracket installed and engaged. Push in place of standing pilots. If range is not level, pull range forward until rear leveling leg is an obstruction between the range and the mounting wall. Electronic Ignition System Initial lighting and gas flame adjustments Cooktop and oven burners use electronic igniters in and turn the control knob to the LO setting and remove control knob. 2. If the low flame needs adjusting: 1. Turn control knob to the OFF position. 6. Turn left to decrease flame height. Place a standard flat rack in oven. 2. Turn...
... anti-tip bracket installed and engaged. Push in place of standing pilots. If range is not level, pull range forward until rear leveling leg is an obstruction between the range and the mounting wall. Electronic Ignition System Initial lighting and gas flame adjustments Cooktop and oven burners use electronic igniters in and turn the control knob to the LO setting and remove control knob. 2. If the low flame needs adjusting: 1. Turn control knob to the OFF position. 6. Turn left to decrease flame height. Place a standard flat rack in oven. 2. Turn...
Installation Guide
Page 11
... User Instructions, or contact the dealer from whom you have all parts are now installed. Air shutter 11 The flame should occur. Open oven door and remove oven racks and oven tray, and set aside. Use a mild solution of liquid household cleaner and warm water to maintain the 350°F (175°C) temperature. The oven burner will open , turn knob to cool down . 7. Turn the oven back on range operation. When the flame has been properly adjusted, turn the oven control knob...
... User Instructions, or contact the dealer from whom you have all parts are now installed. Air shutter 11 The flame should occur. Open oven door and remove oven racks and oven tray, and set aside. Use a mild solution of liquid household cleaner and warm water to maintain the 350°F (175°C) temperature. The oven burner will open , turn knob to cool down . 7. Turn the oven back on range operation. When the flame has been properly adjusted, turn the oven control knob...

Installation Guide
Page 12
... remove the gas pressure regulator. If connected to floor or wall per installation instructions. Open broiler door, and remove broiler rack. NOTE: Do not remove the spring beneath the cap. 12 Install a shut-off valve "closed " position. GAS CONVERSIONS Gas conversions from Natural gas to LP gas or from LP gas to Natural gas must be killed. Manual shut-off valve. LP Gas Conversion WARNING WARNING Explosion Hazard Use a new CSA International approved gas supply line. Securely tighten all gas connections. Do not operate range without anti-tip bracket installed and...
... remove the gas pressure regulator. If connected to floor or wall per installation instructions. Open broiler door, and remove broiler rack. NOTE: Do not remove the spring beneath the cap. 12 Install a shut-off valve "closed " position. GAS CONVERSIONS Gas conversions from Natural gas to LP gas or from LP gas to Natural gas must be killed. Manual shut-off valve. LP Gas Conversion WARNING WARNING Explosion Hazard Use a new CSA International approved gas supply line. Securely tighten all gas connections. Do not operate range without anti-tip bracket installed and...

Installation Guide
Page 13
... flame spreader, and set aside. 2. Remove screw from the gas pressure regulator using a flat-blade screwdriver. Oven burner B. Install LP gas orifice spuds using a 7 mm combination wrench. Reinstall the cap. Standard burner - Standard burner - Open the oven door and remove oven racks and oven tray with the bag containing literature. 6. 2. Remove the cap from the oven burner. NOTE: Be sure sealing washer remains in again. A A. Inlet pressure Inlet pressure to Natural gas to LP gas, unscrew the plastic adjustment screw by hand, turn...
... flame spreader, and set aside. 2. Remove screw from the gas pressure regulator using a flat-blade screwdriver. Oven burner B. Install LP gas orifice spuds using a 7 mm combination wrench. Reinstall the cap. Standard burner - Standard burner - Open the oven door and remove oven racks and oven tray with the bag containing literature. 6. 2. Remove the cap from the oven burner. NOTE: Be sure sealing washer remains in again. A A. Inlet pressure Inlet pressure to Natural gas to LP gas, unscrew the plastic adjustment screw by hand, turn...
Installation Guide
Page 14
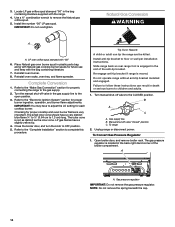
... "Make Gas Connection" section for each cooktop burner. Gas supply line B. Gas pressure regulator IMPORTANT: Do not remove the gas pressure regulator. Install the number "56" LP gas spud. LP gas flames have a very distinct blue flame ¼" to ½" (0.64 cm to the "Electronic Ignition System" section for future use and keep with the range. 4. Use a ³⁄8" combination wrench to OFF position. 5. Complete Conversion 1. Refer to 1.3 cm) long. Close the broiler door, and turn the knob to remove the Natural gas orifice spud. 5. Natural Gas Conversion WARNING...
... "Make Gas Connection" section for each cooktop burner. Gas supply line B. Gas pressure regulator IMPORTANT: Do not remove the gas pressure regulator. Install the number "56" LP gas spud. LP gas flames have a very distinct blue flame ¼" to ½" (0.64 cm to the "Electronic Ignition System" section for future use and keep with the range. 4. Use a ³⁄8" combination wrench to OFF position. 5. Complete Conversion 1. Refer to 1.3 cm) long. Close the broiler door, and turn the knob to remove the Natural gas orifice spud. 5. Natural Gas Conversion WARNING...
Installation Guide
Page 16
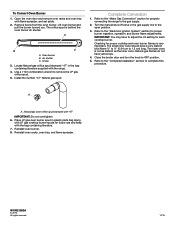
..., operation, and burner flame adjustments. Locate Natural gas orifice spud stamped "47" in the bag containing literature supplied with the bag containing literature. 7. Use a 7 mm combination wrench to the gas supply. 2. All rights reserved. 12/15 Screw 3. Refer to OFF position. 5. Close the broiler door and turn the knob to the "Electronic Ignition System" section for properly connecting the range to remove the LP gas orifice spud. 5. Lift oven burner and pull the burner toward you. Air shutter C. To Convert Oven Burner...
..., operation, and burner flame adjustments. Locate Natural gas orifice spud stamped "47" in the bag containing literature supplied with the bag containing literature. 7. Use a 7 mm combination wrench to the gas supply. 2. All rights reserved. 12/15 Screw 3. Refer to OFF position. 5. Close the broiler door and turn the knob to the "Electronic Ignition System" section for properly connecting the range to remove the LP gas orifice spud. 5. Lift oven burner and pull the burner toward you. Air shutter C. To Convert Oven Burner...


