Specifications Sheet
Page 4
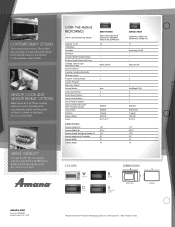
... OPTIONS Make sense of Maytag Corporation or its related companies. ©2009. High/Low/Off . . . 3 . . Metal finish handles match up brilliantly on the stainless steel models. LARGE CAPACITY It's a perfect fit. The microwave interior easily holds and effectively heats your favorite recipe, even if it all. Extra-Large On/Off . . . OVER... 220 CFM W / B / S 171⁄4" 2915 ⁄16" 157⁄16" 91⁄2" 21" 14" Colors W White D Silver B Black S Stainless Steel DIMENSIONS FRONT VIEW SIDE VIEW amana.com Form No.
... OPTIONS Make sense of Maytag Corporation or its related companies. ©2009. High/Low/Off . . . 3 . . Metal finish handles match up brilliantly on the stainless steel models. LARGE CAPACITY It's a perfect fit. The microwave interior easily holds and effectively heats your favorite recipe, even if it all. Extra-Large On/Off . . . OVER... 220 CFM W / B / S 171⁄4" 2915 ⁄16" 157⁄16" 91⁄2" 21" 14" Colors W White D Silver B Black S Stainless Steel DIMENSIONS FRONT VIEW SIDE VIEW amana.com Form No.
Use and Care
Page 5
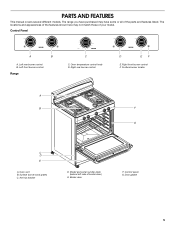
... serial number plate (behind left side of your model. The locations and appearances of the features shown here may have purchased may not match those of broiler door) E. Door gasket 5 Left front burner control ... 140 170 200 BROIL 250 550 300 500 350 400 450 C C. Surface burners and grates C. Control panel G. PARTS AND FEATURES This manual covers several different models. Left rear burner control B. Anti-tip bracket D. Right rear burner control D EF E. Right front burner control F. Oven vent B. Broiler door F. The range you have some...
... serial number plate (behind left side of your model. The locations and appearances of the features shown here may have purchased may not match those of broiler door) E. Door gasket 5 Left front burner control ... 140 170 200 BROIL 250 550 300 500 350 400 450 C C. Surface burners and grates C. Control panel G. PARTS AND FEATURES This manual covers several different models. Left rear burner control B. Anti-tip bracket D. Right rear burner control D EF E. Right front burner control F. Oven vent B. Broiler door F. The range you have some...
Use and Care
Page 8
... chart as a guide. Always move a rack, pull it is directly over another closed and wellventilated room. Allow 2" (5 cm) of foil or liner. ■ On those models with any type of space around bakeware and oven walls. Blocking or covering the oven vent will be blocked or covered. Make sure that could...
... chart as a guide. Always move a rack, pull it is directly over another closed and wellventilated room. Allow 2" (5 cm) of foil or liner. ■ On those models with any type of space around bakeware and oven walls. Blocking or covering the oven vent will be blocked or covered. Make sure that could...
Use and Care
Page 10
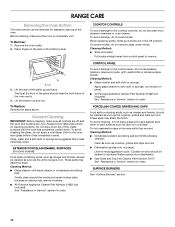
...the front of the oven cavity. 4. Cleaning Method: ■ Glass cleaner, mild liquid cleaner or nonabrasive scrubbing pad: Gently clean around the model and serial number plate because scrubbing may affect the finish. Cleaning Method: ■ Nonabrasive plastic scrubbing pad and mildly abrasive cleanser: Clean as... section to order. Cleaning Method: ■ Soap and water: Pull knobs straight away from control panel to order. Cooked-on some models, do not soak knobs. General Cleaning IMPORTANT: Before cleaning, make sure all controls are off and the oven and cooktop are wet. On...
...the front of the oven cavity. 4. Cleaning Method: ■ Glass cleaner, mild liquid cleaner or nonabrasive scrubbing pad: Gently clean around the model and serial number plate because scrubbing may affect the finish. Cleaning Method: ■ Nonabrasive plastic scrubbing pad and mildly abrasive cleanser: Clean as... section to order. Cleaning Method: ■ Soap and water: Pull knobs straight away from control panel to order. Cooked-on some models, do not soak knobs. General Cleaning IMPORTANT: Before cleaning, make sure all controls are off and the oven and cooktop are wet. On...
Use and Care
Page 11
... is removed from the range. 2. OVEN RACKS AND ROASTING RACKS Cleaning Method: ■ Steel-wool pad BROILER PAN AND GRID (on the range. On some models) Cleaning Method: Wash in warm soapy water. (It is horizontal. However, if removal is necessary, make sure the oven is replaced on some... models, the oven door can result. Tilt top of each door slot is not recommended to wash the chrome grid in a dishwasher.) A mild abrasive cleaner and a ...
... is removed from the range. 2. OVEN RACKS AND ROASTING RACKS Cleaning Method: ■ Steel-wool pad BROILER PAN AND GRID (on the range. On some models) Cleaning Method: Wash in warm soapy water. (It is horizontal. However, if removal is necessary, make sure the oven is replaced on some... models, the oven door can result. Tilt top of each door slot is not recommended to wash the chrome grid in a dishwasher.) A mild abrasive cleaner and a ...
Use and Care
Page 12
... be heard during the cycle. ■ A pop can result in use ■ This is heard when the Bake or Broil burner ignites. ■ On some models, a clicking sound can be heard when the gas valve is detected. Do not use an extension cord. If the problem continues, call . See Installation Instructions...
... be heard during the cycle. ■ A pop can result in use ■ This is heard when the Bake or Broil burner ignites. ■ On some models, a clicking sound can be heard when the gas valve is detected. Do not use an extension cord. If the problem continues, call . See Installation Instructions...
Use and Care
Page 13
... door been opened while cooking? Call the Customer eXperience Center toll free: 1-800-253-1301. When calling, please know the purchase date and the complete model and serial number of time being used to preheat before placing food in Canada. To locate factory-authorized replacement parts in your appliance. In the...
... door been opened while cooking? Call the Customer eXperience Center toll free: 1-800-253-1301. When calling, please know the purchase date and the complete model and serial number of time being used to preheat before placing food in Canada. To locate factory-authorized replacement parts in your appliance. In the...

Use and Care
Page 14
...not apply. Write down the following information about your major appliance for in materials or workmanship. Dealer name Address Phone number Model number Serial number Purchase date This limited warranty is valid only in the United States or Canada and applies only when the...SO THESE EXCLUSIONS OR LIMITATIONS MAY NOT APPLY TO YOU. You will pay for other damage to the finish of your complete model number and serial number. Expenses for travel and transportation for future reference. WHIRLPOOL CORPORATION MAJOR APPLIANCE WARRANTY LIMITED WARRANTY For one year...
...not apply. Write down the following information about your major appliance for in materials or workmanship. Dealer name Address Phone number Model number Serial number Purchase date This limited warranty is valid only in the United States or Canada and applies only when the...SO THESE EXCLUSIONS OR LIMITATIONS MAY NOT APPLY TO YOU. You will pay for other damage to the finish of your complete model number and serial number. Expenses for travel and transportation for future reference. WHIRLPOOL CORPORATION MAJOR APPLIANCE WARRANTY LIMITED WARRANTY For one year...
Warranty
Page 1
... with published installation instructions. 11. WHIRLPOOL SHALL NOT BE LIABLE FOR INCIDENTAL OR CONSEQUENTIAL DAMAGES. Dealer name Address Phone number Model number Serial number Purchase date WHIRLPOOL CORPORATION MAJOR APPLIANCE WARRANTY LIMITED WARRANTY For one year from the date of purchase, when ... major appliance if it was purchased. Damage resulting from your home of your major appliance is located in accordance with original model/serial numbers that is covered by the customer. You can find additional help you obtain assistance or service if you on...
... with published installation instructions. 11. WHIRLPOOL SHALL NOT BE LIABLE FOR INCIDENTAL OR CONSEQUENTIAL DAMAGES. Dealer name Address Phone number Model number Serial number Purchase date WHIRLPOOL CORPORATION MAJOR APPLIANCE WARRANTY LIMITED WARRANTY For one year from the date of purchase, when ... major appliance if it was purchased. Damage resulting from your home of your major appliance is located in accordance with original model/serial numbers that is covered by the customer. You can find additional help you obtain assistance or service if you on...
Dimension Guide
Page 1
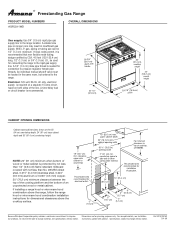
... can be located in insufficient gas supply. For complete details, see NOTE. clearance upper side cabinet to the range location. ® Freestanding Gas Range PRODUCT MODEL NUMBERS AGR3311WD OVERALL DIMENSIONS Gas supply: Use 3/4" (1.9 cm) rigid pipe gas supply line to countertop This shaded area recommended for electrical outlet. 3" (7.6 cm) 13" (33...
... can be located in insufficient gas supply. For complete details, see NOTE. clearance upper side cabinet to the range location. ® Freestanding Gas Range PRODUCT MODEL NUMBERS AGR3311WD OVERALL DIMENSIONS Gas supply: Use 3/4" (1.9 cm) rigid pipe gas supply line to countertop This shaded area recommended for electrical outlet. 3" (7.6 cm) 13" (33...
Installation Instruction
Page 3
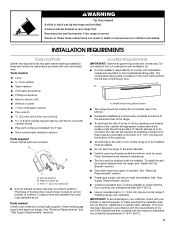
...or fire by installing a range hood that projects horizontally a minimum of 5" (12.7 cm) beyond the bottom of the broiler door. Model/serial rating plate location ■ The range should be used will not discolor, delaminate or sustain other damage. To install the antitip ...; Grounded electrical supply is the installer's responsibility to subfloor. Reconnect the anti-tip bracket, if the range is located on the model/serial rating plate. Failure to follow the instructions provided with the maximum allowable wood cabinet temperatures of flooring may require longer screws to...
...or fire by installing a range hood that projects horizontally a minimum of 5" (12.7 cm) beyond the bottom of the broiler door. Model/serial rating plate location ■ The range should be used will not discolor, delaminate or sustain other damage. To install the antitip ...; Grounded electrical supply is the installer's responsibility to subfloor. Reconnect the anti-tip bracket, if the range is located on the model/serial rating plate. Failure to follow the instructions provided with the maximum allowable wood cabinet temperatures of flooring may require longer screws to...
Installation Instruction
Page 5
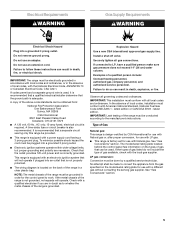
... shall be grounded in order for use with a qualified electrician if you are necessary. Install a shut-off valve. The model/serial rating plate located behind the control panel has information on the model/serial rating plate for the control panel to work. Check with a different gas without consulting the serving gas supplier...
... shall be grounded in order for use with a qualified electrician if you are necessary. Install a shut-off valve. The model/serial rating plate located behind the control panel has information on the model/serial rating plate for the control panel to work. Check with a different gas without consulting the serving gas supplier...
Installation Instruction
Page 6
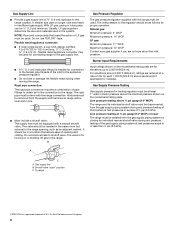
.... Rigid pipe connection: The rigid pipe connection requires a combination of E.I .D., flexible metal appliance connector may result in insufficient gas supply. A smaller size pipe on the model/serial rating plate. Du Pont De Nemours and Company. 6 The inlet pressure to the regulator should be used in the system. Gas Supply Line ■... from the gas supply piping system by closing . Line pressure testing at least 1" water column pressure above sea level (not applicable for turning on the model/serial rating plate are not sure about the inlet pressure.
.... Rigid pipe connection: The rigid pipe connection requires a combination of E.I .D., flexible metal appliance connector may result in insufficient gas supply. A smaller size pipe on the model/serial rating plate. Du Pont De Nemours and Company. 6 The inlet pressure to the regulator should be used in the system. Gas Supply Line ■... from the gas supply piping system by closing . Line pressure testing at least 1" water column pressure above sea level (not applicable for turning on the model/serial rating plate are not sure about the inlet pressure.

Installation Instruction
Page 13
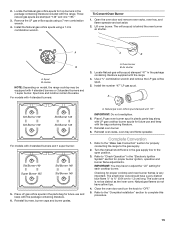
...overtighten. Reinstall oven burner. 8. Three LP gas spuds are stamped "88" and one "96." 3. Reinstall burners, burner caps and burner grates. For models with 4 standard burners or 3 standard burners and 1 super burner. Oven burner B. Use a ³⁄₈" combination wrench and remove the Natural gas...88 Super burner 96 Std burner 88 Std burner 88 A. Remove Natural gas orifice spuds using a 7 mm combination wrench. 5. A B For models with "56" 6. Lift oven burner. Install the number "56" LP gas spud. Reinstall oven racks, oven tray and flame spreader. 13 ...
...overtighten. Reinstall oven burner. 8. Three LP gas spuds are stamped "88" and one "96." 3. Reinstall burners, burner caps and burner grates. For models with 4 standard burners or 3 standard burners and 1 super burner. Oven burner B. Use a ³⁄₈" combination wrench and remove the Natural gas...88 Super burner 96 Std burner 88 Std burner 88 A. Remove Natural gas orifice spuds using a 7 mm combination wrench. 5. A B For models with "56" 6. Lift oven burner. Install the number "56" LP gas spud. Reinstall oven racks, oven tray and flame spreader. 13 ...
Installation Instruction
Page 15
...the oven door and remove oven racks, oven tray, and flame spreader and set aside. 2. Lift oven burner. Spud B. Holder NOTE: Depending on model, the range cooktop may have yellow tips. 4. Use a ³⁄₈" combination wrench and remove the LP gas orifice spud. 5. Reinstall burners... 1 super burner: Std Burner 149 Super Burner 165 Std Burner 149 Std Burner 149 5. The outer cone is behind the oven burner air shutter. For models with "47" IMPORTANT: Do not overtighten. 6. Complete Conversion 1. To Convert Oven Burner 1. A A B B A. A Std Burner 149 Std Burner 149 ...
...the oven door and remove oven racks, oven tray, and flame spreader and set aside. 2. Lift oven burner. Spud B. Holder NOTE: Depending on model, the range cooktop may have yellow tips. 4. Use a ³⁄₈" combination wrench and remove the LP gas orifice spud. 5. Reinstall burners... 1 super burner: Std Burner 149 Super Burner 165 Std Burner 149 Std Burner 149 5. The outer cone is behind the oven burner air shutter. For models with "47" IMPORTANT: Do not overtighten. 6. Complete Conversion 1. To Convert Oven Burner 1. A A B B A. A Std Burner 149 Std Burner 149 ...
