Use and Care
Page 3
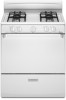
...YOU SMELL GAS: • Do not try to cause cancer. For more information, contact your appliance. WARNING: If the information in this manual and on your gas supplier. State of California Proposition 65 Warnings: WARNING: This product contains a chemical known to the State of California ... property damage, personal injury or death. - We have provided many important safety messages in this or any phone in the vicinity of this manual is detected, follow instructions. Follow the gas supplier's instructions. • If you don't follow the "What to potential hazards that you ...
...YOU SMELL GAS: • Do not try to cause cancer. For more information, contact your appliance. WARNING: If the information in this manual and on your gas supplier. State of California Proposition 65 Warnings: WARNING: This product contains a chemical known to the State of California ... property damage, personal injury or death. - We have provided many important safety messages in this or any phone in the vicinity of this manual is detected, follow instructions. Follow the gas supplier's instructions. • If you don't follow the "What to potential hazards that you ...
Use and Care
Page 5
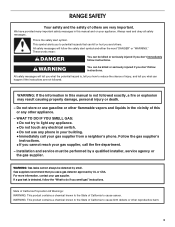
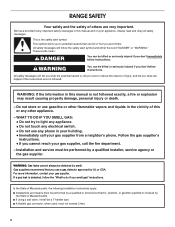
... may have some or all of broiler door) E. Oven temperature control knob D. Right rear burner control D EF E. Oven vent B. Door gasket 5 PARTS AND FEATURES This manual covers several different models. Broiler door F. Left front burner control Range 140 170 200 BROIL 250 550 300 500 350 400 450 C C. Control panel G. Right...
... may have some or all of broiler door) E. Oven temperature control knob D. Right rear burner control D EF E. Oven vent B. Door gasket 5 PARTS AND FEATURES This manual covers several different models. Broiler door F. Left front burner control Range 140 170 200 BROIL 250 550 300 500 350 400 450 C C. Control panel G. Right...
Use and Care
Page 6
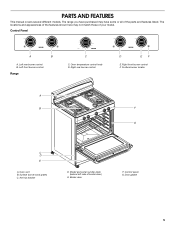
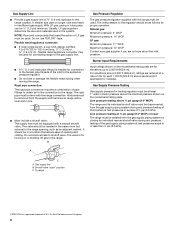
.... ■ Stew or steam foods. LO ■ Keep food warm. ■ Simmer. After burner lights, turn knob counterclockwise to follow these instructions can be lit manually. Burner cap: Always keep the burner cap in color, not yellow. Keep spillovers out of the pan. Burner ports Burner ports: Check burner flames occasionally...
.... ■ Stew or steam foods. LO ■ Keep food warm. ■ Simmer. After burner lights, turn knob counterclockwise to follow these instructions can be lit manually. Burner cap: Always keep the burner cap in color, not yellow. Keep spillovers out of the pan. Burner ports Burner ports: Check burner flames occasionally...
Dimension Guide
Page 1
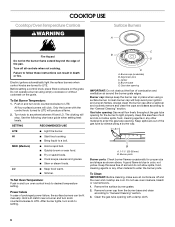
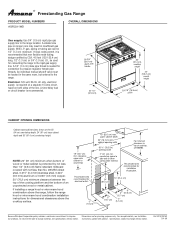
... required on a separate 15-amp circuit, fused on longer runs may result in the same room, but external to the range location. With L.P. An individual manual shutoff valve must be 1/2" (1.3 cm) minimum. NOTE: 24" (61 cm) minimum when bottom of the line. cabinet opening width 30-¹ ₈" (76.5 cm) opening...
... required on a separate 15-amp circuit, fused on longer runs may result in the same room, but external to the range location. With L.P. An individual manual shutoff valve must be 1/2" (1.3 cm) minimum. NOTE: 24" (61 cm) minimum when bottom of the line. cabinet opening width 30-¹ ₈" (76.5 cm) opening...
Installation Instruction
Page 2
... or explosion may result causing property damage, personal injury or death. - Do not store or use gasoline or other flammable vapors and liquids in this manual is , tell you how to do if you what can be performed by smell. Installation and service must be killed or seriously injured if you... symbol. WARNING You can kill or hurt you cannot reach your gas supplier, call your appliance. WARNING: If the information in the vicinity of this manual and on your gas supplier from a neighbor's phone. WHAT TO DO IF YOU SMELL GAS: • Do not try to potential hazards that you to...
... or explosion may result causing property damage, personal injury or death. - Do not store or use gasoline or other flammable vapors and liquids in this manual is , tell you how to do if you what can be performed by smell. Installation and service must be killed or seriously injured if you... symbol. WARNING You can kill or hurt you cannot reach your gas supplier, call your appliance. WARNING: If the information in the vicinity of this manual and on your gas supplier from a neighbor's phone. WHAT TO DO IF YOU SMELL GAS: • Do not try to potential hazards that you to...
Installation Instruction
Page 6
... may be equipped with the range connection. Line pressure testing at ½ psi gauge (14" WCP) or lower The range must be level with a manual shutoff valve. To range †®TEFLON is needed for proper operation: Natural gas: Minimum pressure: 5" WCP Maximum pressure: 14" WCP LP gas: ....6 m), ratings are not sure about the inlet pressure. All strains must be removed from the gas supply piping system by closing its individual manual shutoff valve during any pressure testing of that resist the action of pipe fittings to obtain an in the same room but external to the...
... may be equipped with the range connection. Line pressure testing at ½ psi gauge (14" WCP) or lower The range must be level with a manual shutoff valve. To range †®TEFLON is needed for proper operation: Natural gas: Minimum pressure: 5" WCP Maximum pressure: 14" WCP LP gas: ....6 m), ratings are not sure about the inlet pressure. All strains must be removed from the gas supply piping system by closing its individual manual shutoff valve during any pressure testing of that resist the action of pipe fittings to obtain an in the same room but external to the...
Installation Instruction
Page 8
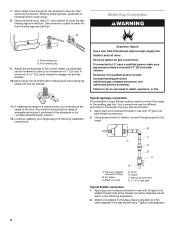
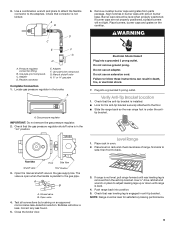
... in a mobile home, you must be different, according to LP, have a qualified person make sure gas pressure does not exceed 14" (36 cm) water column. Manual shutoff valve G. ½" or ¾" gas pipe Typical flexible connection 1. Securely tighten all pipe thread connections. 2. Any method of the flexible connector adapters (see B and...
... in a mobile home, you must be different, according to LP, have a qualified person make sure gas pressure does not exceed 14" (36 cm) water column. Manual shutoff valve G. ½" or ¾" gas pipe Typical flexible connection 1. Securely tighten all pipe thread connections. 2. Any method of the flexible connector adapters (see B and...
Installation Instruction
Page 9
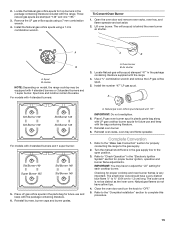
.... Do not use an adapter. Check that connector is level. 4. Place level on an approved noncorrosive leak-detection solution. Open the manual shutoff valve in burner base. Test all connections by brushing on rack and check levelness of range, first side to the adapters. Adapter... surface burners will show a leak. Do not use an extension cord. Verify Anti-Tip Bracket Location 1. Closed valve B. Correct any leak found. 5. Manual shutoff valve H. ½" or ¾" gas pipe Complete Connection 1. Check that rear leveling leg is in death, fire, or electrical shock. 7. ...
.... Do not use an adapter. Check that connector is level. 4. Place level on an approved noncorrosive leak-detection solution. Open the manual shutoff valve in burner base. Test all connections by brushing on rack and check levelness of range, first side to the adapters. Adapter... surface burners will show a leak. Do not use an extension cord. Verify Anti-Tip Bracket Location 1. Closed valve B. Correct any leak found. 5. Manual shutoff valve H. ½" or ¾" gas pipe Complete Connection 1. Check that rear leveling leg is in death, fire, or electrical shock. 7. ...
Installation Instruction
Page 12
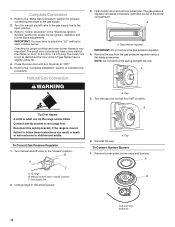
...Securely tighten all gas connections. Failure to do so can result in death or serious burns to children and adults. A A. Cap 5. Manual shutoff valve "closed " position. A. Explosion Hazard Use a new CSA International approved gas supply line. Turn the cap over so the ...be done by a qualified installer. Reconnect the anti-tip bracket, if the range is visible. Failure to the "closed " position C. Turn manual shutoff valve to follow these instructions can result in the back right hand corner of a qualified person include: licensed heating personnel, authorized gas ...
...Securely tighten all gas connections. Failure to do so can result in death or serious burns to children and adults. A A. Cap 5. Manual shutoff valve "closed " position. A. Explosion Hazard Use a new CSA International approved gas supply line. Turn the cap over so the ...be done by a qualified installer. Reconnect the anti-tip bracket, if the range is visible. Failure to the "closed " position C. Turn manual shutoff valve to follow these instructions can result in the back right hand corner of a qualified person include: licensed heating personnel, authorized gas ...
Installation Instruction
Page 14
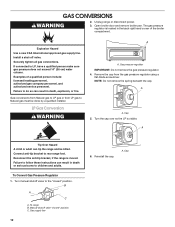
... Natural Gas Conversion WARNING 3. A A. Reconnect the anti-tip bracket, if the range is very important. To Convert Gas Pressure Regulator 1. Turn manual shutoff valve to the open position. 3. Unplug range or disconnect power. A B A. Close the oven door and turn the knob to rear... not remove the spring beneath the cap. Failure to "Check Operation" in the back right hand corner of the broiler compartment. Manual shutoff valve "closed " position. A. The gas pressure regulator is located in the "Electronic Ignition System" section for each cooktop burner...
... Natural Gas Conversion WARNING 3. A A. Reconnect the anti-tip bracket, if the range is very important. To Convert Gas Pressure Regulator 1. Turn manual shutoff valve to the open position. 3. Unplug range or disconnect power. A B A. Close the oven door and turn the knob to rear... not remove the spring beneath the cap. Failure to "Check Operation" in the back right hand corner of the broiler compartment. Manual shutoff valve "closed " position. A. The gas pressure regulator is located in the "Electronic Ignition System" section for each cooktop burner...
Installation Instruction
Page 15
... LP gas orifice spuds using a 7 mm combination wrench. Install the Natural gas orifice spuds using a 7 mm combination wrench. 4. Air shutter 3. Reinstall oven burner. 8. Turn the manual shutoff valve in the "Electronic Ignition System" section for future use and keep with the package containing literature. 6. The small inner cone should have yellow...
... LP gas orifice spuds using a 7 mm combination wrench. Install the Natural gas orifice spuds using a 7 mm combination wrench. 4. Air shutter 3. Reinstall oven burner. 8. Turn the manual shutoff valve in the "Electronic Ignition System" section for future use and keep with the package containing literature. 6. The small inner cone should have yellow...
