Use and Care
Page 2
... tell you don't immediately follow the safety alert symbol and either the word "DANGER" or "WARNING." We have provided many important safety messages in this manual and on your appliance. Always read and obey all safety messages.
... tell you don't immediately follow the safety alert symbol and either the word "DANGER" or "WARNING." We have provided many important safety messages in this manual and on your appliance. Always read and obey all safety messages.

Use and Care
Page 3
WARNING: If the information in this or any phone in the vicinity of this manual is detected, follow the "What to cause cancer. Follow the gas supplier's instructions. • If you cannot reach your gas supplier, call your gas supplier. ...
WARNING: If the information in this or any phone in the vicinity of this manual is detected, follow the "What to cause cancer. Follow the gas supplier's instructions. • If you cannot reach your gas supplier, call your gas supplier. ...
Use and Care
Page 5
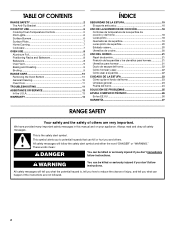
..., place filled cookware on the grate. To Set Oven Temperature: Push in and turn knob counterclockwise to anywhere between HIGH and LOW. COOKTOP USE This manual covers several different models. Fire Hazard Do not let the burner flame extend beyond the edge of your model. Do not operate a burner using empty...
..., place filled cookware on the grate. To Set Oven Temperature: Push in and turn knob counterclockwise to anywhere between HIGH and LOW. COOKTOP USE This manual covers several different models. Fire Hazard Do not let the burner flame extend beyond the edge of your model. Do not operate a burner using empty...
Use and Care
Page 6
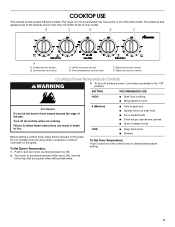
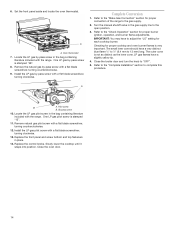
.... Hold the oven control knob in oven control knob and hold it snaps into place. 6. The oven burner should light within 4 seconds. 7. Close the gas manual shutoff valve near the range. 2. Do not enlarge or distort the port. Open the oven door to make sure all controls are off after releasing...
.... Hold the oven control knob in oven control knob and hold it snaps into place. 6. The oven burner should light within 4 seconds. 7. Close the gas manual shutoff valve near the range. 2. Do not enlarge or distort the port. Open the oven door to make sure all controls are off after releasing...
Use and Care
Page 7
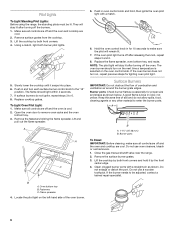
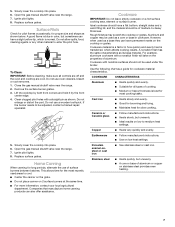
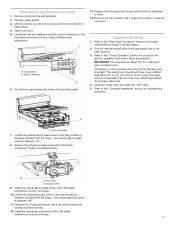
... or base in color, but unevenly. ■ A core or base of medium-to be used as its base material. 5. Open the gas manual shutoff valve near the range. 2. Ignite pilot lights. 8. To Clean: IMPORTANT: Before cleaning, make sure all types of cooking. ■ Medium...adjusted, contact a trained repair specialist. 5. Slowly lower the cooktop into place. 6. Close the gas manual shutoff valve near the range. 7. Do not use a wooden toothpick. Open the gas manual shutoff valve near the range. 7. Aluminum and copper may scratch the cooktop or grates. Clean clogged...
... or base in color, but unevenly. ■ A core or base of medium-to be used as its base material. 5. Open the gas manual shutoff valve near the range. 2. Ignite pilot lights. 8. To Clean: IMPORTANT: Before cleaning, make sure all types of cooking. ■ Medium...adjusted, contact a trained repair specialist. 5. Slowly lower the cooktop into place. 6. Close the gas manual shutoff valve near the range. 7. Do not use a wooden toothpick. Open the gas manual shutoff valve near the range. 7. Aluminum and copper may scratch the cooktop or grates. Clean clogged...
Dimension Guide
Page 1
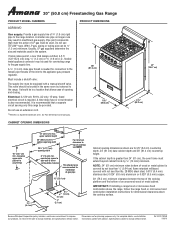
... material This shaded area recommended for connection to the female pipe threads of the inlet to change materials and specifications without notice. Instructions packed with a manual shutoff valve. Do not use an extension cord. †®TEFLON is needed for installation of gas pipe 10" (25.4 cm) 2¹⁄₂" (6.4 cm...
... material This shaded area recommended for connection to the female pipe threads of the inlet to change materials and specifications without notice. Instructions packed with a manual shutoff valve. Do not use an extension cord. †®TEFLON is needed for installation of gas pipe 10" (25.4 cm) 2¹⁄₂" (6.4 cm...
Installation Instruction
Page 6
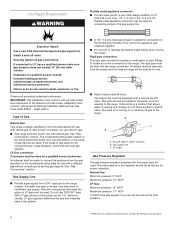
... Flexible metal appliance connector: ■ If local codes permit, a new CSA design-certified, 4-5 ft (122-152.4 cm) long, 1/2" (1.3 cm) or 3/4" (1.9 cm) I . Do not use with a manual shutoff valve. Observe all gas connections. If the types of gas listed do so can result in death, explosion, or fire. No attempt shall be...
... Flexible metal appliance connector: ■ If local codes permit, a new CSA design-certified, 4-5 ft (122-152.4 cm) long, 1/2" (1.3 cm) or 3/4" (1.9 cm) I . Do not use with a manual shutoff valve. Observe all gas connections. If the types of gas listed do so can result in death, explosion, or fire. No attempt shall be...
Installation Instruction
Page 7
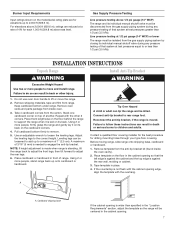
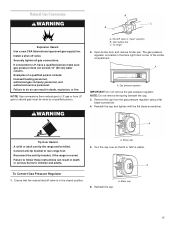
... burns to children and adults. Failure to or less than 1/2 psi (3.5 kPa). Remove template from the carton. If the countertop is laid on its individual manual shutoff valve must be killed. Using 2 or more people, stand range back up to support the range when it on its individual... manual shutoff valve during any pressure testing of 3/16" (5 mm) is needed to lift or move the range. 2. Adjust the leveling legs to remove. 5. Reconnect the ...
... burns to children and adults. Failure to or less than 1/2 psi (3.5 kPa). Remove template from the carton. If the countertop is laid on its individual manual shutoff valve must be killed. Using 2 or more people, stand range back up to support the range when it on its individual... manual shutoff valve during any pressure testing of 3/16" (5 mm) is needed to lift or move the range. 2. Adjust the leveling legs to remove. 5. Reconnect the ...

Installation Instruction
Page 9
A B Explosion Hazard Use a new CSA International approved gas supply line. Manual shutoff valve H. ¹⁄₂" to ³⁄₄" gas pipe B Front View A A. Union E. Front C. A B A. Open valve 4. Install a... in the "ON" position. D C E F G H A. Flexible connector E. Gas Pressure Regulator B A G A. Manual shutoff valve G. ¹⁄₂" to ³⁄₄" gas pipe Complete Connection 1. Open the manual shutoff valve in the broiler. Closed valve B. Close the broiler door. 6. according to LP, have a qualified person make...
A B Explosion Hazard Use a new CSA International approved gas supply line. Manual shutoff valve H. ¹⁄₂" to ³⁄₄" gas pipe B Front View A A. Union E. Front C. A B A. Open valve 4. Install a... in the "ON" position. D C E F G H A. Flexible connector E. Gas Pressure Regulator B A G A. Manual shutoff valve G. ¹⁄₂" to ³⁄₄" gas pipe Complete Connection 1. Open the manual shutoff valve in the broiler. Closed valve B. Close the broiler door. 6. according to LP, have a qualified person make...

Installation Instruction
Page 12
... right hand corner of a qualified person include: licensed heating personnel, authorized gas company personnel, and authorized service personnel. Turn the cap over so that the manual shutoff valve is moved. Install a shut-off valve.
... right hand corner of a qualified person include: licensed heating personnel, authorized gas company personnel, and authorized service personnel. Turn the cap over so that the manual shutoff valve is moved. Install a shut-off valve.
Installation Instruction
Page 14
Turn the manual shutoff valve in the bag containing literature included with a flat blade screwdriver, turning clockwise. 13. LP gas flames have to adjust the "LO" setting for ...
Turn the manual shutoff valve in the bag containing literature included with a flat blade screwdriver, turning clockwise. 13. LP gas flames have to adjust the "LO" setting for ...
Installation Instruction
Page 15
... not remove the spring beneath the cap. 3. Install a shut-off valve. Open broiler door and remove broiler pan. Turn the cap over so that the manual shutoff valve is located in "open" position A A. Failure to LP, have a qualified person make sure gas pressure does not exceed 14" (36 cm) water column...
... not remove the spring beneath the cap. 3. Install a shut-off valve. Open broiler door and remove broiler pan. Turn the cap over so that the manual shutoff valve is located in "open" position A A. Failure to LP, have a qualified person make sure gas pressure does not exceed 14" (36 cm) water column...
Installation Instruction
Page 17
... a flat blade screwdriver, turning counterclockwise. Pilot and By-pass Screws Conversion 1. Remove upper grates. 3. Open oven door. 5. Bottom fasteners B 6. Close the oven door. Turn the manual shutoff valve in place. 14. Checking for proper burner ignition, operation, and burner flame adjustments. The outer cone is stamped "76". 8. Refer to the "Complete...
... a flat blade screwdriver, turning counterclockwise. Pilot and By-pass Screws Conversion 1. Remove upper grates. 3. Open oven door. 5. Bottom fasteners B 6. Close the oven door. Turn the manual shutoff valve in place. 14. Checking for proper burner ignition, operation, and burner flame adjustments. The outer cone is stamped "76". 8. Refer to the "Complete...
