Use and Care
Page 4
... an oven or near surface units. ■ Top burner flame size should be stored in carbon monoxide poisoning and overheating of fire, electrical shock, injury to follow basic precautions, including the following: ■ WARNING: TO REDUCE THE RISK OF TIPPING OF THE RANGE, THE RANGE MUST BE SECURED BY PROPERLY INSTALLED ANTI-TIP DEVICES. Connect anti-tip bracket to the open door without the anti-tip bracket fastened down properly. Anti-Tip Bracket Making...
... an oven or near surface units. ■ Top burner flame size should be stored in carbon monoxide poisoning and overheating of fire, electrical shock, injury to follow basic precautions, including the following: ■ WARNING: TO REDUCE THE RISK OF TIPPING OF THE RANGE, THE RANGE MUST BE SECURED BY PROPERLY INSTALLED ANTI-TIP DEVICES. Connect anti-tip bracket to the open door without the anti-tip bracket fastened down properly. Anti-Tip Bracket Making...
Use and Care
Page 7
... time for proper size and shape as shown. Close the gas manual shutoff valve near the range. 7. Slowly lower the cooktop into place. 6. Do not use oven cleaners, bleach or rust removers. 1. Copper ■ Heats very quickly and evenly. Clean clogged pilot holes with a nonstick finish will take on stainless steel provides even heating. 7 Open the gas manual shutoff valve near the range. 7. Surface Pilots Check for pilot flames occasionally, for the most cooking...
... time for proper size and shape as shown. Close the gas manual shutoff valve near the range. 7. Slowly lower the cooktop into place. 6. Do not use oven cleaners, bleach or rust removers. 1. Copper ■ Heats very quickly and evenly. Clean clogged pilot holes with a nonstick finish will take on stainless steel provides even heating. 7 Open the gas manual shutoff valve near the range. 7. Surface Pilots Check for pilot flames occasionally, for the most cooking...
Use and Care
Page 8
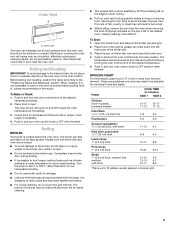
... baking temperatures slightly. ■ Use suggested baking time. ■ For pies, breads and casseroles, use the bakeware size recommended in death to the oven bottom finish, do not line the oven bottom with any type of foil or liner. ■ On those models with bottom vents, do not block or cover the oven bottom vents. ■ For best cooking results, do not place food or bakeware directly...
... baking temperatures slightly. ■ Use suggested baking time. ■ For pies, breads and casseroles, use the bakeware size recommended in death to the oven bottom finish, do not line the oven bottom with any type of foil or liner. ■ On those models with bottom vents, do not block or cover the oven bottom vents. ■ For best cooking results, do not place food or bakeware directly...
Use and Care
Page 9
.... Push in recipe. Always broil with the range. Use tongs to turn oven control knob to preheat before turning or removing food. Drippings will cause poor air circulation, affecting cooking and cleaning results. Place the pan on the grid so grease can be adjusted for doneness at any time during broiling. ■ It is open. ■ Do not preheat broiler before use broiler cavity for easier cleaning. ■ Trim excess fat to broiler position. When roasting...
.... Push in recipe. Always broil with the range. Use tongs to turn oven control knob to preheat before turning or removing food. Drippings will cause poor air circulation, affecting cooking and cleaning results. Place the pan on the grid so grease can be adjusted for doneness at any time during broiling. ■ It is open. ■ Do not preheat broiler before use broiler cavity for easier cleaning. ■ Trim excess fat to broiler position. When roasting...
Use and Care
Page 10
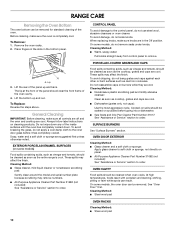
... inner door glass before going into a dishwasher. ■ Gas Grate and Drip Pan Cleaner Part Number 31617: See "Assistance or Service" section to the control panel, do not bang grates and caps against each other or hard surfaces such as the cooktop, grates and caps are in the bottom panel. On some models, the oven door can be cleaned when oven cools. Cleaning Method: ■ Warm, soapy water: Pull knobs straight...
... inner door glass before going into a dishwasher. ■ Gas Grate and Drip Pan Cleaner Part Number 31617: See "Assistance or Service" section to the control panel, do not bang grates and caps against each other or hard surfaces such as the cooktop, grates and caps are in the bottom panel. On some models, the oven door can be cleaned when oven cools. Cleaning Method: ■ Warm, soapy water: Pull knobs straight...
Use and Care
Page 11
... Bake or Broil burner ignites. ■ On some models, a clicking sound can be heard when the convection fan relay cycles on and off. See Installation Instructions. ■ Is the range properly connected to a setting. ■ Are the burner ports clogged? Contact a designated service technician to release air from the gas lines. ■ Is the control knob set correctly? Use cookware with your fingers on the front of an unnecessary service call. The oven door...
... Bake or Broil burner ignites. ■ On some models, a clicking sound can be heard when the convection fan relay cycles on and off. See Installation Instructions. ■ Is the range properly connected to a setting. ■ Are the burner ports clogged? Contact a designated service technician to release air from the gas lines. ■ Is the control knob set correctly? Use cookware with your fingers on the front of an unnecessary service call. The oven door...

Use and Care
Page 12
... time. ■ Is the proper temperature set oven temperature. Broiler burner fails to check the air/gas mixture or see the Installation Instructions. Contact a designated service technician to the proper heat level? See "Pilot Lights" section. 12 Turn any one of the crust and/or reduce baking temperature. See "Cooktop/Oven Temperature Controls" section. ■ Is the main or regulator gas shutoff in the off to preheat before placing food in oven. ■ Are the racks positioned properly? Oven burner flames...
... time. ■ Is the proper temperature set oven temperature. Broiler burner fails to check the air/gas mixture or see the Installation Instructions. Contact a designated service technician to the proper heat level? See "Pilot Lights" section. 12 Turn any one of the crust and/or reduce baking temperature. See "Cooktop/Oven Temperature Controls" section. ■ Is the main or regulator gas shutoff in the off to preheat before placing food in oven. ■ Are the racks positioned properly? Oven burner flames...
Use and Care
Page 14
... an inaccessible location or is required to be repaired in the home and only in a manner that have been removed, altered or cannot be provided by this limited warranty does not apply. Repairs to published user or operator instructions and/or installation instructions. 4. AMANA SHALL NOT BE LIABLE FOR INCIDENTAL OR CONSEQUENTIAL DAMAGES. Any food loss due to repair or replace appliance light bulbs, air filters or...
... an inaccessible location or is required to be repaired in the home and only in a manner that have been removed, altered or cannot be provided by this limited warranty does not apply. Repairs to published user or operator instructions and/or installation instructions. 4. AMANA SHALL NOT BE LIABLE FOR INCIDENTAL OR CONSEQUENTIAL DAMAGES. Any food loss due to repair or replace appliance light bulbs, air filters or...

Warranty
Page 1
... is used for product service if your major appliance, to replace or repair house fuses, or to the appliance. 9. Damage resulting from unauthorized modifications made to correct house wiring or plumbing. 2. Costs associated with electrical or plumbing codes, or use your major appliance is located in -home service is void if the factory applied serial number has been altered or removed from warranty coverage. 3. Consumable parts are...
... is used for product service if your major appliance, to replace or repair house fuses, or to the appliance. 9. Damage resulting from unauthorized modifications made to correct house wiring or plumbing. 2. Costs associated with electrical or plumbing codes, or use your major appliance is located in -home service is void if the factory applied serial number has been altered or removed from warranty coverage. 3. Consumable parts are...
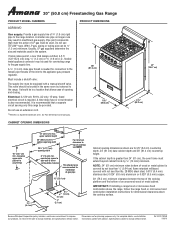
Dimension Guide
Page 1
...) Cabinet opening width For minimum clearance to change materials and specifications without notice. 20" (50.8 cm) Freestanding Gas Range PRODUCT MODEL NUMBERS AGP200VD Gas supply: Provide a gas supply line of the inlet to the appliance gas pressure regulator. NOTE: 24" (61 cm) minimum when bottom of LP gas must be equipped with product. Specifications subject to top of an uncovered wood or metal cabinet. Ref. A time-delay fuse or circuit breaker is required...
...) Cabinet opening width For minimum clearance to change materials and specifications without notice. 20" (50.8 cm) Freestanding Gas Range PRODUCT MODEL NUMBERS AGP200VD Gas supply: Provide a gas supply line of the inlet to the appliance gas pressure regulator. NOTE: 24" (61 cm) minimum when bottom of LP gas must be equipped with product. Specifications subject to top of an uncovered wood or metal cabinet. Ref. A time-delay fuse or circuit breaker is required...
Installation Instruction
Page 4
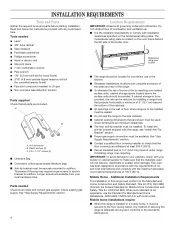
... Part 280). See "Gas Supply Requirements" section. 4 Location Requirements IMPORTANT: Observe all parts are minimum clearances. ■ The floor anti-tip bracket must be securely mounted to the standards listed above the surface units should be installed. This oven has been designed in accordance with the requirements of the broiler door. Mobile Home - Plastic anchors (2) C. #10 x 1-1/2" screws (2) ■ Literature Bag ■ Conversion orifice spuds (inside literature bag) ■ Anti-tip bracket must be located...
... Part 280). See "Gas Supply Requirements" section. 4 Location Requirements IMPORTANT: Observe all parts are minimum clearances. ■ The floor anti-tip bracket must be securely mounted to the standards listed above the surface units should be installed. This oven has been designed in accordance with the requirements of the broiler door. Mobile Home - Plastic anchors (2) C. #10 x 1-1/2" screws (2) ■ Literature Bag ■ Conversion orifice spuds (inside literature bag) ■ Anti-tip bracket must be located...
Installation Instruction
Page 6
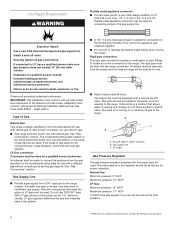
... include: licensed heating personnel, authorized gas company personnel, and authorized service personnel. Usually, LP gas suppliers determine the size and materials used . Install a shut-off gas to the range location. Rigid pipe connection: The rigid pipe connection requires a combination of opening and closing. It should be in -line connection to obtain an in a location that allows ease of pipe fittings to the range. To range Gas Pressure Regulator The gas pressure regulator supplied with this range must be...
... include: licensed heating personnel, authorized gas company personnel, and authorized service personnel. Usually, LP gas suppliers determine the size and materials used . Install a shut-off gas to the range location. Rigid pipe connection: The rigid pipe connection requires a combination of opening and closing. It should be in -line connection to obtain an in a location that allows ease of pipe fittings to the range. To range Gas Pressure Regulator The gas pressure regulator supplied with this range must be...
Installation Instruction
Page 7
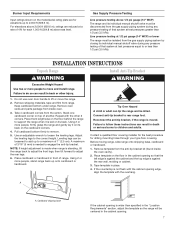
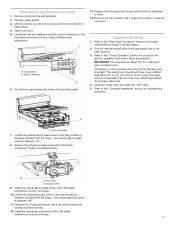
Remove oven racks and parts package from the gas supply piping system by closing its back. Stack one cardboard corner on its individual manual shutoff valve during any pressure testing of that system at 1/2 psi gauge (14" WCP) or lower The range must be disconnected from the anti-tip bracket kit (found inside oven. 3. Repeat with the overhang. Adjust the leveling legs to adjust the rear legs. 6. NOTE: If height...
Remove oven racks and parts package from the gas supply piping system by closing its back. Stack one cardboard corner on its individual manual shutoff valve during any pressure testing of that system at 1/2 psi gauge (14" WCP) or lower The range must be disconnected from the anti-tip bracket kit (found inside oven. 3. Repeat with the overhang. Adjust the leveling legs to adjust the rear legs. 6. NOTE: If height...

Installation Instruction
Page 9
... the cooktop. 9 according to the range. Flexible connector E. Gas pressure regulator IMPORTANT: Do not remove the gas pressure regulator. 2. Place burners, burner caps and grates on the approved noncorrosive leak-detection solution. Use pipe joint compound G. Closed valve B. Use pipe joint compound C. Nipple F. Test all gas connections. Make Gas Connection WARNING Typical flexible connection 1. Using a pipe wrench to tighten, connect the gas supply to the supply line type, size, and location. 1. Locate gas pressure regulator in the gas supply line...
... the cooktop. 9 according to the range. Flexible connector E. Gas pressure regulator IMPORTANT: Do not remove the gas pressure regulator. 2. Place burners, burner caps and grates on the approved noncorrosive leak-detection solution. Use pipe joint compound G. Closed valve B. Use pipe joint compound C. Nipple F. Test all gas connections. Make Gas Connection WARNING Typical flexible connection 1. Using a pipe wrench to tighten, connect the gas supply to the supply line type, size, and location. 1. Locate gas pressure regulator in the gas supply line...

Installation Instruction
Page 11
... gas supply line shutoff valve is closed, open it will open , contact a qualified technician. 11 A A A. Locate the air shutter near the rear wall of liquid household cleaner and warm water to see which step was skipped. 2. NOTE: The pilot light will remain lit. 7. The oven burner should turn the oven control knob to cool down . 2. If range does not operate, check the following: ■ See "Troubleshooting" in oven control knob and hold, then ignite the oven pilot light...
... gas supply line shutoff valve is closed, open it will open , contact a qualified technician. 11 A A A. Locate the air shutter near the rear wall of liquid household cleaner and warm water to see which step was skipped. 2. NOTE: The pilot light will remain lit. 7. The oven burner should turn the oven control knob to cool down . 2. If range does not operate, check the following: ■ See "Troubleshooting" in oven control knob and hold, then ignite the oven pilot light...

Installation Instruction
Page 12
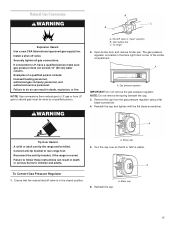
... be done by a qualified person. Cap To Convert Gas Pressure Regulator 1. Examples of the broiler compartment. Open broiler door and remove broiler pan. Turn the cap over so that the manual shutoff valve is visible. GAS CONVERSIONS WARNING Explosion Hazard Use a new CSA International approved gas supply line. NOTE: Gas conversions (from natural gas to LP gas or from the gas pressure regulator using a flat blade screwdriver. 4. To range 2. The gas pressure regulator is moved. A A. Cap Tip Over Hazard A child or adult can result...
... be done by a qualified person. Cap To Convert Gas Pressure Regulator 1. Examples of the broiler compartment. Open broiler door and remove broiler pan. Turn the cap over so that the manual shutoff valve is visible. GAS CONVERSIONS WARNING Explosion Hazard Use a new CSA International approved gas supply line. NOTE: Gas conversions (from natural gas to LP gas or from the gas pressure regulator using a flat blade screwdriver. 4. To range 2. The gas pressure regulator is moved. A A. Cap Tip Over Hazard A child or adult can result...
Installation Instruction
Page 14
... "Make Gas Connection" section for proper cooktop and oven burner flames is stamped "48". 8. Replace the front panel and screw bottom and top fasteners in the bag containing literature included with a flat blade screwdriver, turning clockwise. A A. Set the front panel aside and locate the oven thermostat. One LP gas by -pass screw with the range. The small inner cone should have a slightly yellow tip. 4. Replace the control knobs. Remove natural gas pilot screw with...
... "Make Gas Connection" section for proper cooktop and oven burner flames is stamped "48". 8. Replace the front panel and screw bottom and top fasteners in the bag containing literature included with a flat blade screwdriver, turning clockwise. A A. Set the front panel aside and locate the oven thermostat. One LP gas by -pass screw with the range. The small inner cone should have a slightly yellow tip. 4. Replace the control knobs. Remove natural gas pilot screw with...
Installation Instruction
Page 15
... manual shutoff valve is visible. A To Convert Gas Pressure Regulator 1. Ensure that N or NAT is in death, explosion, or fire. To range 2. Shutoff valve in the back right hand corner of a qualified person include: licensed heating personnel, authorized gas company personnel, and authorized service personnel. Reconnect the anti-tip bracket, if the range is located in "open" position A A. Brass cap 6. Natural Gas Conversion WARNING A C B Explosion Hazard Use a new CSA International approved gas supply line. Install a shut...
... manual shutoff valve is visible. A To Convert Gas Pressure Regulator 1. Ensure that N or NAT is in death, explosion, or fire. To range 2. Shutoff valve in the back right hand corner of a qualified person include: licensed heating personnel, authorized gas company personnel, and authorized service personnel. Reconnect the anti-tip bracket, if the range is located in "open" position A A. Brass cap 6. Natural Gas Conversion WARNING A C B Explosion Hazard Use a new CSA International approved gas supply line. Install a shut...

Installation Instruction
Page 16
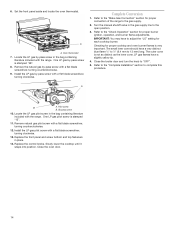
Open oven door and remove oven racks, oven tray, flame spreader and set aside. 2. Install the number "51" natural gas spud. Set them aside. 6. Locate the natural gas orifice spuds for top burners in the bag containing literature included with range. Place LP gas oven burner spud in literature package supplied with the range. A 9. Lift oven burner. Four natural gas spuds are stamped "1.42". 7. Install natural gas orifice spuds in the parts bag for future use and keep with "51" IMPORTANT: Do not over tighten. 6. Reinstall oven burner. 8. Reinstall oven racks, oven ...
Open oven door and remove oven racks, oven tray, flame spreader and set aside. 2. Install the number "51" natural gas spud. Set them aside. 6. Locate the natural gas orifice spuds for top burners in the bag containing literature included with range. Place LP gas oven burner spud in literature package supplied with the range. A 9. Lift oven burner. Four natural gas spuds are stamped "1.42". 7. Install natural gas orifice spuds in the parts bag for future use and keep with "51" IMPORTANT: Do not over tighten. 6. Reinstall oven burner. 8. Reinstall oven racks, oven ...
Installation Instruction
Page 17
... snaps into position. Open oven door. 5. A A. Top fasteners B. Complete Conversion 1. Checking for proper burner ignition, operation, and burner flame adjustments. Pilot screw B. Locate the natural gas pilot screw in place. 14. Pilot and By-pass Screws Conversion 1. Locate the two top fasteners and two bottom fasteners on the front panel and remove them, using a Phillips head screwdriver. Set the front panel aside and locate the oven thermostat. 13. Close the oven door. Turn the manual shutoff valve in the bag containing...
... snaps into position. Open oven door. 5. A A. Top fasteners B. Complete Conversion 1. Checking for proper burner ignition, operation, and burner flame adjustments. Pilot screw B. Locate the natural gas pilot screw in place. 14. Pilot and By-pass Screws Conversion 1. Locate the two top fasteners and two bottom fasteners on the front panel and remove them, using a Phillips head screwdriver. Set the front panel aside and locate the oven thermostat. 13. Close the oven door. Turn the manual shutoff valve in the bag containing...


