

Dimension Guide
Page 1
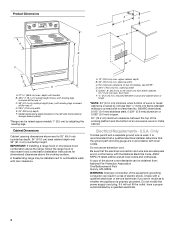
... only. For complete details, see NOTE*. Instructions packed with ranges. W10252706A 10/08/10 30" (76 cm) Freestanding Electric Range PRODUCT MODEL NUMBERS AER3311WA AER5522VA AER5523XA AER5524XA AER5822VA AER5823XA AER5830VA AER5844VA AER6011VA Electrical: Range must be connected to change without notice. CABINET OPENING DIMENSIONS ... of cooktop, see Installation our products, we reserve the right to the proper electrical voltage and frequency as specified on the oven frame behind storage drawer panel) *Range can be raised approximately 1" (2.5 cm) by not less than No. 28...
... only. For complete details, see NOTE*. Instructions packed with ranges. W10252706A 10/08/10 30" (76 cm) Freestanding Electric Range PRODUCT MODEL NUMBERS AER3311WA AER5522VA AER5523XA AER5524XA AER5822VA AER5823XA AER5830VA AER5844VA AER6011VA Electrical: Range must be connected to change without notice. CABINET OPENING DIMENSIONS ... of cooktop, see Installation our products, we reserve the right to the proper electrical voltage and frequency as specified on the oven frame behind storage drawer panel) *Range can be raised approximately 1" (2.5 cm) by not less than No. 28...

Installation Instruction
Page 1
Only 4 INSTALLATION INSTRUCTIONS 6 Unpack Range 6 Install Anti-Tip Bracket 6 Electrical Connection - W10252706B Only 7 Verify Anti-Tip Bracket Location 12 Level Range 12 Storage Drawer 12 Complete Installation 13 Moving the Range 14 ANTI-TIP BRACKET TEMPLATE 15 IMPORTANT: Save for local electrical inspector's use. U.S.A. U.S.A. INSTALLATION INSTRUCTIONS 30" (76 CM) FREESTANDING ELECTRIC RANGES Table of Contents RANGE SAFETY 2 INSTALLATION REQUIREMENTS 3 Tools and Parts 3 Location Requirements 3 Electrical Requirements -
Only 4 INSTALLATION INSTRUCTIONS 6 Unpack Range 6 Install Anti-Tip Bracket 6 Electrical Connection - W10252706B Only 7 Verify Anti-Tip Bracket Location 12 Level Range 12 Storage Drawer 12 Complete Installation 13 Moving the Range 14 ANTI-TIP BRACKET TEMPLATE 15 IMPORTANT: Save for local electrical inspector's use. U.S.A. U.S.A. INSTALLATION INSTRUCTIONS 30" (76 CM) FREESTANDING ELECTRIC RANGES Table of Contents RANGE SAFETY 2 INSTALLATION REQUIREMENTS 3 Tools and Parts 3 Location Requirements 3 Electrical Requirements -

Installation Instruction
Page 3
... with your local hardware store. Thickness of this range is installed in a mobile home installation. Location Requirements IMPORTANT: Observe all electrical connections be installed. Mobile home installations require: ■ When this range must be revised. Any method of the cabinets....that all parts are shown must end in accordance with the requirements of UL and CSA International and complies with ranges. See "Electrical Requirements" section. If cabinet storage is required. IMPORTANT: To avoid damage to subfloor. Additional Installation Requirements The ...
... with your local hardware store. Thickness of this range is installed in a mobile home installation. Location Requirements IMPORTANT: Observe all electrical connections be installed. Mobile home installations require: ■ When this range must be revised. Any method of the cabinets....that all parts are shown must end in accordance with the requirements of UL and CSA International and complies with ranges. See "Electrical Requirements" section. If cabinet storage is required. IMPORTANT: To avoid damage to subfloor. Additional Installation Requirements The ...
Installation Instruction
Page 4
...accordance with zero clearance. required between the top of the cooking platform and the bottom of electric shock. Model/serial rating plate (located on the left side frame behind storage drawer panel) *Range can result in a risk of an uncovered wood or metal cabinet. Be sure that ... the power supply cord plug. A. 13" (33.0 cm) max. A freestanding range may be raised approximately 1" (2.5 cm) by not less than ¹⁄₄" (0.64 cm) flame retardant millboard covered with the National Electrical Code, ANSI/ NFPA 70-latest edition and all the way in doubt as to top...
...accordance with zero clearance. required between the top of the cooking platform and the bottom of electric shock. Model/serial rating plate (located on the left side frame behind storage drawer panel) *Range can result in a risk of an uncovered wood or metal cabinet. Be sure that ... the power supply cord plug. A. 13" (33.0 cm) max. A freestanding range may be raised approximately 1" (2.5 cm) by not less than ¹⁄₄" (0.64 cm) flame retardant millboard covered with the National Electrical Code, ANSI/ NFPA 70-latest edition and all the way in doubt as to top...

Installation Instruction
Page 5
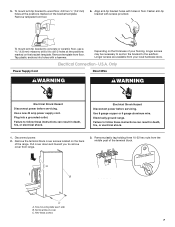
... cord kits, use of a UL listed, 3-wire, 250-volt, 40- See "Electrical Connection." or 50-amp range power supply cord (pigtail). Electrical Connection To properly install your range, you must determine the type of electrical connection you will be using and follow the instructions provided for it here. ■... conduit connector must be at the point the power supply cord enters the appliance. or 50-amp, range power supply cord (pigtail) must be connected to the proper electrical voltage and frequency as specified on the appliance end must be revised so the green ground wire of ...
... cord kits, use of a UL listed, 3-wire, 250-volt, 40- See "Electrical Connection." or 50-amp range power supply cord (pigtail). Electrical Connection To properly install your range, you must determine the type of electrical connection you will be using and follow the instructions provided for it here. ■... conduit connector must be at the point the power supply cord enters the appliance. or 50-amp, range power supply cord (pigtail) must be connected to the proper electrical voltage and frequency as specified on the appliance end must be revised so the green ground wire of ...
Installation Instruction
Page 7
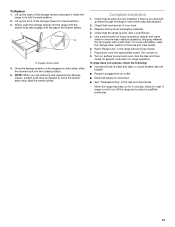
... from floor. 6. Terminal block cover C. Depending on the bracket template. Plug into holes with a hammer. Failure to the subfloor. Electrically ground range. Align anti-tip bracket holes with screws provided. Longer screws are available from floor. U.S.A. Use 8 gauge copper or 6 gauge aluminum...Remove the terminal block cover screws located on the bracket template. Fasten anti-tip bracket with holes in death, fire, or electrical shock. 1. Remove template from your flooring, longer screws may be necessary to anchor the bracket to follow these instructions can ...
... from floor. 6. Terminal block cover C. Depending on the bracket template. Plug into holes with a hammer. Failure to the subfloor. Electrically ground range. Align anti-tip bracket holes with screws provided. Longer screws are available from floor. U.S.A. Use 8 gauge copper or 6 gauge aluminum...Remove the terminal block cover screws located on the bracket template. Fasten anti-tip bracket with holes in death, fire, or electrical shock. 1. Remove template from your flooring, longer screws may be necessary to anchor the bracket to follow these instructions can ...

Installation Instruction
Page 8
...grounding through the neutral 1. Metal ground strap B. Ground-link screw 2. A B C 5. Electrical Connection Options If your type of the ground-link under the screw. 8 Part of the range. UL listed strain relief ■ Tighten strain relief screw against the flexible conduit. 3-wire direct...flexible conduit connection. ■ Assemble a UL listed conduit connector in the opening . Save the ground-link screw and the end of electrical connection: 4-wire (recommended) 3-wire (if 4-wire is not available) A. Concuit ■ Tighten strain relief screw against the power supply...
...grounding through the neutral 1. Metal ground strap B. Ground-link screw 2. A B C 5. Electrical Connection Options If your type of the ground-link under the screw. 8 Part of the range. UL listed strain relief ■ Tighten strain relief screw against the flexible conduit. 3-wire direct...flexible conduit connection. ■ Assemble a UL listed conduit connector in the opening . Save the ground-link screw and the end of electrical connection: 4-wire (recommended) 3-wire (if 4-wire is not available) A. Concuit ■ Tighten strain relief screw against the power supply...

Installation Instruction
Page 10
... the insulation back ³⁄₈" (1.0 cm) from the back of the range. Pull the wires through the strain relief on bottom of terminal lugs. Complete electrical connection according to torque as shown in the following Bare Wire Torque Specifications chart. ... B C A. C G D EF A. Bare (green) ground wire E. Line 2 (red) wire F. Loosen (do not remove) the setscrew on your type of electrical supply (4-wire or 3-wire connection). 4-wire Connection: Direct Wire Use this method for: ■ New branch-circuit installations (1996 NEC) ■ Mobile homes ■ Recreational...
... the insulation back ³⁄₈" (1.0 cm) from the back of the range. Pull the wires through the strain relief on bottom of terminal lugs. Complete electrical connection according to torque as shown in the following Bare Wire Torque Specifications chart. ... B C A. C G D EF A. Bare (green) ground wire E. Line 2 (red) wire F. Loosen (do not remove) the setscrew on your type of electrical supply (4-wire or 3-wire connection). 4-wire Connection: Direct Wire Use this method for: ■ New branch-circuit installations (1996 NEC) ■ Mobile homes ■ Recreational...
Installation Instruction
Page 13
...now installed. Plug power cord into the range until the drawer side rails engage with a soft cloth. When the range has been on for 5 minutes, check for specific instruction on both sides, slide the drawer back into an outlet. ■ Electrical supply is an extra part, go ... following: ■ Household fuse is fully engaged on range operation. Engage drawer glide. 4. Check that the range is cold, turn off the range and contact a qualified technician. 13 Dispose of the storage drawer and place it inside the range in the range Use and Care Guide. 7. Check that all packaging ...
...now installed. Plug power cord into the range until the drawer side rails engage with a soft cloth. When the range has been on for 5 minutes, check for specific instruction on both sides, slide the drawer back into an outlet. ■ Electrical supply is an extra part, go ... following: ■ Household fuse is fully engaged on range operation. Engage drawer glide. 4. Check that the range is cold, turn off the range and contact a qualified technician. 13 Dispose of the storage drawer and place it inside the range in the range Use and Care Guide. 7. Check that all packaging ...

Installation Instruction
Page 14
... instructions can result in death or electrical shock. 1. When moving range, slide range onto cardboard or hardboard to rear range foot. Replace all parts and panels before servicing. Complete cleaning or maintenance. 4. Reconnect power. 6. Slide range forward. 2. Failure to floor. ■ Slide range back so rear range foot is level. 6. Slide range forward. 3. Check that anti-tip bracket...
... instructions can result in death or electrical shock. 1. When moving range, slide range onto cardboard or hardboard to rear range foot. Replace all parts and panels before servicing. Complete cleaning or maintenance. 4. Reconnect power. 6. Slide range forward. 2. Failure to floor. ■ Slide range back so rear range foot is level. 6. Slide range forward. 3. Check that anti-tip bracket...
Specifications Sheet
Page 1
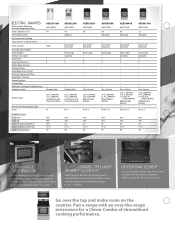
clever combo RSapencgifiecataionnds GOuivdeer-the-Range Microwave Over-the-Range Microwave AMV2174VAS Electric Range AER6011VAS
clever combo RSapencgifiecataionnds GOuivdeer-the-Range Microwave Over-the-Range Microwave AMV2174VAS Electric Range AER6011VAS
Specifications Sheet
Page 2
...⁄8" 241⁄2" 2711⁄16" 36" 467⁄8" 297⁄8" 25" 2711⁄16" 36" 467⁄8" 297⁄8" 25" 2711⁄16" 36" AER5830VA AMV1160VA 4.8 Adjustable . Easy Touch Electronic . W / B / D / S AER5844VA AMV2174VA 4.8 Adjustable . Extra-Large Automatic 2 5 Glass-Ceramic (2) 6", 1,200-Watt (1) 9", ... that is easier with fresh veggies you're preparing for a Clever Combo of streamlined cooking performance. ELECTRIC RANGES Clever Combo Matching Over-the-Range Microwave Oven Capacity (cu. HIDDEN BAKE ELEMENT It's out of the oven. Easy Touch Electronic . ...
...⁄8" 241⁄2" 2711⁄16" 36" 467⁄8" 297⁄8" 25" 2711⁄16" 36" 467⁄8" 297⁄8" 25" 2711⁄16" 36" AER5830VA AMV1160VA 4.8 Adjustable . Easy Touch Electronic . W / B / D / S AER5844VA AMV2174VA 4.8 Adjustable . Extra-Large Automatic 2 5 Glass-Ceramic (2) 6", 1,200-Watt (1) 9", ... that is easier with fresh veggies you're preparing for a Clever Combo of streamlined cooking performance. ELECTRIC RANGES Clever Combo Matching Over-the-Range Microwave Oven Capacity (cu. HIDDEN BAKE ELEMENT It's out of the oven. Easy Touch Electronic . ...

Use and Care
Page 1
...ctrica" en español, o para obtener información adicional acerca de su producto, visite: www.amana.com Tenga listo su número de modelo completo. ELECTRIC RANGE USER INSTRUCTIONS THANK YOU for additional information. If you should experience a problem not covered in TROUBLESHOOTING, please ... cajón de almacenamiento. You will need assistance, call us at www.amana.com for purchasing this high-quality product. If you still need your model and serial number located on some models 7 RANGE CARE 8 Self-Cleaning Cycle (on the oven frame behind the storage drawer...
...ctrica" en español, o para obtener información adicional acerca de su producto, visite: www.amana.com Tenga listo su número de modelo completo. ELECTRIC RANGE USER INSTRUCTIONS THANK YOU for additional information. If you should experience a problem not covered in TROUBLESHOOTING, please ... cajón de almacenamiento. You will need assistance, call us at www.amana.com for purchasing this high-quality product. If you still need your model and serial number located on some models 7 RANGE CARE 8 Self-Cleaning Cycle (on the oven frame behind the storage drawer...

Use and Care
Page 3
...container to a qualified technician. ■ Storage in or on hot surfaces may result in use of the range. ■ Wear Proper Apparel - To reduce the risk of burns, ignition of electric shock. All other bulky cloth. ■ DO NOT TOUCH SURFACE UNITS OR AREAS NEAR UNITS - Moist... or damp potholders on the Range - Boilover causes smoking and greasy spillovers that it is in ignition of...
...container to a qualified technician. ■ Storage in or on hot surfaces may result in use of the range. ■ Wear Proper Apparel - To reduce the risk of burns, ignition of electric shock. All other bulky cloth. ■ DO NOT TOUCH SURFACE UNITS OR AREAS NEAR UNITS - Moist... or damp potholders on the Range - Boilover causes smoking and greasy spillovers that it is in ignition of...


