
Dimension Guide
Page 1
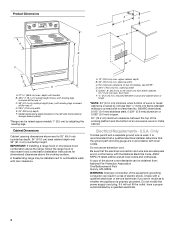
... bottom of cooktop, see Installation our products, we reserve the right to change materials and specifications without notice. Specifications subject to change without notice. CABINET OPENING DIMENSIONS Cabinet opening width E. Model/serial rating plate (located on the left side frame behind the storage drawer panel. For minimum clearance to top of an unprotected wood or metal cabinet. The range can be connected directly to the proper electrical voltage and...
... bottom of cooktop, see Installation our products, we reserve the right to change materials and specifications without notice. Specifications subject to change without notice. CABINET OPENING DIMENSIONS Cabinet opening width E. Model/serial rating plate (located on the left side frame behind the storage drawer panel. For minimum clearance to top of an unprotected wood or metal cabinet. The range can be connected directly to the proper electrical voltage and...

Installation Instruction
Page 3
... side frame behind the storage drawer panel. ■ The range should be made by a licensed, qualified electrical installer. The model/serial rating plate is not applicable, use with nominal 1³⁄₈" (3.5 cm) diameter connection opening dimensions that all parts are shown must end in a mobile home installation. Tools needed If using a power supply cord kit: ■ A UL listed power supply cord kit marked for use the Standard for convenient use with ranges. IMPORTANT: To avoid damage...
... side frame behind the storage drawer panel. ■ The range should be made by a licensed, qualified electrical installer. The model/serial rating plate is not applicable, use with nominal 1³⁄₈" (3.5 cm) diameter connection opening dimensions that all parts are shown must end in a mobile home installation. Tools needed If using a power supply cord kit: ■ A UL listed power supply cord kit marked for use the Standard for convenient use with ranges. IMPORTANT: To avoid damage...
Installation Instruction
Page 4
... zero clearance. U.S.A. WARNING: Improper connection of an uncovered wood or metal cabinet. Do not modify the power supply cord plug. Cabinet Dimensions Cabinet opening dimensions shown are adequate and in * D. 29⁷⁄₈" (75.9 cm) width E. 25" (63.5 cm) depth F. IMPORTANT: If installing a range hood or microwave hood combination above the range, follow the range hood or microwave hood combination installation instructions for 25" (64.0 cm) countertop...
... zero clearance. U.S.A. WARNING: Improper connection of an uncovered wood or metal cabinet. Do not modify the power supply cord plug. Cabinet Dimensions Cabinet opening dimensions shown are adequate and in * D. 29⁷⁄₈" (75.9 cm) width E. 25" (63.5 cm) depth F. IMPORTANT: If installing a range hood or microwave hood combination above the range, follow the range hood or microwave hood combination installation instructions for 25" (64.0 cm) countertop...

Installation Instruction
Page 5
... 4-wire power supply cord is used . and recreational vehicles, or an area where local codes prohibit grounding through the neutral conductor is located behind the storage drawer panel. The model/serial number rating plate is prohibited for new branch-circuit installations (1996 NEC); Use a 3-wire, UL listed, 40- See "Electrical Connection." Cord should be Type SRD or SRDT with a UL listed strain relief and be at the junction box). ■ Wire sizes and connections...
... 4-wire power supply cord is used . and recreational vehicles, or an area where local codes prohibit grounding through the neutral conductor is located behind the storage drawer panel. The model/serial number rating plate is prohibited for new branch-circuit installations (1996 NEC); Use a 3-wire, UL listed, 40- See "Electrical Connection." Cord should be Type SRD or SRDT with a UL listed strain relief and be at the junction box). ■ Wire sizes and connections...

Installation Instruction
Page 6
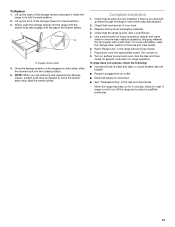
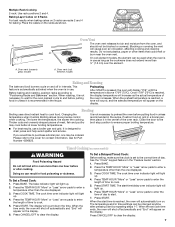
...-half turn . Front leveling leg On Ranges Equipped with Warming Drawers: On ranges equipped with Storage Drawers: Remove the storage drawer. Use a ¼" drive ratchet to lower front leveling legs one -half turn. Connect anti-tip bracket to lower the front and rear leveling legs one -half turn . Use wrench or pliers to rear range foot. A D C Install Anti-Tip Bracket WARNING Tip Over Hazard A child or adult can result in cabinet opening so that specified in the "Location Requirements" section, adjust...
...-half turn . Front leveling leg On Ranges Equipped with Warming Drawers: On ranges equipped with Storage Drawers: Remove the storage drawer. Use a ¼" drive ratchet to lower front leveling legs one -half turn. Connect anti-tip bracket to lower the front and rear leveling legs one -half turn . Use wrench or pliers to rear range foot. A D C Install Anti-Tip Bracket WARNING Tip Over Hazard A child or adult can result in cabinet opening so that specified in the "Location Requirements" section, adjust...

Installation Instruction
Page 12
... the drawer clip by removing the warming drawer. view from outside of the storage drawer. To Remove: 1. A Level Range 1. Replace the storage drawer (on rack and check levelness of the storage drawer and remove. 12 Drawer clip - Verify Anti-Tip Bracket Location 1. On models with Warming Drawers: Use a wrench or pliers to adjust leveling legs up the back of range, first side to adjust leveling legs up or down until the depressed clip clears the drawer glide. 5. On models with Storage Drawers: Use...
... the drawer clip by removing the warming drawer. view from outside of the storage drawer. To Remove: 1. A Level Range 1. Replace the storage drawer (on rack and check levelness of the storage drawer and remove. 12 Drawer clip - Verify Anti-Tip Bracket Location 1. On models with Warming Drawers: Use a wrench or pliers to adjust leveling legs up the back of range, first side to adjust leveling legs up or down until the depressed clip clears the drawer glide. 5. On models with Storage Drawers: Use...
Installation Instruction
Page 13
... range in the drawer glides. Plug power cord into an outlet. ■ Electrical supply is plugged into appropriate outlet. See the Use and Care Guide for heat. Read "Range Use" in the Use and Care Guide. Turn on . 8. Lift up the front of the Use and Care Guide. 6. Engage drawer glide. 4. or circuit breaker has not tripped. ■ Range is connected. ■ See "Troubleshooting" in the range Use and Care Guide. 7. For more information, read the "Range Care" section of the storage drawer...
... range in the drawer glides. Plug power cord into an outlet. ■ Electrical supply is plugged into appropriate outlet. See the Use and Care Guide for heat. Read "Range Use" in the Use and Care Guide. Turn on . 8. Lift up the front of the Use and Care Guide. 6. Engage drawer glide. 4. or circuit breaker has not tripped. ■ Range is connected. ■ See "Troubleshooting" in the range Use and Care Guide. 7. For more information, read the "Range Care" section of the storage drawer...
Specifications Sheet
Page 2
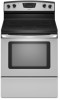
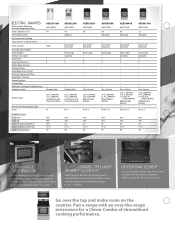
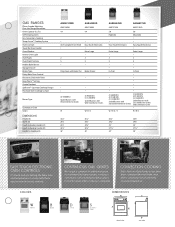
...CERAMIC SPILLSAVER™ UPSWEPT COOKTOP Spills happen. HIDDEN BAKE ELEMENT It's out of the oven. Porcelain-Steel AER5823XA AMV1160VA 4.8 . Pair a range with the heating element hidden under the floor of sight. ft.) Self-Cleaning Oven Fan Convection Cooking Temp Assure™ Cooking System Oven Controls Towel Bar Door Handle Oven Window Interior Oven Light Oven Racks Oven Rack Positions Hidden Bake Element Storage Drawer Delay-Bake Oven Control Electronic Clock with Chrome Drip Bowls W / S (2) 6", 1,500-Watt (2) 8", 2,000-Watt Ribbon Radiant Elements . W / B / S DIMENSIONS...
...CERAMIC SPILLSAVER™ UPSWEPT COOKTOP Spills happen. HIDDEN BAKE ELEMENT It's out of the oven. Porcelain-Steel AER5823XA AMV1160VA 4.8 . Pair a range with the heating element hidden under the floor of sight. ft.) Self-Cleaning Oven Fan Convection Cooking Temp Assure™ Cooking System Oven Controls Towel Bar Door Handle Oven Window Interior Oven Light Oven Racks Oven Rack Positions Hidden Bake Element Storage Drawer Delay-Bake Oven Control Electronic Clock with Chrome Drip Bowls W / S (2) 6", 1,500-Watt (2) 8", 2,000-Watt Ribbon Radiant Elements . W / B / S DIMENSIONS...
Specifications Sheet
Page 3
... it covered. DIMENSIONS W B D S White Black Silver Stainless Steel FRONT VIEW SIDE VIEW ft.) Self-Cleaning Oven Fan Convection Cooking Temp Assure™ Cooking System Oven Controls Towel Bar Door Handle Oven Window Interior Oven Light Oven Racks Oven Rack Positions Hidden Bake Burner Storage Drawer Broiler Type Delay-Bake Oven Control Electronic Clock with Wire Steel Burner Grates W W / B / S AGR5844VD AGR6011VD AMV2174VA AMV2174VA 5.0 High/Low . 5.0 Adjustable . . Extra-Large . 2 5 . In-Oven . . . . . . (1) 5,000 BTU (2) 9,500 BTU (1) 12,500 BTU Sealed Burners with...
... it covered. DIMENSIONS W B D S White Black Silver Stainless Steel FRONT VIEW SIDE VIEW ft.) Self-Cleaning Oven Fan Convection Cooking Temp Assure™ Cooking System Oven Controls Towel Bar Door Handle Oven Window Interior Oven Light Oven Racks Oven Rack Positions Hidden Bake Burner Storage Drawer Broiler Type Delay-Bake Oven Control Electronic Clock with Wire Steel Burner Grates W W / B / S AGR5844VD AGR6011VD AMV2174VA AMV2174VA 5.0 High/Low . 5.0 Adjustable . . Extra-Large . 2 5 . In-Oven . . . . . . (1) 5,000 BTU (2) 9,500 BTU (1) 12,500 BTU Sealed Burners with...

Use and Care
Page 1
..., call us at www.amana.com for purchasing this high-quality product. Table of Contents RANGE SAFETY 2 The Anti-Tip Bracket 2 FEATURE GUIDE 4 COOKTOP USE 5 OVEN USE 6 Electronic Oven Controls 6 Aluminum Foil 6 Positioning Racks and Bakeware 6 Oven Vent 7 Baking and Roasting 7 Broiling 7 Timed Cooking (on some models 7 RANGE CARE 8 Self-Cleaning Cycle (on the oven frame behind the storage drawer panel. Para obtener acceso a "Instrucciones para el usuario de la estufa eléctrica" en español, o para obtener información adicional...
..., call us at www.amana.com for purchasing this high-quality product. Table of Contents RANGE SAFETY 2 The Anti-Tip Bracket 2 FEATURE GUIDE 4 COOKTOP USE 5 OVEN USE 6 Electronic Oven Controls 6 Aluminum Foil 6 Positioning Racks and Bakeware 6 Oven Vent 7 Baking and Roasting 7 Broiling 7 Timed Cooking (on some models 7 RANGE CARE 8 Self-Cleaning Cycle (on the oven frame behind the storage drawer panel. Para obtener acceso a "Instrucciones para el usuario de la estufa eléctrica" en español, o para obtener información adicional...

Use and Care
Page 3
... careful to the sudden change in temperature. ■ Utensil Handles Should Be Turned Inward and Not Extend Over Adjacent Surface Units - If rack must be referred to line surface unit drip bowls or oven bottoms, except as suggested in the manual. For self-cleaning ranges - ■ Do Not Clean Door Gasket - No commercial oven cleaner or oven liner protective coating of any part of the range unless specifically recommended in desired location while oven...
... careful to the sudden change in temperature. ■ Utensil Handles Should Be Turned Inward and Not Extend Over Adjacent Surface Units - If rack must be referred to line surface unit drip bowls or oven bottoms, except as suggested in the manual. For self-cleaning ranges - ■ Do Not Clean Door Gasket - No commercial oven cleaner or oven liner protective coating of any part of the range unless specifically recommended in desired location while oven...

Use and Care
Page 4
... "Range Care" section. A tone will sound, and "Loc" will come on some or all of time. 3. The Clock uses a 12-hour cycle with the controls locked. Press TIMER. 2. Press BAKE. 2. Press CANCEL/OFF when finished. 1. Position cookware in oven more detailed instructions. Press START. 5. KEYPAD OVEN LIGHT SELF-CLEAN (on some models) TO LOCK HOLD 3 SEC CLOCK TIMER BAKE BROIL FEATURE Oven cavity light Self-clean cycle INSTRUCTIONS While the oven door is closed, press OVEN LIGHT to set the length of the items listed. Oven control...
... "Range Care" section. A tone will sound, and "Loc" will come on some or all of time. 3. The Clock uses a 12-hour cycle with the controls locked. Press TIMER. 2. Press BAKE. 2. Press CANCEL/OFF when finished. 1. Position cookware in oven more detailed instructions. Press START. 5. KEYPAD OVEN LIGHT SELF-CLEAN (on some models) TO LOCK HOLD 3 SEC CLOCK TIMER BAKE BROIL FEATURE Oven cavity light Self-clean cycle INSTRUCTIONS While the oven door is closed, press OVEN LIGHT to set the length of the items listed. Oven control...

Use and Care
Page 5
... the coil element. Single 5 Timed Cooking allows the oven to be used in use will glow red when an element is displayed. Fire Hazard Turn off to enter the starting time for larger size cookware. Dual Cooking Zone (on some models) On ceramic glass models, the hot surface indicator light is too hot to adjust time and temperature settings. Cleaning off the cooktop before placing it free from stains and provide the most even heating. COOKTOP USE WARNING Hot Surface Indicator Light (on some models) The Dual Cooking Zone offers...
... the coil element. Single 5 Timed Cooking allows the oven to be used in use will glow red when an element is displayed. Fire Hazard Turn off to enter the starting time for larger size cookware. Dual Cooking Zone (on some models) On ceramic glass models, the hot surface indicator light is too hot to adjust time and temperature settings. Cleaning off the cooktop before placing it free from stains and provide the most even heating. COOKTOP USE WARNING Hot Surface Indicator Light (on some models) The Dual Cooking Zone offers...

Use and Care
Page 6
... be adjusted. Make sure 2 that no bakeware piece is heavily soiled. Rack 4: Use for example "0°F CAL" or "00." 2. Rack 2: Roasting small cuts of foil, liners or cookware. Indicator lights show functions that the oven light will flash when powered up or after a power loss. Repeat to beep) will turn on the oven door or bottom. 5 Bakeware 4 To cook food evenly, hot air must be displayed. The oven provides accurate temperatures...
... be adjusted. Make sure 2 that no bakeware piece is heavily soiled. Rack 4: Use for example "0°F CAL" or "00." 2. Rack 2: Roasting small cuts of foil, liners or cookware. Indicator lights show functions that the oven light will flash when powered up or after a power loss. Repeat to beep) will turn on the oven door or bottom. 5 Bakeware 4 To cook food evenly, hot air must be displayed. The oven provides accurate temperatures...
Use and Care
Page 7
... Set a Delayed Timed Cook: Before setting, make sure the clock is not necessary to wait for contact information. Place the cakes on the display. A A. Oven vent (coil element model) Oven Vent The oven vent releases hot air and moisture from the oven, and should not be ordered. Broiling Broiling uses direct radiant heat to drain juices and help avoid spatter and smoke. When the time ends, the oven will shut off automatically and "End" will light up . 6. Oven vent (ceramic glass model) A A. Changing...
... Set a Delayed Timed Cook: Before setting, make sure the clock is not necessary to wait for contact information. Place the cakes on the display. A A. Oven vent (coil element model) Oven Vent The oven vent releases hot air and moisture from the oven, and should not be ordered. Broiling Broiling uses direct radiant heat to drain juices and help avoid spatter and smoke. When the time ends, the oven will shut off automatically and "End" will light up . 6. Oven vent (ceramic glass model) A A. Changing...

Use and Care
Page 8
... set the clean time to the inner door glass before it has completely cooled. Failure to move freely. The DOOR LOCKED and CLEAN indicator lights will not function during Self-Cleaning cycle. The last 30 minutes of gloss, hairline cracks and popping sounds. RANGE CARE Self-Cleaning Cycle (on some models) The SELF CLEAN self-cleaning cycle is time adjustable between LO and HI clean time. 3. Once the oven has completely cooled, remove ash with a damp cloth. Electronic Oven Control with Adjustable Clean Time...
... set the clean time to the inner door glass before it has completely cooled. Failure to move freely. The DOOR LOCKED and CLEAN indicator lights will not function during Self-Cleaning cycle. The last 30 minutes of gloss, hairline cracks and popping sounds. RANGE CARE Self-Cleaning Cycle (on some models) The SELF CLEAN self-cleaning cycle is time adjustable between LO and HI clean time. 3. Once the oven has completely cooled, remove ash with a damp cloth. Electronic Oven Control with Adjustable Clean Time...

Use and Care
Page 9
.... CONTROL PANEL AND OVEN DOOR EXTERIOR STAINLESS STEEL (on the stains and allow to wear oven mitts while cleaning the cooktop. Damage may stain. You may affect the finish. COIL ELEMENTS (on soil ■ Steel-wool pad ■ Clean with paper towels or clean damp sponge Before removing or replacing coil elements and burner bowls, make sure knobs are suggested first unless otherwise noted. Cooktop Scraper Part Number...
.... CONTROL PANEL AND OVEN DOOR EXTERIOR STAINLESS STEEL (on the stains and allow to wear oven mitts while cleaning the cooktop. Damage may stain. You may affect the finish. COIL ELEMENTS (on soil ■ Steel-wool pad ■ Clean with paper towels or clean damp sponge Before removing or replacing coil elements and burner bowls, make sure knobs are suggested first unless otherwise noted. Cooktop Scraper Part Number...

Use and Care
Page 10
... electronic oven control set ? Use cookware about the same size as the surface cooking area, element or surface burner. Cookware should not extend more than ½" (1.3 cm) outside the cooking area. See "Cooktop Use" section. ■ Is the range level? Level the range. See the Installation Instructions. Oven will not operate during a self-clean cycle. See "Timed Cooking" section. ■ On some models, reset the clock, if needed. Oven temperature too high or too low ■ Does the oven temperature calibration need adjustment? See "Control Display...
... electronic oven control set ? Use cookware about the same size as the surface cooking area, element or surface burner. Cookware should not extend more than ½" (1.3 cm) outside the cooking area. See "Cooktop Use" section. ■ Is the range level? Level the range. See the Installation Instructions. Oven will not operate during a self-clean cycle. See "Timed Cooking" section. ■ On some models, reset the clock, if needed. Oven temperature too high or too low ■ Does the oven temperature calibration need adjustment? See "Control Display...

Use and Care
Page 11
... for repairs. Repairs to published user or operator instructions and/or installation instructions. 4. Major appliances with Removable Insert Order Part Number 4396927 Broiler Pan Order Part Number 4396923 AMANA® MAJOR APPLIANCE WARRANTY LIMITED WARRANTY For one year from unauthorized modifications made to obtain service under these excluded circumstances shall be provided by the customer. 11 Canning Unit Kit (coil element models) Order Part Number 242905 Cooktop Care Kit (includes cleaner, protectant, and applicator pads) Order Part Number 31605 Cooktop...
... for repairs. Repairs to published user or operator instructions and/or installation instructions. 4. Major appliances with Removable Insert Order Part Number 4396927 Broiler Pan Order Part Number 4396923 AMANA® MAJOR APPLIANCE WARRANTY LIMITED WARRANTY For one year from unauthorized modifications made to obtain service under these excluded circumstances shall be provided by the customer. 11 Canning Unit Kit (coil element models) Order Part Number 242905 Cooktop Care Kit (includes cleaner, protectant, and applicator pads) Order Part Number 31605 Cooktop...

Warranty
Page 1
... workmanship and is reported to Amana within 30 days from warranty coverage. 3. Major appliances with electrical or plumbing codes, or use or when it was purchased. Adjust cooking time. ■ Has the oven door been opened while cooking? The removal and reinstallation of repair or replacement under this major appliance is operated and maintained according to instructions attached to or furnished with the removal from accident, alteration, misuse...
... workmanship and is reported to Amana within 30 days from warranty coverage. 3. Major appliances with electrical or plumbing codes, or use or when it was purchased. Adjust cooking time. ■ Has the oven door been opened while cooking? The removal and reinstallation of repair or replacement under this major appliance is operated and maintained according to instructions attached to or furnished with the removal from accident, alteration, misuse...


