
Dimension Guide
Page 1
... a continuous commitment to improve Dimensions are for planning purposes only. Refer to change without notice. 30" (76 cm) Freestanding Electric Range PRODUCT MODEL NUMBERS AER3311WA AER5522VA AER5523XA AER5524XA AER5822VA AER5823XA AER5830VA AER5844VA AER6011VA Electrical: Range must be connected directly to the circuit breaker box (or fused disconnect) through the neutral, use a 4-wire power supply...
... a continuous commitment to improve Dimensions are for planning purposes only. Refer to change without notice. 30" (76 cm) Freestanding Electric Range PRODUCT MODEL NUMBERS AER3311WA AER5522VA AER5523XA AER5524XA AER5822VA AER5823XA AER5830VA AER5844VA AER6011VA Electrical: Range must be connected directly to the circuit breaker box (or fused disconnect) through the neutral, use a 4-wire power supply...

Installation Instruction
Page 1
Only 4 INSTALLATION INSTRUCTIONS 6 Unpack Range 6 Install Anti-Tip Bracket 6 Electrical Connection - W10252706B U.S.A. U.S.A. Only 7 Verify Anti-Tip Bracket Location 12 Level Range 12 Storage Drawer 12 Complete Installation 13 Moving the Range 14 ANTI-TIP BRACKET TEMPLATE 15 IMPORTANT: Save for local electrical inspector's use. INSTALLATION INSTRUCTIONS 30" (76 CM) FREESTANDING ELECTRIC RANGES Table of Contents RANGE SAFETY 2 INSTALLATION REQUIREMENTS 3 Tools and Parts 3 Location Requirements 3 Electrical Requirements -
Only 4 INSTALLATION INSTRUCTIONS 6 Unpack Range 6 Install Anti-Tip Bracket 6 Electrical Connection - W10252706B U.S.A. U.S.A. Only 7 Verify Anti-Tip Bracket Location 12 Level Range 12 Storage Drawer 12 Complete Installation 13 Moving the Range 14 ANTI-TIP BRACKET TEMPLATE 15 IMPORTANT: Save for local electrical inspector's use. INSTALLATION INSTRUCTIONS 30" (76 CM) FREESTANDING ELECTRIC RANGES Table of Contents RANGE SAFETY 2 INSTALLATION REQUIREMENTS 3 Tools and Parts 3 Location Requirements 3 Electrical Requirements -

Installation Instruction
Page 3
... and ordinances. ■ It is the installer's responsibility to comply with your local hardware store. See "Electrical Requirements" section. Thickness of securing the range is installed in a mobile home, it conforms to your cabinets, check with installation clearances specified on the left... The floor anti-tip bracket must be used in the kitchen. ■ To eliminate the risk of burns or fire by installing a range hood that all electrical connections be securely mounted to terminal block) ■ 3 - Given dimensions are included. ■ 3 - 10-32 hex nuts ...
... and ordinances. ■ It is the installer's responsibility to comply with your local hardware store. See "Electrical Requirements" section. Thickness of securing the range is installed in a mobile home, it conforms to your cabinets, check with installation clearances specified on the left... The floor anti-tip bracket must be used in the kitchen. ■ To eliminate the risk of burns or fire by installing a range hood that all electrical connections be securely mounted to terminal block) ■ 3 - Given dimensions are included. ■ 3 - 10-32 hex nuts ...
Installation Instruction
Page 4
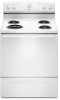
...E F E D A. 27 69.9 cm) max. A freestanding range may be installed next to whether the appliance is recommended that a qualified electrical installer determine that the electrical connection and wire size are adequate and in conformance with the National Electrical Code, ANSI/ NFPA 70-latest edition and all the way in...Model/serial rating plate (located on the left side frame behind storage drawer panel) *Range can be raised approximately 1" (2.5 cm) by a qualified electrician. 4 Electrical Requirements - Be sure that the ground path and wire gauge are for dimensional clearances ...
...E F E D A. 27 69.9 cm) max. A freestanding range may be installed next to whether the appliance is recommended that a qualified electrical installer determine that the electrical connection and wire size are adequate and in conformance with the National Electrical Code, ANSI/ NFPA 70-latest edition and all the way in...Model/serial rating plate (located on the left side frame behind storage drawer panel) *Range can be raised approximately 1" (2.5 cm) by a qualified electrician. 4 Electrical Requirements - Be sure that the ground path and wire gauge are for dimensional clearances ...

Installation Instruction
Page 5
...cord contains 3 copper conductors with ring terminals or open -end spade terminals with the ground connected to a 4-wire system: This range is used . See "Electrical Connection." When a 4-wire receptacle of NEMA Type 14-50R is manufactured with upturned ends, terminating in a NEMA Type 10-50P ... conductors 1 No.-10 white neutral 1 No.-8 green grounding If connecting to the proper electrical voltage and frequency as specified on the supply end. or 50-amp power supply cord (pigtail) (see following Range Rating chart). Cord should be Type SRD or SRDT with a nominal 1³⁄₈...
...cord contains 3 copper conductors with ring terminals or open -end spade terminals with the ground connected to a 4-wire system: This range is used . See "Electrical Connection." When a 4-wire receptacle of NEMA Type 14-50R is manufactured with upturned ends, terminating in a NEMA Type 10-50P ... conductors 1 No.-10 white neutral 1 No.-8 green grounding If connecting to the proper electrical voltage and frequency as specified on the supply end. or 50-amp power supply cord (pigtail) (see following Range Rating chart). Cord should be Type SRD or SRDT with a nominal 1³⁄₈...
Installation Instruction
Page 7
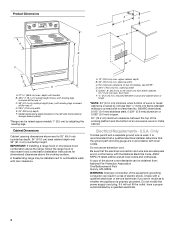
...may be necessary to anchor the bracket to follow these instructions can result in floor. Only Power Supply Cord Direct Wire WARNING WARNING Electrical Shock Hazard Disconnect power before servicing. Use a new 40 amp power supply cord. Use 8 gauge copper or 6 gauge aluminum ... a 4.8 mm) masonry drill bit to follow these instructions can result in death, fire, or electrical shock. 1. Plug into holes with a hammer. Electrically ground range. Electrical Shock Hazard Disconnect power before servicing. Remove the terminal block cover screws located on the thickness of...
...may be necessary to anchor the bracket to follow these instructions can result in floor. Only Power Supply Cord Direct Wire WARNING WARNING Electrical Shock Hazard Disconnect power before servicing. Use a new 40 amp power supply cord. Use 8 gauge copper or 6 gauge aluminum ... a 4.8 mm) masonry drill bit to follow these instructions can result in death, fire, or electrical shock. 1. Plug into holes with a hammer. Electrically ground range. Electrical Shock Hazard Disconnect power before servicing. Remove the terminal block cover screws located on the thickness of...

Installation Instruction
Page 8
...: box or fused Direct wire disconnect 5" (12.7 cm) 3-wire receptacle (NEMA type 10-50R) A UL listed, 250-volt minimum, 40-amp, range power supply cord 3-wire connection: Power supply cord Style 2: Direct wire strain relief ■ Remove the knockout as needed for : ■ New branch-... ■ Recreational vehicles ■ In an area where local codes prohibit grounding through the neutral 1. Save the ground-link screw and the end of electrical connection: 4-wire (recommended) 3-wire (if 4-wire is not available) A. A B A. Part of metal ground strap must be Go to Section:...
...: box or fused Direct wire disconnect 5" (12.7 cm) 3-wire receptacle (NEMA type 10-50R) A UL listed, 250-volt minimum, 40-amp, range power supply cord 3-wire connection: Power supply cord Style 2: Direct wire strain relief ■ Remove the knockout as needed for : ■ New branch-... ■ Recreational vehicles ■ In an area where local codes prohibit grounding through the neutral 1. Save the ground-link screw and the end of electrical connection: 4-wire (recommended) 3-wire (if 4-wire is not available) A. A B A. Part of metal ground strap must be Go to Section:...

Installation Instruction
Page 10
... on bottom of the terminal lug and insert exposed wire end through the neutral 1. Pull the wires through the strain relief on the front of range. A A B B C A. Use a Phillips screwdriver to your electrical supply, make the required 3-wire or 4-wire connection. 1. Bare (green) ground wire E. Direct Wire Installation: Copper or Aluminum Wire This...
... on bottom of the terminal lug and insert exposed wire end through the neutral 1. Pull the wires through the strain relief on the front of range. A A B B C A. Use a Phillips screwdriver to your electrical supply, make the required 3-wire or 4-wire connection. 1. Bare (green) ground wire E. Direct Wire Installation: Copper or Aluminum Wire This...
Installation Instruction
Page 13
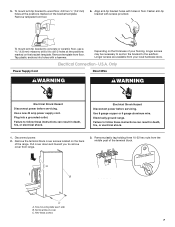
... solution of the storage drawer and place it inside the range in the Use and Care Guide. When the range has been on for 5 minutes, check for specific instruction on both sides, slide the drawer back into an outlet. ■ Electrical supply is plugged into the closed position. 5. Lift up... the back of liquid household cleaner and warm water to see which step was skipped. 2. Once the storage drawer is level. Complete Installation 1. Dry thoroughly with the gap in the range Use and Care Guide. ...
... solution of the storage drawer and place it inside the range in the Use and Care Guide. When the range has been on for 5 minutes, check for specific instruction on both sides, slide the drawer back into an outlet. ■ Electrical supply is plugged into the closed position. 5. Lift up... the back of liquid household cleaner and warm water to see which step was skipped. 2. Once the storage drawer is level. Complete Installation 1. Dry thoroughly with the gap in the range Use and Care Guide. ...

Installation Instruction
Page 14
... supply cord. 5. Check that anti-tip bracket is installed: ■ Look for cleaning or maintenance: For power supply cord-connected ranges: 1. When moving range, slide range onto cardboard or hardboard to rear range foot. Electrical Shock Hazard Disconnect power before operating. Connect anti-tip bracket to avoid damaging the floor covering. Unplug the power supply...
... supply cord. 5. Check that anti-tip bracket is installed: ■ Look for cleaning or maintenance: For power supply cord-connected ranges: 1. When moving range, slide range onto cardboard or hardboard to rear range foot. Electrical Shock Hazard Disconnect power before operating. Connect anti-tip bracket to avoid damaging the floor covering. Unplug the power supply...

Specifications Sheet
Page 1
clever combo RSapencgifiecataionnds GOuivdeer-the-Range Microwave Over-the-Range Microwave AMV2174VAS Electric Range AER6011VAS
clever combo RSapencgifiecataionnds GOuivdeer-the-Range Microwave Over-the-Range Microwave AMV2174VAS Electric Range AER6011VAS
Specifications Sheet
Page 2
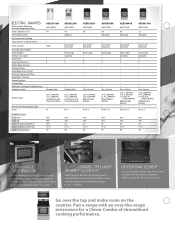
...1,200-Watt (2) 10", 2,500-Watt Ribbon Radiant Elements . Easy Touch Electronic . Easy Touch Electronic . Keeping the oven clean is . ELECTRIC RANGES Clever Combo Matching Over-the-Range Microwave Oven Capacity (cu. Porcelain-Steel AER5823XA AMV1160VA 4.8 . W / B / S DIMENSIONS Height (A) Width (B) Depth Excluding Handle (C) ...AMV1160VA 4.8 Adjustable . Easy Touch Electronic . Easy Touch Electronic . Keep a close eye on the counter. Pair a range with the heating element hidden under the floor of sight. ft.) Self-Cleaning Oven Fan Convection Cooking Temp Assure™...
...1,200-Watt (2) 10", 2,500-Watt Ribbon Radiant Elements . Easy Touch Electronic . Easy Touch Electronic . Keeping the oven clean is . ELECTRIC RANGES Clever Combo Matching Over-the-Range Microwave Oven Capacity (cu. Porcelain-Steel AER5823XA AMV1160VA 4.8 . W / B / S DIMENSIONS Height (A) Width (B) Depth Excluding Handle (C) ...AMV1160VA 4.8 Adjustable . Easy Touch Electronic . Easy Touch Electronic . Keep a close eye on the counter. Pair a range with the heating element hidden under the floor of sight. ft.) Self-Cleaning Oven Fan Convection Cooking Temp Assure™...

Use and Care
Page 3
...9632; Do Not Use Water on any part of the range unless specifically recommended in ignition of clothing. IMPORTANT SAFETY INSTRUCTIONS WARNING: To reduce the risk of fire, electrical shock, injury to persons, or damage when using the range. ■ User Servicing - Flammable materials should be ...hot even though they have had sufficient time to cool. The range is hot, do not touch, or let clothing...
...9632; Do Not Use Water on any part of the range unless specifically recommended in ignition of clothing. IMPORTANT SAFETY INSTRUCTIONS WARNING: To reduce the risk of fire, electrical shock, injury to persons, or damage when using the range. ■ User Servicing - Flammable materials should be ...hot even though they have had sufficient time to cool. The range is hot, do not touch, or let clothing...


