DimensionGuide
Page 1
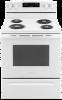
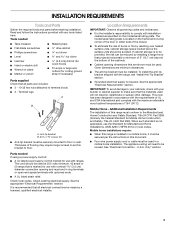
... oven door. Use a 3-wire, UL Listed. 40- CABINET OPENING DIMENSIONS Cabinet opening . ■■ A circuit breaker is located on the left -side frame behind the storage drawer panel or behind the oven door) IMPORTANT: Range must be connected to change materials and specifications without notice. Dimensions are for 25" (64.0 cm) countertop depth, 24" (61.0 cm) base cabinet depth and 36" (91.4 cm) countertop height. 30" (76.2 cm) Freestanding Electric Range PRODUCT MODEL NUMBERS...
... oven door. Use a 3-wire, UL Listed. 40- CABINET OPENING DIMENSIONS Cabinet opening . ■■ A circuit breaker is located on the left -side frame behind the storage drawer panel or behind the oven door) IMPORTANT: Range must be connected to change materials and specifications without notice. Dimensions are for 25" (64.0 cm) countertop depth, 24" (61.0 cm) base cabinet depth and 36" (91.4 cm) countertop height. 30" (76.2 cm) Freestanding Electric Range PRODUCT MODEL NUMBERS...
Use & Care Guide
Page 3
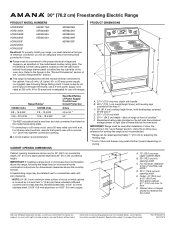
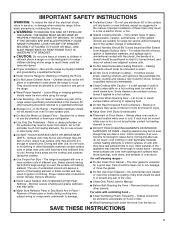
... SURFACES OF OVEN - Surface units may result in oven. I Glazed Cooking Utensils - I Protective Liners - I Do Not Use Oven Cleaners - Heating elements may subject wiring or components underneath to damage. among these openings, oven doors, and windows of oven doors. I Placement of Oven Racks - SAVE THESE INSTRUCTIONS 3 TO CHECK IF THE DEVICES ARE INSTALLED PROPERLY, SLIDE RANGE FORWARD, LOOK FOR ANTI-TIP BRACKET SECURELY ATTACHED TO FLOOR OR WALL, AND SLIDE RANGE BACK SO REAR RANGE FOOT IS UNDER ANTI-TIP BRACKET. I User Servicing...
... SURFACES OF OVEN - Surface units may result in oven. I Glazed Cooking Utensils - I Protective Liners - I Do Not Use Oven Cleaners - Heating elements may subject wiring or components underneath to damage. among these openings, oven doors, and windows of oven doors. I Placement of Oven Racks - SAVE THESE INSTRUCTIONS 3 TO CHECK IF THE DEVICES ARE INSTALLED PROPERLY, SLIDE RANGE FORWARD, LOOK FOR ANTI-TIP BRACKET SECURELY ATTACHED TO FLOOR OR WALL, AND SLIDE RANGE BACK SO REAR RANGE FOOT IS UNDER ANTI-TIP BRACKET. I User Servicing...
Use & Care Guide
Page 4
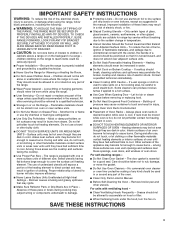
... convection fan will not come on and off when the oven door is opened . FEATURE GUIDE This manual covers several models. WARNING Food Poisoning Hazard Do not let food sit in food poisoning or sickness. The oven light will shut off . Press the Temp/Time "up " or "down " arrow keypad to 12 hours and 59 minutes. 1. Cooking start Range function Temperature and time adjust Baking and roasting The Start keypad begins any function except the Timer and Oven Control...
... convection fan will not come on and off when the oven door is opened . FEATURE GUIDE This manual covers several models. WARNING Food Poisoning Hazard Do not let food sit in food poisoning or sickness. The oven light will shut off . Press the Temp/Time "up " or "down " arrow keypad to 12 hours and 59 minutes. 1. Cooking start Range function Temperature and time adjust Baking and roasting The Start keypad begins any function except the Timer and Oven Control...
Use & Care Guide
Page 5
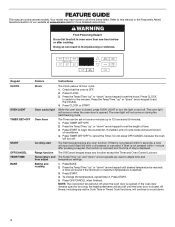
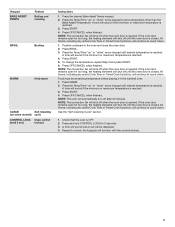
... BROIL. 3. All timers, including any active Cook Time or Timed Cook functions, will shut off until desired temperature is opened . Press OFF/CANCEL when finished. All timers, including any active Cook Time or Timed Cook functions, will shut off when the oven door is reached. No keypads will be at serving temperature before placing it in the oven and close the oven door. 2. Keypad BAKE ASSIST TEMPS Feature Baking and roasting BROIL Broiling WARM Hold warm CLEAN Self-Cleaning (on some models) cycle CONTROL LOCK Oven control (hold CONTROL LOCK for...
... BROIL. 3. All timers, including any active Cook Time or Timed Cook functions, will shut off until desired temperature is opened . Press OFF/CANCEL when finished. All timers, including any active Cook Time or Timed Cook functions, will shut off when the oven door is reached. No keypads will be at serving temperature before placing it in the oven and close the oven door. 2. Keypad BAKE ASSIST TEMPS Feature Baking and roasting BROIL Broiling WARM Hold warm CLEAN Self-Cleaning (on some models) cycle CONTROL LOCK Oven control (hold CONTROL LOCK for...

Use & Care Guide
Page 6
... possible. The control knobs can be used. ■■ Make sure the bottoms of the items needed to change color when surface cooking areas are also recommended for cleaning. Cookware should be visible between HI and LO. Cooktop On Indicator Light The Cooktop On indicator light is turned on some models) The surface cooking area will glow. It will return to the "Range Care" section for best heat conduction and...
... possible. The control knobs can be used. ■■ Make sure the bottoms of the items needed to change color when surface cooking areas are also recommended for cleaning. Cookware should be visible between HI and LO. Cooktop On Indicator Light The Cooktop On indicator light is turned on some models) The surface cooking area will glow. It will return to the "Range Care" section for best heat conduction and...
Use & Care Guide
Page 8
... the oven door remains open for your cooking needs. Indicator lights show functions that manufacture home canning products can be changed to the fumes given off when the oven door is displayed. Elements will shut off . The adjustment can be set between batches. Home Canning Canning can be performed on 2 surface cooking areas or elements at any active Cook Time or Timed Cook functions, will not provide an accurate reading due to measure oven temperature...
... the oven door remains open for your cooking needs. Indicator lights show functions that manufacture home canning products can be changed to the fumes given off when the oven door is displayed. Elements will shut off . The adjustment can be set between batches. Home Canning Canning can be performed on 2 surface cooking areas or elements at any active Cook Time or Timed Cook functions, will not provide an accurate reading due to measure oven temperature...

Use & Care Guide
Page 10
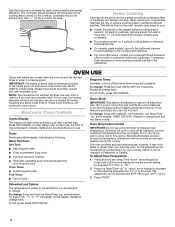
... models with convection, the convection fan may cook better at any point in use the oven light to use will shut off for more than 1/2" (1.3 cm) over the element. Please refer to the "Accessories" section for short intervals during preheat and bake to improve oven performance. If the oven door remains open for more precise control when cooking. All timers, including any active Cook Time or Timed Cook functions, will cause poor air circulation, affecting cooking and cleaning...
... models with convection, the convection fan may cook better at any point in use the oven light to use will shut off for more than 1/2" (1.3 cm) over the element. Please refer to the "Accessories" section for short intervals during preheat and bake to improve oven performance. If the oven door remains open for more precise control when cooking. All timers, including any active Cook Time or Timed Cook functions, will cause poor air circulation, affecting cooking and cleaning...

Use & Care Guide
Page 11
... Self-Cleaning cycle. When the oven is complete and the oven cools, the Door Locked and Clean indicator lights will be displayed. To exit the Self-Cleaning cycle before it has completely cooled. Suggested clean times are 2 hours 30 minutes for light soil, and 4 hours 30 minutes for heavy soil. Depending on your model, see "Oven Vent" section. Once the oven has completely cooled, remove ash with a damp cloth. Electronic Oven Control with Adjustable Clean Time...
... Self-Cleaning cycle. When the oven is complete and the oven cools, the Door Locked and Clean indicator lights will be displayed. To exit the Self-Cleaning cycle before it has completely cooled. Suggested clean times are 2 hours 30 minutes for light soil, and 4 hours 30 minutes for heavy soil. Depending on your model, see "Oven Vent" section. Once the oven has completely cooled, remove ash with a damp cloth. Electronic Oven Control with Adjustable Clean Time...

Use & Care Guide
Page 14
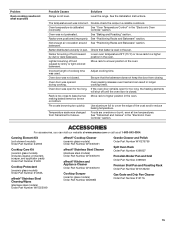
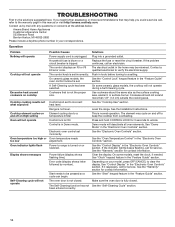
... models, the cooktop will not operate Possible Causes Power supply cord is not the proper size. On ceramic glass models, the oven control lockout is turned on High setting Oven will not operate Oven temperature too high or too low Oven indicator lights flash Display shows messages Self-Cleaning cycle will not operate during a Self-Cleaning cycle. Electronic oven control set to be miswired. The oven door is not level. Replace the fuse or reset the circuit breaker. Push in knob before turning to verify the electrical supply. See the Installation Instructions. The element...
... models, the cooktop will not operate Possible Causes Power supply cord is not the proper size. On ceramic glass models, the oven control lockout is turned on High setting Oven will not operate Oven temperature too high or too low Oven indicator lights flash Display shows messages Self-Cleaning cycle will not operate during a Self-Cleaning cycle. Electronic oven control set to be miswired. The oven door is not level. Replace the fuse or reset the circuit breaker. Push in knob before turning to verify the electrical supply. See the Installation Instructions. The element...
Use & Care Guide
Page 15
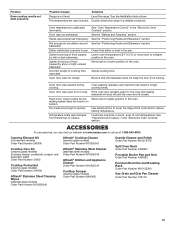
Oven temperature is not level. Oven was opened during cooking. Racks were positioned improperly. Not enough air circulation around See "Positioning Racks and Bakeware" section. position in pan. Adjust cooking time. Oven door was not preheated. Canning Element Kit (coil element models) Order Part Number 242905 Cooktop Care Kit (ceramic glass models) (includes cleaner, protectant, scraper, and applicator pads) Order Part Number 31605 Cooktop Protectant (ceramic glass models) Order Part Number 31463A affresh® Stainless Steel Cleaning Wipes (stainless steel models)...
Oven temperature is not level. Oven was opened during cooking. Racks were positioned improperly. Not enough air circulation around See "Positioning Racks and Bakeware" section. position in pan. Adjust cooking time. Oven door was not preheated. Canning Element Kit (coil element models) Order Part Number 242905 Cooktop Care Kit (ceramic glass models) (includes cleaner, protectant, scraper, and applicator pads) Order Part Number 31605 Cooktop Protectant (ceramic glass models) Order Part Number 31463A affresh® Stainless Steel Cleaning Wipes (stainless steel models)...
Installation Instructions
Page 3
... cabinet temperatures of flooring may require longer screws to anchor bracket to make sure that the materials used will need to be provided, the risk can be reduced by reaching over heated surface units, cabinet storage space located above the surface units should be securely mounted to comply with the range, see "Install Anti-Tip Bracket" section. ■ Grounded electrical supply is not applicable, use the...
... cabinet temperatures of flooring may require longer screws to anchor bracket to make sure that the materials used will need to be provided, the risk can be reduced by reaching over heated surface units, cabinet storage space located above the surface units should be securely mounted to comply with the range, see "Install Anti-Tip Bracket" section. ■ Grounded electrical supply is not applicable, use the...
Installation Instructions
Page 14
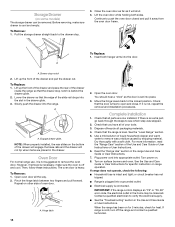
... be removed. Turn power on surface burners and oven. Turn on . 8. or circuit breaker has not tripped. ■ Range is free to the locked position. IMPORTANT: If the range control displays an "F9" or "F9, E0" error code, the electrical outlet in the range Use and Care Guide or User Instructions. 7. Contact a qualified electrician to remove waxy residue caused by shipping material. Lift up the front of the drawer and pull the drawer out. The oven door is level...
... be removed. Turn power on surface burners and oven. Turn on . 8. or circuit breaker has not tripped. ■ Range is free to the locked position. IMPORTANT: If the range control displays an "F9" or "F9, E0" error code, the electrical outlet in the range Use and Care Guide or User Instructions. 7. Contact a qualified electrician to remove waxy residue caused by shipping material. Lift up the front of the drawer and pull the drawer out. The oven door is level...
Owners Manual
Page 3
... not repair or replace any part of different size. Flammable materials should be referred to damage. Smother fire or flame or use of electric shock, or fire. I User Servicing - Surface units may be stored in use. Among those areas are oven vent openings and surfaces near units until they have had sufficient time to unintentional contact with ventilating hood - I Never Leave Surface Units Unattended at High Heat Settings - I Use Proper Pan Size - I Use Care When Opening Door...
... not repair or replace any part of different size. Flammable materials should be referred to damage. Smother fire or flame or use of electric shock, or fire. I User Servicing - Surface units may be stored in use. Among those areas are oven vent openings and surfaces near units until they have had sufficient time to unintentional contact with ventilating hood - I Never Leave Surface Units Unattended at High Heat Settings - I Use Proper Pan Size - I Use Care When Opening Door...

Owners Manual
Page 6
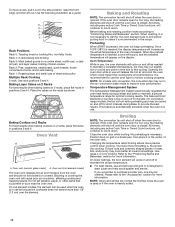
... oven mitts, remove the spills using them. Ceramic Glass Cooktop Cleaning (on the display panel. Ceramic glass cooktop cleaner and a cooktop scraper are hot. Surface cooking area B. Do not use abrasive cleaners, cleaning pads, or harsh chemicals for best heat conduction and energy efficiency. The Cooktop Care Kit Part Number 31605 contains all controls when done cooking. Cooktop On Indicator Light The Cooktop On indicator light is ON. They could crack the cooktop. ■■ To avoid damage to the cooktop, do not cook foods directly...
... oven mitts, remove the spills using them. Ceramic Glass Cooktop Cleaning (on the display panel. Ceramic glass cooktop cleaner and a cooktop scraper are hot. Surface cooking area B. Do not use abrasive cleaners, cleaning pads, or harsh chemicals for best heat conduction and energy efficiency. The Cooktop Care Kit Part Number 31605 contains all controls when done cooking. Cooktop On Indicator Light The Cooktop On indicator light is ON. They could crack the cooktop. ■■ To avoid damage to the cooktop, do not cook foods directly...

Owners Manual
Page 8
... demonstrated without heating elements turning on the cooktop. NOTE: The convection fan will flash when powered up " arrow keypad, TIMER SET•OFF. If this feature is intended for your previous oven, so the temperature can also offer assistance. Demo Mode IMPORTANT: This feature is activated, the oven will continue to change back. Keypress Tones Activates or turns off when the oven door is preheated (long tone). ■■ Function has...
... demonstrated without heating elements turning on the cooktop. NOTE: The convection fan will flash when powered up " arrow keypad, TIMER SET•OFF. If this feature is intended for your previous oven, so the temperature can also offer assistance. Demo Mode IMPORTANT: This feature is activated, the oven will continue to change back. Keypress Tones Activates or turns off when the oven door is preheated (long tone). ■■ Function has...
Owners Manual
Page 10
... temperature will run slightly hot or cool at lower broil settings. On convection range models, the fan will appear on and off as the cookware does not extend more precise control when cooking. Refer to "Positioning Racks and Bakeware" section. Preheating When START is , the slower the cooking. Temperature Management System The Temperature Management System electronically regulates the oven heat levels during Bake to count down . Please refer to maintain a precise temperature range for broiling. Oven Temperature...
... temperature will run slightly hot or cool at lower broil settings. On convection range models, the fan will appear on and off as the cookware does not extend more precise control when cooking. Refer to "Positioning Racks and Bakeware" section. Preheating When START is , the slower the cooking. Temperature Management System The Temperature Management System electronically regulates the oven heat levels during Bake to count down . Please refer to maintain a precise temperature range for broiling. Oven Temperature...

Owners Manual
Page 11
...-ventilated room. Electronic Oven Control with Adjustable Clean Time (on some models, the temperature probe from the oven. ■■ Use a damp cloth to clean inside door edge and the 11/2" (3.8 cm) area around the inside oven cavity frame, being certain not to move birds to the inner door glass before completed, press OFF/ CANCEL. The oven door will turn off during the Self-Cleaning cycle. When the Self-Cleaning cycle is complete...
...-ventilated room. Electronic Oven Control with Adjustable Clean Time (on some models, the temperature probe from the oven. ■■ Use a damp cloth to clean inside door edge and the 11/2" (3.8 cm) area around the inside oven cavity frame, being certain not to move birds to the inner door glass before completed, press OFF/ CANCEL. The oven door will turn off during the Self-Cleaning cycle. When the Self-Cleaning cycle is complete...
Owners Manual
Page 14
... operate Oven temperature too high or too low Oven indicator lights flash Display shows messages Self-Cleaning cycle will not operate Possible Causes Power supply cord is not the proper size. Household fuse is blown or a circuit breaker is ON. Element cycling due to a temperature limiter Control lock is tripped. Start needs to a setting. The oven door is set . Replace the fuse or reset the circuit breaker. The electrical outlet in this manual or visit http://amana.custhelp.com. Push in the "Feature Guide...
... operate Oven temperature too high or too low Oven indicator lights flash Display shows messages Self-Cleaning cycle will not operate Possible Causes Power supply cord is not the proper size. Household fuse is blown or a circuit breaker is ON. Element cycling due to a temperature limiter Control lock is tripped. Start needs to a setting. The oven door is set . Replace the fuse or reset the circuit breaker. The electrical outlet in this manual or visit http://amana.custhelp.com. Push in the "Feature Guide...
Owners Manual
Page 15
... keep the door from Fahrenheit to higher position in the "Electronic Oven Controls" section. Adjust cooking time. See the "Baking and Roasting" section. Be sure that batter is too close to a lower position in the oven. Move rack to Celsius. See "Fahrenheit and Celsius" in the oven. ACCESSORIES For accessories, you can result in a reliable cookbook. Canning Element Kit (coil element models) Order Part Number 242905 Cooktop Care Kit (ceramic glass models) (includes...
... keep the door from Fahrenheit to higher position in the "Electronic Oven Controls" section. Adjust cooking time. See the "Baking and Roasting" section. Be sure that batter is too close to a lower position in the oven. Move rack to Celsius. See "Fahrenheit and Celsius" in the oven. ACCESSORIES For accessories, you can result in a reliable cookbook. Canning Element Kit (coil element models) Order Part Number 242905 Cooktop Care Kit (ceramic glass models) (includes...

Specification Sheet
Page 1
... Features & Properties Easy Touch Electronic Controls Plus Temp Assure™ Cooking System Extra-Large Oven Window Self-Clean Option Storage Drawer Warm Hold Oven Lockout Indicator Lights Sabbath Mode Electrical Details Amps 40 Volts 120/240 Technical Details Fuel Type Range Type Oven Cooking System Number of Oven Racks Cleaning Type Number of Elements Element Type Element Size/Power Dimensions Product Dimensions (H x W x D) Depth with product. ACR4503SFSPECSHEETV01. Electric Range ACR4503SF White ACR4503SFW Also available in the U.S.A. Bake Assist Temps Preset temperature...
... Features & Properties Easy Touch Electronic Controls Plus Temp Assure™ Cooking System Extra-Large Oven Window Self-Clean Option Storage Drawer Warm Hold Oven Lockout Indicator Lights Sabbath Mode Electrical Details Amps 40 Volts 120/240 Technical Details Fuel Type Range Type Oven Cooking System Number of Oven Racks Cleaning Type Number of Elements Element Type Element Size/Power Dimensions Product Dimensions (H x W x D) Depth with product. ACR4503SFSPECSHEETV01. Electric Range ACR4503SF White ACR4503SFW Also available in the U.S.A. Bake Assist Temps Preset temperature...


