Owners Manual
Page 1
... Sabbath Mode 9 Warm 9 Aluminum Foil 9 Positioning Racks and Bakeware 10 Oven Vent 10 Baking and Roasting 10 Broiling 11 RANGE CARE 11 Self-Cleaning Cycle 11 General Cleaning 12 Oven Light 13 TROUBLESHOOTING 14 ACCESSORIES 15 WARRANTY 16 W11235898A Register your product ...model and serial numbers. For future reference, please make a note of your range at www.amana.com. Para referencia futura, tome nota de los números de modelo y de serie de su producto. UUSESEELELRERECICINTNTSRSRTITICRCRURURCACATNTNIGIOGOENENSS...
... Sabbath Mode 9 Warm 9 Aluminum Foil 9 Positioning Racks and Bakeware 10 Oven Vent 10 Baking and Roasting 10 Broiling 11 RANGE CARE 11 Self-Cleaning Cycle 11 General Cleaning 12 Oven Light 13 TROUBLESHOOTING 14 ACCESSORIES 15 WARRANTY 16 W11235898A Register your product ...model and serial numbers. For future reference, please make a note of your range at www.amana.com. Para referencia futura, tome nota de los números de modelo y de serie de su producto. UUSESEELELRERECICINTNTSRSRTITICRCRURURCACATNTNIGIOGOENENSS...

Owners Manual
Page 2
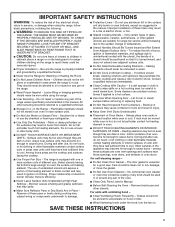
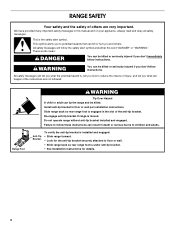
...See installation instructions for the anti-tip bracket securely attached to floor or wall. • Slide range back so rear range foot is the safety alert symbol. However, the range can tip the range and be killed or seriously injured if you apply too much force or weight to children and ...the open door without anti-tip bracket installed and engaged. All safety messages will not tip during normal use. The Anti-Tip Bracket The range will follow instructions. WARNING Tip Over Hazard A child or adult can tip if you don't immediately follow the safety alert symbol and ...
...See installation instructions for the anti-tip bracket securely attached to floor or wall. • Slide range back so rear range foot is the safety alert symbol. However, the range can tip the range and be killed or seriously injured if you apply too much force or weight to children and ...the open door without anti-tip bracket installed and engaged. All safety messages will not tip during normal use. The Anti-Tip Bracket The range will follow instructions. WARNING Tip Over Hazard A child or adult can tip if you don't immediately follow the safety alert symbol and ...
Owners Manual
Page 3
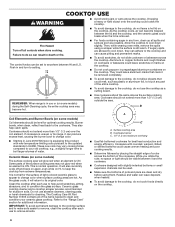
...cooktop. Care should be taken not to burst and result in the manual. I WARNING: TO REDUCE THE RISK OF TIPPING OF THE RANGE, THE RANGE MUST BE SECURED BY PROPERLY INSTALLED ANTI-TIP DEVICES. Let hot air or steam escape before removing or replacing food. I DO NOT ...are oven vent openings and surfaces near units until they have had sufficient time to unintentional contact with the utensil, the handle of the range unless specifically recommended in injury. Interior surfaces of utensil to cause burns. I Keep Oven Vent Ducts Unobstructed. Proper relationship of an ...
...cooktop. Care should be taken not to burst and result in the manual. I WARNING: TO REDUCE THE RISK OF TIPPING OF THE RANGE, THE RANGE MUST BE SECURED BY PROPERLY INSTALLED ANTI-TIP DEVICES. Let hot air or steam escape before removing or replacing food. I DO NOT ...are oven vent openings and surfaces near units until they have had sufficient time to unintentional contact with the utensil, the handle of the range unless specifically recommended in injury. Interior surfaces of utensil to cause burns. I Keep Oven Vent Ducts Unobstructed. Proper relationship of an ...
Owners Manual
Page 4
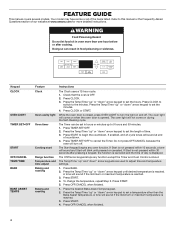
...-of-cycle tones will turn the light on during the Self-Cleaning cycle. Do not press OFF/CANCEL because the oven will sound at www.amana.com for more than the Bake Assist Temperature. Press OFF/CANCEL when finished. 1. Press the Temp/Time "up" or "down " arrow keypad until ... OVEN LIGHT TIMER SET•OFF START OFF/CANCEL TEMP/TIME BAKE BAKE ASSIST TEMPS Feature Instructions Clock Oven cavity light Oven timer Cooking start Range function Temperature and time adjust Baking and roasting Baking and roasting The Clock uses a 12-hour cycle. 1. Press the Temp/Time "up " or "down "...
...-of-cycle tones will turn the light on during the Self-Cleaning cycle. Do not press OFF/CANCEL because the oven will sound at www.amana.com for more than the Bake Assist Temperature. Press OFF/CANCEL when finished. 1. Press the Temp/Time "up" or "down " arrow keypad until ... OVEN LIGHT TIMER SET•OFF START OFF/CANCEL TEMP/TIME BAKE BAKE ASSIST TEMPS Feature Instructions Clock Oven cavity light Oven timer Cooking start Range function Temperature and time adjust Baking and roasting Baking and roasting The Clock uses a 12-hour cycle. 1. Press the Temp/Time "up " or "down "...
Owners Manual
Page 6
REMEMBER: When range is in use or (on some models) Coil elements should be visible between it and the cookware. ■■ Cookware designed with new temperature-limiting ... hot. Refer to the cookware. Cookware should not extend more than 1/2" (1.3 cm) over the coil element. Burner bowls, when clean, reflect heat back to the "Range Care" section for additional information. The Cooktop Care Kit Part Number 31605 contains all spills and soils as soon as possible. As the cooktop cools...
REMEMBER: When range is in use or (on some models) Coil elements should be visible between it and the cookware. ■■ Cookware designed with new temperature-limiting ... hot. Refer to the cookware. Cookware should not extend more than 1/2" (1.3 cm) over the coil element. Burner bowls, when clean, reflect heat back to the "Range Care" section for additional information. The Cooktop Care Kit Part Number 31605 contains all spills and soils as soon as possible. As the cooktop cools...

Owners Manual
Page 7
...Single B. Dual Melt Cooking Element (on some models) The Melt cooking element offers flexibility due to a wide range of cooking. ■■ Medium or heavy thickness is transferred which may be diminished if cleaned immediately after ...types of settings between it and the cookware. 1 2 3 1 4 5 6 2 7 8 3 9 1 0 1 1 4 1 2 1 3 5 1 4 1 5 1 6 6 1 7 1 8 7 1 9 2 0 A B A. Refer to the "Range Care" section for most cooking tasks. ■■ May leave aluminum residues which may be diminished if cleaned immediately after cooking. Single size can leave...
...Single B. Dual Melt Cooking Element (on some models) The Melt cooking element offers flexibility due to a wide range of cooking. ■■ Medium or heavy thickness is transferred which may be diminished if cleaned immediately after ...types of settings between it and the cookware. 1 2 3 1 4 5 6 2 7 8 3 9 1 0 1 1 4 1 2 1 3 5 1 4 1 5 1 6 6 1 7 1 8 7 1 9 2 0 A B A. Refer to the "Range Care" section for most cooking tasks. ■■ May leave aluminum residues which may be diminished if cleaned immediately after cooking. Single size can leave...

Owners Manual
Page 10
...the element can be cycled on the display. Baking and Roasting Before baking and roasting, position racks according to improve oven performance. On convection range models, the fan will increase as the actual temperature of the oven increases. Once 100ºF (38ºC) is pressed, the oven ...piece is in use , the oven elements will appear on and off for short intervals during preheat and bake to maintain a precise temperature range for the oven preheat cycle to provide the best results. When roasting, it is not necessary to wait for optimal cooking results. Temperature...
...the element can be cycled on the display. Baking and Roasting Before baking and roasting, position racks according to improve oven performance. On convection range models, the fan will increase as the actual temperature of the oven increases. Once 100ºF (38ºC) is pressed, the oven ...piece is in use , the oven elements will appear on and off for short intervals during preheat and bake to maintain a precise temperature range for the oven preheat cycle to provide the best results. When roasting, it is not necessary to wait for optimal cooking results. Temperature...
Owners Manual
Page 11
... adjustable between 2 hours 30 minutes and 4 hours 30 minutes in the recipe. Do not block the oven vent(s) during the Self-Cleaning cycle. RANGE CARE Self-Cleaning Cycle (on some birds is too high, the oven door will remain locked and "cool" and " " will not begin. ..., hairline cracks, and popping sounds. Refer to the inner door glass before putting food in unless recommended otherwise in 30-minute increments. Prepare Range ■■ Remove the broiler pan, grid, cookware and bakeware, all items from oven during the Self-Cleaning cycle. To avoid breaking the...
... adjustable between 2 hours 30 minutes and 4 hours 30 minutes in the recipe. Do not block the oven vent(s) during the Self-Cleaning cycle. RANGE CARE Self-Cleaning Cycle (on some birds is too high, the oven door will remain locked and "cool" and " " will not begin. ..., hairline cracks, and popping sounds. Refer to the inner door glass before putting food in unless recommended otherwise in 30-minute increments. Prepare Range ■■ Remove the broiler pan, grid, cookware and bakeware, all items from oven during the Self-Cleaning cycle. To avoid breaking the...
Owners Manual
Page 12
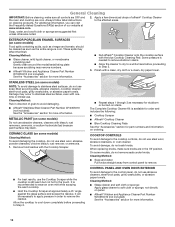
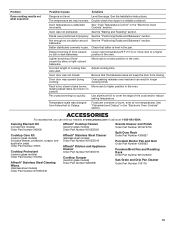
... for stubborn or burned-on some models) Food spills containing acids, such as the entire range is recommended to wear an oven mitt while scraping the warm cooktop. ■■ Hold the Cooktop Scraper at www.amana.com. 2. METALLIC PAINT (on panel. ■■ Affresh® Kitchen and Appliance Cleaner Part Number...
... for stubborn or burned-on some models) Food spills containing acids, such as the entire range is recommended to wear an oven mitt while scraping the warm cooktop. ■■ Hold the Cooktop Scraper at www.amana.com. 2. METALLIC PAINT (on panel. ■■ Affresh® Kitchen and Appliance Cleaner Part Number...

Owners Manual
Page 13
... the "Accessories" section for a short time, then gently scrub with a plastic scrubber. At high temperatures, foods react with Self-Cleaning cycle. Unplug range or disconnect power. 2. Replace bulb, then bulb cover by both front corners until the support locks into place. Cleaning Method: ■■ Mild .... Food spills should be used to remove. 3. Turn the glass bulb cover in the Off position. Do not clean or immerse in range or reconnect power. 13 SURFACE UNDER COOKTOP (on some models) The coil cooktop will burn off when hot. STORAGE DRAWER (on some models...
... the "Accessories" section for a short time, then gently scrub with a plastic scrubber. At high temperatures, foods react with Self-Cleaning cycle. Unplug range or disconnect power. 2. Replace bulb, then bulb cover by both front corners until the support locks into place. Cleaning Method: ■■ Mild .... Food spills should be used to remove. 3. Turn the glass bulb cover in the Off position. Do not clean or immerse in range or reconnect power. 13 SURFACE UNDER COOKTOP (on some models) The coil cooktop will burn off when hot. STORAGE DRAWER (on some models...
Owners Manual
Page 14
... Oven temperature needs adjustment. Error code (display shows letter followed by mail with any questions or concerns at the address below: Amana Brand Home Appliances Customer eXperience Center 553 Benson Road Benton Harbor, MI 49022-2692 Please include a daytime phone number in this manual...to unlock. The oven door is not the proper size. See the "Cooktop Use" section. See the "Self-Cleaning Cycle" section. 14 Range is in the home may help you avoid a service call an electrician. Control is not level. Contact a qualified electrician to keep (s) ...
... Oven temperature needs adjustment. Error code (display shows letter followed by mail with any questions or concerns at the address below: Amana Brand Home Appliances Customer eXperience Center 553 Benson Road Benton Harbor, MI 49022-2692 Please include a daytime phone number in this manual...to unlock. The oven door is not the proper size. See the "Cooktop Use" section. See the "Self-Cleaning Cycle" section. 14 Range is in the home may help you avoid a service call an electrician. Control is not level. Contact a qualified electrician to keep (s) ...
Owners Manual
Page 15
... circulation around See the "Positioning Racks and Bakeware" section. Oven peeking releases oven heat and can visit our website at www.amana.com or call us at low temperatures. Use aluminum foil to cover the edge of food caused by dull or dark bakeware....Cleaner Order Part Number 31617A 15 Pie crusts browning too quickly. Problem Oven cooking results not what expected Possible Causes Solutions Range is calibrated incorrectly. Level the range. See "Oven Temperature Control" in the oven. Move rack to Celsius. Adjust cooking time. Foods are overdone or...
... circulation around See the "Positioning Racks and Bakeware" section. Oven peeking releases oven heat and can visit our website at www.amana.com or call us at low temperatures. Use aluminum foil to cover the edge of food caused by dull or dark bakeware....Cleaner Order Part Number 31617A 15 Pie crusts browning too quickly. Problem Oven cooking results not what expected Possible Causes Solutions Range is calibrated incorrectly. Level the range. See "Oven Temperature Control" in the oven. Move rack to Celsius. Adjust cooking time. Foods are overdone or...
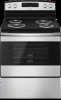
Specification Sheet
Page 1
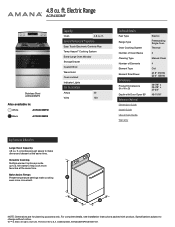
... Bake Assist Temps Preset temperature settings make dinner and dessert at the same time. D200052XXB. ACR4303MFSPECSHEETV01. Electric Range ACR4303MF Stainless Steel ACR4303MFS Also available in the U.S.A. provides enough space to change without notice. ®/™ © 2020. ... Window Storage Drawer Custom Broil Warm Hold Oven Lockout Indicator Lights Electrical Details Amps 40 Volts 120 Technical Details Fuel Type Range Type Oven Cooking System Number of Oven Racks Cleaning Type Number of Elements Element Type Element Size/Power Dimensions Product Dimensions ...
... Bake Assist Temps Preset temperature settings make dinner and dessert at the same time. D200052XXB. ACR4303MFSPECSHEETV01. Electric Range ACR4303MF Stainless Steel ACR4303MFS Also available in the U.S.A. provides enough space to change without notice. ®/™ © 2020. ... Window Storage Drawer Custom Broil Warm Hold Oven Lockout Indicator Lights Electrical Details Amps 40 Volts 120 Technical Details Fuel Type Range Type Oven Cooking System Number of Oven Racks Cleaning Type Number of Elements Element Type Element Size/Power Dimensions Product Dimensions ...
DimensionGuide
Page 1
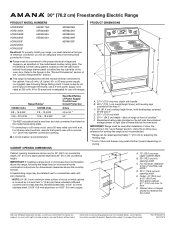
.... upper cabinet depth B. 30" (76.2 cm) min. Follow the instructions in * D. 297/8" (75.9 cm) width E. 255/16" (64.3 cm) depth - 30" (76.2 cm) Freestanding Electric Range PRODUCT MODEL NUMBERS ACR2303MF ACR3130BA ACR4303ME ACR4303MF ACR4503SF ACR4530BA ACR4503SF AER3311WA AER5330BA AER5523XA AER5524XA AER5630BA AER5823XA AER5830VA AER6303MF AER6603SF Electrical: To properly install your...
.... upper cabinet depth B. 30" (76.2 cm) min. Follow the instructions in * D. 297/8" (75.9 cm) width E. 255/16" (64.3 cm) depth - 30" (76.2 cm) Freestanding Electric Range PRODUCT MODEL NUMBERS ACR2303MF ACR3130BA ACR4303ME ACR4303MF ACR4503SF ACR4530BA ACR4503SF AER3311WA AER5330BA AER5523XA AER5524XA AER5630BA AER5823XA AER5830VA AER6303MF AER6603SF Electrical: To properly install your...
Installation Instructions
Page 1
Only 8 Verify Anti-Tip Bracket Is Installed and Engaged 12 Level Range 13 Warming Drawer or Premium Storage Drawer 13 Storage Drawer 14 Oven Door 14 Complete Installation 14 Moving the Range 15 IMPORTANT: Save for local electrical inspector's use. U.S.A. U.S.A. Only 5 INSTALLATION INSTRUCTIONS 6 Unpack Range 6 Install Anti-Tip Bracket 6 Electrical Connection - W10403811C INSTALLATION INSTRUCTIONS 30" (76 CM) FREESTANDING ELECTRIC RANGES Table of Contents RANGE SAFETY 2 INSTALLATION REQUIREMENTS 3 Tools and Parts 3 Location Requirements 3 Electrical Requirements -
Only 8 Verify Anti-Tip Bracket Is Installed and Engaged 12 Level Range 13 Warming Drawer or Premium Storage Drawer 13 Storage Drawer 14 Oven Door 14 Complete Installation 14 Moving the Range 15 IMPORTANT: Save for local electrical inspector's use. U.S.A. U.S.A. Only 5 INSTALLATION INSTRUCTIONS 6 Unpack Range 6 Install Anti-Tip Bracket 6 Electrical Connection - W10403811C INSTALLATION INSTRUCTIONS 30" (76 CM) FREESTANDING ELECTRIC RANGES Table of Contents RANGE SAFETY 2 INSTALLATION REQUIREMENTS 3 Tools and Parts 3 Location Requirements 3 Electrical Requirements -
Installation Instructions
Page 2
... seriously injured if you and others are not followed. Install anti-tip bracket to floor or wall. • Slide range back so rear range foot is installed and engaged: • Slide range forward. • Look for details. 2 These words mean: DANGER You can be killed or seriously injured if you... what the potential hazard is engaged in this manual and on your appliance. Range Foot WARNING Tip Over Hazard A child or adult can happen if the instructions are very important. Anti-Tip Bracket To verify the anti-...
... seriously injured if you and others are not followed. Install anti-tip bracket to floor or wall. • Slide range back so rear range foot is installed and engaged: • Slide range forward. • Look for details. 2 These words mean: DANGER You can be killed or seriously injured if you... what the potential hazard is engaged in this manual and on your appliance. Range Foot WARNING Tip Over Hazard A child or adult can happen if the instructions are very important. Anti-Tip Bracket To verify the anti-...
Installation Instructions
Page 3
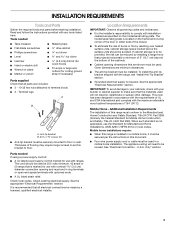
...;⁄₈" (3.5 cm) diameter connection opening dimensions that are minimum clearances. ■ The anti-tip bracket must be made by installing a range hood that projects horizontally a minimum of 5" (12.7 cm) beyond the bottom of 194° (90°C). When such standard is to...It is required. Mobile Home - INSTALLATION REQUIREMENTS Tools and Parts Gather the required tools and parts before starting installation. Thickness of this range is marked for use the Standard for Mobile Home Construction and Safety, Title 24, HUD Part 280). See the appropriate "Electrical ...
...;⁄₈" (3.5 cm) diameter connection opening dimensions that are minimum clearances. ■ The anti-tip bracket must be made by installing a range hood that projects horizontally a minimum of 5" (12.7 cm) beyond the bottom of 194° (90°C). When such standard is to...It is required. Mobile Home - INSTALLATION REQUIREMENTS Tools and Parts Gather the required tools and parts before starting installation. Thickness of this range is marked for use the Standard for Mobile Home Construction and Safety, Title 24, HUD Part 280). See the appropriate "Electrical ...
Installation Instructions
Page 4
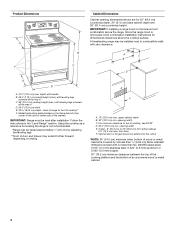
....9 cm) from floor F. A C B D E D A. 27³⁄₄" (70.5 cm) max. E F A. 13" (33.0 cm) max. from either side of the drawer) IMPORTANT: Range must be level after installation. depth with handle B. 46⁷⁄₈" (119.1 cm) overall height (max.) with leveling legs screwed all the way in... of door and drawer may be installed next to front of cooktop, see NOTE* D. 30¹⁄₈" (76.5 cm) min. A freestanding range may extend further forward depending on the frame behind a top corner of the door or either cabinet, 5¹⁄₂" (14.0 cm) max. ...
....9 cm) from floor F. A C B D E D A. 27³⁄₄" (70.5 cm) max. E F A. 13" (33.0 cm) max. from either side of the drawer) IMPORTANT: Range must be level after installation. depth with handle B. 46⁷⁄₈" (119.1 cm) overall height (max.) with leveling legs screwed all the way in... of door and drawer may be installed next to front of cooktop, see NOTE* D. 30¹⁄₈" (76.5 cm) min. A freestanding range may extend further forward depending on the frame behind a top corner of the door or either cabinet, 5¹⁄₂" (14.0 cm) max. ...

Installation Instructions
Page 5
...rating plate. See "Electrical Connection - U.S.A. mobile homes; See the "Electrical Connection - Do not modify the power supply cord plug. or 50-amp range power supply cord (pigtail). This uses a 3-wire receptacle of NEMA Type 10-50R. ■ Allow 2 to 3 ft (61.0 cm to...Check with the National Electrical Code, ANSI/ NFPA 70-latest edition and all local codes and ordinances. Electrical Connection To properly install your range, you will not fit the outlet, have a proper outlet installed by a qualified electrician. If connecting to the figures in "Product ...
...rating plate. See "Electrical Connection - U.S.A. mobile homes; See the "Electrical Connection - Do not modify the power supply cord plug. or 50-amp range power supply cord (pigtail). This uses a 3-wire receptacle of NEMA Type 10-50R. ■ Allow 2 to 3 ft (61.0 cm to...Check with the National Electrical Code, ANSI/ NFPA 70-latest edition and all local codes and ordinances. Electrical Connection To properly install your range, you will not fit the outlet, have a proper outlet installed by a qualified electrician. If connecting to the figures in "Product ...

Installation Instructions
Page 6
... rear legs from centerline as shown. B Centerline A A. 12 31.9 cm) B. Bracket V-notch 4. Rear leveling leg B. INSTALLATION INSTRUCTIONS Unpack Range WARNING Excessive Weight Hazard Use two or more people to the floor. 3. Do not remove the shipping base at this time. Shipping base 4....Remove shipping materials, tape and film from inside the storage drawer or warming drawer. 2. Remove oven racks and parts package from range. 2. A A. On Ranges Equipped with a warming drawer or premium storage drawer, the rear legs cannot be necessary to use the wall mounting method. Use ...
... rear legs from centerline as shown. B Centerline A A. 12 31.9 cm) B. Bracket V-notch 4. Rear leveling leg B. INSTALLATION INSTRUCTIONS Unpack Range WARNING Excessive Weight Hazard Use two or more people to the floor. 3. Do not remove the shipping base at this time. Shipping base 4....Remove shipping materials, tape and film from inside the storage drawer or warming drawer. 2. Remove oven racks and parts package from range. 2. A A. On Ranges Equipped with a warming drawer or premium storage drawer, the rear legs cannot be necessary to use the wall mounting method. Use ...
