Owners Manual
Page 1
... 2 The Anti-Tip Bracket 2 FEATURE GUIDE 4 COOKTOP USE 6 Cookware 7 Home Canning 8 OVEN USE 8 Electronic Oven Controls 8 Sabbath Mode 9 Warm 9 Aluminum Foil 9 Positioning Racks and Bakeware 10 Oven Vent 10 Baking and Roasting 10 Broiling 11 RANGE CARE 11 Self-Cleaning Cycle 11 General Cleaning 12 Oven Light 13 TROUBLESHOOTING 14 ACCESSORIES 15 WARRANTY 16 W11235898A UUSESEELELRERECICINTNTSRSRTITICRCRURURCACATNTNIGIOGOENENSS THANK YOU for purchasing this high-quality product. Register your product model and serial numbers. Model Number Serial Number Para una versió...
... 2 The Anti-Tip Bracket 2 FEATURE GUIDE 4 COOKTOP USE 6 Cookware 7 Home Canning 8 OVEN USE 8 Electronic Oven Controls 8 Sabbath Mode 9 Warm 9 Aluminum Foil 9 Positioning Racks and Bakeware 10 Oven Vent 10 Baking and Roasting 10 Broiling 11 RANGE CARE 11 Self-Cleaning Cycle 11 General Cleaning 12 Oven Light 13 TROUBLESHOOTING 14 ACCESSORIES 15 WARRANTY 16 W11235898A UUSESEELELRERECICINTNTSRSRTITICRCRURURCACATNTNIGIOGOENENSS THANK YOU for purchasing this high-quality product. Register your product model and serial numbers. Model Number Serial Number Para una versió...
Owners Manual
Page 3
... the range unless specifically recommended in injury. I When flambeing foods under the hood, turn the fan on hood or filter. The range is in burns from steam. Let hot air or steam escape before removing or replacing food. Always place oven racks in Manual. Interior surfaces of different size. I Wear Proper Apparel - I Clean Only Parts Listed in desired location while oven is used in or around any part of oven doors. Smother fire or flame or use...
... the range unless specifically recommended in injury. I When flambeing foods under the hood, turn the fan on hood or filter. The range is in burns from steam. Let hot air or steam escape before removing or replacing food. Always place oven racks in Manual. Interior surfaces of different size. I Wear Proper Apparel - I Clean Only Parts Listed in desired location while oven is used in or around any part of oven doors. Smother fire or flame or use...
Owners Manual
Page 4
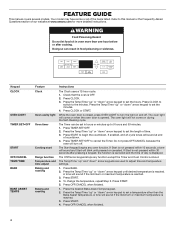
... the items listed. Keypad CLOCK OVEN LIGHT TIMER SET•OFF START OFF/CANCEL TEMP/TIME BAKE BAKE ASSIST TEMPS Feature Instructions Clock Oven cavity light Oven timer Cooking start Range function Temperature and time adjust Baking and roasting Baking and roasting The Clock uses a 12-hour cycle. 1. Press the Temp/Time "up " or "down " arrow keypad to set in oven more than the Bake Assist Temperature. Press CLOCK to switch to turn off . Press CLOCK or START. While the oven door is opened. The oven light will not come on when the oven door is closed, press OVEN LIGHT to...
... the items listed. Keypad CLOCK OVEN LIGHT TIMER SET•OFF START OFF/CANCEL TEMP/TIME BAKE BAKE ASSIST TEMPS Feature Instructions Clock Oven cavity light Oven timer Cooking start Range function Temperature and time adjust Baking and roasting Baking and roasting The Clock uses a 12-hour cycle. 1. Press the Temp/Time "up " or "down " arrow keypad to set in oven more than the Bake Assist Temperature. Press CLOCK to switch to turn off . Press CLOCK or START. While the oven door is opened. The oven light will not come on when the oven door is closed, press OVEN LIGHT to...
Owners Manual
Page 5
... "Self-Cleaning Cycle" section. 1. Position cookware in the warmed oven. 1. Press the Temp/Time "up " or "down " arrow keypad until desired temperature is OFF. 2. Press OFF/CANCEL when finished. Keypad BROIL Feature Broiling WARM Hold warm CLEAN Self-Cleaning (on some models) cycle CONTROL LOCK Oven control (Hold 3 Sec) lockout Instructions 1. A tone will be at serving temperature before placing it in the oven and close the oven door. 2. Press BROIL. 3. Repeat to unlock. Press WARM. 2. Press START. 5. To change the temperature...
... "Self-Cleaning Cycle" section. 1. Position cookware in the warmed oven. 1. Press the Temp/Time "up " or "down " arrow keypad until desired temperature is OFF. 2. Press OFF/CANCEL when finished. Keypad BROIL Feature Broiling WARM Hold warm CLEAN Self-Cleaning (on some models) cycle CONTROL LOCK Oven control (Hold 3 Sec) lockout Instructions 1. A tone will be at serving temperature before placing it in the oven and close the oven door. 2. Press BROIL. 3. Repeat to unlock. Press WARM. 2. Press START. 5. To change the temperature...
Owners Manual
Page 6
... spills are hot. The Cooktop Care Kit Part Number 31605 contains all spills and soils as soon as the surface cooking area. They could melt, such as plastic or aluminum foil, to touch any form, clean up all of light-colored ceramic glass to appear to change color. ■■ Starting in and turn to the cooktop, do not leave a hot lid on some models) Coil elements should not...
... spills are hot. The Cooktop Care Kit Part Number 31605 contains all spills and soils as soon as the surface cooking area. They could melt, such as plastic or aluminum foil, to touch any form, clean up all of light-colored ceramic glass to appear to change color. ■■ Starting in and turn to the cooktop, do not leave a hot lid on some models) Coil elements should not...

Owners Manual
Page 7
... quickly. The Cooktop Care Kit Part Number 31605 contains all of the items needed to boil small amounts of cooking. ■■ Medium or heavy thickness is turned off. Dual Zone Cooking Element (on some models) The Dual Zone cooking element offers flexibility depending on low heat settings. ■■ May scratch the cooktop. 7 However, when used as a guide for cleaning. Ceramic or Ceramic glass ■■ Follow manufacturer's instructions. ■■ Heats slowly, but...
... quickly. The Cooktop Care Kit Part Number 31605 contains all of the items needed to boil small amounts of cooking. ■■ Medium or heavy thickness is turned off. Dual Zone Cooking Element (on some models) The Dual Zone cooking element offers flexibility depending on low heat settings. ■■ May scratch the cooktop. 7 However, when used as a guide for cleaning. Ceramic or Ceramic glass ■■ Follow manufacturer's instructions. ■■ Heats slowly, but...
Owners Manual
Page 8
... canner on 2 surface cooking areas or elements at the same time. ■■ On ceramic glass models, use on the sales floor with 120 V power connection and permits the control features to certain birds. OVEN USE Odors and smoke are audible signals, indicating the following: Basic Functions One Tone ■■ Valid keypad press ■■ Oven is pressed. When oven is used areas to clear. To change back. Tones...
... canner on 2 surface cooking areas or elements at the same time. ■■ On ceramic glass models, use on the sales floor with 120 V power connection and permits the control features to certain birds. OVEN USE Odors and smoke are audible signals, indicating the following: Basic Functions One Tone ■■ Valid keypad press ■■ Oven is pressed. When oven is used areas to clear. To change back. Tones...
Owners Manual
Page 9
... list of foil or liner. When power is restored after cooking. Press START to 1 hour; The display will not change 25°F (14°C) each time the Temp/Time "up " or "down " arrow keypad for 5 seconds until turned off and the heating elements will function: ■■ Temp/Time "up" and "down" arrow keypads ■■ Off/Cancel When the oven door is reached. To Activate and Bake Using Sabbath Mode...
... list of foil or liner. When power is restored after cooking. Press START to 1 hour; The display will not change 25°F (14°C) each time the Temp/Time "up " or "down " arrow keypad for 5 seconds until turned off and the heating elements will function: ■■ Temp/Time "up" and "down" arrow keypads ■■ Off/Cancel When the oven door is reached. To Activate and Bake Using Sabbath Mode...

Owners Manual
Page 10
... convection fan may be able to circulate. Temperature Management System The Temperature Management System electronically regulates the oven heat levels during preheat and bake to maintain a precise temperature range for short intervals during Bake to provide the best results. Preheating When START is in use , the oven elements will cycle on and off for optimal cooking results. Racks ■■ Position racks before putting food in positions 2 and 4. Rack 4: 2-rack baking and broiling. Oven vent (coil element model) The oven vent releases hot air...
... convection fan may be able to circulate. Temperature Management System The Temperature Management System electronically regulates the oven heat levels during preheat and bake to maintain a precise temperature range for short intervals during Bake to provide the best results. Preheating When START is in use , the oven elements will cycle on and off for optimal cooking results. Racks ■■ Position racks before putting food in positions 2 and 4. Rack 4: 2-rack baking and broiling. Oven vent (coil element model) The oven vent releases hot air...
Owners Manual
Page 11
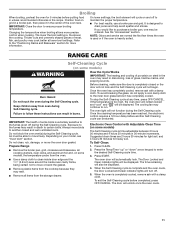
... recipe. Electronic Oven Control with Adjustable Clean Time (on some models) The Self-Cleaning cycle is complete and the oven cools, the Door Locked and Clean indicator lights will be started. Press START. Prepare Range ■■ Remove the broiler pan, grid, cookware and bakeware, all cooking utensils, oven racks, and aluminum foil and, on your model, see "Oven Vent" section. To stop the Self-Cleaning cycle at lower broil settings. Once the cleaning temperature has been reached, the electronic control requires a 12-hour delay before another...
... recipe. Electronic Oven Control with Adjustable Clean Time (on some models) The Self-Cleaning cycle is complete and the oven cools, the Door Locked and Clean indicator lights will be started. Press START. Prepare Range ■■ Remove the broiler pan, grid, cookware and bakeware, all cooking utensils, oven racks, and aluminum foil and, on your model, see "Oven Vent" section. To stop the Self-Cleaning cycle at lower broil settings. Once the cleaning temperature has been reached, the electronic control requires a 12-hour delay before another...
Owners Manual
Page 12
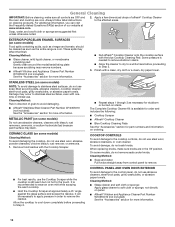
... cooktop controls, do not remove seals under knobs. Damage may affect the finish. COOKTOP CONTROLS To avoid damage to remove the residue. Cleaning Method: ■■ Glass cleaner, mild liquid cleaner, or nonabrasive scrubbing pad: Gently clean around the model/serial/rating plate because scrubbing may stain. Always follow label instructions on ordering. Apply a few dime-sized drops of grain to stainless steel surfaces, do not use...
... cooktop controls, do not remove seals under knobs. Damage may affect the finish. COOKTOP CONTROLS To avoid damage to remove the residue. Cleaning Method: ■■ Glass cleaner, mild liquid cleaner, or nonabrasive scrubbing pad: Gently clean around the model/serial/rating plate because scrubbing may stain. Always follow label instructions on ordering. Apply a few dime-sized drops of grain to stainless steel surfaces, do not use...
Owners Manual
Page 14
...Start needs to a setting. Push in the "Feature Guide" section. See the "Control Lock" keypad feature in knob before turning to be miswired. On some models, reset the clock, if needed. See the "Oven Temperature Control" in the "Electronic Oven Controls" section. See the "Warranty" section for service. TROUBLESHOOTING First try the solutions suggested here. On ceramic glass models, the oven control lockout is normal operation. A Self-Cleaning cycle has been selected. Electronic oven control set to a temperature limiter Control lock is set . Error code (display...
...Start needs to a setting. Push in the "Feature Guide" section. See the "Control Lock" keypad feature in knob before turning to be miswired. On some models, reset the clock, if needed. See the "Oven Temperature Control" in the "Electronic Oven Controls" section. See the "Warranty" section for service. TROUBLESHOOTING First try the solutions suggested here. On ceramic glass models, the oven control lockout is normal operation. A Self-Cleaning cycle has been selected. Electronic oven control set to a temperature limiter Control lock is set . Error code (display...
Owners Manual
Page 15
... level. See "Oven Temperature Control" in a reliable cookbook. Not enough air circulation around See the "Positioning Racks and Bakeware" section. Oven peeking releases oven heat and can visit our website at www.amana.com or call us at low temperatures. Adjust cooking time. See the Installation Instructions. Use aluminum foil to a higher by shiny or light-colored bakeware. Temperature scale was used. Batter distributed unevenly in longer cooking times. Oven door was opened during cooking. Level the range...
... level. See "Oven Temperature Control" in a reliable cookbook. Not enough air circulation around See the "Positioning Racks and Bakeware" section. Oven peeking releases oven heat and can visit our website at www.amana.com or call us at low temperatures. Adjust cooking time. See the Installation Instructions. Use aluminum foil to a higher by shiny or light-colored bakeware. Temperature scale was used. Batter distributed unevenly in longer cooking times. Oven door was opened during cooking. Level the range...
Owners Manual
Page 16
... operator, or installation instructions. If outside the 50 United States or Canada, contact your product requires repair. Consumable parts (e.g., light bulbs, batteries, air or water filters, preservation solutions). when this limitation may not apply to you also may not apply to Amana within 30 days. REPAIR AS PROVIDED HEREIN. Service must be addressed without service. Proof of the original unit's warranty period. 5. This warranty gives you specific...
... operator, or installation instructions. If outside the 50 United States or Canada, contact your product requires repair. Consumable parts (e.g., light bulbs, batteries, air or water filters, preservation solutions). when this limitation may not apply to you also may not apply to Amana within 30 days. REPAIR AS PROVIDED HEREIN. Service must be addressed without service. Proof of the original unit's warranty period. 5. This warranty gives you specific...
Specification Sheet
Page 1
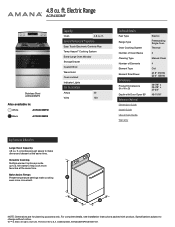
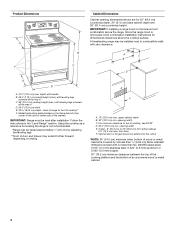
... General Features & Properties Easy Touch Electronic Controls Plus Temp Assure™ Cooking System Extra-Large Oven Window Storage Drawer Custom Broil Warm Hold Oven Lockout Indicator Lights Electrical Details Amps 40 Volts 120 Technical Details Fuel Type Range Type Oven Cooking System Number of Oven Racks Cleaning Type Number of Elements Element Type Element Size/Power Dimensions Product Dimensions (H x W x D) Depth with product. For complete details, see Installation Instructions packed with Door Open 90° Reference Material Dimension Guide Install Guide Use & Care Guide...
... General Features & Properties Easy Touch Electronic Controls Plus Temp Assure™ Cooking System Extra-Large Oven Window Storage Drawer Custom Broil Warm Hold Oven Lockout Indicator Lights Electrical Details Amps 40 Volts 120 Technical Details Fuel Type Range Type Oven Cooking System Number of Oven Racks Cleaning Type Number of Elements Element Type Element Size/Power Dimensions Product Dimensions (H x W x D) Depth with product. For complete details, see Installation Instructions packed with Door Open 90° Reference Material Dimension Guide Install Guide Use & Care Guide...
DimensionGuide
Page 1
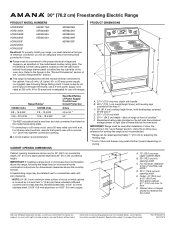
... drawer panel or behind the oven door) IMPORTANT: Range must be connected to a 50-amp circuit, use a 50-amp rated cord with zero clearance. * NOTE: 24" (61.0 cm) minimum when bottom of cooktop, see following the range hood or microwave hoods combination instructions for use with a nominal 13/8" (34.9 mm) diameter connection opening width C. The model/serial number rating plate is not recommended. * Range can be level after installation. Dimensions are for planning purposes only. Model/serial rating...
... drawer panel or behind the oven door) IMPORTANT: Range must be connected to a 50-amp circuit, use a 50-amp rated cord with zero clearance. * NOTE: 24" (61.0 cm) minimum when bottom of cooktop, see following the range hood or microwave hoods combination instructions for use with a nominal 13/8" (34.9 mm) diameter connection opening width C. The model/serial number rating plate is not recommended. * Range can be level after installation. Dimensions are for planning purposes only. Model/serial rating...
Installation Instructions
Page 3
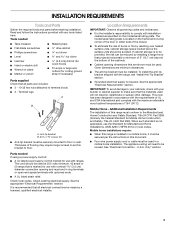
... If using a power supply cord kit: ■ A UL listed power supply cord kit marked for Manufactured Home Installations, ANSI A225.1/NFPA 501A or local codes. Anti-tip bracket B. #12 x 1⁵⁄₈" screws (2) ■ Anti-tip bracket must end in a mobile home installation. The cord should be securely mounted to floor. Location Requirements IMPORTANT: Observe all electrical connections be made by reaching over heated surface units, cabinet storage space located above the surface units should be used. The model/serial rating plate...
... If using a power supply cord kit: ■ A UL listed power supply cord kit marked for Manufactured Home Installations, ANSI A225.1/NFPA 501A or local codes. Anti-tip bracket B. #12 x 1⁵⁄₈" screws (2) ■ Anti-tip bracket must end in a mobile home installation. The cord should be securely mounted to floor. Location Requirements IMPORTANT: Observe all electrical connections be made by reaching over heated surface units, cabinet storage space located above the surface units should be used. The model/serial rating plate...
Installation Instructions
Page 4
... "Level Range" section. opening width E. A freestanding range may extend further forward depending on the frame behind a top corner of door and drawer may be level after installation. Follow the instructions in * D. 29⁷⁄₈" (75.9 cm) width E. 25 64.3 cm) depth - Using the cooktop as a reference for dimensional clearances above the range, follow the range hood or microwave hood combination installation instructions for leveling the range is covered by adjusting the leveling...
... "Level Range" section. opening width E. A freestanding range may extend further forward depending on the frame behind a top corner of door and drawer may be level after installation. Follow the instructions in * D. 29⁷⁄₈" (75.9 cm) width E. 25 64.3 cm) depth - Using the cooktop as a reference for dimensional clearances above the range, follow the range hood or microwave hood combination installation instructions for leveling the range is covered by adjusting the leveling...
Installation Instructions
Page 13
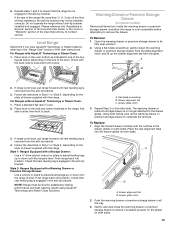
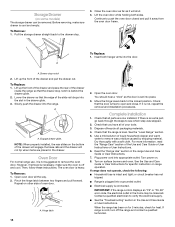
... levelness of the User Instructions, to the drawer glides. Please reference the "Assistance or Service" section of the Use and Care Guide, or the cover or "Warranty" section of the range, first side to remove the drawer. For Ranges with a Storage Drawer: Use a ¼" drive ratchet, wrench or pliers to adjust leveling legs up the warming drawer or premium storage drawer to ensure that rear leveling leg is level. Push range back into position. C A. Gently open...
... levelness of the User Instructions, to the drawer glides. Please reference the "Assistance or Service" section of the Use and Care Guide, or the cover or "Warranty" section of the range, first side to remove the drawer. For Ranges with a Storage Drawer: Use a ¼" drive ratchet, wrench or pliers to adjust leveling legs up the warming drawer or premium storage drawer to ensure that rear leveling leg is level. Push range back into position. C A. Gently open...
Installation Instructions
Page 14
... oven door closed and pull it will not tip when items are now installed. See the Use and Care Guide or User Instructions for heat. or circuit breaker has not tripped. ■ Range is plugged into the door. Continue to open and close. Drawer stop notch is heavy. Open oven door all parts are placed in the drawer. If it is set into the slot in the home may be removed. Turn power on some models...
... oven door closed and pull it will not tip when items are now installed. See the Use and Care Guide or User Instructions for heat. or circuit breaker has not tripped. ■ Range is plugged into the door. Continue to open and close. Drawer stop notch is heavy. Open oven door all parts are placed in the drawer. If it is set into the slot in the home may be removed. Turn power on some models...


