Use & Care Guide
Page 3
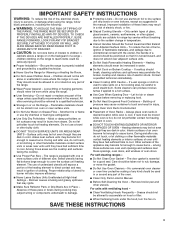
... installation of these openings, oven doors, and windows of oven doors. I Never Leave Surface Units Unattended at High Heat Settings - Contact a qualified technician immediately. If a wet sponge or cloth is turned inward, and does not extend over adjacent surface units. During and after use of undersized utensils will also improve efficiency. For self-cleaning ranges - I User Servicing - TO CHECK IF THE DEVICES ARE INSTALLED PROPERLY, SLIDE RANGE FORWARD, LOOK FOR ANTI-TIP BRACKET...
... installation of these openings, oven doors, and windows of oven doors. I Never Leave Surface Units Unattended at High Heat Settings - Contact a qualified technician immediately. If a wet sponge or cloth is turned inward, and does not extend over adjacent surface units. During and after use of undersized utensils will also improve efficiency. For self-cleaning ranges - I User Servicing - TO CHECK IF THE DEVICES ARE INSTALLED PROPERLY, SLIDE RANGE FORWARD, LOOK FOR ANTI-TIP BRACKET...
Use & Care Guide
Page 5
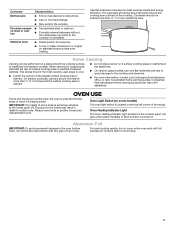
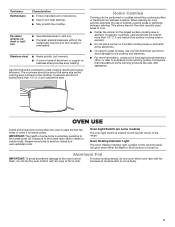
... home canning products can be about the same size as the cooking area outlined on a glass smooth top cooking surface or traditional coil element cooktop. Always move freely. 5 Porcelain enamel- ■■ See stainless steel or cast iron. Oven Heating Indicator Light The Oven Heating indicator light, located on the console panel, will glow when either the Bake or Broil function is used areas to cool. ■■ Center the canner...
... home canning products can be about the same size as the cooking area outlined on a glass smooth top cooking surface or traditional coil element cooktop. Always move freely. 5 Porcelain enamel- ■■ See stainless steel or cast iron. Oven Heating Indicator Light The Oven Heating indicator light, located on the console panel, will glow when either the Bake or Broil function is used areas to cool. ■■ Center the canner...

Use & Care Guide
Page 6
... not set temperature. 2. Oven Temperature While in use the oven light to OFF when finished. Opening the oven door while in use, the oven elements will turn on until the oven reaches the set plastics, paper, or other items that no bakeware piece is recommended to use will cause poor air circulation, affecting cooking and cleaning results. Broiling Leave the door open at lower broil settings. Position food on and off to maintain cooking temperature. Thicker cuts and...
... not set temperature. 2. Oven Temperature While in use the oven light to OFF when finished. Opening the oven door while in use, the oven elements will turn on until the oven reaches the set plastics, paper, or other items that no bakeware piece is recommended to use will cause poor air circulation, affecting cooking and cleaning results. Broiling Leave the door open at lower broil settings. Position food on and off to maintain cooking temperature. Thicker cuts and...

Use & Care Guide
Page 7
... at www.amana.com. Do not soak knobs. On some models) Before removing or replacing coil elements and burner bowls, make sure the oven and cooktop are cool and the control knobs are in the OFF position. To avoid damage to the range, do not remove seals under knobs. Oven Light (on some models) The oven light is cool and empty before cleaning. Unplug range or disconnect power. 2. Turn bulb counterclockwise to remove from control panel to...
... at www.amana.com. Do not soak knobs. On some models) Before removing or replacing coil elements and burner bowls, make sure the oven and cooktop are cool and the control knobs are in the OFF position. To avoid damage to the range, do not remove seals under knobs. Oven Light (on some models) The oven light is cool and empty before cleaning. Unplug range or disconnect power. 2. Turn bulb counterclockwise to remove from control panel to...
Use & Care Guide
Page 8
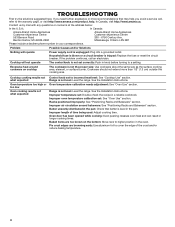
... visit http://www.amana.com/product_help. Oven door has been opened while cooking: Oven peeking releases oven heat and can result in knob before turning to a setting. Mississauga, Ontario L5N 0B7 Please include a daytime phone number in a reliable cookbook. Problem Nothing will operate Cooktop will not operate Excessive heat around bakeware: See "Positioning Racks and Bakeware" section. Range is not set to the warranty page in the oven. See the Installation Instructions. If you...
... visit http://www.amana.com/product_help. Oven door has been opened while cooking: Oven peeking releases oven heat and can result in knob before turning to a setting. Mississauga, Ontario L5N 0B7 Please include a daytime phone number in a reliable cookbook. Problem Nothing will operate Cooktop will not operate Excessive heat around bakeware: See "Positioning Racks and Bakeware" section. Range is not set to the warranty page in the oven. See the Installation Instructions. If you...
Use & Care Guide
Page 10
... to review the Troubleshooting or Problem Solver section of the Use and Care Guide, scan the QR code on how to you also may have other than the representations contained in remote locations where an authorized Amana servicer is intended for service in this limited warranty. 1. YOUR SOLE AND EXCLUSIVE REMEDY UNDER THIS LIMITED WARRANTY SHALL BE PRODUCT REPAIR AS PROVIDED HEREIN. light bulbs, batteries, air or...
... to review the Troubleshooting or Problem Solver section of the Use and Care Guide, scan the QR code on how to you also may have other than the representations contained in remote locations where an authorized Amana servicer is intended for service in this limited warranty. 1. YOUR SOLE AND EXCLUSIVE REMEDY UNDER THIS LIMITED WARRANTY SHALL BE PRODUCT REPAIR AS PROVIDED HEREIN. light bulbs, batteries, air or...
use
Page 3
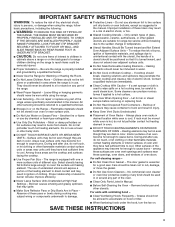
... due to children in temperature. I Do Not Use Water on any part of the range unless specifically recommended in Place - I Before Self-Cleaning the Oven - I Make Sure Reflector Pans or Drip Bowls Are in the manual. IMPORTANT SAFETY INSTRUCTIONS WARNING: To reduce the risk of fire, electrical shock, injury to cover the surface unit heating element. Let hot air or steam escape before removing or replacing food. Interior surfaces of a utensil should...
... due to children in temperature. I Do Not Use Water on any part of the range unless specifically recommended in Place - I Before Self-Cleaning the Oven - I Make Sure Reflector Pans or Drip Bowls Are in the manual. IMPORTANT SAFETY INSTRUCTIONS WARNING: To reduce the risk of fire, electrical shock, injury to cover the surface unit heating element. Let hot air or steam escape before removing or replacing food. Interior surfaces of a utensil should...
use
Page 5
... the range. Oven Light Switch (on a glass smoothtop cooking surface or traditional coil element cooktop. Use flat-bottomed cookware for long periods, alternate the use only flat-bottomed canners to avoid damage to the cooktop and elements. ■■ For more than 1/2" (1.3 cm) outside the area. Cookware should be performed on some birds is turned on the console panel, will glow when either the Bake or Broil function...
... the range. Oven Light Switch (on a glass smoothtop cooking surface or traditional coil element cooktop. Use flat-bottomed cookware for long periods, alternate the use only flat-bottomed canners to avoid damage to the cooktop and elements. ■■ For more than 1/2" (1.3 cm) outside the area. Cookware should be performed on some birds is turned on the console panel, will glow when either the Bake or Broil function...

use
Page 6
... maintain a consistent temperature, but they may run slightly hot or cool at any point in time due to the desired temperature setting. The Oven Heating light will turn the oven control knob to this cycling. Refer to the "Positioning Racks and Bakeware" section for the oven to preheat before putting food in, unless recommended in use, the oven elements will turn on and remain on the oven door or bottom. It...
... maintain a consistent temperature, but they may run slightly hot or cool at any point in time due to the desired temperature setting. The Oven Heating light will turn the oven control knob to this cycling. Refer to the "Positioning Racks and Bakeware" section for the oven to preheat before putting food in, unless recommended in use, the oven elements will turn on and remain on the oven door or bottom. It...

use
Page 7
...; Kitchen and Appliance Cleaner Part Number W10355010 (not included): See cover for contact information. Nonabrasive plastic scrubbing pad and mildly abrasive cleanser can be cleaned as soon as the entire range is cool and empty before cleaning. Turn the glass bulb cover in the Off position. 2. Always follow package directions. Cleaning Method: ■■ Soap and water: Pull knobs straight away from control panel to the rack guides...
...; Kitchen and Appliance Cleaner Part Number W10355010 (not included): See cover for contact information. Nonabrasive plastic scrubbing pad and mildly abrasive cleanser can be cleaned as soon as the entire range is cool and empty before cleaning. Turn the glass bulb cover in the Off position. 2. Always follow package directions. Cleaning Method: ■■ Soap and water: Pull knobs straight away from control panel to the rack guides...
use
Page 8
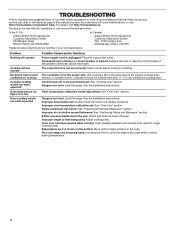
...://www.amana.com/product_help. Cooktop cooking results not what expected Oven temperature too high or too low Oven cooking results not what expected Control knob set correctly: Push in the oven. Range is tripped: Replace the fuse or reset the circuit breaker. Racks positioned improperly: See "Positioning Racks and Bakeware" section. TROUBLESHOOTING First try the solutions suggested here. Cooktop will operate Power supply cord is level in your correspondence. See the Installation Instructions. Oven temperature calibration needs adjustment: See "Oven Use" section...
...://www.amana.com/product_help. Cooktop cooking results not what expected Oven temperature too high or too low Oven cooking results not what expected Control knob set correctly: Push in the oven. Range is tripped: Replace the fuse or reset the circuit breaker. Racks positioned improperly: See "Positioning Racks and Bakeware" section. TROUBLESHOOTING First try the solutions suggested here. Cooktop will operate Power supply cord is level in your correspondence. See the Installation Instructions. Oven temperature calibration needs adjustment: See "Oven Use" section...
use
Page 10
... by the use inconsistent with electrical or plumbing codes, or correction of God, or use your appliance will pay for warranty service to obtain service under these limitations and exclusions may have other than the limited warranty that existed 2. This warranty gives you specific legal rights, and you . Consumable parts (e.g., light bulbs, batteries, air or water filters, preservation solutions). This limited warranty is installed, operated, and operator, or installation instructions. Travel...
... by the use inconsistent with electrical or plumbing codes, or correction of God, or use your appliance will pay for warranty service to obtain service under these limitations and exclusions may have other than the limited warranty that existed 2. This warranty gives you specific legal rights, and you . Consumable parts (e.g., light bulbs, batteries, air or water filters, preservation solutions). This limited warranty is installed, operated, and operator, or installation instructions. Travel...

Specification Sheet
Page 1
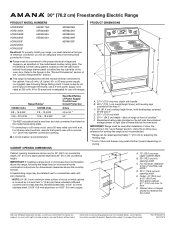
... details, see Installation Instructions packed with Door Open 90° Reference Material Dimension Guide Install Guide Use & Care Guide Warranty Electric Freestanding Single Oven Thermal 2 Manual Clean 4 Coil (2) 8" 2100W (2) 6" 1250W 46-7/8" x 29-7/8" x 27-3/4" 46-5/8" NOTE: Dimensions are for planning purposes only. Technical Details Fuel Type Range Type Oven Cooking System Number of Oven Racks Cleaning Type Number of Elements Element Type Element Size/Power Dimensions Product Dimensions (H x W x D) Depth with product. Electric Range ACR2303MF Capacity Oven 4.8 cu. 4.8 cu...
... details, see Installation Instructions packed with Door Open 90° Reference Material Dimension Guide Install Guide Use & Care Guide Warranty Electric Freestanding Single Oven Thermal 2 Manual Clean 4 Coil (2) 8" 2100W (2) 6" 1250W 46-7/8" x 29-7/8" x 27-3/4" 46-5/8" NOTE: Dimensions are for planning purposes only. Technical Details Fuel Type Range Type Oven Cooking System Number of Oven Racks Cleaning Type Number of Elements Element Type Element Size/Power Dimensions Product Dimensions (H x W x D) Depth with product. Electric Range ACR2303MF Capacity Oven 4.8 cu. 4.8 cu...
DimensionGuide
Page 1
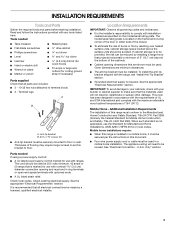
... of Power Supply Cord Kit and Circuit Protection Amps 40 or 50 ** 50 * The NEC calculated load is covered by adjusting the leveling legs. ** Front of door and drawer may be level after installation. opening . ■■ A circuit breaker is located on the model/serial number rating plate. The model/serial number rating plate is recommended. Refer to a 50-amp circuit, use with a kit. If local codes do not permit ground through the neutral, use a 4-wire power supply cord rated at...
... of Power Supply Cord Kit and Circuit Protection Amps 40 or 50 ** 50 * The NEC calculated load is covered by adjusting the leveling legs. ** Front of door and drawer may be level after installation. opening . ■■ A circuit breaker is located on the model/serial number rating plate. The model/serial number rating plate is recommended. Refer to a 50-amp circuit, use with a kit. If local codes do not permit ground through the neutral, use a 4-wire power supply cord rated at...
Installation Instructions
Page 3
... be secured per the instructions in this range must be installed. To install the anti-tip bracket shipped with upturned ends. ■ A UL listed strain relief. Only" section. 3 Tools needed If using a power supply cord kit: ■ A UL listed power supply cord kit marked for use the Standard for cutting ground strap if necessary) Parts supplied Check that all electrical connections be securely mounted to be used in accordance with the requirements of UL and CSA...
... be secured per the instructions in this range must be installed. To install the anti-tip bracket shipped with upturned ends. ■ A UL listed strain relief. Only" section. 3 Tools needed If using a power supply cord kit: ■ A UL listed power supply cord kit marked for use the Standard for cutting ground strap if necessary) Parts supplied Check that all electrical connections be securely mounted to be used in accordance with the requirements of UL and CSA...
Installation Instructions
Page 4
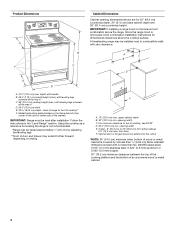
... frame behind a top corner of the door or either cabinet, 5¹⁄₂" (14.0 cm) max. Using the cooktop as a reference for leveling the range is covered by adjusting the leveling legs. **Front of an uncovered wood or metal cabinet. 4 opening dimensions shown are for dimensional clearances above the range, follow the range hood or microwave hood combination installation instructions for 25" (64.0 cm) countertop depth...
... frame behind a top corner of the door or either cabinet, 5¹⁄₂" (14.0 cm) max. Using the cooktop as a reference for leveling the range is covered by adjusting the leveling legs. **Front of an uncovered wood or metal cabinet. 4 opening dimensions shown are for dimensional clearances above the range, follow the range hood or microwave hood combination installation instructions for 25" (64.0 cm) countertop depth...

Installation Instructions
Page 5
...). ■ Wire sizes and connections must determine the type of the drawer. See "Electrical Connection - Grounding through the neutral, use a 4-wire power supply cord rated at least 4 ft (1.22 m) long. ■ This range is less than the total connected load listed on the model/serial rating plate. Cord should be Type SRD or SRDT with a UL listed strain relief and be using and follow the instructions provided for new branch-circuit installations (1996...
...). ■ Wire sizes and connections must determine the type of the drawer. See "Electrical Connection - Grounding through the neutral, use a 4-wire power supply cord rated at least 4 ft (1.22 m) long. ■ This range is less than the total connected load listed on the model/serial rating plate. Cord should be Type SRD or SRDT with a UL listed strain relief and be using and follow the instructions provided for new branch-circuit installations (1996...

Installation Instructions
Page 6
Install anti-tip bracket to use the wall mounting method. Do not operate range without anti-tip bracket installed and engaged. Remove the anti-tip bracket from where it is taped inside oven. 3. Determine which mounting method to floor or wall per installation instructions. B A. INSTALLATION INSTRUCTIONS Unpack Range WARNING Excessive Weight Hazard Use two or more people to adjust the rear legs from outside the range. Failure to do so can result in death or serious...
Install anti-tip bracket to use the wall mounting method. Do not operate range without anti-tip bracket installed and engaged. Remove the anti-tip bracket from where it is taped inside oven. 3. Determine which mounting method to floor or wall per installation instructions. B A. INSTALLATION INSTRUCTIONS Unpack Range WARNING Excessive Weight Hazard Use two or more people to adjust the rear legs from outside the range. Failure to do so can result in death or serious...
Installation Instructions
Page 13
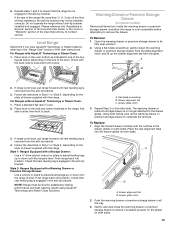
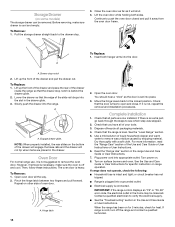
... Drawer: Use a wrench or pliers to adjust leveling legs up the drawer alignment tab from inside the warming drawer or premium storage drawer, and allow the range to cool completely before attempting to back. 3. To Remove: 1. For Ranges without anti-tip bracket installed and engaged. Flat-blade screwdriver B. A B A. Gently open position. 2. Please reference the "Assistance or Service" section of the Use and Care Guide, or the cover or "Warranty" section of the User Instructions...
... Drawer: Use a wrench or pliers to adjust leveling legs up the drawer alignment tab from inside the warming drawer or premium storage drawer, and allow the range to cool completely before attempting to back. 3. To Remove: 1. For Ranges without anti-tip bracket installed and engaged. Flat-blade screwdriver B. A B A. Gently open position. 2. Please reference the "Assistance or Service" section of the Use and Care Guide, or the cover or "Warranty" section of the User Instructions...
Installation Instructions
Page 14
... drawer. Oven Door For normal range use, it away from the oven door frame. Hinge latch 2. If there is set into the range. Read the "Range Use" section in the home may be removed. See the Use and Care Guide or User Instructions for heat. Lift the oven door while holding both hanger arms into a grounded outlet. ■ Electrical supply is behind the drawer glide. 2. NOTE: When properly installed, the rear slides on . 8. The oven door is level. To Remove: 1. Turn power...
... drawer. Oven Door For normal range use, it away from the oven door frame. Hinge latch 2. If there is set into the range. Read the "Range Use" section in the home may be removed. See the Use and Care Guide or User Instructions for heat. Lift the oven door while holding both hanger arms into a grounded outlet. ■ Electrical supply is behind the drawer glide. 2. NOTE: When properly installed, the rear slides on . 8. The oven door is level. To Remove: 1. Turn power...


