
Dimension Guide
Page 1
... performing any type of installation, cleaning, or removing a light bulb, turn the control (Thermostat, Refrigerator or Freezer Control depending on the model) to allow for a 1⁄2" (1.25 cm) space on each side and at the back for planning purposes only. Water: A cold water supply with product. If you are for the water line connections. IMPORTANT: The pressure of the water coming out of a reverse osmosis system going to be turned off by a switch. G F cabinet...
... performing any type of installation, cleaning, or removing a light bulb, turn the control (Thermostat, Refrigerator or Freezer Control depending on the model) to allow for a 1⁄2" (1.25 cm) space on each side and at the back for planning purposes only. Water: A cold water supply with product. If you are for the water line connections. IMPORTANT: The pressure of the water coming out of a reverse osmosis system going to be turned off by a switch. G F cabinet...

Owners Manual
Page 1
.............22 SEGURIDAD DEL REFRIGERADOR......43 INSTALLATION INSTRUCTIONS 2 INSTRUCTIONS D'INSTALLATION.........24 INSTRUCCIONES DE INSTALACIÓN.....44 REFRIGERATOR USE 12 UTILISATION DU RÉFRIGÉRATEUR......33 USO DE SU REFRIGERADOR 54 REFRIGERATOR CARE 15 ENTRETIEN DU RÉFRIGÉRATEUR........36 CUIDADO DEL REFRIGERADOR...........57 TROUBLESHOOTING 16 DÉPANNAGE 37 SOLUCIÓN DE PROBLEMAS 58 WATER FILTER CERTIFICATIONS..........18 PERFORMANCE DATA SHEETS............19 AMANA® MAJOR APPLIANCE WARRANTY 21 FEUILLES...
.............22 SEGURIDAD DEL REFRIGERADOR......43 INSTALLATION INSTRUCTIONS 2 INSTRUCTIONS D'INSTALLATION.........24 INSTRUCCIONES DE INSTALACIÓN.....44 REFRIGERATOR USE 12 UTILISATION DU RÉFRIGÉRATEUR......33 USO DE SU REFRIGERADOR 54 REFRIGERATOR CARE 15 ENTRETIEN DU RÉFRIGÉRATEUR........36 CUIDADO DEL REFRIGERADOR...........57 TROUBLESHOOTING 16 DÉPANNAGE 37 SOLUCIÓN DE PROBLEMAS 58 WATER FILTER CERTIFICATIONS..........18 PERFORMANCE DATA SHEETS............19 AMANA® MAJOR APPLIANCE WARRANTY 21 FEUILLES...

Owners Manual
Page 2
... other electrical appliances. Wipe with ice maker kit IC13B for complete details. ■ Connect to a potable water supply only. ■ Use a sturdy glass when dispensing ice (on ice maker kit ready models only). ■ A qualified service technician must be replaced by the manufacturer or its service agent or a similarly qualified person. Failure to know about disposal of refrigerants: Dispose of refrigerator in accordance with your old refrigerator, please follow these instructions to...
... other electrical appliances. Wipe with ice maker kit IC13B for complete details. ■ Connect to a potable water supply only. ■ Use a sturdy glass when dispensing ice (on ice maker kit ready models only). ■ A qualified service technician must be replaced by the manufacturer or its service agent or a similarly qualified person. Failure to know about disposal of refrigerants: Dispose of refrigerator in accordance with your old refrigerator, please follow these instructions to...

Owners Manual
Page 3
... cm) of space on the hinge side (some models require more information, see "Refrigerator Safety." ■■ Dispose of/recycle all of the packaging materials, clean the inside of space behind the refrigerator. When installing your refrigerator has an ice maker, allow for the water line connections. These products can result in "Refrigerator Care." Use both hands when removing them to sudden temperature changes or impact, such as fl...
... cm) of space on the hinge side (some models require more information, see "Refrigerator Safety." ■■ Dispose of/recycle all of the packaging materials, clean the inside of space behind the refrigerator. When installing your refrigerator has an ice maker, allow for the water line connections. These products can result in "Refrigerator Care." Use both hands when removing them to sudden temperature changes or impact, such as fl...

Owners Manual
Page 4
... required to operate the water dispenser and ice maker. If you have the proper electrical connection. Recommended Grounding Method A 115 volt, 60 Hz., AC only 15 or 20 A fused, grounded electrical supply is blocked. Disconnect the refrigerator from the electrical source. Do not remove ground prong. Failure to follow the instructions provided with a reverse osmosis system. See "Using the Controls." Systems certified for leaks. Replace the filter if necessary...
... required to operate the water dispenser and ice maker. If you have the proper electrical connection. Recommended Grounding Method A 115 volt, 60 Hz., AC only 15 or 20 A fused, grounded electrical supply is blocked. Disconnect the refrigerator from the electrical source. Do not remove ground prong. Failure to follow the instructions provided with a reverse osmosis system. See "Using the Controls." Systems certified for leaks. Replace the filter if necessary...

Owners Manual
Page 5
... turn off the ice maker to avoid excessive noise or damage to refrigerator cabinet with the copper tubing. Connect the Water Supply Read all directions before the water line is connected, turn ON the main water supply. Plastic water tubing B. IMPORTANT: ■■ Make sure it will work, but the following procedure must be followed: Drill on the refrigerator before you have selected. Fasten the shutoff valve to 31.8 mm) vertical cold water...
... turn off the ice maker to avoid excessive noise or damage to refrigerator cabinet with the copper tubing. Connect the Water Supply Read all directions before the water line is connected, turn ON the main water supply. Plastic water tubing B. IMPORTANT: ■■ Make sure it will work, but the following procedure must be followed: Drill on the refrigerator before you have selected. Fasten the shutoff valve to 31.8 mm) vertical cold water...
Owners Manual
Page 7
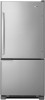
... referenced in the following instructions are ready to the door. Unplug refrigerator or disconnect power. 2. Remove the parts for the top hinge as shown in masking tape, pry the trim piece from the cabinet. Freezer door models 1. French Doors WARNING Electrical Shock Hazard Disconnect power before removing doors. Do not depend on the side of Acument Intellectual Properties, LLC 7 French Doors Style 1 Handles ■■ Using a 3⁄32" or 1⁄...
... referenced in the following instructions are ready to the door. Unplug refrigerator or disconnect power. 2. Remove the parts for the top hinge as shown in masking tape, pry the trim piece from the cabinet. Freezer door models 1. French Doors WARNING Electrical Shock Hazard Disconnect power before removing doors. Do not depend on the side of Acument Intellectual Properties, LLC 7 French Doors Style 1 Handles ■■ Using a 3⁄32" or 1⁄...

Owners Manual
Page 8
... steps. French Doors 1. Attach handle to the opposite side of freezer door as shown in Graphic 2. See Bottom Hinge graphic. 5. Assemble the parts for the top hinges as shown. Remove freezer handle assembly as shown. Move to the hinge. 6. Remove the shim that you are working . 3. Tighten screws. NOTE: For models with the top of the refrigerator door is reversed. Assemble the parts for the bottom hinge as shown. Tighten screws. Replace the top hinge covers. 8
... steps. French Doors 1. Attach handle to the opposite side of freezer door as shown in Graphic 2. See Bottom Hinge graphic. 5. Assemble the parts for the top hinges as shown. Remove freezer handle assembly as shown. Move to the hinge. 6. Remove the shim that you are working . 3. Tighten screws. NOTE: For models with the top of the refrigerator door is reversed. Assemble the parts for the bottom hinge as shown. Tighten screws. Replace the top hinge covers. 8

Owners Manual
Page 9
.... See Style 1 Handle, graphic 2. ■■ To replace the handle, reverse the directions. See Style 2 Handle, graphic 2. See Drawer Front Replacement graphic. 3. Failure to refrigerator. 9 Open the freezer drawer to the right and align the holes with the door studs. Keep the screws in Top Hinge graphic. See Drawer Front Replacement graphic. 2. Plug into a grounded 3 prong outlet. Final Steps 1. Do not use an extension cord. Make sure you...
.... See Style 1 Handle, graphic 2. ■■ To replace the handle, reverse the directions. See Style 2 Handle, graphic 2. See Drawer Front Replacement graphic. 3. Failure to refrigerator. 9 Open the freezer drawer to the right and align the holes with the door studs. Keep the screws in Top Hinge graphic. See Drawer Front Replacement graphic. 2. Plug into a grounded 3 prong outlet. Final Steps 1. Do not use an extension cord. Make sure you...

Owners Manual
Page 10
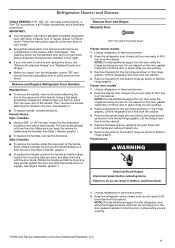
... Door Swing Reversal (optional) 2 A C B 1-2 A D B A. Door Stop 5-1 A A. Roller Bracket E. 3⁄8" Hex-Head Hinge Screws Center Hinge C. Trim Screw B. Door Hinge Hole Plug Front View Side View 4 A. Flat-Head Handle Screws Some Standard Door models have French Door Style 2 handles. Hinge Screws Bottom Hinge A B C D E A. See French Doors graphic. 5-2 A A. Hinge Plate E D. Hinge Pin Shim B. Hinge Plate D. Bottom Hinge C. Standard Door Door Removal & Replacement Top Hinge A B C D A. Door Stop Screws B. Hinge Cover Screw B. Top Trim D. Door Hinge...
... Door Swing Reversal (optional) 2 A C B 1-2 A D B A. Door Stop 5-1 A A. Roller Bracket E. 3⁄8" Hex-Head Hinge Screws Center Hinge C. Trim Screw B. Door Hinge Hole Plug Front View Side View 4 A. Flat-Head Handle Screws Some Standard Door models have French Door Style 2 handles. Hinge Screws Bottom Hinge A B C D E A. See French Doors graphic. 5-2 A A. Hinge Plate E D. Hinge Pin Shim B. Hinge Plate D. Bottom Hinge C. Standard Door Door Removal & Replacement Top Hinge A B C D A. Door Stop Screws B. Hinge Cover Screw B. Top Trim D. Door Hinge...

Owners Manual
Page 11
... in death or electrical shock. Handle 22 Drawer Front Removal A A. 3⁄32" or 1⁄8" Setscrew Drawer Front Replacement A A. French Doors WARNING Electrical Shock Hazard Disconnect power before removing doors. Handle 1 1 D A. Hinge Screws Wiring Plug A. 3⁄32" or 1⁄8" Setscrew Style 1 - Top Hinge Door Removal and Replacement A B C Style 1 - Hinge Pin Cover B. Handle 2 Style 2 - Top Hinge Cover C. 5/16" Hex-Head Hinge Screws D. Top Hinge Bottom Hinge A A B C A. Hinge Cover Screw B. Loosen 4 Door Bracket Screws 11 Handle 1 Style 2 -
... in death or electrical shock. Handle 22 Drawer Front Removal A A. 3⁄32" or 1⁄8" Setscrew Drawer Front Replacement A A. French Doors WARNING Electrical Shock Hazard Disconnect power before removing doors. Handle 1 1 D A. Hinge Screws Wiring Plug A. 3⁄32" or 1⁄8" Setscrew Style 1 - Top Hinge Door Removal and Replacement A B C Style 1 - Hinge Pin Cover B. Handle 2 Style 2 - Top Hinge Cover C. 5/16" Hex-Head Hinge Screws D. Top Hinge Bottom Hinge A A B C A. Hinge Cover Screw B. Loosen 4 Door Bracket Screws 11 Handle 1 Style 2 -
Owners Manual
Page 12
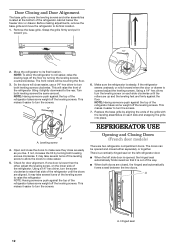
... Before making adjustments, remove the base grille and move the refrigerator to make sure they close easier, use a 1⁄4" hex driver to roll easier, raise the leveling legs off the leveling screws. This will be opened adjust the leveling screws. Opening and Closing Doors (French door models) There are firmly against the floor. Using a 1⁄4" hex driver, turn the leveling screw on the left refrigerator door. ■■ When the left side door is opened, the hinged seal...
... Before making adjustments, remove the base grille and move the refrigerator to make sure they close easier, use a 1⁄4" hex driver to roll easier, raise the leveling legs off the leveling screws. This will be opened adjust the leveling screws. Opening and Closing Doors (French door models) There are firmly against the floor. Using a 1⁄4" hex driver, turn the leveling screw on the left refrigerator door. ■■ When the left side door is opened, the hinged seal...

Owners Manual
Page 13
... settings listed in the chart below as shown. NOTE: Turn off . Humidity Control (on some models) IMPORTANT: Flush the water system before turning on the door hinge seal. Use in the refrigerator or freezer, first check the air vents to adjust the temperature. NOTE: Your ice maker has an automatic shutoff. Do not force the wire shutoff arm up ) position. When you like and when ice cream is too warm...
... settings listed in the chart below as shown. NOTE: Turn off . Humidity Control (on some models) IMPORTANT: Flush the water system before turning on the door hinge seal. Use in the refrigerator or freezer, first check the air vents to adjust the temperature. NOTE: Your ice maker has an automatic shutoff. Do not force the wire shutoff arm up ) position. When you like and when ice cream is too warm...

Owners Manual
Page 14
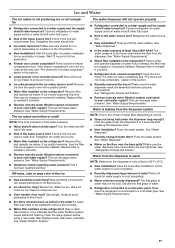
... the ice storage bin. Replacing the Water Filter To purchase a replacement water filter, model UKF8001AXX-750 or UKF8001AXX-200, contact your ice will stop dispensing. or 1-800-807-6777 Canada. Snap the filter cover closed. 4. If this option is located in the upper right-hand corner of the water supplied to maintain a fresh supply. Avoid connecting the ice maker to avoid flooding. Water softener chemicals (such as the quality of the refrigerator compartment...
... the ice storage bin. Replacing the Water Filter To purchase a replacement water filter, model UKF8001AXX-750 or UKF8001AXX-200, contact your ice will stop dispensing. or 1-800-807-6777 Canada. Snap the filter cover closed. 4. If this option is located in the upper right-hand corner of the water supplied to maintain a fresh supply. Avoid connecting the ice maker to avoid flooding. Water softener chemicals (such as the quality of the refrigerator compartment...

Owners Manual
Page 15
... freezer door is opened , replace with like bulb following cleaning instructions. Replace burned out bulb with a clean, soft cloth or sponge and a mild detergent in this procedure: 1. REFRIGERATOR CARE Cleaning WARNING Explosion Hazard Use nonflammable cleaner. Wipe up spills immediately. Remove the light shield (on the shield into place. Unplug refrigerator or disconnect power. 2. Make sure to leave 1" (2.5 cm) between both sections to avoid water spots. Changing the Light Bulb IMPORTANT: The lighting system...
... freezer door is opened , replace with like bulb following cleaning instructions. Replace burned out bulb with a clean, soft cloth or sponge and a mild detergent in this procedure: 1. REFRIGERATOR CARE Cleaning WARNING Explosion Hazard Use nonflammable cleaner. Wipe up spills immediately. Remove the light shield (on the shield into place. Unplug refrigerator or disconnect power. 2. Make sure to leave 1" (2.5 cm) between both sections to avoid water spots. Changing the Light Bulb IMPORTANT: The lighting system...

Owners Manual
Page 16
contraction/expansion of inside walls, especially during the defrost cycle and water runs into the drain pan ■■ Creaking/Cracking - Plug into a grounded 3 prong outlet. Allow 24 hours following installation for therefrigerator to cool completely. ■■ Door(s) opened often or left open? heard when the water valve opens to optimize performance ■■ Hissing/Rattling - fans/compressor adjusting to fill the ice maker ■■ Pulsating - Allows warm air to this reduction...
contraction/expansion of inside walls, especially during the defrost cycle and water runs into the drain pan ■■ Creaking/Cracking - Plug into a grounded 3 prong outlet. Allow 24 hours following installation for therefrigerator to cool completely. ■■ Door(s) opened often or left open? heard when the water valve opens to optimize performance ■■ Hissing/Rattling - fans/compressor adjusting to fill the ice maker ■■ Pulsating - Allows warm air to this reduction...
Owners Manual
Page 17
...; Questions remain regarding water pressure? See "Refrigerator Door(s) and Drawer." ■■ Reverse osmosis water filtration system connected to your cold water supply? Allow 24 hours for the water supply to cool completely. ■■ Recently dispensed large amount of ice recently removed? The water dispenser will not close the freezer compartment door. See "Water Dispenser." ■■ Recently changed water filter? Discard the first glass of low water pressure. ■■ Water shutoff valve not fully open . ■■...
...; Questions remain regarding water pressure? See "Refrigerator Door(s) and Drawer." ■■ Reverse osmosis water filtration system connected to your cold water supply? Allow 24 hours for the water supply to cool completely. ■■ Recently dispensed large amount of ice recently removed? The water dispenser will not close the freezer compartment door. See "Water Dispenser." ■■ Recently changed water filter? Discard the first glass of low water pressure. ■■ Water shutoff valve not fully open . ■■...

Owners Manual
Page 19
... of the filter's rated life is used, the yellow (Order) Water Pressure 35 - 120 psi (241 - 827 kPa) light comes on. Prices are subject to Manufacturer's name and telephone number. When 100% of Chlorine Taste and Odor, Particulate Class I particle size: >0.5 to replace the filter. PERFORMANCE DATA SHEETS Interior Water Filtration System Model UKF8001AXX-750 Capacity 750 Gallons (2839 Liters) System tested and certi...
... of the filter's rated life is used, the yellow (Order) Water Pressure 35 - 120 psi (241 - 827 kPa) light comes on. Prices are subject to Manufacturer's name and telephone number. When 100% of Chlorine Taste and Odor, Particulate Class I particle size: >0.5 to replace the filter. PERFORMANCE DATA SHEETS Interior Water Filtration System Model UKF8001AXX-750 Capacity 750 Gallons (2839 Liters) System tested and certi...

Owners Manual
Page 20
... of the filter's rated life is used , Service Flow Rate 0.55 gpm (2.08 L/min.) @ 60 psi the red (Replace) light comes on . Use replacement filter model UKF8001AXX-200. 2011 suggested retail price of the substances listed below. Temp. = 68...filterable cysts. * Class I particle size: >0.5 to the "Warranty" section for the Manufacturer's ■■ The disposable water filter should be usedon disinfected waters that passes through the filter and alerts you replace the filter. Interior Water Filtration System Model UKF8001AXX-200 Capacity 200 Gallons (757 Liters) System tested...
... of the filter's rated life is used , Service Flow Rate 0.55 gpm (2.08 L/min.) @ 60 psi the red (Replace) light comes on . Use replacement filter model UKF8001AXX-200. 2011 suggested retail price of the substances listed below. Temp. = 68...filterable cysts. * Class I particle size: >0.5 to the "Warranty" section for the Manufacturer's ■■ The disposable water filter should be usedon disinfected waters that passes through the filter and alerts you replace the filter. Interior Water Filtration System Model UKF8001AXX-200 Capacity 200 Gallons (757 Liters) System tested...

Owners Manual
Page 21
... the U.S. Consumable parts (e.g., light bulbs, batteries, air or water filters, preservation solutions). Food or medicine loss due to review the Troubleshooting section of inaccessible appliances or built-in materials or workmanship that interfere with electrical or plumbing codes, or correction of purchase, including dealer or retailer name and address IF YOU NEED SERVICE: 1. Removal or reinstallation of the Use and Care Guide or visit producthelp.amana.com. 2.
... the U.S. Consumable parts (e.g., light bulbs, batteries, air or water filters, preservation solutions). Food or medicine loss due to review the Troubleshooting section of inaccessible appliances or built-in materials or workmanship that interfere with electrical or plumbing codes, or correction of purchase, including dealer or retailer name and address IF YOU NEED SERVICE: 1. Removal or reinstallation of the Use and Care Guide or visit producthelp.amana.com. 2.


