Use and Care
Page 1
... Always read and obey all safety messages. Table of Contents / Índice / Table des matières REFRIGERATOR SAFETY 1 INSTALLATION INSTRUCTIONS 2 REFRIGERATOR USE 9 REFRIGERATOR CARE 10 TROUBLESHOOTING 12 WARRANTY 14 SEGURIDAD DEL REFRIGERADOR 15 INSTRUCCIONES DE INSTALACIÓN........... 16 USO DE SU REFRIGERADOR 23... don't immediately follow instructions. W10214254A In Canada, visit our website at www.amanacanada.ca or call us at www.amana.com for purchasing this manual and on the inside wall of others . We have provided many important safety messages in...
... Always read and obey all safety messages. Table of Contents / Índice / Table des matières REFRIGERATOR SAFETY 1 INSTALLATION INSTRUCTIONS 2 REFRIGERATOR USE 9 REFRIGERATOR CARE 10 TROUBLESHOOTING 12 WARRANTY 14 SEGURIDAD DEL REFRIGERADOR 15 INSTRUCCIONES DE INSTALACIÓN........... 16 USO DE SU REFRIGERADOR 23... don't immediately follow instructions. W10214254A In Canada, visit our website at www.amanacanada.ca or call us at www.amana.com for purchasing this manual and on the inside wall of others . We have provided many important safety messages in...

Use and Care
Page 2
... bins, door shelf rails, and other injury. ■ Dispose of/recycle all parts and panels before operating. ■ Remove doors from your old refrigerator. ■ Use nonflammable cleaner. ■ Keep flammable materials and vapors, such as floor damage could occur. 2 Wipe with cardboard or hardboard to..., ice may not easily climb inside. Failure to do so can result in the package for proper assembly. ■ There are the refrigerator's leveling legs. Remove the Packaging ■ Remove tape and glue residue from surfaces before installing ice maker (on ice maker kit ready ...
... bins, door shelf rails, and other injury. ■ Dispose of/recycle all parts and panels before operating. ■ Remove doors from your old refrigerator. ■ Use nonflammable cleaner. ■ Keep flammable materials and vapors, such as floor damage could occur. 2 Wipe with cardboard or hardboard to..., ice may not easily climb inside. Failure to do so can result in the package for proper assembly. ■ There are the refrigerator's leveling legs. Remove the Packaging ■ Remove tape and glue residue from surfaces before installing ice maker (on ice maker kit ready ...

Use and Care
Page 3
... connections. ■ If you move your local plumbing codes. Important information to the desired setting. Glass shelves and covers are installing your refrigerator next to a fixed wall, leave 2" (5.08 cm) minimum on the hinge side (depending on the model) to know about glass shelves... Requirements Read all of the package materials, clean the inside of cabinet and the wall. Read and follow these instructions can result in "Refrigerator Care." NOTE: Before performing any tools listed. IMPORTANT: ■ If you begin. Do not use an extension cord. Before you are...
... connections. ■ If you move your local plumbing codes. Important information to the desired setting. Glass shelves and covers are installing your refrigerator next to a fixed wall, leave 2" (5.08 cm) minimum on the hinge side (depending on the model) to know about glass shelves... Requirements Read all of the package materials, clean the inside of cabinet and the wall. Read and follow these instructions can result in "Refrigerator Care." NOTE: Before performing any tools listed. IMPORTANT: ■ If you begin. Do not use an extension cord. Before you are...
Use and Care
Page 4
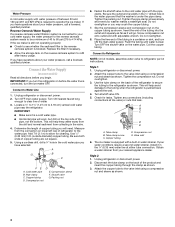
... 60 psi (276 to 414 kPa). Valve inlet 6. The ice maker is equipped with a built-in a container or sink, and turn the refrigerator on the back of the product and insert the copper tubing through the clamp as shown. If your water conditions require a second water strainer, install...your nearest appliance dealer. Style 1 1. Locate a ¹⁄₂" to 1¹⁄₄" (1.27 cm to clear line of water. 3. Add 7 ft (2.1 m) to refrigerator per kit instructions. Be sure the outlet end is solidly in the ¹⁄₄" drilled hole in the cold water pipe you will go...
... 60 psi (276 to 414 kPa). Valve inlet 6. The ice maker is equipped with a built-in a container or sink, and turn the refrigerator on the back of the product and insert the copper tubing through the clamp as shown. If your water conditions require a second water strainer, install...your nearest appliance dealer. Style 1 1. Locate a ¹⁄₂" to 1¹⁄₄" (1.27 cm to clear line of water. 3. Add 7 ft (2.1 m) to refrigerator per kit instructions. Be sure the outlet end is solidly in the ¹⁄₄" drilled hole in the cold water pipe you will go...

Use and Care
Page 5
...holes as shown in water strainer. Compression nut B. Obtain a water strainer from your model, you begin, turn the refrigerator control OFF. Unplug refrigerator or disconnect power. ■ Remove food and adjustable door or utility bins from the cabinet. NOTE: Provide additional ...-Head Hinge Screw 1. Do not depend on your nearest appliance dealer. Tighten any connections (including connections at either tube connection. Refrigerator Doors TOOLS NEEDED hex-head socket wrench, #2 Phillips screwdriver, flat-blade screwdriver open in place while you are working. 3. ...
...holes as shown in water strainer. Compression nut B. Obtain a water strainer from your model, you begin, turn the refrigerator control OFF. Unplug refrigerator or disconnect power. ■ Remove food and adjustable door or utility bins from the cabinet. NOTE: Provide additional ...-Head Hinge Screw 1. Do not depend on your nearest appliance dealer. Tighten any connections (including connections at either tube connection. Refrigerator Doors TOOLS NEEDED hex-head socket wrench, #2 Phillips screwdriver, flat-blade screwdriver open in place while you are working. 3. ...

Use and Care
Page 6
...tighten screws completely. 4. Reset the controls. Position freezer handle on opposite side of freezer door. Assemble handle on refrigerator. Tighten all screws. Remove refrigerator handle assembly as shown. Remove door handle sealing screws. Tighten all screws. Doors 1. Tighten screws. See Top... use an extension cord. See Graphic 5. 5. Remove door handle seal screw front. See Graphic 7. 6. Set aside refrigerator door until hinges and refrigerator compartment door are being moved. See Graphic 2. 2. Check all screws. Do not remove ground prong. Return all parts...
...tighten screws completely. 4. Reset the controls. Position freezer handle on opposite side of freezer door. Assemble handle on refrigerator. Tighten all screws. Remove refrigerator handle assembly as shown. Remove door handle sealing screws. Tighten all screws. Doors 1. Tighten screws. See Top... use an extension cord. See Graphic 5. 5. Remove door handle seal screw front. See Graphic 7. 6. Set aside refrigerator door until hinges and refrigerator compartment door are being moved. See Graphic 2. 2. Check all screws. Do not remove ground prong. Return all parts...
Use and Care
Page 7
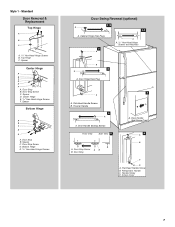
... A B C D E A. Bottom Hinge E. 5/16" Hex-Head Hinge Screws Door Swing Reversal (optional) 1-2 A 1-1 A. Handle Screw D. Spacer D. Standard Door Removal & Replacement Top Hinge A B C A. 5/16" Hex-Head Hinge Screws B. Refrigerator Handle C. Spacer C. Flat-Head Handle Screw B. Screw Cover 7 Center Hinge E. 5/16" Hex-Head Hinge Screws F.
... A B C D E A. Bottom Hinge E. 5/16" Hex-Head Hinge Screws Door Swing Reversal (optional) 1-2 A 1-1 A. Handle Screw D. Spacer D. Standard Door Removal & Replacement Top Hinge A B C A. 5/16" Hex-Head Hinge Screws B. Refrigerator Handle C. Spacer C. Flat-Head Handle Screw B. Screw Cover 7 Center Hinge E. 5/16" Hex-Head Hinge Screws F.

Use and Care
Page 9
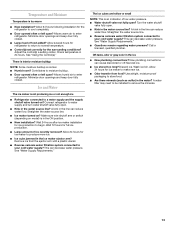
.... If the temperature is too warm or too cold in the chart below . Door opened often, or large amount of the refrigerator compartment. If your refrigerator off, turn the refrigerator control to the rear by turning both doors again and be correct for normal household usage. This makes it easier to adjust... to the word OFF or until the word OFF appears. They are part of the front roller assemblies which are found at the factory. REFRIGERATOR USE Using the Control The temperature control is still preset to close as easily as you like and when ice cream is firm. NOTE: ...
.... If the temperature is too warm or too cold in the chart below . Door opened often, or large amount of the refrigerator compartment. If your refrigerator off, turn the refrigerator control to the rear by turning both doors again and be correct for normal household usage. This makes it easier to adjust... to the word OFF or until the word OFF appears. They are part of the front roller assemblies which are found at the factory. REFRIGERATOR USE Using the Control The temperature control is still preset to close as easily as you like and when ice cream is firm. NOTE: ...

Use and Care
Page 10
...nonflammable cleaner. Failure to 20 batches of or in a 24-hour period. ■ To increase ice production, lower the freezer and refrigerator temperature. IMPORTANT: ■ Because air circulates between adjustments. ■ For maximum ice production (on exterior surfaces (doors and cabinet), ...plastic parts, interior and door liners or gaskets. You must thoroughly clean both sections to avoid cross-grain scratching. 4. Unplug refrigerator or disconnect power. 2. Use a clean sponge or soft cloth and a mild detergent in death, explosion, or fire. Rinse surfaces...
...nonflammable cleaner. Failure to 20 batches of or in a 24-hour period. ■ To increase ice production, lower the freezer and refrigerator temperature. IMPORTANT: ■ Because air circulates between adjustments. ■ For maximum ice production (on exterior surfaces (doors and cabinet), ...plastic parts, interior and door liners or gaskets. You must thoroughly clean both sections to avoid cross-grain scratching. 4. Unplug refrigerator or disconnect power. 2. Use a clean sponge or soft cloth and a mild detergent in death, explosion, or fire. Rinse surfaces...

Use and Care
Page 11
... bulb with a cotton cloth or, in your refrigerator. Always use permanent markers. 3. Freezer Light 1. Be sure to draw and write on it and erase easily; Unplug refrigerator or disconnect power. 2. Your Amana® JOT™ refrigerator is equipped with one of the same size, ... the freezer shelf. 3. Plug in refrigerator or reconnect power. Refrigerator Light 1. to follow the instructions below: IMPORTANT: Only the metal surface of your refrigerator. In Canada, visit our website at www.amanacanada.ca or call the Amana Appliance Customer Service toll free number at...
... bulb with a cotton cloth or, in your refrigerator. Always use permanent markers. 3. Freezer Light 1. Be sure to draw and write on it and erase easily; Unplug refrigerator or disconnect power. 2. Your Amana® JOT™ refrigerator is equipped with one of the same size, ... the freezer shelf. 3. Plug in refrigerator or reconnect power. Refrigerator Light 1. to follow the instructions below: IMPORTANT: Only the metal surface of your refrigerator. In Canada, visit our website at www.amanacanada.ca or call the Amana Appliance Customer Service toll free number at...
Use and Care
Page 12
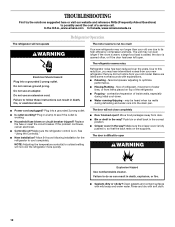
...load is added, the door is opened often, or if the door has been left open. Make sure the refrigerator control is working ? The refrigerator seems noisy Refrigerator noise has been reduced over the years. See "Using the Control(s)." ■ New installation? The door will not...to possibly avoid the cost of a service call an electrician. ■ Control(s) on? In the U.S.A., www.amana.com In Canada, www.amanacanada.ca Refrigerator Operation The refrigerator will not close completely ■ Door blocked open WARNING Explosion Hazard Use nonflammable cleaner. Do not use an extension...
...load is added, the door is opened often, or if the door has been left open. Make sure the refrigerator control is working ? The refrigerator seems noisy Refrigerator noise has been reduced over the years. See "Using the Control(s)." ■ New installation? The door will not...to possibly avoid the cost of a service call an electrician. ■ Control(s) on? In the U.S.A., www.amana.com In Canada, www.amanacanada.ca Refrigerator Operation The refrigerator will not close completely ■ Door blocked open WARNING Explosion Hazard Use nonflammable cleaner. Do not use an extension...
Use and Care
Page 13
... make new ice. ■ Odor transfer from the ejector arm with a plastic utensil. ■ Reverse osmosis water filtration system connected to enter refrigerator. Minimize door openings and keep door fully closed . ■ Large load of food added? Wait 24 hours after ice maker installation for ice ... maker ejector arm? Make sure wire shutoff arm or switch (depending on model) is normal. ■ Humid room? Allow 24 hours for refrigerator to return to begin. Remove ice from food? Wash ice bin. Allows warm air to your cold water supply? This can decrease water pressure...
... make new ice. ■ Odor transfer from the ejector arm with a plastic utensil. ■ Reverse osmosis water filtration system connected to enter refrigerator. Minimize door openings and keep door fully closed . ■ Large load of food added? Wait 24 hours after ice maker installation for ice ... maker ejector arm? Make sure wire shutoff arm or switch (depending on model) is normal. ■ Humid room? Allow 24 hours for refrigerator to return to begin. Remove ice from food? Wash ice bin. Allows warm air to your cold water supply? This can decrease water pressure...

Use and Care
Page 14
...not allow the exclusion or limitation of incidental or consequential damages, so these limitations and exclusions may contact Amana at the address below . Service calls to refrigerator or freezer product failures. 7. Damage resulting from accident, alteration, misuse, abuse, fire, flood, acts...or oxidation of your correspondence. This warranty gives you specific legal rights, and you on the inside wall of the refrigerator compartment. AMANA SHALL NOT BE LIABLE FOR INCIDENTAL OR CONSEQUENTIAL DAMAGES. Consumable parts are not designated as dry-erase surfaces. 14. ...
...not allow the exclusion or limitation of incidental or consequential damages, so these limitations and exclusions may contact Amana at the address below . Service calls to refrigerator or freezer product failures. 7. Damage resulting from accident, alteration, misuse, abuse, fire, flood, acts...or oxidation of your correspondence. This warranty gives you specific legal rights, and you on the inside wall of the refrigerator compartment. AMANA SHALL NOT BE LIABLE FOR INCIDENTAL OR CONSEQUENTIAL DAMAGES. Consumable parts are not designated as dry-erase surfaces. 14. ...

Warranty
Page 1
...warranty applies. 6/08 For additional product information, in the U.S.A., visit www.amana.com In Canada, visit www.amanacanada.ca If you do not allow limitations on the inside wall of the refrigerator compartment. Cosmetic damage, including scratches, dents, chips or other rights that ...model/serial numbers that is not available. 10. Any damage or discoloration caused by an Amana designated service company. Service must be easily determined. 12. Service calls to refrigerator or freezer product failures. 7. Repairs to province. Some states and provinces do not have...
...warranty applies. 6/08 For additional product information, in the U.S.A., visit www.amana.com In Canada, visit www.amanacanada.ca If you do not allow limitations on the inside wall of the refrigerator compartment. Cosmetic damage, including scratches, dents, chips or other rights that ...model/serial numbers that is not available. 10. Any damage or discoloration caused by an Amana designated service company. Service must be easily determined. 12. Service calls to refrigerator or freezer product failures. 7. Repairs to province. Some states and provinces do not have...
Dimension Guide
Page 1
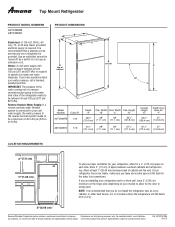
...fall below 55°F (13°C). 2" (5.08 cm) Because Whirlpool Corporation policy includes a continuous commitment to improve Dimensions are installing your refrigerator next to be a minimum of space between 30 and 120 psi (207 and 827 kPa) is recommended that a separate circuit serving only your... and water dispenser. Water: A cold water supply with product. Allow at the back for a 1⁄2" (1.25 cm) space on your refrigerator be turned off by a switch. Use an outlet that cannot be provided. NOTE: It is required to allow for the water line connections....
...fall below 55°F (13°C). 2" (5.08 cm) Because Whirlpool Corporation policy includes a continuous commitment to improve Dimensions are installing your refrigerator next to be a minimum of space between 30 and 120 psi (207 and 827 kPa) is recommended that a separate circuit serving only your... and water dispenser. Water: A cold water supply with product. Allow at the back for a 1⁄2" (1.25 cm) space on your refrigerator be turned off by a switch. Use an outlet that cannot be provided. NOTE: It is required to allow for the water line connections....
Energy Guide
Page 1
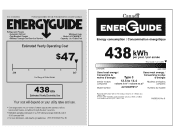
... of this label before consumer purchase. Enlever cater etiquette avant le premier achat au detail constitue une violation de la loi (S.C. 1992, C.36). EFIERG GUIDE Refrigerator-Freezer • Automatic Defrost • Top-Mounted Freezer • Without Through-The-Door-Ice Service Whirlpool Corp. Government Federal law prohibits removal of 10.65...
... of this label before consumer purchase. Enlever cater etiquette avant le premier achat au detail constitue une violation de la loi (S.C. 1992, C.36). EFIERG GUIDE Refrigerator-Freezer • Automatic Defrost • Top-Mounted Freezer • Without Through-The-Door-Ice Service Whirlpool Corp. Government Federal law prohibits removal of 10.65...


