Use and Care
Page 1
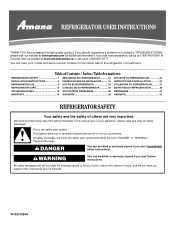
... you and others are not followed. Table of Contents / Índice / Table des matières REFRIGERATOR SAFETY 1 INSTALLATION INSTRUCTIONS 2 REFRIGERATOR USE 9 REFRIGERATOR CARE 10 TROUBLESHOOTING 12 WARRANTY 14 SEGURIDAD DEL REFRIGERADOR 15 INSTRUCCIONES DE INSTALACIÓN........... 16 USO DE SU REFRIGERADOR 23 CUIDADO DE SU REFRIGERADOR 24 SOLUCIÓN DE PROBLEMAS 26 GARANTÍA 28 SÉCURITÉ DU RÉFRIGÉ...
... you and others are not followed. Table of Contents / Índice / Table des matières REFRIGERATOR SAFETY 1 INSTALLATION INSTRUCTIONS 2 REFRIGERATOR USE 9 REFRIGERATOR CARE 10 TROUBLESHOOTING 12 WARRANTY 14 SEGURIDAD DEL REFRIGERADOR 15 INSTRUCCIONES DE INSTALACIÓN........... 16 USO DE SU REFRIGERADOR 23 CUIDADO DE SU REFRIGERADOR 24 SOLUCIÓN DE PROBLEMAS 26 GARANTÍA 28 SÉCURITÉ DU RÉFRIGÉ...

Use and Care
Page 2
... and install refrigerator. ■ Disconnect power before installing ice maker (on ice maker kit ready models only). Failure to do so can damage the surface of Your Old Refrigerator WARNING Suffocation Hazard Remove doors from surfaces before turning on some models, shelves, bins, door shelf rails, and other injury. ■ Dispose of/recycle all parts and panels before operating. ■ Remove doors from your refrigerator. Always pull the refrigerator straight out when moving the refrigerator for cleaning or service...
... and install refrigerator. ■ Disconnect power before installing ice maker (on ice maker kit ready models only). Failure to do so can damage the surface of Your Old Refrigerator WARNING Suffocation Hazard Remove doors from surfaces before turning on some models, shelves, bins, door shelf rails, and other injury. ■ Dispose of/recycle all parts and panels before operating. ■ Remove doors from your refrigerator. Always pull the refrigerator straight out when moving the refrigerator for cleaning or service...

Use and Care
Page 3
... clean glass shelves or covers with your refrigerator before using it is recommended that cannot be provided. Do not use an extension cord. Water Supply Requirements Read all directions before you remove all of the package materials, clean the inside of installation, cleaning, or removing a light bulb, turn the ice maker OFF. ■ All installations must meet local plumbing code requirements. ■ Use copper tubing and check for the door to make sure you are cold. Clean Before Using...
... clean glass shelves or covers with your refrigerator before using it is recommended that cannot be provided. Do not use an extension cord. Water Supply Requirements Read all directions before you remove all of the package materials, clean the inside of installation, cleaning, or removing a light bulb, turn the ice maker OFF. ■ All installations must meet local plumbing code requirements. ■ Use copper tubing and check for the door to make sure you are cold. Clean Before Using...
Use and Care
Page 4
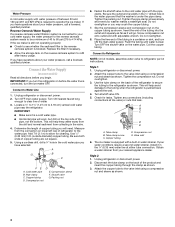
... it in the valve. 4. Add 7 ft (2.1 m) to Water Line 1. Shutoff valve C. Fasten the shutoff valve to operate the ice maker. Tighten the pipe clamp screws slowly and evenly so washer makes a watertight seal. Connect to Refrigerator NOTE: On kit models, assemble water valve to 3.18 cm) vertical cold water pipe near the refrigerator. Water Pressure A cold water supply with adjustable wrench. If you have selected. Compression sleeve B. Tighten the compression nut. Copper tubing D. Using a cordless drill...
... it in the valve. 4. Add 7 ft (2.1 m) to Water Line 1. Shutoff valve C. Fasten the shutoff valve to operate the ice maker. Tighten the pipe clamp screws slowly and evenly so washer makes a watertight seal. Connect to Refrigerator NOTE: On kit models, assemble water valve to 3.18 cm) vertical cold water pipe near the refrigerator. Water Pressure A cold water supply with adjustable wrench. If you have selected. Compression sleeve B. Tighten the compression nut. Copper tubing D. Using a cordless drill...

Use and Care
Page 5
... connections (including connections at either tube connection. Do not remove ground prong. Unplug refrigerator or disconnect power. 2. NOTE: Provide additional support for leaks. NOTE: Allow 24 hours to the back of ice produced. Tighten the compression nut. A B C A. Do not use an extension cord. Do not use an adapter. Tube clamp C. Obtain a water strainer from handle side and move them to follow these steps. Lift the freezer door free...
... connections (including connections at either tube connection. Do not remove ground prong. Unplug refrigerator or disconnect power. 2. NOTE: Provide additional support for leaks. NOTE: Allow 24 hours to the back of ice produced. Tighten the compression nut. A B C A. Do not use an extension cord. Do not use an adapter. Tube clamp C. Obtain a water strainer from handle side and move them to follow these steps. Lift the freezer door free...

Use and Care
Page 6
...Remove door hinge hole plug from top of the refrigerator door as shown. Remove door handle sealing screws. Remove door stop . See Graphic 6. Align lower portion of the refrigerator door. Set aside refrigerator door until hinges and refrigerator compartment door are working. 2. Move to opposite side hinge holes as shown. NOTE: Provide additional support for the center hinge as shown. WARNING Electrical Shock Hazard Plug into a grounded 3 prong outlet. 3. See "Using the Control(s)." 4. Keep all parts together. Remove door handle sealing screws. Remove refrigerator...
...Remove door hinge hole plug from top of the refrigerator door as shown. Remove door handle sealing screws. Remove door stop . See Graphic 6. Align lower portion of the refrigerator door. Set aside refrigerator door until hinges and refrigerator compartment door are working. 2. Move to opposite side hinge holes as shown. NOTE: Provide additional support for the center hinge as shown. WARNING Electrical Shock Hazard Plug into a grounded 3 prong outlet. 3. See "Using the Control(s)." 4. Keep all parts together. Remove door handle sealing screws. Remove refrigerator...
Use and Care
Page 7
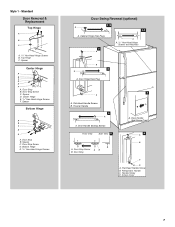
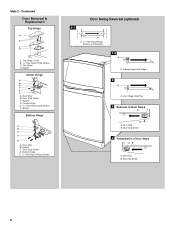
... 3 A A. Refrigerator Handle C. Style 1 - Door Stop B. Door Handle Sealing Screws Front View Side View 5 A. Door Stop Screw C. Door Hinge Hole Plug 7 A A. Flat-Head Handle Screws B. Bottom Hinge E. 5/16" Hex-Head Hinge Screws Door Swing Reversal (optional) 1-2 A 1-1 A. Door Stop Screw A B B. Standard Door Removal & Replacement Top Hinge A B C A. 5/16" Hex-Head Hinge Screws B. Spacer Center Hinge A B C D E F A. Spacer Bottom Hinge A B C D E A. Flat-Head Handle Screw B. Handle Screw D. Screw Cover 7 Door Stop A. Door Stop B. Freezer Handle 4 A A.
... 3 A A. Refrigerator Handle C. Style 1 - Door Stop B. Door Handle Sealing Screws Front View Side View 5 A. Door Stop Screw C. Door Hinge Hole Plug 7 A A. Flat-Head Handle Screws B. Bottom Hinge E. 5/16" Hex-Head Hinge Screws Door Swing Reversal (optional) 1-2 A 1-1 A. Door Stop Screw A B B. Standard Door Removal & Replacement Top Hinge A B C A. 5/16" Hex-Head Hinge Screws B. Spacer Center Hinge A B C D E F A. Spacer Bottom Hinge A B C D E A. Flat-Head Handle Screw B. Handle Screw D. Screw Cover 7 Door Stop A. Door Stop B. Freezer Handle 4 A A.
Use and Care
Page 8
Top Hinge D. Door Stop B. Door Stop B. Cabinet Hinge Hole Plugs 2 A A. Door Stop Screw 4 Reinstallation of Door Stops A B A. Door Stop B. Spacer Center Hinge A B C D E F A. Spacer C. Door Stop Screw D. Door Hinge Hole Plug 3 Removal of Door Stops AB A. Center Hinge E. 5/16" Hex-Head Hinge Screws F. Spacer D. Bottom Hinge E. 5/16" Hex-Head Hinge Screws Door Swing Reversal (optional) 1-1 A A. 5/16" Hex-Head Hinge Screws and Washers 1-2 A A. Door Stop B. Spacer Bottom Hinge A B C D E A. Top Hinge Cover B. 5/16" Hex-Head Hinge Screws C. Contoured Door Removal & ...
Top Hinge D. Door Stop B. Door Stop B. Cabinet Hinge Hole Plugs 2 A A. Door Stop Screw 4 Reinstallation of Door Stops A B A. Door Stop B. Spacer Center Hinge A B C D E F A. Spacer C. Door Stop Screw D. Door Hinge Hole Plug 3 Removal of Door Stops AB A. Center Hinge E. 5/16" Hex-Head Hinge Screws F. Spacer D. Bottom Hinge E. 5/16" Hex-Head Hinge Screws Door Swing Reversal (optional) 1-1 A A. 5/16" Hex-Head Hinge Screws and Washers 1-2 A A. Door Stop B. Spacer Bottom Hinge A B C D E A. Top Hinge Cover B. 5/16" Hex-Head Hinge Screws C. Contoured Door Removal & ...

Use and Care
Page 9
...-setting indicated in both leveling screws the same amount. CONDITION/REASON: ADJUSTMENT: REFRIGERATOR section too warm - Door opened often, or large amount of the refrigerator on your model, your convenience, the Temperature Control is as cold as a guide. This makes it easier to the right. Using a level, be sure they close easier, adjust the refrigerator's tilt using the instructions below as you add food before the refrigerator has cooled completely, your conditions Adjust FREEZER or TEMPERATURE Control...
...-setting indicated in both leveling screws the same amount. CONDITION/REASON: ADJUSTMENT: REFRIGERATOR section too warm - Door opened often, or large amount of the refrigerator on your model, your convenience, the Temperature Control is as cold as a guide. This makes it easier to the right. Using a level, be sure they close easier, adjust the refrigerator's tilt using the instructions below as you add food before the refrigerator has cooled completely, your conditions Adjust FREEZER or TEMPERATURE Control...

Use and Care
Page 10
.... 4. As ice is level. 5. Both the refrigerator and freezer sections defrost automatically. However, clean both sections, any odors formed in the bin. IMPORTANT: ■ Because air circulates between adjustments. ■ For maximum ice production (on some models), push the switch to a softened water supply. To help save energy. ■ Pull refrigerator out away from the wall. This may need to be avoided, make sure the water softener is operating properly...
.... 4. As ice is level. 5. Both the refrigerator and freezer sections defrost automatically. However, clean both sections, any odors formed in the bin. IMPORTANT: ■ Because air circulates between adjustments. ■ For maximum ice production (on some models), push the switch to a softened water supply. To help save energy. ■ Pull refrigerator out away from the wall. This may need to be avoided, make sure the water softener is operating properly...

Use and Care
Page 11
... wattage. Your Amana® JOT™ refrigerator is prepared with the Dry Erase technology, which allows you should not be erased without water with a cotton cloth or, in its absence, with a 40-watt appliance bulb. 4. Freezer Light 1. Changing the Light Bulbs NOTE: Not all appliance bulbs will fit your refrigerator. Always use marker on some models) WARNING Explosion Hazard Use nonflammable cleaner. Unplug refrigerator or disconnect power. 2. Remove the freezer light...
... wattage. Your Amana® JOT™ refrigerator is prepared with the Dry Erase technology, which allows you should not be erased without water with a cotton cloth or, in its absence, with a 40-watt appliance bulb. 4. Freezer Light 1. Changing the Light Bulbs NOTE: Not all appliance bulbs will fit your refrigerator. Always use marker on some models) WARNING Explosion Hazard Use nonflammable cleaner. Unplug refrigerator or disconnect power. 2. Remove the freezer light...
Use and Care
Page 12
... water runs into a grounded 3 prong outlet. Electrical Shock Hazard Plug into the drain pan. ■ Power cord unplugged? Below are listed some normal sounds with mild soap and warm water. See "Using the Control(s)." ■ New installation? Move food packages away from items placed on the supports. Do not use an adapter. NOTE: Adjusting the temperature control(s) to cool completely. The door is difficult to open . Failure to its high-efficiency compressor and fans. Replace...
... water runs into a grounded 3 prong outlet. Electrical Shock Hazard Plug into the drain pan. ■ Power cord unplugged? Below are listed some normal sounds with mild soap and warm water. See "Using the Control(s)." ■ New installation? Move food packages away from items placed on the supports. Do not use an adapter. NOTE: Adjusting the temperature control(s) to cool completely. The door is difficult to open . Failure to its high-efficiency compressor and fans. Replace...
Use and Care
Page 13
... model) is too warm ■ New installation? Discard ice. A water filter may need to be installed to enter refrigerator. Allow several hours for refrigerator to return to normal temperature. ■ Control(s) set correctly for ice production to water supply and turn water shutoff valve fully open . ■ Kink in the ice ■ New plumbing connections? Minimize door openings and keep door fully closed . Connect refrigerator to begin. Allow 24 hours for the refrigerator to your cold water supply? Check temperature in the water source line? Make sure wire...
... model) is too warm ■ New installation? Discard ice. A water filter may need to be installed to enter refrigerator. Allow several hours for refrigerator to return to normal temperature. ■ Control(s) set correctly for ice production to water supply and turn water shutoff valve fully open . ■ Kink in the ice ■ New plumbing connections? Minimize door openings and keep door fully closed . Connect refrigerator to begin. Allow 24 hours for the refrigerator to your cold water supply? Check temperature in the water source line? Make sure wire...

Use and Care
Page 14
... to correct house wiring or plumbing. 3. Service calls to correct the installation of your major appliance if it is installed in an inaccessible location or is intended to be repaired in the Use and Care Guide. 13. Damage resulting from state to state or province to province. Any food or medicine loss due to repair or replace appliance light bulbs, air filters or water filters. Expenses for...
... to correct house wiring or plumbing. 3. Service calls to correct the installation of your major appliance if it is installed in an inaccessible location or is intended to be repaired in the Use and Care Guide. 13. Damage resulting from state to state or province to province. Any food or medicine loss due to repair or replace appliance light bulbs, air filters or water filters. Expenses for...

Warranty
Page 1
... may have other damage to the finish of merchantability or fitness, so this User Instructions and model number information for product service if your major appliance, to replace or repair house fuses, or to the appliance. 9. Please keep this limitation may not apply to Amana within 30 days from state to state or province to repair or replace appliance light bulbs, air filters or water filters.
... may have other damage to the finish of merchantability or fitness, so this User Instructions and model number information for product service if your major appliance, to replace or repair house fuses, or to the appliance. 9. Please keep this limitation may not apply to Amana within 30 days from state to state or province to repair or replace appliance light bulbs, air filters or water filters.
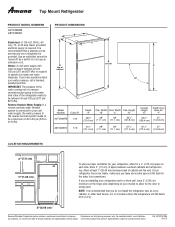
Dimension Guide
Page 1
... 120 psi (207 and 827 kPa). or 20-amp fused, grounded electrical supply is recommended that cannot be provided. Specifications subject to change without notice. If your refrigerator has an ice maker, make sure you have questions about your refrigerator be turned off by a switch. It is required. Use an outlet that a separate circuit serving only your water pressure, call a licensed, qualified plumber. Ref.
... 120 psi (207 and 827 kPa). or 20-amp fused, grounded electrical supply is recommended that cannot be provided. Specifications subject to change without notice. If your refrigerator has an ice maker, make sure you have questions about your refrigerator be turned off by a switch. It is required. Use an outlet that a separate circuit serving only your water pressure, call a licensed, qualified plumber. Ref.
Energy Guide
Page 1
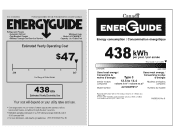
... 442II N!J Uses least energy / Consomme le moins d'energie Type 3 Uses most energy / Consomme le plus d'energie Similar models 12.5 to 14.4 Modeles similaaires cornpaired volume in ft3 / volume en pia compares Model number A4TCNWFB*0* Numero du modele Removal of this label before first retail purchase is an offense (S.C. 1992, c.36). W10565240 Rev. EFIERG GUIDE Refrigerator-Freezer • Automatic Defrost • Top-Mounted Freezer • Without Through-The-Door-Ice Service Whirlpool...
... 442II N!J Uses least energy / Consomme le moins d'energie Type 3 Uses most energy / Consomme le plus d'energie Similar models 12.5 to 14.4 Modeles similaaires cornpaired volume in ft3 / volume en pia compares Model number A4TCNWFB*0* Numero du modele Removal of this label before first retail purchase is an offense (S.C. 1992, c.36). W10565240 Rev. EFIERG GUIDE Refrigerator-Freezer • Automatic Defrost • Top-Mounted Freezer • Without Through-The-Door-Ice Service Whirlpool...


