Installation Manual
Page 1
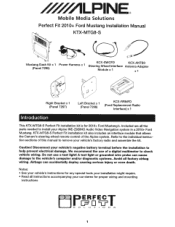
... wheel remote control of this manual to help prevent electrical damage. Mobile Media Solutions Perfect Fit 201 0+ Ford Mustang Installation Manual KTX-MTG8-S Mustang Dash Kit x 1 (Panel7295) Power Harness x 1 KCX-SWCFD KCX-ANTB3 Steering Wheel Interface Antenna Adapter Module x 1 x 1 Right Bracket x 1 (Panel 7297) Left Bracket x 1 (Panel 7296) KCX-RRMFD (Ford Replacement Radio Interface) x 1 Introduction This KTX-MTG8-S Perfect Fit installation kit is for proper wiring and mounting instructions 1 Refer to the individual instruction sections...
... wheel remote control of this manual to help prevent electrical damage. Mobile Media Solutions Perfect Fit 201 0+ Ford Mustang Installation Manual KTX-MTG8-S Mustang Dash Kit x 1 (Panel7295) Power Harness x 1 KCX-SWCFD KCX-ANTB3 Steering Wheel Interface Antenna Adapter Module x 1 x 1 Right Bracket x 1 (Panel 7297) Left Bracket x 1 (Panel 7296) KCX-RRMFD (Ford Replacement Radio Interface) x 1 Introduction This KTX-MTG8-S Perfect Fit installation kit is for proper wiring and mounting instructions 1 Refer to the individual instruction sections...
Installation Manual
Page 2
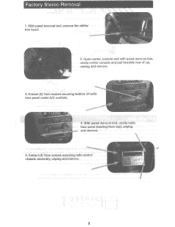
Extract (2) 7mm screws securing bottom of car, unplug and remove. 3. Extract (4) 7mm screws securing radio motor/ chassis assembly, unplug and remove. 2 Factory Stereo Removal 1. With panel removal tool, remove the shifter trim bezel. 2. With panel removal tool, unclip radio face panel (starting from top), unplug and remove. 5. Open center console and with panel removal tool, unclip center console and pull towards rear of radio face panel under A/C controls. 4.
Extract (2) 7mm screws securing bottom of car, unplug and remove. 3. Extract (4) 7mm screws securing radio motor/ chassis assembly, unplug and remove. 2 Factory Stereo Removal 1. With panel removal tool, remove the shifter trim bezel. 2. With panel removal tool, unclip radio face panel (starting from top), unplug and remove. 5. Open center console and with panel removal tool, unclip center console and pull towards rear of radio face panel under A/C controls. 4.
Installation Manual
Page 3
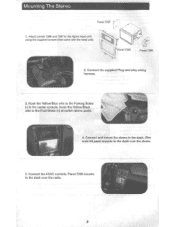
Hook the Yellow/Blue wire to the Parking Brake (-) in the dash. (The main kit panel mounts to the dash over the stereo. 5. Attach panels 7296 and 7297 to the Foot Brake(+) at switch above pedal. 4. Hook the Yellow/Black wire to the Alpine head unit using the supplied screws (that come with the head unit). Panel7295 mounts to the dash over the radio. 3 Mounting The Stereo 1. Panel7296 2. Connect the HVAC controls. Connect and mount the stereo in the center console. Connect the supplied Plug-and-play wiring harness. 3.
Hook the Yellow/Blue wire to the Parking Brake (-) in the dash. (The main kit panel mounts to the dash over the stereo. 5. Attach panels 7296 and 7297 to the Foot Brake(+) at switch above pedal. 4. Hook the Yellow/Black wire to the Alpine head unit using the supplied screws (that come with the head unit). Panel7295 mounts to the dash over the radio. 3 Mounting The Stereo 1. Panel7296 2. Connect the HVAC controls. Connect and mount the stereo in the center console. Connect the supplied Plug-and-play wiring harness. 3.
Installation Manual
Page 4
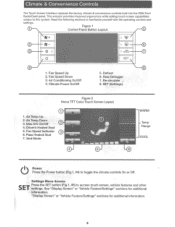
... Temp Up 2. Driver's Heated Seat 5. Defrost 6. Vent Mode Temp Range Power Press the Power button {Fig.1, #4) to familiarize yourself with the operating controls and settings. Fan Speed Down 3. SET {Settings) Figure 2 Home TFT Color Touch Screen Layout 1. Fan Speed Indicator 6. "Display Screen" or "Vehicle Feature/Settings" sections for additional information. Climate & Convenience Controls The Touch Screen Interface replaces the factory climate & convenience controls built into the OEM Ford Radio/Dash panel. Re-circulate...
... Temp Up 2. Driver's Heated Seat 5. Defrost 6. Vent Mode Temp Range Power Press the Power button {Fig.1, #4) to familiarize yourself with the operating controls and settings. Fan Speed Down 3. SET {Settings) Figure 2 Home TFT Color Touch Screen Layout 1. Fan Speed Indicator 6. "Display Screen" or "Vehicle Feature/Settings" sections for additional information. Climate & Convenience Controls The Touch Screen Interface replaces the factory climate & convenience controls built into the OEM Ford Radio/Dash panel. Re-circulate...
Installation Manual
Page 5
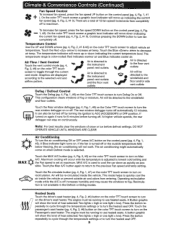
... the level of snow or ice before turning off by turning the ignition to turn on Max A/C. This mode helps to quickly cool the air inside the vehicle. Heated Seats Touch the driver's seat heater (pg. 4, Fig. 2, #4) button on the color TFT touch screen to turn on the control panel (pg. 4, Fig. , - 1, #2). A button graphic = = will occur with the temperature is adjusted to lowest cold setting and...
... the level of snow or ice before turning off by turning the ignition to turn on Max A/C. This mode helps to quickly cool the air inside the vehicle. Heated Seats Touch the driver's seat heater (pg. 4, Fig. 2, #4) button on the color TFT touch screen to turn on the control panel (pg. 4, Fig. , - 1, #2). A button graphic = = will occur with the temperature is adjusted to lowest cold setting and...
Installation Manual
Page 6
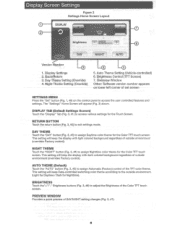
... set screen SETTINGS MENU Press the "Set" button (Fig. 1, #8) on the control panel to adjust the Brightness of the TFT color theme. Overview Window Other: Software version number appears on lower left corner of DAY/NIGHT setting changes (Fig. 3, #7). This setting will keep the display with light colored background regardless of outside environment (overrides Factory control). This setting will keep the display with dark colored background regardless of outside environment (overrides Factory control). Display Settings 2. Auto Theme Setting...
... set screen SETTINGS MENU Press the "Set" button (Fig. 1, #8) on the control panel to adjust the Brightness of the TFT color theme. Overview Window Other: Software version number appears on lower left corner of DAY/NIGHT setting changes (Fig. 3, #7). This setting will keep the display with light colored background regardless of outside environment (overrides Factory control). This setting will keep the display with dark colored background regardless of outside environment (overrides Factory control). Display Settings 2. Auto Theme Setting...
Installation Manual
Page 7
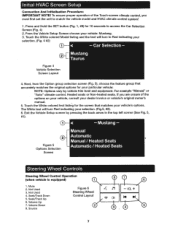
...'s original owner's manual. .. 5. Next, from the Option group selection screen (Fig. 5), choose the feature group that matches your selection. (Fig.5, #2). 6. Mute 2. Seek/Track Down 5. Initial HVAC Screen Setup Connection And Initialization Procedure: IMPORTANT NOTE! Touch the White colored Model listing and the text will turn to access the Car Selection Screen (Fig. 4) 2. If you must first set the unit to match the vehicle model and HVAC climate control system...
...'s original owner's manual. .. 5. Next, from the Option group selection screen (Fig. 5), choose the feature group that matches your selection. (Fig.5, #2). 6. Mute 2. Seek/Track Down 5. Initial HVAC Screen Setup Connection And Initialization Procedure: IMPORTANT NOTE! Touch the White colored Model listing and the text will turn to access the Car Selection Screen (Fig. 4) 2. If you must first set the unit to match the vehicle model and HVAC climate control system...
Installation Manual
Page 8
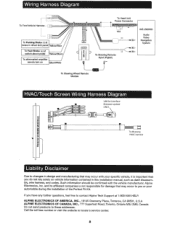
... should be confirmed with your automobile during the installation of the Perfect Fit Kit. c:;) 0 ~ To Mustang HVAC harness Liability Disclaimer Due to contact Alpine Tech Support at switch above pedal To aftermarket amplifier F====fi remote turn on To Head Unit Power Connector INE-Z928HD Audio Video Navigation System To Steering Remote Input (Pigtail) To Steering Wheel Remote Module HVAC/Touch Screen Wiring Harness Diagram USB for damage that you do not rely...
... should be confirmed with your automobile during the installation of the Perfect Fit Kit. c:;) 0 ~ To Mustang HVAC harness Liability Disclaimer Due to contact Alpine Tech Support at switch above pedal To aftermarket amplifier F====fi remote turn on To Head Unit Power Connector INE-Z928HD Audio Video Navigation System To Steering Remote Input (Pigtail) To Steering Wheel Remote Module HVAC/Touch Screen Wiring Harness Diagram USB for damage that you do not rely...

Installation Manual
Page 9
Tech Tip: Mustang Shaker System Integration To Ford Vehicle Harnesses INE-XXXX INE-XXXX AVN system To aftermarket amplifier remote turn on To Foot Brake (+)at switch above pedal Blue/White Yellow/Black To Parking Brake (-)at the parking brake in drivers kick panel Yellow/ Blue KCX-RRMFD Ford Radio Replacement Module ~ I ~ KCX-SWCFD Ford Steering Wheel Control Module Factory OEM AUX Port (Below rad io) To Steering Remote Input (Pigtail) For Shaker systems add 200K n resistor to all speaker leads
Tech Tip: Mustang Shaker System Integration To Ford Vehicle Harnesses INE-XXXX INE-XXXX AVN system To aftermarket amplifier remote turn on To Foot Brake (+)at switch above pedal Blue/White Yellow/Black To Parking Brake (-)at the parking brake in drivers kick panel Yellow/ Blue KCX-RRMFD Ford Radio Replacement Module ~ I ~ KCX-SWCFD Ford Steering Wheel Control Module Factory OEM AUX Port (Below rad io) To Steering Remote Input (Pigtail) For Shaker systems add 200K n resistor to all speaker leads
Installation Manual
Page 10
- - - -1 ~ ...~- - SOLU T ION S • KIT D' INSTALLATION PERFECT FIT™ ALPINE ELECTRONICS OF AMERICA, INC. www.alpine.com DRIVING MOBILE MEDIA SOLUTIONS 1 KTX-MTGS 2010-UP FORD MUSTANG INSTALLATION KIT (NON-NAVIGATION) KTX-MTGS 2010-UP FORD MUSTANG INSTALLATION KIT (NON-NAVIGATION) Mobile Media Solutions PERFECT FIT™ INSTALLATION KIT PERFECT • I ~0'1:?
- - - -1 ~ ...~- - SOLU T ION S • KIT D' INSTALLATION PERFECT FIT™ ALPINE ELECTRONICS OF AMERICA, INC. www.alpine.com DRIVING MOBILE MEDIA SOLUTIONS 1 KTX-MTGS 2010-UP FORD MUSTANG INSTALLATION KIT (NON-NAVIGATION) KTX-MTGS 2010-UP FORD MUSTANG INSTALLATION KIT (NON-NAVIGATION) Mobile Media Solutions PERFECT FIT™ INSTALLATION KIT PERFECT • I ~0'1:?

Installation Manual
Page 12
MADE IN CHINA FABRIOUE EN CHINE Alpine, Alpine Mobile Media Solutions, Driving Mobile Media Solutions are registered trademarks of Alpine Electronics, Inc. Alpine, Alpine Mobile Media Solutions, Driving Mobile Media Solutions sont des marques deposees d'Aipine Electronics, Inc.
MADE IN CHINA FABRIOUE EN CHINE Alpine, Alpine Mobile Media Solutions, Driving Mobile Media Solutions are registered trademarks of Alpine Electronics, Inc. Alpine, Alpine Mobile Media Solutions, Driving Mobile Media Solutions sont des marques deposees d'Aipine Electronics, Inc.


